User Manual
Page 2
...authorized in writing by the purchaser for identification or explanation and to the owners' benefit, without the express written permission of ASUSTeK Computer Inc. ("ASUS"). Product warranty or service will not be extended if: (1) the product is repaired, modified or altered, unless such repair, ...be registered trademarks or copyrights of alteration is defaced or missing. ENGLISH E6586 First Edition April 2011 Copyright © 2011 ASUSTeK Computer Inc. ASUS PROVIDES THIS MANUAL "AS IS" WITHOUT WARRANTY OF ANY KIND, EITHER EXPRESS OR IMPLIED, INCLUDING BUT NOT LIMITED TO THE ...
...authorized in writing by the purchaser for identification or explanation and to the owners' benefit, without the express written permission of ASUSTeK Computer Inc. ("ASUS"). Product warranty or service will not be extended if: (1) the product is repaired, modified or altered, unless such repair, ...be registered trademarks or copyrights of alteration is defaced or missing. ENGLISH E6586 First Edition April 2011 Copyright © 2011 ASUSTeK Computer Inc. ASUS PROVIDES THIS MANUAL "AS IS" WITHOUT WARRANTY OF ANY KIND, EITHER EXPRESS OR IMPLIED, INCLUDING BUT NOT LIMITED TO THE ...
User Manual
Page 3
...to find more information vii Package contents viii Chapter 1 Getting started Welcome!...1-1 Getting to know your computer 1-1 Setting up your computer 1-10 Turning your computer ON/OFF 1-14 Chapter 2 Using Windows® 7 Starting for the first time 2-1 Using ...computer Connecting a USB storage device 3-1 Connecting microphone and speakers 3-2 Chapter 4 Using your computer Proper posture when using your Desktop PC 4-1 Using the optical drive (on selected models only 4-2 Chapter 5 Connecting to the Internet Wired connection 5-1 Chapter 6 Using the utilities ASUS AI Suite II 6-1 ASUS...
...to find more information vii Package contents viii Chapter 1 Getting started Welcome!...1-1 Getting to know your computer 1-1 Setting up your computer 1-10 Turning your computer ON/OFF 1-14 Chapter 2 Using Windows® 7 Starting for the first time 2-1 Using ...computer Connecting a USB storage device 3-1 Connecting microphone and speakers 3-2 Chapter 4 Using your computer Proper posture when using your Desktop PC 4-1 Using the optical drive (on selected models only 4-2 Chapter 5 Connecting to the Internet Wired connection 5-1 Chapter 6 Using the utilities ASUS AI Suite II 6-1 ASUS...
User Manual
Page 9
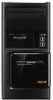
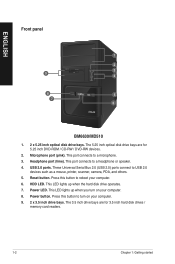
All these values are for purchasing the ASUS Desktop PC! Getting to know your ASUS Desktop PC. The ports and their locations, and the chassis color vary with different models. The ASUS Desktop PC provides cutting-edge performance, uncompromised reliability, and user-centric utilities. Chapter 1 Getting started Welcome! Thank you for reference only. ASUS BM6630/MD510, BP6230/SD510, BM6330 1-1 Read the ASUS Warranty Card before setting up your computer Illustrations are encapsulated in a stunningly futuristic and stylish system casing.
All these values are for purchasing the ASUS Desktop PC! Getting to know your ASUS Desktop PC. The ports and their locations, and the chassis color vary with different models. The ASUS Desktop PC provides cutting-edge performance, uncompromised reliability, and user-centric utilities. Chapter 1 Getting started Welcome! Thank you for reference only. ASUS BM6630/MD510, BP6230/SD510, BM6330 1-1 Read the ASUS Warranty Card before setting up your computer Illustrations are encapsulated in a stunningly futuristic and stylish system casing.
User Manual
Page 10
...This LED lights up when you turn on your computer. 6. HDD LED. This LED lights up when the hard disk drive operates. 7. USB 2.0 ports. Microphone port (pink). Power button. ENGLISH Front panel 1 2 3 9 4 8 5 7 6 BM6630/MD510 1. 2 x 5.25 inch optical disk drive... bays. These Universal Serial Bus 2.0 (USB 2.0) ports connect to a headphone or speaker. 4. This port connects to reboot your computer. 8. Power LED. Press this button to a microphone. 3.
...This LED lights up when you turn on your computer. 6. HDD LED. This LED lights up when the hard disk drive operates. 7. USB 2.0 ports. Microphone port (pink). Power button. ENGLISH Front panel 1 2 3 9 4 8 5 7 6 BM6630/MD510 1. 2 x 5.25 inch optical disk drive... bays. These Universal Serial Bus 2.0 (USB 2.0) ports connect to a headphone or speaker. 4. This port connects to reboot your computer. 8. Power LED. Press this button to a microphone. 3.
User Manual
Page 11
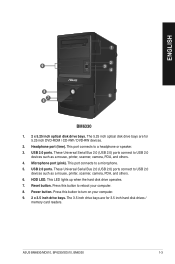
...port connects to a microphone. 5. These Universal Serial Bus 2.0 (USB 2.0) ports connect to turn on your computer. 8. Press this button to USB 2.0 devices such as a mouse, printer, scanner, camera, PDA, and others . 6. ASUS BM6630/MD510, BP6230/SD510, BM6330 1-3 ENGLISH 9 8 67 1 2 3 4 5 BM6330 1. 2 x ...connects to a headphone or speaker. 3. Headphone port (lime). These Universal Serial Bus 2.0 (USB 2.0) ports connect to reboot your computer. 9. 2 x 3.5 inch drive bays. The 3.5 inch drive bays are for 3.5 inch hard disk drives / memory card readers. USB 2.0 ports....
...port connects to a microphone. 5. These Universal Serial Bus 2.0 (USB 2.0) ports connect to turn on your computer. 8. Press this button to USB 2.0 devices such as a mouse, printer, scanner, camera, PDA, and others . 6. ASUS BM6630/MD510, BP6230/SD510, BM6330 1-3 ENGLISH 9 8 67 1 2 3 4 5 BM6330 1. 2 x ...connects to a headphone or speaker. 3. Headphone port (lime). These Universal Serial Bus 2.0 (USB 2.0) ports connect to reboot your computer. 9. 2 x 3.5 inch drive bays. The 3.5 inch drive bays are for 3.5 inch hard disk drives / memory card readers. USB 2.0 ports....
User Manual
Page 12
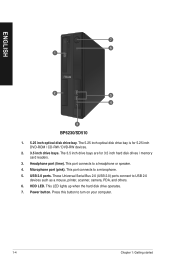
..., camera, PDA, and others. 6. These Universal Serial Bus 2.0 (USB 2.0) ports connect to a microphone. 5. Headphone port (lime). HDD LED. This port connects to turn on your computer. 1-4 Chapter 1: Getting started Press this button to a headphone or speaker. 4. Microphone port (pink). The 5.25 inch optical disk drive bay is for 3.5 inch hard disk...
..., camera, PDA, and others. 6. These Universal Serial Bus 2.0 (USB 2.0) ports connect to a microphone. 5. Headphone port (lime). HDD LED. This port connects to turn on your computer. 1-4 Chapter 1: Getting started Press this button to a headphone or speaker. 4. Microphone port (pink). The 5.25 inch optical disk drive bay is for 3.5 inch hard disk...
User Manual
Page 15
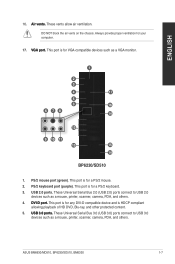
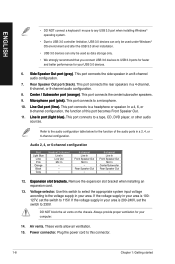
...�I�-�D��p��o�r�t�. PS/2 keyboard port (purple). DO NOT block the air vents on the chassis. USB 2.0 ports. ASUS BM6630/MD510, BP6230/SD510, BM6330 1-7 This port is for your computer. 17. � V�G��A��p�o�r�t�.
...�I�-�D��p��o�r�t�. PS/2 keyboard port (purple). DO NOT block the air vents on the chassis. USB 2.0 ports. ASUS BM6630/MD510, BP6230/SD510, BM6330 1-7 This port is for your computer. 17. � V�G��A��p�o�r�t�.
User Manual
Page 16
... In Front Speaker Out Mic In - Remove the expansion slot bracket when installing an expansion card. 13. Voltage selector. Always provide proper ventilation for your computer. 14.
... In Front Speaker Out Mic In - Remove the expansion slot bracket when installing an expansion card. 13. Voltage selector. Always provide proper ventilation for your computer. 14.
User Manual
Page 18
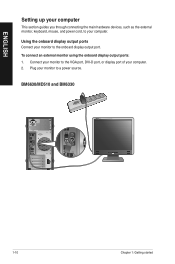
BM6630/MD510 and BM6330 1-10 Chapter 1: Getting started Connect your monitor to the onboard display output port. Using the onboard display output ports Connect your monitor to the VGA port, DVI-D port, or display port of your computer. 2. To connect an external monitor using the onboard display output ports: 1. Plug your monitor to your computer. ENGLISH Setting up your computer This section guides you through connecting the main hardware devices, such as the external monitor, keyboard, mouse, and power cord, to a power source.
BM6630/MD510 and BM6330 1-10 Chapter 1: Getting started Connect your monitor to the onboard display output port. Using the onboard display output ports Connect your monitor to the VGA port, DVI-D port, or display port of your computer. 2. To connect an external monitor using the onboard display output ports: 1. Plug your monitor to your computer. ENGLISH Setting up your computer This section guides you through connecting the main hardware devices, such as the external monitor, keyboard, mouse, and power cord, to a power source.

User Manual
Page 19
Hence, connect your monitor to a display output port on the graphics card. • To connect multiple external monitors to your computer comes with an ASUS Graphics Card, the graphics card is set as the primary display device in Chapter 3 of this user manual for details. BP6230/SD510 ENGLISH • If your computer, refer to Connecting multiple external monitors in the BIOS. ASUS BM6630/MD510, BP6230/SD510, BM6330 1-11
Hence, connect your monitor to a display output port on the graphics card. • To connect multiple external monitors to your computer comes with an ASUS Graphics Card, the graphics card is set as the primary display device in Chapter 3 of this user manual for details. BP6230/SD510 ENGLISH • If your computer, refer to Connecting multiple external monitors in the BIOS. ASUS BM6630/MD510, BP6230/SD510, BM6330 1-11
User Manual
Page 20
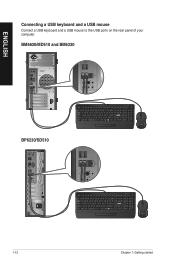
BM6630/MD510 and BM6330 BP6230/SD510 1-12 Chapter 1: Getting started ENGLISH Connecting a USB keyboard and a USB mouse Connect a USB keyboard and a USB mouse to the USB ports on the rear panel of your computer.
BM6630/MD510 and BM6330 BP6230/SD510 1-12 Chapter 1: Getting started ENGLISH Connecting a USB keyboard and a USB mouse Connect a USB keyboard and a USB mouse to the USB ports on the rear panel of your computer.
User Manual
Page 21
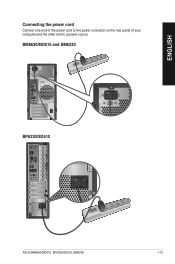
BM6630/MD510 and BM6330 BP6230/SD510 ASUS BM6630/MD510, BP6230/SD510, BM6330 1-13 ENGLISH Connecting the power cord Connect one end of the power cord to the power connector on the rear panel of your computer and the other end to a power source.
BM6630/MD510 and BM6330 BP6230/SD510 ASUS BM6630/MD510, BP6230/SD510, BM6330 1-13 ENGLISH Connecting the power cord Connect one end of the power cord to the power connector on the rear panel of your computer and the other end to a power source.
User Manual
Page 22
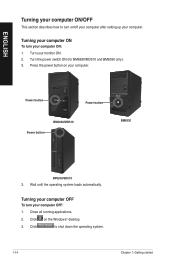
... BM6330 only). 3. Power button Power button Power button BM6630/MD510 BM6330 BP6230/SD510 3. Wait until the operating system loads automatically. Click on /off your computer after setting up your computer. Press the power button on your computer ON: 1. Turning your computer ON To turn your computer. Turning your computer OFF To turn on the Windows® desktop...
... BM6330 only). 3. Power button Power button Power button BM6630/MD510 BM6330 BP6230/SD510 3. Wait until the operating system loads automatically. Click on /off your computer after setting up your computer. Press the power button on your computer ON: 1. Turning your computer ON To turn your computer. Turning your computer OFF To turn on the Windows® desktop...
User Manual
Page 23
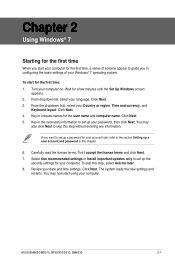
... to guide you in uniques names for the first time: 1. You may now start using your computer. Chapter 2 Using Windows® 7 Starting for the first time When you start your computer for a few minutes until the Set Up Windows screen appears. 2. Turn your language. Click Next... up a password for your computer. Key in this chapter. 6. Select Use recommended settings or Install important updates only to set up the security settings for your password, then click Next. Review your Country or region, Time and currency, and Keyboard layout. ASUS BM6630/MD510, BP6230/SD510, BM6330...
... to guide you in uniques names for the first time: 1. You may now start using your computer. Chapter 2 Using Windows® 7 Starting for the first time When you start your computer for a few minutes until the Set Up Windows screen appears. 2. Turn your language. Click Next... up a password for your computer. Key in this chapter. 6. Select Use recommended settings or Install important updates only to set up the security settings for your password, then click Next. Review your Country or region, Time and currency, and Keyboard layout. ASUS BM6630/MD510, BP6230/SD510, BM6330...
User Manual
Page 24
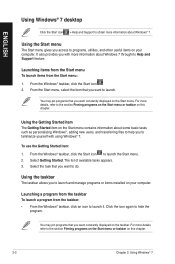
...use the Getting Started item: 1. From the Start menu, select the item that you to launch and manage programs or items installed on your computer. Launching a program from the taskbar To launch a program from the Start menu: 1. For more details, refer to the section Pinning programs on... an icon to launch it. Select Getting Started. You may pin programs that you to programs, utilities, and other useful items on your computer. Using the Start menu The Start menu gives you with using Windows® 7. It also provides you access to familiarize yourself with more...
...use the Getting Started item: 1. From the Start menu, select the item that you to launch and manage programs or items installed on your computer. Launching a program from the taskbar To launch a program from the Start menu: 1. For more details, refer to the section Pinning programs on... an icon to launch it. Select Getting Started. You may pin programs that you to programs, utilities, and other useful items on your computer. Using the Start menu The Start menu gives you with using Windows® 7. It also provides you access to familiarize yourself with more...
User Manual
Page 27
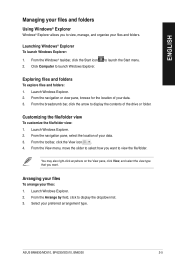
... by field, click to launch the Start menu. Select your files: 1. Launching Windows® Explorer To launch Windows Explorer: 1. Launch Windows Explorer. 2. ASUS BM6630/MD510, BP6230/SD510, BM6330 2-5 Click Computer to view, manage, and organize your files and folders. From the navigation or view pane, browse for the location of the drive or...
... by field, click to launch the Start menu. Select your files: 1. Launching Windows® Explorer To launch Windows Explorer: 1. Launch Windows Explorer. 2. ASUS BM6630/MD510, BP6230/SD510, BM6330 2-5 Click Computer to view, manage, and organize your files and folders. From the navigation or view pane, browse for the location of the drive or...

User Manual
Page 29
...computer problems. You may customize the notifications. Click > All Programs > Accessories > System Tools > System Restore. 3. To launch Windows 7 Action Center, click the Notification icon , then click Open Action Center. 2. Launching Windows® 7 Action Center To launch Windows® 7 Action Center: 1. Launching Windows® Update To launch Windows® Update: 1. ASUS BM6630.../MD510, BP6230/SD510, BM6330 2-7 It allows you to restore or undo changes to complete the process. ENGLISH Restoring your computer.
...computer problems. You may customize the notifications. Click > All Programs > Accessories > System Tools > System Restore. 3. To launch Windows 7 Action Center, click the Notification icon , then click Open Action Center. 2. Launching Windows® 7 Action Center To launch Windows® 7 Action Center: 1. Launching Windows® Update To launch Windows® Update: 1. ASUS BM6630.../MD510, BP6230/SD510, BM6330 2-7 It allows you to restore or undo changes to complete the process. ENGLISH Restoring your computer.
User Manual
Page 30
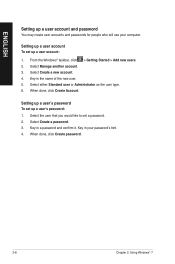
... either Standard user or Administrator as the user type. 6. Key in the name of the new user. 5. When done, click Create Account. Key in your computer. From the Windows® taskbar, click > Getting Started > Add new users. 2. Select Create a new account. 4. Setting up a user's password To set up a user account: 1. Setting...
... either Standard user or Administrator as the user type. 6. Key in the name of the new user. 5. When done, click Create Account. Key in your computer. From the Windows® taskbar, click > Getting Started > Add new users. 2. Select Create a new account. 4. Setting up a user's password To set up a user account: 1. Setting...
User Manual
Page 31
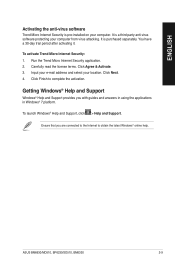
...period after activating it. Carefully read the license terms. Click Agree & Activate. 3. Input your e-mail address and select your computer. Getting Windows® Help and Support Windows® Help and Support provides you are connected to the Internet to complete the ...the anti-virus software Trend Micro Internet Security is a third-party anti-virus software protecting your computer from virus attacking. It is pre-installed on your location. Click Next. 4. ASUS BM6630/MD510, BP6230/SD510, BM6330 2-9 Run the Trend Micro Internet Security application. 2. Click Finish...
...period after activating it. Carefully read the license terms. Click Agree & Activate. 3. Input your e-mail address and select your computer. Getting Windows® Help and Support Windows® Help and Support provides you are connected to the Internet to complete the ...the anti-virus software Trend Micro Internet Security is a third-party anti-virus software protecting your computer from virus attacking. It is pre-installed on your location. Click Next. 4. ASUS BM6630/MD510, BP6230/SD510, BM6330 2-9 Run the Trend Micro Internet Security application. 2. Click Finish...
User Manual
Page 33
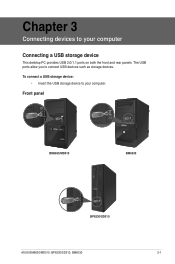
The USB ports allow you to connect USB devices such as storage devices. Front panel BM6630/MD510 BM6330 BP6230/SD510 ASUS BM6630/MD510, BP6230/SD510, BM6330 3-1 To connect a USB storage device: • Insert the USB storage device to your computer Connecting a USB storage device This desktop PC provides USB 2.0/1.1 ports on both the front and rear panels. Chapter 3 Connecting devices to your computer.
The USB ports allow you to connect USB devices such as storage devices. Front panel BM6630/MD510 BM6330 BP6230/SD510 ASUS BM6630/MD510, BP6230/SD510, BM6330 3-1 To connect a USB storage device: • Insert the USB storage device to your computer Connecting a USB storage device This desktop PC provides USB 2.0/1.1 ports on both the front and rear panels. Chapter 3 Connecting devices to your computer.


