User Manual
Page 10
The ASUS BM6650/MD520, BM6350 Desktop PC provides cutting-edge performance, uncompromised reliability, and user-centric utilities. All these values are for purchasing the ASUS BM6650/MD520, BM6350 Desktop PC! Read the ASUS Warranty Card before setting up your computer Illustrations are encapsulated in a stunningly futuristic and stylish system casing. Getting to know your ASUS Desktop PC. Chapter 1 Getting started Welcome! The ports and their locations, and the chassis color vary with different models. Thank you for reference only. ASUS BM6650/MD520, BM6350 1-1
The ASUS BM6650/MD520, BM6350 Desktop PC provides cutting-edge performance, uncompromised reliability, and user-centric utilities. All these values are for purchasing the ASUS BM6650/MD520, BM6350 Desktop PC! Read the ASUS Warranty Card before setting up your computer Illustrations are encapsulated in a stunningly futuristic and stylish system casing. Getting to know your ASUS Desktop PC. Chapter 1 Getting started Welcome! The ports and their locations, and the chassis color vary with different models. Thank you for reference only. ASUS BM6650/MD520, BM6350 1-1

User Manual
Page 12
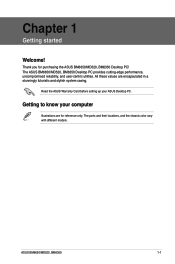
.... These Universal Serial Bus 2.0 (USB 2.0) ports connect to reboot your computer. 9. 2 x 3.5 inch drive bays. BM6350 1. 2 x 5.25 inch optical disk drive bays. USB 2.0 ports. USB 2.0 ports. Reset button. This port connects to view its corresponding description. ASUS BM6650/MD520, BM6350 1-3 HDD LED. Microphone port (pink). Headphone port (lime). This port connects to turn on...
.... These Universal Serial Bus 2.0 (USB 2.0) ports connect to reboot your computer. 9. 2 x 3.5 inch drive bays. BM6350 1. 2 x 5.25 inch optical disk drive bays. USB 2.0 ports. USB 2.0 ports. Reset button. This port connects to view its corresponding description. ASUS BM6650/MD520, BM6350 1-3 HDD LED. Microphone port (pink). Headphone port (lime). This port connects to turn on...

User Manual
Page 14
...;N��(R��J�-4��5�)�p��o�r�t�. Remove the expansion slot bracket when installing an expansion card. ASUS BM6650/MD520, BM6350 1-5 11. Microphone port (pink). These Universal Serial Bus 3.0 (USB 3.0) ports connect to USB 3.0 devices such as a mouse, printer, scanner, camera, PDA, and others. •...
...;N��(R��J�-4��5�)�p��o�r�t�. Remove the expansion slot bracket when installing an expansion card. ASUS BM6650/MD520, BM6350 1-5 11. Microphone port (pink). These Universal Serial Bus 3.0 (USB 3.0) ports connect to USB 3.0 devices such as a mouse, printer, scanner, camera, PDA, and others. •...
User Manual
Page 16
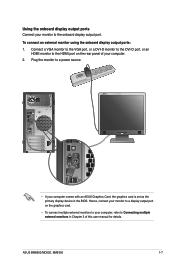
..., or an HDMI monitor to the HDMI port on the graphics card. • To connect multiple external monitors to your computer. 2. ASUS BM6650/MD520, BM6350 1-7 Plug the monitor to a power source. • If your monitor to Connecting multiple external monitors in the BIOS. Using the onboard... display output ports Connect your computer comes with an ASUS Graphics Card, the graphics card is set as the primary display device in ...
..., or an HDMI monitor to the HDMI port on the graphics card. • To connect multiple external monitors to your computer. 2. ASUS BM6650/MD520, BM6350 1-7 Plug the monitor to a power source. • If your monitor to Connecting multiple external monitors in the BIOS. Using the onboard... display output ports Connect your computer comes with an ASUS Graphics Card, the graphics card is set as the primary display device in ...

User Manual
Page 18
.../off your computer after setting up your monitor ON. 2. Turning your computer ON/OFF This section describes how to shut down the operating system. BM6350 ASUS BM6650/MD520, BM6350 1-9 Turn your computer. Click on your computer. Turning your computer OFF To turn your computer OFF: 1. Turning your computer ON To turn your computer...
.../off your computer after setting up your monitor ON. 2. Turning your computer ON/OFF This section describes how to shut down the operating system. BM6350 ASUS BM6650/MD520, BM6350 1-9 Turn your computer. Click on your computer. Turning your computer OFF To turn your computer OFF: 1. Turning your computer ON To turn your computer...
User Manual
Page 19
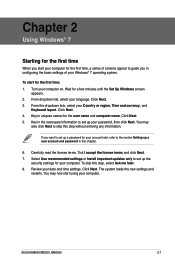
... recommended settings or Install important updates only to set up the security settings for the first time: 1. From the dropdown lists, select your computer. ASUS BM6650/MD520, BM6350 2-1 To start using your computer on. Review your language. Click Next. The system loads the new settings and restarts. From dropdown list, select your...
... recommended settings or Install important updates only to set up the security settings for the first time: 1. From the dropdown lists, select your computer. ASUS BM6650/MD520, BM6350 2-1 To start using your computer on. Review your language. Click Next. The system loads the new settings and restarts. From dropdown list, select your...

User Manual
Page 21
... the taskbar: • From the Windows® taskbar, click an icon to familiarize yourself with using Windows® 7. To use the Getting Started item: 1. ASUS BM6650/MD520, BM6350 2-3 Using the Getting Started item The Getting Started item on the Start menu contains information about some basic tasks such as personalizing Windows®...
... the taskbar: • From the Windows® taskbar, click an icon to familiarize yourself with using Windows® 7. To use the Getting Started item: 1. ASUS BM6650/MD520, BM6350 2-3 Using the Getting Started item The Getting Started item on the Start menu contains information about some basic tasks such as personalizing Windows®...

User Manual
Page 23
... Remove from taskbar. Displaying an alert notification To display an alert notification: • Click the Notification icon , then click the message to open it. ASUS BM6650/MD520, BM6350 2-5 Unpinning programs from the Start menu To unpin programs from the taskbar: 1. Network connection This icon displays the connection status and signal strength of...
... Remove from taskbar. Displaying an alert notification To display an alert notification: • Click the Notification icon , then click the message to open it. ASUS BM6650/MD520, BM6350 2-5 Unpinning programs from the Start menu To unpin programs from the taskbar: 1. Network connection This icon displays the connection status and signal strength of...

User Manual
Page 25
...® Explorer Windows® Explorer allows you to view, manage, and organize your data. 3. Launching Windows® Explorer To launch Windows Explorer: 1. Launch Windows Explorer. 2. ASUS BM6650/MD520, BM6350 2-7 From the Windows® taskbar, click the Start icon 2.
...® Explorer Windows® Explorer allows you to view, manage, and organize your data. 3. Launching Windows® Explorer To launch Windows Explorer: 1. Launch Windows Explorer. 2. ASUS BM6650/MD520, BM6350 2-7 From the Windows® taskbar, click the Start icon 2.

User Manual
Page 27
... Explorer. 2. Launch Windows Explorer. 2. Key in a name for the new folder. From the menu that appears, select Sort by , then select your preferred sorting type. ASUS BM6650/MD520, BM6350 2-9 Right-click anywhere on the View pane. 3. Sorting your files To sort your files: 1. Grouping your files To group your files: 1.
... Explorer. 2. Launch Windows Explorer. 2. Key in a name for the new folder. From the menu that appears, select Sort by , then select your preferred sorting type. ASUS BM6650/MD520, BM6350 2-9 Right-click anywhere on the View pane. 3. Sorting your files To sort your files: 1. Grouping your files To group your files: 1.

User Manual
Page 29
... Center Windows® 7 Action Center provides you want to do. For more details, refer to the previous section Customizing icons and notifications in this chapter. ASUS BM6650/MD520, BM6350 2-11 Launching Windows® 7 Action Center To launch Windows® 7 Action Center: 1.
... Center Windows® 7 Action Center provides you want to do. For more details, refer to the previous section Customizing icons and notifications in this chapter. ASUS BM6650/MD520, BM6350 2-11 Launching Windows® 7 Action Center To launch Windows® 7 Action Center: 1.

User Manual
Page 31
Select either Standard user or Administrator as the user type. 6. From the Windows® taskbar, click > Getting Started > Add new users. 2. Select Manage another account. 3. Key in the name of the new user. 5. Setting up a user account To set up a user account and password You may create user accounts and passwords for people who will use your computer. Select Create a new account. 4. When done, click Create Account. Setting up a user account: 1. ASUS BM6650/MD520, BM6350 2-13
Select either Standard user or Administrator as the user type. 6. From the Windows® taskbar, click > Getting Started > Add new users. 2. Select Manage another account. 3. Key in the name of the new user. 5. Setting up a user account To set up a user account and password You may create user accounts and passwords for people who will use your computer. Select Create a new account. 4. When done, click Create Account. Setting up a user account: 1. ASUS BM6650/MD520, BM6350 2-13
User Manual
Page 33
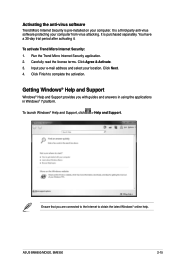
To activate Trend Micro Internet Security: 1. Input your e-mail address and select your computer. To launch Windows® Help and Support, click > Help and Support. ASUS BM6650/MD520, BM6350 2-15 Click Finish to obtain the latest Windows® online help. Ensure that you with guides and answers in using the applications in Windows...
To activate Trend Micro Internet Security: 1. Input your e-mail address and select your computer. To launch Windows® Help and Support, click > Help and Support. ASUS BM6650/MD520, BM6350 2-15 Click Finish to obtain the latest Windows® online help. Ensure that you with guides and answers in using the applications in Windows...

User Manual
Page 34
To connect a USB storage device: • Insert the USB storage device to your computer Connecting a USB storage device This desktop PC provides USB 2.0/1.1 ports on both the front and rear panels. Front panel Rear panel BM6650/MD520 BM6350 ASUS BM6650/MD520, BM6350 3-1 Chapter 3 Connecting devices to your computer. The USB ports allow you to connect USB devices such as storage devices.
To connect a USB storage device: • Insert the USB storage device to your computer Connecting a USB storage device This desktop PC provides USB 2.0/1.1 ports on both the front and rear panels. Front panel Rear panel BM6650/MD520 BM6350 ASUS BM6650/MD520, BM6350 3-1 Chapter 3 Connecting devices to your computer. The USB ports allow you to connect USB devices such as storage devices.

User Manual
Page 36
Connecting 2-channel Speakers Connecting 4-channel Speakers ASUS BM6650/MD520, BM6350 3-3
Connecting 2-channel Speakers Connecting 4-channel Speakers ASUS BM6650/MD520, BM6350 3-3

User Manual
Page 38
Connect the two monitors to your computer and connect the power cords to enlarge your Windows desktop. ASUS BM6650/MD520, BM6350 3-5 When a graphics card is set up multiple displays: 1. You can use the additional monitor as a duplicate of the graphics card. Turn off your computer, connect ...
Connect the two monitors to your computer and connect the power cords to enlarge your Windows desktop. ASUS BM6650/MD520, BM6350 3-5 When a graphics card is set up multiple displays: 1. You can use the additional monitor as a duplicate of the graphics card. Turn off your computer, connect ...

User Manual
Page 40
Then click Keep Changes on the confirmation message. ASUS BM6650/MD520, BM6350 3-7 Click Apply or OK. 6.
Then click Keep Changes on the confirmation message. ASUS BM6650/MD520, BM6350 3-7 Click Apply or OK. 6.
User Manual
Page 42
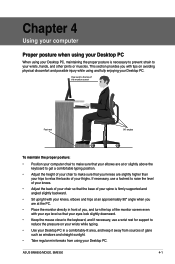
ASUS BM6650/MD520, BM6350 4-1 Eye level to the top of the monitor screen Foot rest 90˚ angles To maintain the proper posture: • Position your computer chair to ...
ASUS BM6650/MD520, BM6350 4-1 Eye level to the top of the monitor screen Foot rest 90˚ angles To maintain the proper posture: • Position your computer chair to ...

User Manual
Page 43
... your computer and the other end to the LAN (RJ-45) port on the DSL/cable modem and your computer. 4. Modem RJ-45 cable 3. ASUS BM6650/MD520, BM6350 5-1 Chapter 5 Connecting to the Internet Wired connection Use an RJ-45 cable to connect your computer to the documentation that came with your DSL...
... your computer and the other end to the LAN (RJ-45) port on the DSL/cable modem and your computer. 4. Modem RJ-45 cable 3. ASUS BM6650/MD520, BM6350 5-1 Chapter 5 Connecting to the Internet Wired connection Use an RJ-45 cable to connect your computer to the documentation that came with your DSL...
User Manual
Page 45
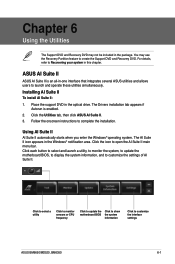
... BIOS, to display the system information, and to customize the interface settings ASUS BM6650/MD520, BM6350 6-1 Place the support DVD in the Windows® notification area. Click the Utilities tab, then click ASUS AI Suite II. 3. ASUS AI Suite II ASUS AI Suite II is enabled. 2. For details, refer to launch and ... the Support DVD and Recovery DVD. The Drivers installation tab appears if Autorun is an all-in-one interface that integrates several ASUS utilities and allows users to Recovering your system in the package. The AI Suite II icon appears in the optical drive.
... BIOS, to display the system information, and to customize the interface settings ASUS BM6650/MD520, BM6350 6-1 Place the support DVD in the Windows® notification area. Click the Utilities tab, then click ASUS AI Suite II. 3. ASUS AI Suite II ASUS AI Suite II is enabled. 2. For details, refer to launch and ... the Support DVD and Recovery DVD. The Drivers installation tab appears if Autorun is an all-in-one interface that integrates several ASUS utilities and allows users to Recovering your system in the package. The AI Suite II icon appears in the optical drive.


