
BE24EQK Series User Guide
Page 3
... the arm/base (for VESA wall mount 2-2 2.3 Attaching/Removing the MiniPC Kit (BE24EQSK 2-3 2.4 Adjusting the monitor 2-4 2.5 Adjusting the webcam 2-5 2.6 Connecting the cables 2-6 2.7 Turning on the monitor 2-7 2.8 Setting up the monitor webcam as default setting 2-7 2.9 Setting up the monitor speaker as default setting 2-10 Chapter 3: General instructions 3.1 OSD (On-Screen Display) menu 3-1 3.1.1 How to reconfigure 3-1 3.1.2 OSD function introduction 3-2 3.2 Specifications summary 3-9 3.3 Outline dimensions 3-12 3.4 Troubleshooting (FAQ 3-14 3.5 Supported operating modes 3-15...
... the arm/base (for VESA wall mount 2-2 2.3 Attaching/Removing the MiniPC Kit (BE24EQSK 2-3 2.4 Adjusting the monitor 2-4 2.5 Adjusting the webcam 2-5 2.6 Connecting the cables 2-6 2.7 Turning on the monitor 2-7 2.8 Setting up the monitor webcam as default setting 2-7 2.9 Setting up the monitor speaker as default setting 2-10 Chapter 3: General instructions 3.1 OSD (On-Screen Display) menu 3-1 3.1.1 How to reconfigure 3-1 3.1.2 OSD function introduction 3-2 3.2 Specifications summary 3-9 3.3 Outline dimensions 3-12 3.4 Troubleshooting (FAQ 3-14 3.5 Supported operating modes 3-15...

BE24EQK Series User Guide
Page 4
Changes or modifications to this unit not expressly approved by turning the equipment off and on a circuit different from that to which can radiate radio frequency energy and, if not installed and used in accordance with the instructions, may cause harmful interference to the environment. The monitor and computer are designed to Part 15 of the FCC Rules. To...
Changes or modifications to this unit not expressly approved by turning the equipment off and on a circuit different from that to which can radiate radio frequency energy and, if not installed and used in accordance with the instructions, may cause harmful interference to the environment. The monitor and computer are designed to Part 15 of the FCC Rules. To...

BE24EQK Series User Guide
Page 7
... it will not be used for a long period of electronic products. This will protect the monitor from the type of power source indicated on the back or top of the volume control as well as the equalizer to other settings than the center position may increase the ear-/headphones output voltage and therefore the sound pressure level. AEEE yö...
... it will not be used for a long period of electronic products. This will protect the monitor from the type of power source indicated on the back or top of the volume control as well as the equalizer to other settings than the center position may increase the ear-/headphones output voltage and therefore the sound pressure level. AEEE yö...

BE24EQK Series User Guide
Page 8
... image. Do not repair the screen by the stand or the cord. • Cleaning. Care & Cleaning • Before you can turn off and unplug the power cord. NOTE: Tips and additional information to complete a task. Do not lift the display by yourself! Turn your monitor off the Power Switch for hours. • When the screen becomes black or flashes, or cannot work anymore, contact your dealer or service center to fix...
... image. Do not repair the screen by the stand or the cord. • Cleaning. Care & Cleaning • Before you can turn off and unplug the power cord. NOTE: Tips and additional information to complete a task. Do not lift the display by yourself! Turn your monitor off the Power Switch for hours. • When the screen becomes black or flashes, or cannot work anymore, contact your dealer or service center to fix...

BE24EQK Series User Guide
Page 12
... Description White Amber Off On Standby mode Off 2. Exit button: • Press this button to display the OSD menu when the OSD is as the below table. 1.3 Monitor introduction 1.3.1 Front view 89 7 7 BE24EQK BE24EQSK 65 4 3 2 1 1. Menu button: • Press this button to display the OSD menu when the OSD is off. • Enters the OSD menu. • Toggles the Key Lock function between on /off. • The color definition of the power indicator...
... Description White Amber Off On Standby mode Off 2. Exit button: • Press this button to display the OSD menu when the OSD is as the below table. 1.3 Monitor introduction 1.3.1 Front view 89 7 7 BE24EQK BE24EQSK 65 4 3 2 1 1. Menu button: • Press this button to display the OSD menu when the OSD is off. • Enters the OSD menu. • Toggles the Key Lock function between on /off. • The color definition of the power indicator...

BE24EQK Series User Guide
Page 14
... VGA connection. 9. The connection enables the built-in port. This port is only available when an HDMI/DisplayPort cable is for connection with an HDMI compatible device. 8. This 15-pin port is for connection with a USB upstream cable. Kensington lock slot. 2. This port is for connection with a DisplayPort compatible device. 7. This port connects the power cord. 4. This port is connected. 6. Press the switch to turn on the monitor. 1-4 Chapter 1: Product introduction Earphone jack. USB upstream port. Power switch. DisplayPort in. 1.3.2 Back view...
... VGA connection. 9. The connection enables the built-in port. This port is only available when an HDMI/DisplayPort cable is for connection with an HDMI compatible device. 8. This 15-pin port is for connection with a USB upstream cable. Kensington lock slot. 2. This port is for connection with a DisplayPort compatible device. 7. This port connects the power cord. 4. This port is connected. 6. Press the switch to turn on the monitor. 1-4 Chapter 1: Product introduction Earphone jack. USB upstream port. Power switch. DisplayPort in. 1.3.2 Back view...
BE24EQK Series User Guide
Page 16
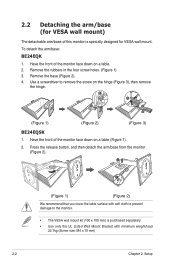
Remove the base (Figure 2). 4. Press the release button, and then detach the arm/base from the monitor (Figure 2). 2 1 (Figure 1) (Figure 2) We recommend that you cover the table surface with minimum weight/load 22.7kg (Screw size: M4 x 10 mm) 2-2 Chapter 2: Setup Use a screwdriver to the monitor. • The VESA wall mount kit (100 x 100 mm) is specially designed for VESA wall mount. 2.2 Detaching the arm/base (for VESA wall mount) The detachable...
Remove the base (Figure 2). 4. Press the release button, and then detach the arm/base from the monitor (Figure 2). 2 1 (Figure 1) (Figure 2) We recommend that you cover the table surface with minimum weight/load 22.7kg (Screw size: M4 x 10 mm) 2-2 Chapter 2: Setup Use a screwdriver to the monitor. • The VESA wall mount kit (100 x 100 mm) is specially designed for VESA wall mount. 2.2 Detaching the arm/base (for VESA wall mount) The detachable...

BE24EQK Series User Guide
Page 18
... highest position. 2. You can adjust the monitor's angle from +35˚ to -5˚and it allows 180˚ swivel adjustment (by removing the stop screw) from falling when you change its maximum angle. 3. Tilt the monitor to its angle. • BE24EQK: The recommended adjusting angle is +20 to -5˚ • BE24EQSK: You can also adjust the monitor's height within +/- 130 mm. 2.4 Adjusting the monitor • For optimal viewing...
... highest position. 2. You can adjust the monitor's angle from +35˚ to -5˚and it allows 180˚ swivel adjustment (by removing the stop screw) from falling when you change its maximum angle. 3. Tilt the monitor to its angle. • BE24EQK: The recommended adjusting angle is +20 to -5˚ • BE24EQSK: You can also adjust the monitor's height within +/- 130 mm. 2.4 Adjusting the monitor • For optimal viewing...
BE24EQK Series User Guide
Page 20
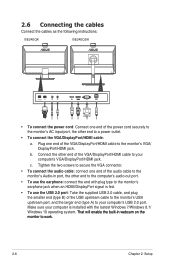
... the VGA connector. • To connect the audio cable: connect one end of the power cord securely to the monitor's AC input port, the other end to the computer's audio-out port. • To use the USB 2.0 port: Take the supplied USB 2.0 cable, and plug the smaller end (type B) of the VGA/DisplayPort/HDMI cable to the monitor's earphone jack when an HDMI/DisplayPort signal is fed. • To use the earphone: connect the end with the lastest Windows 7/Windows 8.1/ Windows...
... the VGA connector. • To connect the audio cable: connect one end of the power cord securely to the monitor's AC input port, the other end to the computer's audio-out port. • To use the USB 2.0 port: Take the supplied USB 2.0 cable, and plug the smaller end (type B) of the VGA/DisplayPort/HDMI cable to the monitor's earphone jack when an HDMI/DisplayPort signal is fed. • To use the earphone: connect the end with the lastest Windows 7/Windows 8.1/ Windows...
BE24EQK Series User Guide
Page 21
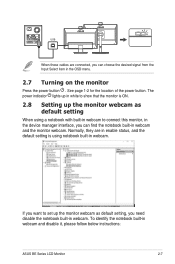
... monitor is ON. 2.8 Setting up the monitor webcam as default setting When using notebook built-in webcam. The power indicator lights up in white to connect this monitor, in the device manager interface, you can choose the desired signal from the Input Select item in webcam and disable it, please follow below instructions: ASUS BE Series LCD Monitor 2-7 To identify the notebook built-in the OSD menu. 2.7 Turning on the monitor Press the power button...
... monitor is ON. 2.8 Setting up the monitor webcam as default setting When using notebook built-in webcam. The power indicator lights up in white to connect this monitor, in the device manager interface, you can choose the desired signal from the Input Select item in webcam and disable it, please follow below instructions: ASUS BE Series LCD Monitor 2-7 To identify the notebook built-in the OSD menu. 2.7 Turning on the monitor Press the power button...

BE24EQK Series User Guide
Page 24
Click Open Sound settings enter to set up the monitor speaker as default setting When your computer connects multiple speakers, if you want to Sound setting interface. 2.9 Setting up the monitor speaker as default setting, please follow below instructions: Right-click Volume in the Windows task bar notification area. Enter Sound setting interface then select Sound Control Panel. 2-10 Chapter 2: Setup
Click Open Sound settings enter to set up the monitor speaker as default setting When your computer connects multiple speakers, if you want to Sound setting interface. 2.9 Setting up the monitor speaker as default setting, please follow below instructions: Right-click Volume in the Windows task bar notification area. Enter Sound setting interface then select Sound Control Panel. 2-10 Chapter 2: Setup

BE24EQK Series User Guide
Page 29
... Series LCD Monitor 3-3 When Blue Light Filter is advised to alleviate eye strains: • Users should rest the eye periodically by focusing on objects that are far away. • Eye exercises can adjust the blue light filter level. The Brightness function is scattered. It is activated,the default settings of continuous working for long hours. Blue Light Filter Level 0 Level 1 Level 2 Level 3 Level 4 ASUS BE24E Standard Mode...
... Series LCD Monitor 3-3 When Blue Light Filter is advised to alleviate eye strains: • Users should rest the eye periodically by focusing on objects that are far away. • Eye exercises can adjust the blue light filter level. The Brightness function is scattered. It is activated,the default settings of continuous working for long hours. Blue Light Filter Level 0 Level 1 Level 2 Level 3 Level 4 ASUS BE24E Standard Mode...

BE24EQK Series User Guide
Page 30
... User Mode. • Skin Tone: contains three color modes including Reddish, Natural, and Yellowish. 4. Image Sharpness Trace Free Aspect Control VividPixel ASCR Position Focus Auto Adjust ASUS BE24E Standard Mode DisplayPort 1920 x 1080 @ 60Hz • Sharpness: The adjusting range is only available for the HDMI input source. 3-4 Chapter 3: OSD (On-Screen Display) menu OverScan is from 0 to full, 4:3, 1:1 (optional) or OverScan (optional). 4:3 is only available when input source is in 4:3 format. Image Set the image related setting...
... User Mode. • Skin Tone: contains three color modes including Reddish, Natural, and Yellowish. 4. Image Sharpness Trace Free Aspect Control VividPixel ASCR Position Focus Auto Adjust ASUS BE24E Standard Mode DisplayPort 1920 x 1080 @ 60Hz • Sharpness: The adjusting range is only available for the HDMI input source. 3-4 Chapter 3: OSD (On-Screen Display) menu OverScan is from 0 to full, 4:3, 1:1 (optional) or OverScan (optional). 4:3 is only available when input source is in 4:3 format. Image Set the image related setting...

BE24EQK Series User Guide
Page 31
... available for VGA input): adjusts the horizontal position (H-Position) and the vertical position (V-Position) of the image. Sound You can adjust Volume, Mute and Source from this menu. ASUS BE Series LCD Monitor 3-5 With a wrong phase adjustment, the screen shows horizontal disturbances. • Clock (pixel frequency) controls the number of pixels scanned by adjusting (Phase) and (Clock) separately. The adjusting range is from 0 to 100. • Phase adjusts the phase of the pixel clock signal. • VividPixel: Enhances the outline of the displayed picture and...
... available for VGA input): adjusts the horizontal position (H-Position) and the vertical position (V-Position) of the image. Sound You can adjust Volume, Mute and Source from this menu. ASUS BE Series LCD Monitor 3-5 With a wrong phase adjustment, the screen shows horizontal disturbances. • Clock (pixel frequency) controls the number of pixels scanned by adjusting (Phase) and (Clock) separately. The adjusting range is from 0 to 100. • Phase adjusts the phase of the pixel clock signal. • VividPixel: Enhances the outline of the displayed picture and...

BE24EQK Series User Guide
Page 33
ASUS BE Series LCD Monitor 3-7 Press the second button from opaque to cancel the key lock function. • Information: Shows the monitor information. • Power Indicator: Turns the power LED indicator on the screen. * Paper size: You can view the documents in real size on the screen. 4x6 3x5 2x2 8x10 5x7 • ECO Mode: reduces power consumption. • Webcam: To enable or disable the webcam function. • OSD Setup: * Adjusts the OSD timeout...
ASUS BE Series LCD Monitor 3-7 Press the second button from opaque to cancel the key lock function. • Information: Shows the monitor information. • Power Indicator: Turns the power LED indicator on the screen. * Paper size: You can view the documents in real size on the screen. 4x6 3x5 2x2 8x10 5x7 • ECO Mode: reduces power consumption. • Webcam: To enable or disable the webcam function. • OSD Setup: * Adjusts the OSD timeout...

BE24EQK Series User Guide
Page 34
...: Blue Light Filter, Splendid, Brightness, Auto Adjust, Contrast, Color Temp., Volume, Input Select. 3-8 Chapter 3: OSD (On-Screen Display) menu Available function choices for Shortcut 1 and 2 buttons. Shortcut Shortcut 1 Shortcut 2 ASUS BE24E Standard Mode DisplayPort 1920 x 1080 @ 60Hz • Shortcut 1/Shortcut 2: Selects a function for Shortcut 1 and 2 buttons. When a certain function is selected or activated, your shortcut key may not support. • Auto Source Detection: Enables or disables the auto source detecting function. • All Reset...
...: Blue Light Filter, Splendid, Brightness, Auto Adjust, Contrast, Color Temp., Volume, Input Select. 3-8 Chapter 3: OSD (On-Screen Display) menu Available function choices for Shortcut 1 and 2 buttons. Shortcut Shortcut 1 Shortcut 2 ASUS BE24E Standard Mode DisplayPort 1920 x 1080 @ 60Hz • Shortcut 1/Shortcut 2: Selects a function for Shortcut 1 and 2 buttons. When a certain function is selected or activated, your shortcut key may not support. • Auto Source Detection: Enables or disables the auto source detecting function. • All Reset...
BE24EQK Series User Guide
Page 35
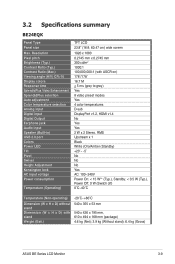
... summary BE24EQK Panel Type Panel size Max. Resolution Pixel pitch Brightness (Typ.) Contrast Ratio (Typ.) Contrast Ratio (Max.) Viewing angle (H/V) CR>10 Display colors Response time SplendidPlus Video Enhancement SplendidPlus selection Auto adjustment Color temperature selection Analog input Digital input Digital Output Earphone jack Audio input Speaker (Built-in) USB 2.0 port Colors Power LED Tilt Pivot Swivel Height Adjustment Kensington lock AC input voltage Power consumption Temperature (Operating) TFT LCD 23.8" (16:9, 60.47 cm) wide screen 1920 x 1080 0.2745 mm x 0.2745 mm...
... summary BE24EQK Panel Type Panel size Max. Resolution Pixel pitch Brightness (Typ.) Contrast Ratio (Typ.) Contrast Ratio (Max.) Viewing angle (H/V) CR>10 Display colors Response time SplendidPlus Video Enhancement SplendidPlus selection Auto adjustment Color temperature selection Analog input Digital input Digital Output Earphone jack Audio input Speaker (Built-in) USB 2.0 port Colors Power LED Tilt Pivot Swivel Height Adjustment Kensington lock AC input voltage Power consumption Temperature (Operating) TFT LCD 23.8" (16:9, 60.47 cm) wide screen 1920 x 1080 0.2745 mm x 0.2745 mm...

BE24EQK Series User Guide
Page 36
... Video Enhancement SplendidPlus selection Auto adjustment Color temperature selection Analog input Digital input Digital Output Earphone jack Audio input Speaker (Built-in) USB 2.0 port Colors Power LED Tilt Pivot Swivel Height Adjustment TFT LCD 23.8" (16:9, 60.47 cm) wide screen 1920 x 1080 0.2745 mm x 0.2745 mm 300 cd/m2 1000:1 100,000,000:1 (with ASCR on) 178˚/178˚ 16.7 M < 5 ms (grey to change without notice. **Measuring a screen brightness of 200 nits without audio/USB/Card reader connection. BE24EQSK Panel Type Panel size...
... Video Enhancement SplendidPlus selection Auto adjustment Color temperature selection Analog input Digital input Digital Output Earphone jack Audio input Speaker (Built-in) USB 2.0 port Colors Power LED Tilt Pivot Swivel Height Adjustment TFT LCD 23.8" (16:9, 60.47 cm) wide screen 1920 x 1080 0.2745 mm x 0.2745 mm 300 cd/m2 1000:1 100,000,000:1 (with ASCR on) 178˚/178˚ 16.7 M < 5 ms (grey to change without notice. **Measuring a screen brightness of 200 nits without audio/USB/Card reader connection. BE24EQSK Panel Type Panel size...

BE24EQK Series User Guide
Page 37
...), 631 x 450 x 222 mm (package) 5.6 kg (Net); 3.7 kg (Without stand); 7.9 kg (Gross) 21 languages (English, French, German, Italian, Spanish, Dutch, Portuguese, Russian, Czech, Croatian, Polish, Romanian, Hungarian, Turkish, Simplified Chinese, Traditional Chinese, Japanese, Korean, Thai, Indonesian, Persian) Quick start guide, warranty card, power cord, HDMI cable (optional), DisplayPort cable (optional), VGA cable (optional), USB B to A cable (optional), Audio cable (optional), MiniPC Kit (optional) UL/cUL, FCC, ICES-3, EPEAT...
...), 631 x 450 x 222 mm (package) 5.6 kg (Net); 3.7 kg (Without stand); 7.9 kg (Gross) 21 languages (English, French, German, Italian, Spanish, Dutch, Portuguese, Russian, Czech, Croatian, Polish, Romanian, Hungarian, Turkish, Simplified Chinese, Traditional Chinese, Japanese, Korean, Thai, Indonesian, Persian) Quick start guide, warranty card, power cord, HDMI cable (optional), DisplayPort cable (optional), VGA cable (optional), USB B to A cable (optional), Audio cable (optional), MiniPC Kit (optional) UL/cUL, FCC, ICES-3, EPEAT...
BE24EQK Series User Guide
Page 40
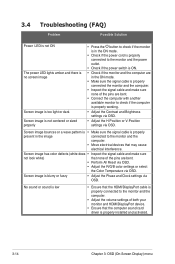
... Reset via OSD. • Adjust the R/G/B color settings or select the Color Temperature via OSD. 3.4 Troubleshooting (FAQ) Problem Possible Solution Power LED is not ON The power LED lights amber and there is no screen image Screen image is too light or dark Screen image is not centered or sized properly • Press the button to check if the monitor is in the ON mode. • Check if the power cord is properly connected to the monitor and the power outlet. • Check...
... Reset via OSD. • Adjust the R/G/B color settings or select the Color Temperature via OSD. 3.4 Troubleshooting (FAQ) Problem Possible Solution Power LED is not ON The power LED lights amber and there is no screen image Screen image is too light or dark Screen image is not centered or sized properly • Press the button to check if the monitor is in the ON mode. • Check if the power cord is properly connected to the monitor and the power outlet. • Check...


