User Manual
Page 3
Contents Notices...v Safety information vi About this guide vii AT3N7A-I specifications summary viii Chapter 1: Product introduction 1-1 1.1 Before you proceed 1-1 1.2 Motherboard overview 1-2 1.2.1 Motherboard layout 1-2 1.2.2 Layout contents 1-2 1.3 Central Processing Unit...1-16 1.8.2 Support DVD information 1-16 Chapter 2: BIOS information 2-1 2.1 Managing and updating your BIOS 2-1 2.1.1 ASUS Update utility 2-1 2.1.2 ASUS EZ Flash 2 2-2 2.1.3 ASUS CrashFree BIOS 2-3 2.2 BIOS setup program 2-4 2.3 Main menu 2-4 2.3.1 System Time 2-5 2.3.2 System Date 2-5 2.3.3...
Contents Notices...v Safety information vi About this guide vii AT3N7A-I specifications summary viii Chapter 1: Product introduction 1-1 1.1 Before you proceed 1-1 1.2 Motherboard overview 1-2 1.2.1 Motherboard layout 1-2 1.2.2 Layout contents 1-2 1.3 Central Processing Unit...1-16 1.8.2 Support DVD information 1-16 Chapter 2: BIOS information 2-1 2.1 Managing and updating your BIOS 2-1 2.1.1 ASUS Update utility 2-1 2.1.2 ASUS EZ Flash 2 2-2 2.1.3 ASUS CrashFree BIOS 2-3 2.2 BIOS setup program 2-4 2.3 Main menu 2-4 2.3.1 System Time 2-5 2.3.2 System Date 2-5 2.3.3...
User Manual
Page 7
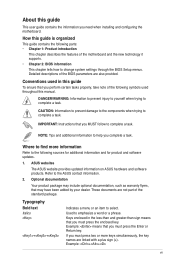
... provided. Used to complete a task. ASUS websites The ASUS website provides updated information on ASUS hardware and software products. About this guide is organized This guide contains the following parts: • Chapter 1: Product introduction This chapter describes the features of the motherboard and the new technology it supports. • Chapter 2: BIOS information This chapter tells how...
... provided. Used to complete a task. ASUS websites The ASUS website provides updated information on ASUS hardware and software products. About this guide is organized This guide contains the following parts: • Chapter 1: Product introduction This chapter describes the features of the motherboard and the new technology it supports. • Chapter 2: BIOS information This chapter tells how...
User Manual
Page 9
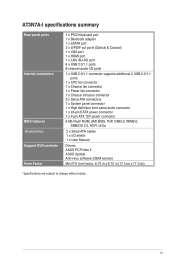
ix AT3N7A-I specifications summary Rear panel ports Internal connectors BIOS features Accessories Support DVD contents Form Factor 1 x PS/2 Keyboard port 1 x Bluetooth adapter 1 x eSATA port 2 x S/PDIF out ports (Optical & Coaxial) 1 x VGA port 1 x HDMI port 1...24-pin EATX power connector 1 x 4-pin ATX 12V power connector 8 Mb Flash ROM, AMI BIOS, PnP, DMI2.0, WfM2.0, SMBIOS 2.5, ACPI v2.0a 2 x Serial ATA cables 1 x I/O shield 1 x User Manual Drivers ASUS PC Probe II ASUS Update Anti-virus software (OEM version) Mini ITX form factor: 6.75 in x 6.75 in (17.1cm x 17.1cm) *Specifications are ...
ix AT3N7A-I specifications summary Rear panel ports Internal connectors BIOS features Accessories Support DVD contents Form Factor 1 x PS/2 Keyboard port 1 x Bluetooth adapter 1 x eSATA port 2 x S/PDIF out ports (Optical & Coaxial) 1 x VGA port 1 x HDMI port 1...24-pin EATX power connector 1 x 4-pin ATX 12V power connector 8 Mb Flash ROM, AMI BIOS, PnP, DMI2.0, WfM2.0, SMBIOS 2.5, ACPI v2.0a 2 x Serial ATA cables 1 x I/O shield 1 x User Manual Drivers ASUS PC Probe II ASUS Update Anti-virus software (OEM version) Mini ITX form factor: 6.75 in x 6.75 in (17.1cm x 17.1cm) *Specifications are ...
User Manual
Page 26
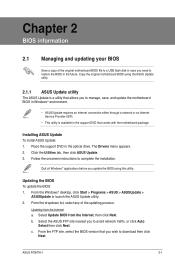
... case you to manage, save, and update the motherboard BIOS in Windows® environment. • ASUS Update requires an Internet connection either through a network or an Internet Service Provider (ISP). • This utility is a utility that allows you need to restore the BIOS in the optical drive. c. ASUS AT3N7A-I 2-1 Updating the BIOS To update the BIOS: 1. Place the support DVD in the...
... case you to manage, save, and update the motherboard BIOS in Windows® environment. • ASUS Update requires an Internet connection either through a network or an Internet Service Provider (ISP). • This utility is a utility that allows you need to restore the BIOS in the optical drive. c. ASUS AT3N7A-I 2-1 Updating the BIOS To update the BIOS: 1. Place the support DVD in the...
User Manual
Page 27
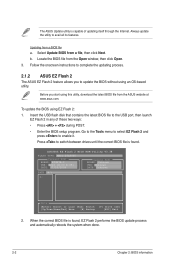
... BIOS file is found . Updating from a file, then click Next. Select Update BIOS from a BIOS file a. To update the BIOS using EZ Flash 2: 1. ASUSTek EZ Flash 2 BIOS ROM Utility V3.38 FLASH TYPE: MXIC 25L8005 Current ROM BOARD: AT3N7A-I VER: 0210 (H:00 B:05) DATE: 07/16/2009 Update ... the USB port, then launch EZ Flash 2 in any of updating itself through the Internet. When the correct BIOS file is found , EZ Flash 2 performs the BIOS update process and automatically reboots the system when done. 2-2 Chapter 2: BIOS information Locate the BIOS file from the ASUS website at www...
... BIOS file is found . Updating from a file, then click Next. Select Update BIOS from a BIOS file a. To update the BIOS using EZ Flash 2: 1. ASUSTek EZ Flash 2 BIOS ROM Utility V3.38 FLASH TYPE: MXIC 25L8005 Current ROM BOARD: AT3N7A-I VER: 0210 (H:00 B:05) DATE: 07/16/2009 Update ... the USB port, then launch EZ Flash 2 in any of updating itself through the Internet. When the correct BIOS file is found , EZ Flash 2 performs the BIOS update process and automatically reboots the system when done. 2-2 Chapter 2: BIOS information Locate the BIOS file from the ASUS website at www...
User Manual
Page 28
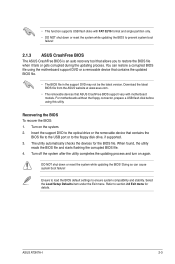
... starts flashing the corrupted BIOS file. 4. ASUS AT3N7A-I 2-3 Turn off the system after the utility completes the updating process and turn on the system. 2. Ensure to load the BIOS default settings to restore the BIOS file when it fails or gets corrupted during the updating process. • This function supports USB flash disks with motherboard models. DO NOT...
... starts flashing the corrupted BIOS file. 4. ASUS AT3N7A-I 2-3 Turn off the system after the utility completes the updating process and turn on the system. 2. Ensure to load the BIOS default settings to restore the BIOS file when it fails or gets corrupted during the updating process. • This function supports USB flash disks with motherboard models. DO NOT...
User Manual
Page 29
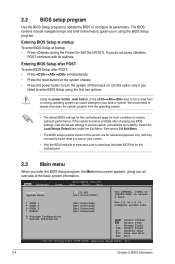
... [ENTER], [TAB] or [SHIFT-TAB] to ensure system compatibility and stability. Entering BIOS Setup at startup To enter BIOS Setup at www.asus.com to download the latest BIOS file for this motherboard apply for reference purposes only, and may not exactly match what you an overview of..., American Megatrends, Inc. 2-4 Chapter 2: BIOS information See section 2.8 Exit Menu. • The BIOS setup screens shown in this option only if you in using the first two options. 2.2 BIOS setup program Use the BIOS Setup program to update the BIOS or configure its routines. Do this section are...
... [ENTER], [TAB] or [SHIFT-TAB] to ensure system compatibility and stability. Entering BIOS Setup at startup To enter BIOS Setup at www.asus.com to download the latest BIOS file for this motherboard apply for reference purposes only, and may not exactly match what you an overview of..., American Megatrends, Inc. 2-4 Chapter 2: BIOS information See section 2.8 Exit Menu. • The BIOS setup screens shown in this option only if you in using the first two options. 2.2 BIOS setup program Use the BIOS Setup program to update the BIOS or configure its routines. Do this section are...
User Manual
Page 39
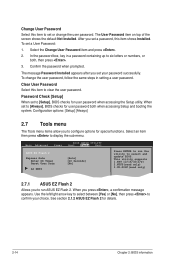
.... Use the left/right arrow key to select between [Yes] or [No], then press to display the sub-menu. Main Advanced Power BIOS SETUP UTILITY Boot Tools Exit ASUS EZ Flash 2 Express Gate Enter OS Timer Reset User Data AI NET2 [Auto] [10 Seconds] [No] Press ENTER to run the ... top of the screen shows the default Not Installed. Configuration options: [Setup] [Always] 2.7 Tools menu The Tools menu items allow you to select and update BIOS. Change User Password Select this item to set or change the user password, follow the same steps in a password containing up to six letters or...
.... Use the left/right arrow key to select between [Yes] or [No], then press to display the sub-menu. Main Advanced Power BIOS SETUP UTILITY Boot Tools Exit ASUS EZ Flash 2 Express Gate Enter OS Timer Reset User Data AI NET2 [Auto] [10 Seconds] [No] Press ENTER to run the ... top of the screen shows the default Not Installed. Configuration options: [Setup] [Always] 2.7 Tools menu The Tools menu items allow you to select and update BIOS. Change User Password Select this item to set or change the user password, follow the same steps in a password containing up to six letters or...


