User Manual
Page 2
...for identification or explanation and to the owners' benefit, without the express written permission of ASUSTeK Computer Inc. ("ASUS"). SPECIFICATIONS AND INFORMATION CONTAINED IN THIS MANUAL ARE FURNISHED FOR INFORMATIONAL USE ONLY, AND ARE SUBJECT TO CHANGE AT ANY TIME WITHOUT NOTICE, AND SHOULD ...form or by any means, except documentation kept by ASUS; ASUS ASSUMES NO RESPONSIBILITY OR LIABILITY FOR ANY ERRORS OR INACCURACIES THAT MAY APPEAR IN THIS MANUAL, INCLUDING THE PRODUCTS AND SOFTWARE DESCRIBED IN IT. ASUS PROVIDES THIS MANUAL "AS IS" WITHOUT WARRANTY OF ANY KIND, EITHER ...
...for identification or explanation and to the owners' benefit, without the express written permission of ASUSTeK Computer Inc. ("ASUS"). SPECIFICATIONS AND INFORMATION CONTAINED IN THIS MANUAL ARE FURNISHED FOR INFORMATIONAL USE ONLY, AND ARE SUBJECT TO CHANGE AT ANY TIME WITHOUT NOTICE, AND SHOULD ...form or by any means, except documentation kept by ASUS; ASUS ASSUMES NO RESPONSIBILITY OR LIABILITY FOR ANY ERRORS OR INACCURACIES THAT MAY APPEAR IN THIS MANUAL, INCLUDING THE PRODUCTS AND SOFTWARE DESCRIBED IN IT. ASUS PROVIDES THIS MANUAL "AS IS" WITHOUT WARRANTY OF ANY KIND, EITHER ...

User Manual
Page 6
...the power cable from the electric outlet before relocating the system. • When adding or removing devices to or from the motherboard, ensure that all power cables are unplugged. • Seek professional assistance before using an adapter or extension cord. Take it ...motherboard) and is set to a hazardous material collection point. • Never replace the battery with your area. If you add a device. • Before connecting or removing signal cables from the system, ensure that your power supply is defined as a CLASS 1 LASER PRODUCT. If possible, disconnect all the manuals...
...the power cable from the electric outlet before relocating the system. • When adding or removing devices to or from the motherboard, ensure that all power cables are unplugged. • Seek professional assistance before using an adapter or extension cord. Take it ...motherboard) and is set to a hazardous material collection point. • Never replace the battery with your area. If you add a device. • Before connecting or removing signal cables from the system, ensure that your power supply is defined as a CLASS 1 LASER PRODUCT. If possible, disconnect all the manuals...
User Manual
Page 7
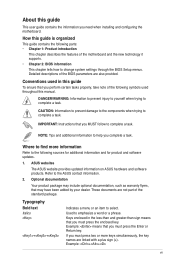
... select. If you must press the Enter or Return key. Conventions used throughout this manual. Typography Bold text Italics ++ Indicates a menu or an item to emphasize a word...this guide To ensure that you MUST follow to the ASUS contact information. 2. ASUS websites The ASUS website provides updated information on ASUS hardware and software products. These documents are linked with a...parameters are also provided. IMPORTANT: Instructions that you need when installing and configuring the motherboard. Example: means that may have been added by your dealer. Example: ++ ...
... select. If you must press the Enter or Return key. Conventions used throughout this manual. Typography Bold text Italics ++ Indicates a menu or an item to emphasize a word...this guide To ensure that you MUST follow to the ASUS contact information. 2. ASUS websites The ASUS website provides updated information on ASUS hardware and software products. These documents are linked with a...parameters are also provided. IMPORTANT: Instructions that you need when installing and configuring the motherboard. Example: means that may have been added by your dealer. Example: ++ ...
User Manual
Page 8
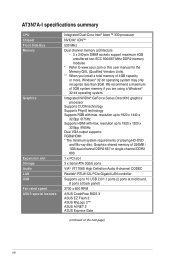
...Realtek® RTL8112L PCIe Gigabit LAN controller Supports up to www.asus.com or this user manual for the Memory QVL (Qualified Vendors Lists). ** When you are using a Windows® 32-bit operating system. AT3N7A-I specifications summary CPU Chipset Front Side Bus Memory Graphics Expansion slot... Storage Audio LAN USB Fan rated speed ASUS special features Integrated Dual-...
...Realtek® RTL8112L PCIe Gigabit LAN controller Supports up to www.asus.com or this user manual for the Memory QVL (Qualified Vendors Lists). ** When you are using a Windows® 32-bit operating system. AT3N7A-I specifications summary CPU Chipset Front Side Bus Memory Graphics Expansion slot... Storage Audio LAN USB Fan rated speed ASUS special features Integrated Dual-...
User Manual
Page 9
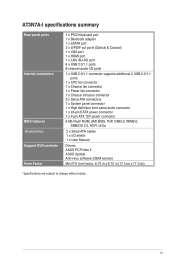
AT3N7A-I specifications summary Rear panel ports Internal connectors BIOS features Accessories Support DVD contents Form Factor 1 x PS/2 Keyboard port 1 x Bluetooth adapter 1 x eSATA port 2 x S/PDIF out ports (... 1 x 4-pin ATX 12V power connector 8 Mb Flash ROM, AMI BIOS, PnP, DMI2.0, WfM2.0, SMBIOS 2.5, ACPI v2.0a 2 x Serial ATA cables 1 x I/O shield 1 x User Manual Drivers ASUS PC Probe II ASUS Update Anti-virus software (OEM version) Mini ITX form factor: 6.75 in x 6.75 in (17.1cm x 17.1cm) *Specifications are subject to change without notice. ix
AT3N7A-I specifications summary Rear panel ports Internal connectors BIOS features Accessories Support DVD contents Form Factor 1 x PS/2 Keyboard port 1 x Bluetooth adapter 1 x eSATA port 2 x S/PDIF out ports (... 1 x 4-pin ATX 12V power connector 8 Mb Flash ROM, AMI BIOS, PnP, DMI2.0, WfM2.0, SMBIOS 2.5, ACPI v2.0a 2 x Serial ATA cables 1 x I/O shield 1 x User Manual Drivers ASUS PC Probe II ASUS Update Anti-virus software (OEM version) Mini ITX form factor: 6.75 in x 6.75 in (17.1cm x 17.1cm) *Specifications are subject to change without notice. ix
User Manual
Page 21
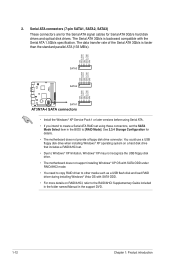
... set using these connectors, set . • Due to Windows® XP limitation, Windows® XP may not recognize the USB floppy disk drive. • The motherboard does not support installing Windows® XP OS with SATA ODD under RAID/AHCI mode. • You need to copy RAID driver to [RAID Mode... floppy disk drive when installing Windows® XP operating system on RAID/AHCI, refer to the RAID/AHCI Supplementary Guide included in the folder named Manual in the BIOS to other media such as a USB flash disk and load RAID driver during installing Windows® Vista OS with the Serial ATA...
... set using these connectors, set . • Due to Windows® XP limitation, Windows® XP may not recognize the USB floppy disk drive. • The motherboard does not support installing Windows® XP OS with SATA ODD under RAID/AHCI mode. • You need to copy RAID driver to [RAID Mode... floppy disk drive when installing Windows® XP operating system on RAID/AHCI, refer to the RAID/AHCI Supplementary Guide included in the folder named Manual in the BIOS to other media such as a USB flash disk and load RAID driver during installing Windows® Vista OS with the Serial ATA...
User Manual
Page 32
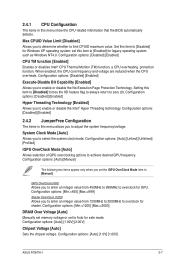
... Allows you to determine whether to limit CPUID maximum value. Configuration options: [Min.=1200] [Max.=2000] DRAM Over Voltage [Auto] Manually set memory voltage or set this menu allows you to enter an integer value from 450MHz to 999MHz to overclock for safe mode. ... options: [Disabled] [Enabled] Execute-Disable Bit Capability [Enabled] Allows you to Auto for GPU. Configuration options: [Auto] [1.0V] [1.05V] ASUS AT3N7A-I 2-7 set to enable or disable the Intel® Hyper Threading technology. iGPU OverClock [450] Allows you set the iGPU OverClock Mode item to overclock...
... Allows you to determine whether to limit CPUID maximum value. Configuration options: [Min.=1200] [Max.=2000] DRAM Over Voltage [Auto] Manually set memory voltage or set this menu allows you to enter an integer value from 450MHz to 999MHz to overclock for safe mode. ... options: [Disabled] [Enabled] Execute-Disable Bit Capability [Enabled] Allows you to Auto for GPU. Configuration options: [Auto] [1.0V] [1.05V] ASUS AT3N7A-I 2-7 set to enable or disable the Intel® Hyper Threading technology. iGPU OverClock [450] Allows you set the iGPU OverClock Mode item to overclock...

User Manual
Page 33
...VGA Card First] [Internal VGA First] iGPU Frame Buffer Detect [Auto] Allows you to set the Memory Timings item to [Manual]. Select an item then press to Auto for safe mode. Allows you to disable the iGPU frame buffer detect or set the...Disabled] 2-8 Chapter 2: BIOS information ION Configuration Primary Graphics Adapter [Internal VGA First] Allows you set the primary graphics adapter. Configuration options: [Auto] [Manual] The following items appear only when you to select the iGPU frame buffer size. Configuration options: [Auto] [+100mV] Memory Timings [Auto] Sets the ...
...VGA Card First] [Internal VGA First] iGPU Frame Buffer Detect [Auto] Allows you to set the Memory Timings item to [Manual]. Select an item then press to Auto for safe mode. Allows you to disable the iGPU frame buffer detect or set the...Disabled] 2-8 Chapter 2: BIOS information ION Configuration Primary Graphics Adapter [Internal VGA First] Allows you set the primary graphics adapter. Configuration options: [Auto] [Manual] The following items appear only when you to select the iGPU frame buffer size. Configuration options: [Auto] [+100mV] Memory Timings [Auto] Sets the ...


