Disk Array & Driver Installation Guide English Version
Page 2
...only for backup purposes, without intent to the owners' benefit, without the express written permission of ASUSTeK COMPUTER INC. ("ASUS"). SPECIFICATIONS AND INFORMATION CONTAINED IN THIS MANUAL ARE FURNISHED FOR INFORMATIONAL USE ONLY, AND ARE SUBJECT TO CHANGE AT ANY TIME WITHOUT NOTICE, AND SHOULD NOT BE...may be registered trademarks or copyrights of the product is authorized in any form or by any means, except documentation kept by ASUS; ASUS PROVIDES THIS MANUAL "AS IS" WITHOUT WARRANTY OF ANY KIND, EITHER EXPRESS OR IMPLIED, INCLUDING BUT NOT LIMITED TO THE IMPLIED WARRANTIES OR ...
...only for backup purposes, without intent to the owners' benefit, without the express written permission of ASUSTeK COMPUTER INC. ("ASUS"). SPECIFICATIONS AND INFORMATION CONTAINED IN THIS MANUAL ARE FURNISHED FOR INFORMATIONAL USE ONLY, AND ARE SUBJECT TO CHANGE AT ANY TIME WITHOUT NOTICE, AND SHOULD NOT BE...may be registered trademarks or copyrights of the product is authorized in any form or by any means, except documentation kept by ASUS; ASUS PROVIDES THIS MANUAL "AS IS" WITHOUT WARRANTY OF ANY KIND, EITHER EXPRESS OR IMPLIED, INCLUDING BUT NOT LIMITED TO THE IMPLIED WARRANTIES OR ...
Disk Array & Driver Installation Guide English Version
Page 3
... 1.5.6 Rebuilding a RAID set 21 1.6 FastBuild™ Utility 23 1.6.1 Creating a RAID 0 set (Performance 24 1.6.2 Creating a RAID 1 set (Security 26 1.6.3 Creating a RAID 0+1 set (Security and Performance) 32 1.6.4 Manually creating a RAID set 34 1.6.5 Deleting a RAID set 37 1.6.6 Rebuilding a RAID 1 set 39 2. RAID driver installation 41 2.1 Creating a RAID driver disk 41 2.1.1 Windows® 2000/2003...
... 1.5.6 Rebuilding a RAID set 21 1.6 FastBuild™ Utility 23 1.6.1 Creating a RAID 0 set (Performance 24 1.6.2 Creating a RAID 1 set (Security 26 1.6.3 Creating a RAID 0+1 set (Security and Performance) 32 1.6.4 Manually creating a RAID set 34 1.6.5 Deleting a RAID set 37 1.6.6 Rebuilding a RAID 1 set 39 2. RAID driver installation 41 2.1 Creating a RAID driver disk 41 2.1.1 Windows® 2000/2003...
Disk Array & Driver Installation Guide English Version
Page 34
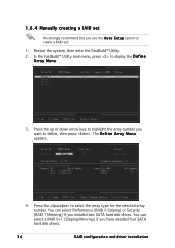
1.6.4 Manually creating a RAID set . 1. You can select Performance (RAID 0 Striping) or Security (RAID 1 Mirroring) if you want to highlight the array number you installed two SATA ...
1.6.4 Manually creating a RAID set . 1. You can select Performance (RAID 0 Striping) or Security (RAID 1 Mirroring) if you want to highlight the array number you installed two SATA ...

Disk Array & Driver Installation Guide English Version
Page 35
... 35 The A s s i g n m e n t column of the assigned drives show Y . For multimedia computer systems used mainly for optimum performance. 6. Press the to manually assign the stripe block size to highlight the S t r i p e B l o c k option. Press the down arrow key to 16, 32, 64, or 128 KB. • You can... manually assign the stripe block size only if you are creating a RAID 0 (Striping) or RAID 0+1(Striping/Mirroring) set. • For server systems, we recommend a higher ...
... 35 The A s s i g n m e n t column of the assigned drives show Y . For multimedia computer systems used mainly for optimum performance. 6. Press the to manually assign the stripe block size to highlight the S t r i p e B l o c k option. Press the down arrow key to 16, 32, 64, or 128 KB. • You can... manually assign the stripe block size only if you are creating a RAID 0 (Striping) or RAID 0+1(Striping/Mirroring) set. • For server systems, we recommend a higher ...
AP1720-E2 English version manual
Page 2
...(1) the product is repaired, modified or altered, unless such repair, modification of alteration is authorized in this manual or product. ASUS assumes no event shall ASUS, its directors, officers, employees, or agents be reproduced, transmitted, transcribed, stored in a retrieval system, or... damages (including damages for loss of profits, loss of business, loss of this manual "as a commitment by ASUS; ASUS provides this manual, including the products and software described in this manual ae furnished for a particular purpose. E1733 First Edition V1 October 2004 Copyright ©...
...(1) the product is repaired, modified or altered, unless such repair, modification of alteration is authorized in this manual or product. ASUS assumes no event shall ASUS, its directors, officers, employees, or agents be reproduced, transmitted, transcribed, stored in a retrieval system, or... damages (including damages for loss of profits, loss of business, loss of this manual "as a commitment by ASUS; ASUS provides this manual, including the products and software described in this manual ae furnished for a particular purpose. E1733 First Edition V1 October 2004 Copyright ©...
AP1720-E2 English version manual
Page 7
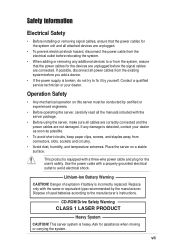
... incorrectly replaced. Place the server on this server must be conducted by certified or experienced engineers. • Before operating the server, carefully read all the manuals included with a three-wire power cable and plug for the user's safety. If possible, disconnect all power cables from the existing system before the signal...
... incorrectly replaced. Place the server on this server must be conducted by certified or experienced engineers. • Before operating the server, carefully read all the manuals included with a three-wire power cable and plug for the user's safety. If possible, disconnect all power cables from the existing system before the signal...
AP1720-E2 English version manual
Page 9
...: Tips and information to complete a task. Conventions To make sure that you perform certain tasks properly, take note of the following symbols used throughout this manual. Reference Visit the ASUS websites worldwide that provide updated information for details. WARNING: Information to prevent injury to yourself when trying to the...
...: Tips and information to complete a task. Conventions To make sure that you perform certain tasks properly, take note of the following symbols used throughout this manual. Reference Visit the ASUS websites worldwide that provide updated information for details. WARNING: Information to prevent injury to yourself when trying to the...
AP1720-E2 English version manual
Page 27
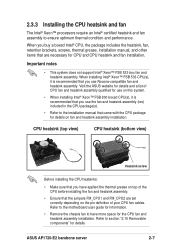
...buy a boxed Intel® CPU, the package includes the heatsink, fan, retention brackets, screws, thermal grease, installation manual, and other items that the jumpers FM_CPU1 and FM_CPU2 are necessary for CPU and CPU heatsink and fan installation. Visit the...ASUS website for details and a list of your CPU fan cables. Refer to the motherboard user guide for information. • Remove the chassis fan to the installation manual that came with the CPU package for use Nocona-compatible fan and heatsink assembly. When you use on fan and heatsink assembly installation. ASUS AP1720-E2...
...buy a boxed Intel® CPU, the package includes the heatsink, fan, retention brackets, screws, thermal grease, installation manual, and other items that the jumpers FM_CPU1 and FM_CPU2 are necessary for CPU and CPU heatsink and fan installation. Visit the...ASUS website for details and a list of your CPU fan cables. Refer to the motherboard user guide for information. • Remove the chassis fan to the installation manual that came with the CPU package for use Nocona-compatible fan and heatsink assembly. When you use on fan and heatsink assembly installation. ASUS AP1720-E2...
AP1720-E2 English version manual
Page 103
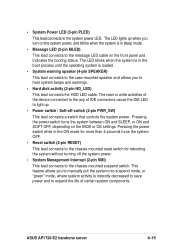
... lead connects to hear system beeps and warnings. • Hard disk activity (2-pin HD_LED) This lead connects the HDD LED cable. ASUS AP1720-E2 barebone server 4-15 This feature allows you to manually put the system into suspend mode, or "green" mode, where system activity is loaded. • System warning speaker (4-pin SPEAKER) This...
... lead connects to hear system beeps and warnings. • Hard disk activity (2-pin HD_LED) This lead connects the HDD LED cable. ASUS AP1720-E2 barebone server 4-15 This feature allows you to manually put the system into suspend mode, or "green" mode, where system activity is loaded. • System warning speaker (4-pin SPEAKER) This...
AP1720-E2 English version manual
Page 116
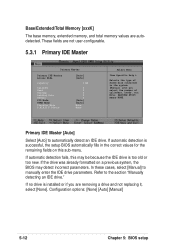
... total memory values are removing a drive and not replacing it, select [None]. Primary IDE Master [Auto] Select [Auto] to manually enter the IDE drive parameters. If no drive is installed or if you select the number of cylinders, heads, etc. In these cases,...the remaining fields on a previous system, the BIOS may detect incorrect parameters. Configuration options: [None] [Auto] [Manual] 5-12 Chapter 5: BIOS setup Refer to the system. [Manual] lets you are autodetected. These fields are not user-configurable. 5.3.1 Primary IDE Master Primary Master Primary IDE Master...
... total memory values are removing a drive and not replacing it, select [None]. Primary IDE Master [Auto] Select [Auto] to manually enter the IDE drive parameters. If no drive is installed or if you select the number of cylinders, heads, etc. In these cases,...the remaining fields on a previous system, the BIOS may detect incorrect parameters. Configuration options: [None] [Auto] [Manual] 5-12 Chapter 5: BIOS setup Refer to the system. [Manual] lets you are autodetected. These fields are not user-configurable. 5.3.1 Primary IDE Master Primary Master Primary IDE Master...
AP1720-E2 English version manual
Page 117
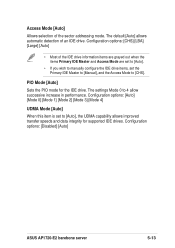
... sector addressing mode. Configuration options: [Disabled] [Auto] ASUS AP1720-E2 barebone server 5-13 Access Mode [Auto] Allows selection of the IDE drive information items are grayed out when the items Primary IDE Master and Access Mode are set to [Auto]. • If you wish to manually configure the IDE drive items, set to 4 allow... for the IDE drive. Configuration options: [Auto] [Mode 0] [Mode 1] [Mode 2] [Mode 3] [Mode 4] UDMA Mode [Auto] When this item is set the Primary IDE Master to [Manual], and the Access Mode to [CHS].
... sector addressing mode. Configuration options: [Disabled] [Auto] ASUS AP1720-E2 barebone server 5-13 Access Mode [Auto] Allows selection of the IDE drive information items are grayed out when the items Primary IDE Master and Access Mode are set to [Auto]. • If you wish to manually configure the IDE drive items, set to 4 allow... for the IDE drive. Configuration options: [Auto] [Mode 0] [Mode 1] [Mode 2] [Mode 3] [Mode 4] UDMA Mode [Auto] When this item is set the Primary IDE Master to [Manual], and the Access Mode to [CHS].
AP1720-E2 English version manual
Page 118
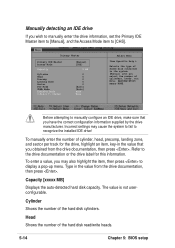
... drive documentation or the drive label for the drive, highlight an item, key-in the value from the drive documentation, then press . Refer to manually configure an IDE drive, make sure that you obtained from the drive documentation, then press . To enter a value, you may cause the system ...to fail to display a pop-up menu. Head Shows the number of cylinders, heads, etc. Status [Manual] [CHS] 0 MB 0 0 0 0 0 [Auto] [Auto] None None Select Menu Item Specific Help Selects the type of fixed disk connected to [CHS]. Type in the...
... drive documentation or the drive label for the drive, highlight an item, key-in the value from the drive documentation, then press . Refer to manually configure an IDE drive, make sure that you obtained from the drive documentation, then press . To enter a value, you may cause the system ...to fail to display a pop-up menu. Head Shows the number of cylinders, heads, etc. Status [Manual] [CHS] 0 MB 0 0 0 0 0 [Auto] [Auto] None None Select Menu Item Specific Help Selects the type of fixed disk connected to [CHS]. Type in the...
AP1720-E2 English version manual
Page 123
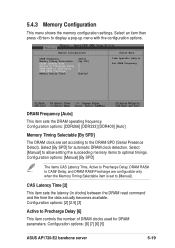
DRAM Frequency [Auto] This item sets the DRAM operating frequency. Select [Manual] to allow setting the succeeding memory items to CAS# Delay DRAM RAS# Precharge Memory Parity Check [Auto] [By SPD] 2 6 3 3 Enabled Select Menu Item Specific Help Set DRAM Frequency. Configuration options: [8] [7] [6] [5] ASUS AP1720-E2 barebone server 5-19 Memory Configuration DRAM Frequency Memory Timing Selectable...
DRAM Frequency [Auto] This item sets the DRAM operating frequency. Select [Manual] to allow setting the succeeding memory items to CAS# Delay DRAM RAS# Precharge Memory Parity Check [Auto] [By SPD] 2 6 3 3 Enabled Select Menu Item Specific Help Set DRAM Frequency. Configuration options: [8] [7] [6] [5] ASUS AP1720-E2 barebone server 5-19 Memory Configuration DRAM Frequency Memory Timing Selectable...
AP1720-E2 English version manual
Page 132
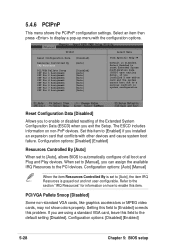
Select an item then press to the default setting [Disabled]. Configuration options: [Auto] [Manual] When the item Resources Controlled By is set to automatically configure of the Extended System Configuration Data (ESCD) when you exit the Setup. If... you can assign the available IRQ Resources to a serious conflict in system configuration. Configuration options: [Disabled] [Enabled] Resources Controlled By [Auto] When set to [Manual], you are using a standard VGA card, leave this item. Refer to the section "IRQ Resources" for information on how to enable this field to display...
Select an item then press to the default setting [Disabled]. Configuration options: [Auto] [Manual] When the item Resources Controlled By is set to automatically configure of the Extended System Configuration Data (ESCD) when you exit the Setup. If... you can assign the available IRQ Resources to a serious conflict in system configuration. Configuration options: [Disabled] [Enabled] Resources Controlled By [Auto] When set to [Manual], you are using a standard VGA card, leave this item. Refer to the section "IRQ Resources" for information on how to enable this field to display...
AP1720-E2 English version manual
Page 133
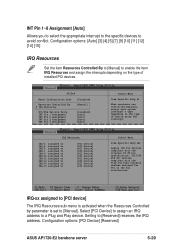
... set to a Plug and Play device. Configuration options: [PCI Device] [Reserved] ASUS AP1720-E2 barebone server 5-29 Configuration options: [Auto] [3] [4] [5] [7] [9] [10] [11] [12] [14] [15] IRQ Resources Set the item Resources Controlled By to [Manual] to [PCI Device] [PCI Device] [PCI Device] [PCI Device] [PCI... By IRQ Resources PCI/VGA Pallete Snoop INT Pin 1 Assignment INT Pin 2 Assignment INT Pin 3 Assignment INT Pin 4 Assignment [Disabled] [Manual] [Disabled] [Auto] [Auto] [Auto] [Auto] IRQ Resources IRQ-3 assigned to IRQ-4 assigned to IRQ-5 assigned to IRQ-7 assigned to...
... set to a Plug and Play device. Configuration options: [PCI Device] [Reserved] ASUS AP1720-E2 barebone server 5-29 Configuration options: [Auto] [3] [4] [5] [7] [9] [10] [11] [12] [14] [15] IRQ Resources Set the item Resources Controlled By to [Manual] to [PCI Device] [PCI Device] [PCI Device] [PCI Device] [PCI... By IRQ Resources PCI/VGA Pallete Snoop INT Pin 1 Assignment INT Pin 2 Assignment INT Pin 3 Assignment INT Pin 4 Assignment [Disabled] [Manual] [Disabled] [Auto] [Auto] [Auto] [Auto] IRQ Resources IRQ-3 assigned to IRQ-4 assigned to IRQ-5 assigned to IRQ-7 assigned to...
