A8R-MVP User's Manual for English Edtion
Page 33
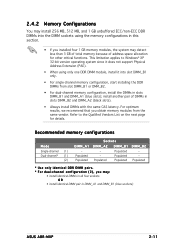
... detect less than 3 GB of total memory because of DIMMs in DIMM_A1 and DIMM_B1 (blue sockets) ASUS A8R-MVP 2-11 Populated Populated Sockets DIMM_A2 DIMM_B1 - - Refer to Windows® XP 32-bit version operating system since it does not support Physical Address Extension (PAE). • When using only one DDR DIMM module, install it into...
... detect less than 3 GB of total memory because of DIMMs in DIMM_A1 and DIMM_B1 (blue sockets) ASUS A8R-MVP 2-11 Populated Populated Sockets DIMM_A2 DIMM_B1 - - Refer to Windows® XP 32-bit version operating system since it does not support Physical Address Extension (PAE). • When using only one DDR DIMM module, install it into...
A8R-MVP User's Manual for English Edtion
Page 44
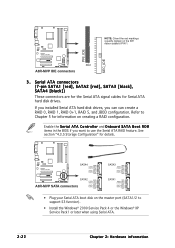
...are for the Serial ATA signal cables for details. A8R-MVP ® SATA4 GND RSATA_TXP4 RSATA_TXN4 GND RSATA_RXP4 RSATA_RXN4 GND A8R-MVP SATA connectors SATA2 GND RSATA_TXP2 RSATA_TXN2 GND RSATA_RXP2 RSATA_RXN2 ... section "4.3.5 Storage Configuration" for Serial ATA hard disk drives. Refer to Chapter 5 for information on the master port (SATA1/2 to support S3 function). • Install the Windows® 2000 Service Pack 4 or the Windows® XP Service Pack1 or later when using Serial ATA. 2-22 Chapter 2: Hardware information Enable the S e r i a l A T A C o n ...
...are for the Serial ATA signal cables for details. A8R-MVP ® SATA4 GND RSATA_TXP4 RSATA_TXN4 GND RSATA_RXP4 RSATA_RXN4 GND A8R-MVP SATA connectors SATA2 GND RSATA_TXP2 RSATA_TXN2 GND RSATA_RXP2 RSATA_RXN2 ... section "4.3.5 Storage Configuration" for Serial ATA hard disk drives. Refer to Chapter 5 for information on the master port (SATA1/2 to support S3 function). • Install the Windows® 2000 Service Pack 4 or the Windows® XP Service Pack1 or later when using Serial ATA. 2-22 Chapter 2: Hardware information Enable the S e r i a l A T A C o n ...
A8R-MVP User's Manual for English Edtion
Page 57
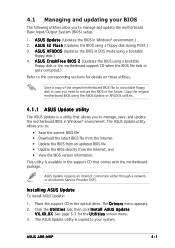
... To install ASUS Update: 1. Place the support CD in DOS mode using the ASUS Update or AFUDOS utilities. 4.1.1 ASUS Update utility The ASUS Update is a utility that comes with the motherboard package. X X. The ASUS Update utility is available in Windows® environment. Click the U t i l i t i e s tab, then click I O S 2 (Updates the BIOS using a floppy disk during POST.) 3. A S U S C r a s h F r e e B I n s t a l l A S U S U p d a t e V X . ASUS A8R-MVP 4-1 See page...
... To install ASUS Update: 1. Place the support CD in DOS mode using the ASUS Update or AFUDOS utilities. 4.1.1 ASUS Update utility The ASUS Update is a utility that comes with the motherboard package. X X. The ASUS Update utility is available in Windows® environment. Click the U t i l i t i e s tab, then click I O S 2 (Updates the BIOS using a floppy disk during POST.) 3. A S U S C r a s h F r e e B I n s t a l l A S U S U p d a t e V X . ASUS A8R-MVP 4-1 See page...
A8R-MVP User's Manual for English Edtion
Page 103
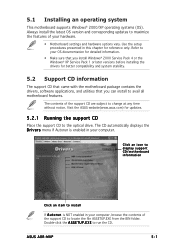
... file ASSETUP.EXE from the BIN folder. E X E to the optical drive. Visit the ASUS website(www.asus.com) for updates. 5.2.1 Running the support CD Place the support CD to run the CD. ASUS A8R-MVP 5-1 Double-click the A S S E T U P . 5.1 Installing an operating system This motherboard supports Windows® 2000/XP operating systems (OS). Always install the latest OS version and...
... file ASSETUP.EXE from the BIN folder. E X E to the optical drive. Visit the ASUS website(www.asus.com) for updates. 5.2.1 Running the support CD Place the support CD to run the CD. ASUS A8R-MVP 5-1 Double-click the A S S E T U P . 5.1 Installing an operating system This motherboard supports Windows® 2000/XP operating systems (OS). Always install the latest OS version and...
A8R-MVP User's Manual for English Edtion
Page 105
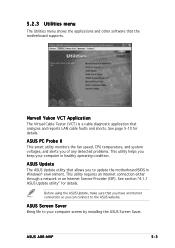
...) is a cable diagnostic application that the motherboard supports. ASUS A8R-MVP 5-3 See page 5-10 for details. ASUS Update The ASUS Update utility that you have an Internet connection so you keep your computer screen by installing the ASUS Screen Saver. 5.2.3 Utilities menu The Utilities menu ...you can connect to your computer in Windows® environment. Before using the ASUS Update, make sure that allows you to update the motherboard BIOS in healthy operating condition. ASUS Screen Saver Bring life to the ASUS website. This utility requires an Internet ...
...) is a cable diagnostic application that the motherboard supports. ASUS A8R-MVP 5-3 See page 5-10 for details. ASUS Update The ASUS Update utility that you have an Internet connection so you keep your computer screen by installing the ASUS Screen Saver. 5.2.3 Utilities menu The Utilities menu ...you can connect to your computer in Windows® environment. Before using the ASUS Update, make sure that allows you to update the motherboard BIOS in healthy operating condition. ASUS Screen Saver Bring life to the ASUS website. This utility requires an Internet ...
A8R-MVP User's Manual for English Edtion
Page 110
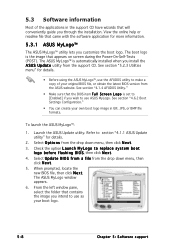
... file, then click N e x t. From the left window pane, select the folder that will conveniently guide you through the installation. See section "5.2.3 Utilities menu" for more information. 5.3.1 ASUS MyLogo™ The ASUS MyLogo™ utility lets you wish to make a copy of...o g o is the image that came with the software application for details. • Before using the ASUS MyLogo™, use the AFUDOS utility to use as your boot logo. 5-8 Chapter 5: Software support 5.3 Software information Most of your original BIOS file, or obtain the latest BIOS version from the drop down...
... file, then click N e x t. From the left window pane, select the folder that will conveniently guide you through the installation. See section "5.2.3 Utilities menu" for more information. 5.3.1 ASUS MyLogo™ The ASUS MyLogo™ utility lets you wish to make a copy of...o g o is the image that came with the software application for details. • Before using the ASUS MyLogo™, use the AFUDOS utility to use as your boot logo. 5-8 Chapter 5: Software support 5.3 Software information Most of your original BIOS file, or obtain the latest BIOS version from the drop down...
A8R-MVP User's Manual for English Edtion
Page 112
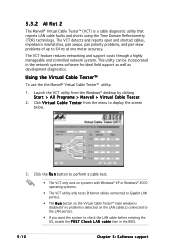
This utility can be incorporated in the BIOS. 5-10 Chapter 5: Software support 5.3.2 AI Net 2 The Marvell® Virtual Cable Tester™ (VCT) is detected on the Virtual Cable Tester™ main window is disabled if no problem is a cable diagnostic utility that reports LAN ...cable faults and shorts using the Time Domain Reflectometry (TDR) technology. The VCT feature reduces networking and support costs through a highly manageable and controlled network...
This utility can be incorporated in the BIOS. 5-10 Chapter 5: Software support 5.3.2 AI Net 2 The Marvell® Virtual Cable Tester™ (VCT) is detected on the Virtual Cable Tester™ main window is disabled if no problem is a cable diagnostic utility that reports LAN ...cable faults and shorts using the Time Domain Reflectometry (TDR) technology. The VCT feature reduces networking and support costs through a highly manageable and controlled network...
A8R-MVP User's Manual for English Edtion
Page 113
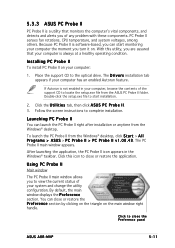
... You can launch the PC Probe II right after installation or anytime from the Windows® desktop, click S t a r t > A l l P r o g r a m s > A S U S > P C P r o b e I I > P C P r o b e I I . 3. Double-click the setup.exe file to close the Preference panel ASUS A8R-MVP 5-11 By default, the main window displays the P r e f e r e n c e section. Click...Installing PC Probe II To install PC Probe II on . Place the support CD to complete installation. Launching PC Probe II You can close or restore the application. 5.3.3 ASUS PC Probe II PC Probe II is a utility that your system and...
... You can launch the PC Probe II right after installation or anytime from the Windows® desktop, click S t a r t > A l l P r o g r a m s > A S U S > P C P r o b e I I > P C P r o b e I I . 3. Double-click the setup.exe file to close the Preference panel ASUS A8R-MVP 5-11 By default, the main window displays the P r e f e r e n c e section. Click...Installing PC Probe II To install PC Probe II on . Place the support CD to complete installation. Launching PC Probe II You can close or restore the application. 5.3.3 ASUS PC Probe II PC Probe II is a utility that your system and...
A8R-MVP User's Manual for English Edtion
Page 114
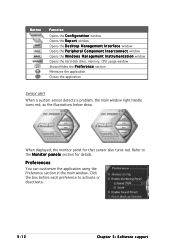
... 5: Software support Preferences You can customize the application using the Preference section in the main window. When displayed, the monitor panel for details. Click the box before each preference to the M o n i t o r p a n e l s section for that sensor also turns red. Button Function Opens the C o n f i g u r a t i o n window Opens the R e p o r t window Opens the D e s k t o p M a n a g e m e n t I n t e r f a c e window Opens the P e r i p h e r a l C o m p o n e n t I n t e r c o n n e c t window Opens the W i n d o w s M a n a g e m e n t I n s t r u m e n t a t i o n window Opens...
... 5: Software support Preferences You can customize the application using the Preference section in the main window. When displayed, the monitor panel for details. Click the box before each preference to the M o n i t o r p a n e l s section for that sensor also turns red. Button Function Opens the C o n f i g u r a t i o n window Opens the R e p o r t window Opens the D e s k t o p M a n a g e m e n t I n t e r f a c e window Opens the P e r i p h e r a l C o m p o n e n t I n t e r c o n n e c t window Opens the W i n d o w s M a n a g e m e n t I n s t r u m e n t a t i o n window Opens...
A8R-MVP User's Manual for English Edtion
Page 116
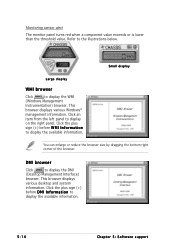
...browser. Click the plus sign (+) before W M I I n f o r m a t i o n to display the WMI (Windows Management Instrumentation) browser. Refer to display the available information. Small display Large display WMI browser Click to display the available information. 5-14 Chapter 5: ...Software support Click the plus sign (+) before D M I I n f o r m a t i o n to the illustrations below. This ...
...browser. Click the plus sign (+) before W M I I n f o r m a t i o n to display the WMI (Windows Management Instrumentation) browser. Refer to display the available information. Small display Large display WMI browser Click to display the available information. 5-14 Chapter 5: ...Software support Click the plus sign (+) before D M I I n f o r m a t i o n to the illustrations below. This ...

A8R-MVP User's Manual for English Edtion
Page 118
The S e n s o r / T h r e s h o l d tab enables you to adjust the sensor threshold values. The C o n f i g window has two tabs: S e n s o r / T h r e s h o l d and P r e f e r e n c e. The P r e f e r e n c e tab allows you to activate the sensors or to customize sensor alerts, or ...values for each sensor Applies your changes Cancels or ignores your changes Loads your saved configuration Saves your configuration 5-16 Chapter 5: Software support Configuring PC Probe II Click to view and adjust the sensor threshold values. Memory usage The Memory tab shows both used (blue...
The S e n s o r / T h r e s h o l d tab enables you to adjust the sensor threshold values. The C o n f i g window has two tabs: S e n s o r / T h r e s h o l d and P r e f e r e n c e. The P r e f e r e n c e tab allows you to activate the sensors or to customize sensor alerts, or ...values for each sensor Applies your changes Cancels or ignores your changes Loads your saved configuration Saves your configuration 5-16 Chapter 5: Software support Configuring PC Probe II Click to view and adjust the sensor threshold values. Memory usage The Memory tab shows both used (blue...
A8R-MVP User's Manual for English Edtion
Page 119
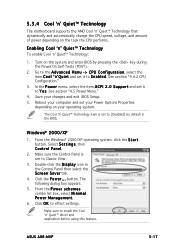
...Configuration." 3. Select S e t t i n g s, then Control Panel. 2. 5.3.4 Cool 'n' Quiet™ Technology The motherboard supports the AMD Cool 'n' Quiet™ Technology that dynamically and automatically change the CPU speed, voltage, and amount of power depending on the...Quiet™ Technology item is set it to E n a b l e d. button. Double-click the D i s p l a y icon in the BIOS. ASUS A8R-MVP 5-17 Windows® 2000/XP 1. From the Windows® 2000/XP operating system, click the S t a r t button. Make sure the Control Panel is set to Classic View. 3. From the P o w e...
...Configuration." 3. Select S e t t i n g s, then Control Panel. 2. 5.3.4 Cool 'n' Quiet™ Technology The motherboard supports the AMD Cool 'n' Quiet™ Technology that dynamically and automatically change the CPU speed, voltage, and amount of power depending on the...Quiet™ Technology item is set it to E n a b l e d. button. Double-click the D i s p l a y icon in the BIOS. ASUS A8R-MVP 5-17 Windows® 2000/XP 1. From the Windows® 2000/XP operating system, click the S t a r t button. Make sure the Control Panel is set to Classic View. 3. From the P o w e...

A8R-MVP User's Manual for English Edtion
Page 120
...button. If you are using Windows® XP, click the S t a r t button. Select Programs-> ASUS -> Cool & Quiet -> Cool & Quiet. 2. The Cool 'n' Quiet!™ technology screen appears and displays the current CPU Frequency and CPU Voltage. 5-18 Chapter 5: Software support Make sure to view your...: 1. Launching the Cool 'n' Quiet™ software The motherboard support CD includes the Cool 'n' Quie!™ software that enables you to install the Cool 'n' Quiet™ software from the motherboard support CD. Select A l l Programs-> ASUS -> Cool & Quiet -> Cool & Quiet. 3. Refer to...
...button. If you are using Windows® XP, click the S t a r t button. Select Programs-> ASUS -> Cool & Quiet -> Cool & Quiet. 2. The Cool 'n' Quiet!™ technology screen appears and displays the current CPU Frequency and CPU Voltage. 5-18 Chapter 5: Software support Make sure to view your...: 1. Launching the Cool 'n' Quiet™ software The motherboard support CD includes the Cool 'n' Quie!™ software that enables you to install the Cool 'n' Quiet™ software from the motherboard support CD. Select A l l Programs-> ASUS -> Cool & Quiet -> Cool & Quiet. 3. Refer to...

A8R-MVP User's Manual for English Edtion
Page 121
ASUS A8R-MVP 5-19 The software implements high quality audio synthesis/rendering, 3D sound positioning, and advanced voice-input technologies. If the SoundMAX® audio utility is installed before installing SoundMAX®. Follow the installation wizard to install the A D I A D 1 9 8 6 A A u d i o D r i v e r from the support CD that one of these operating systems is correctly installed, you...to activate the SoundMAX® audio utility. • You must use 4-channel or 6-channel speakers for this setup. • SoundMAX® requires Microsoft® Windows® 2000/XP.
ASUS A8R-MVP 5-19 The software implements high quality audio synthesis/rendering, 3D sound positioning, and advanced voice-input technologies. If the SoundMAX® audio utility is installed before installing SoundMAX®. Follow the installation wizard to install the A D I A D 1 9 8 6 A A u d i o D r i v e r from the support CD that one of these operating systems is correctly installed, you...to activate the SoundMAX® audio utility. • You must use 4-channel or 6-channel speakers for this setup. • SoundMAX® requires Microsoft® Windows® 2000/XP.
A8R-MVP User's Manual for English Edtion
Page 127
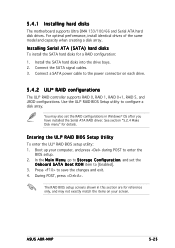
You may not exactly match the items on each drive. 5.4.2 ULI® RAID configurations The ULI® RAID controller supports RAID 0, RAID 1, RAID 0+1, RAID 5, and JBOD configurations. ASUS A8R-MVP 5-25 Connect the SATA signal cables. 3. See section "5.2.4 Make Disk menu" for a RAID configuration: 1. During POST, press ...Setup utility to save the changes and exit. 4. Press to configure a disk array. The RAID BIOS setup screens shown in Windows® OS after you have installed the Serial ATA RAID driver. For optimal performance, install identical drives of the same model ...
You may not exactly match the items on each drive. 5.4.2 ULI® RAID configurations The ULI® RAID controller supports RAID 0, RAID 1, RAID 0+1, RAID 5, and JBOD configurations. ASUS A8R-MVP 5-25 Connect the SATA signal cables. 3. See section "5.2.4 Make Disk menu" for a RAID configuration: 1. During POST, press ...Setup utility to save the changes and exit. 4. Press to configure a disk array. The RAID BIOS setup screens shown in Windows® OS after you have installed the Serial ATA RAID driver. For optimal performance, install identical drives of the same model ...
A8R-MVP User's Manual for English Edtion
Page 135
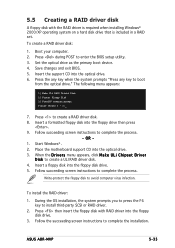
...Windows® . 2. Follow succeeding screen instructions to create a RAID driver disk. 8. ASUS A8R-MVP 5-33 The following menu appears: 1) Make ULi RAID Driver Disk 2) Format Floppy Disk 3) FreeDOS command prompt Please choose 1 ~ 3:_ 7. Press to complete the process. To create a RAID driver disk: 1. Press during POST to enter the BIOS setup utility. 3. Insert the support... CD into the floppy disk drive. 5. OR 1. Boot your computer. 2. Press then insert the floppy disk with the RAID driver is required when installing Windows® 2000/XP operating...
...Windows® . 2. Follow succeeding screen instructions to create a RAID driver disk. 8. ASUS A8R-MVP 5-33 The following menu appears: 1) Make ULi RAID Driver Disk 2) Format Floppy Disk 3) FreeDOS command prompt Please choose 1 ~ 3:_ 7. Press to complete the process. To create a RAID driver disk: 1. Press during POST to enter the BIOS setup utility. 3. Insert the support... CD into the floppy disk drive. 5. OR 1. Boot your computer. 2. Press then insert the floppy disk with the RAID driver is required when installing Windows® 2000/XP operating...
A8R-MVP User's Manual for English Edtion
Page 139
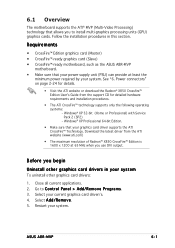
...install multi-graphics processing units (GPU) graphics cards. ASUS A8R-MVP 6-1 Follow the installation procedures in your system. Select your graphics card driver supports the ATI CrossFire™ Technology. Requirements • ...CrossFire™ Edition graphics card (Master) • CrossFire™-ready graphics card (Slave) • CrossFire™-ready motherboard, such as the ASUS A8R-MVP motherboard. • Make sure that allows you begin Uninstall other graphics card drivers: 1. Windows...
...install multi-graphics processing units (GPU) graphics cards. ASUS A8R-MVP 6-1 Follow the installation procedures in your system. Select your graphics card driver supports the ATI CrossFire™ Technology. Requirements • ...CrossFire™ Edition graphics card (Master) • CrossFire™-ready graphics card (Slave) • CrossFire™-ready motherboard, such as the ASUS A8R-MVP motherboard. • Make sure that allows you begin Uninstall other graphics card drivers: 1. Windows...
A8R-MVP User's Manual for English Edtion
Page 144
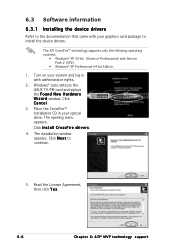
The ATI CrossFire™ technology supports only the following operating systems: • Windows® XP 32-bit (Home or Professional) with Service Pack 2 (SP2) • Windows® XP Professional 64-bit Edition. 1. Place the CrossFire™ installation CD in with administrator rights. 2. Read the License Agreement, then click Y e s. 6-6 C h a p t e r 6 : A T I n s t a l l C r o s s F i r e d r ...5. The opening menu appears. The installation window appears. Click I ® M V P t e c h n o l o g y s u p p o r t Windows® auto-detects the ASUS TV/FM card and siplays the...
The ATI CrossFire™ technology supports only the following operating systems: • Windows® XP 32-bit (Home or Professional) with Service Pack 2 (SP2) • Windows® XP Professional 64-bit Edition. 1. Place the CrossFire™ installation CD in with administrator rights. 2. Read the License Agreement, then click Y e s. 6-6 C h a p t e r 6 : A T I n s t a l l C r o s s F i r e d r ...5. The opening menu appears. The installation window appears. Click I ® M V P t e c h n o l o g y s u p p o r t Windows® auto-detects the ASUS TV/FM card and siplays the...


