
A8N-VM CSM User's Manual for English Edition
Page 4
... 2.1 Managing and updating your BIOS 2-2 2.1.1 Creating a bootable floppy disk 2-2 2.1.2 ASUS EZ Flash utility 2-3 2.1.3 AFUDOS utility 2-4 2.1.4 ASUS Update utility 2-6 2.2 BIOS setup program 2-9 2.2.1 BIOS menu screen 2-10 2.2.2 Menu bar 2-10 2.2.3 Navigation keys 2-10 2.2.4 Menu items 2-11 2.2.5 Sub-menu items 2-11 2.2.6 Configuration fields 2-11 2.2.7 Pop-up window 2-11 2.2.8 Scroll bar 2-11 2.2.9 General help 2-11 2.3 Main menu...
... 2.1 Managing and updating your BIOS 2-2 2.1.1 Creating a bootable floppy disk 2-2 2.1.2 ASUS EZ Flash utility 2-3 2.1.3 AFUDOS utility 2-4 2.1.4 ASUS Update utility 2-6 2.2 BIOS setup program 2-9 2.2.1 BIOS menu screen 2-10 2.2.2 Menu bar 2-10 2.2.3 Navigation keys 2-10 2.2.4 Menu items 2-11 2.2.5 Sub-menu items 2-11 2.2.6 Configuration fields 2-11 2.2.7 Pop-up window 2-11 2.2.8 Scroll bar 2-11 2.2.9 General help 2-11 2.3 Main menu...

A8N-VM CSM User's Manual for English Edition
Page 34
... SATA4 ® GND RSATA_RXN3 RSATA_RXP3 GND RSATA_TXN3 RSATA_TXP3 GND GND RSATA_RXN1 RSATA_RXP1 GND RSATA_TXN1 RSATA_TXP1 GND A8N-VM CSM SATA connectors SATA1 SATA3 Important note on Serial ATA Install the Windows® 2000 Service Pack 4 or the Windows® XP Service Pack1 before using Serial ATA. Serial ATA connectors (7-pin SATA1, SATA2, SATA3, SATA4) These...
... SATA4 ® GND RSATA_RXN3 RSATA_RXP3 GND RSATA_TXN3 RSATA_TXP3 GND GND RSATA_RXN1 RSATA_RXP1 GND RSATA_TXN1 RSATA_TXP1 GND A8N-VM CSM SATA connectors SATA1 SATA3 Important note on Serial ATA Install the Windows® 2000 Service Pack 4 or the Windows® XP Service Pack1 before using Serial ATA. Serial ATA connectors (7-pin SATA1, SATA2, SATA3, SATA4) These...

A8N-VM CSM User's Manual for English Edition
Page 42
... AFUDOS utilities. 2.1.1 Creating a bootable floppy disk 1. Copy the original motherboard BIOS using a floppy disk during POST.) ASUS EZ Flash and ASUS CrashFree BIOS 2 only support VGA/RGB output. A F o r m a t 3 1 / 2 F l o p p y D i s k window appears. D O S s t a r t u p d i s k from the menu, then select F o r m a t. Insert the Windows® 2000 CD to the floppy disk drive. Do either one of the following utilities allow...
... AFUDOS utilities. 2.1.1 Creating a bootable floppy disk 1. Copy the original motherboard BIOS using a floppy disk during POST.) ASUS EZ Flash and ASUS CrashFree BIOS 2 only support VGA/RGB output. A F o r m a t 3 1 / 2 F l o p p y D i s k window appears. D O S s t a r t u p d i s k from the menu, then select F o r m a t. Insert the Windows® 2000 CD to the floppy disk drive. Do either one of the following utilities allow...
A8N-VM CSM User's Manual for English Edition
Page 46
... utility is a utility that comes with the motherboard package. 2.1.4 ASUS Update utility The ASUS Update is copied to your system. Quit all Windows® applications before you to manage, save, and update the motherboard BIOS in Windows® environment. The ASUS Update utility allows you update the BIOS using this utility. 2-6 Chapter 2: BIOS setup This...
... utility is a utility that comes with the motherboard package. 2.1.4 ASUS Update utility The ASUS Update is copied to your system. Quit all Windows® applications before you to manage, save, and update the motherboard BIOS in Windows® environment. The ASUS Update utility allows you update the BIOS using this utility. 2-6 Chapter 2: BIOS setup This...

A8N-VM CSM User's Manual for English Edition
Page 47
Launch the ASUS Update utility from the nearest you to avoid network drop-down menu, then click traffic, or click A u t o S e l e c t. Updating the BIOS through the Internet To update the BIOS through the Internet: 1. Select the ASUS FTP site t h e I O S f r o m 3. N e x t. ASUS A8N-VM CSM 2-7 Select U p d a t e B I n t e r n e t option from the Windows® desktop by clicking S t a r t > P r o g r a m s > A S U S > A S U S U p d a t e > A S U S U p d a t e. The ASUS Update main window appears. 2. Click N e x t.
Launch the ASUS Update utility from the nearest you to avoid network drop-down menu, then click traffic, or click A u t o S e l e c t. Updating the BIOS through the Internet To update the BIOS through the Internet: 1. Select the ASUS FTP site t h e I O S f r o m 3. N e x t. ASUS A8N-VM CSM 2-7 Select U p d a t e B I n t e r n e t option from the Windows® desktop by clicking S t a r t > P r o g r a m s > A S U S > A S U S U p d a t e > A S U S U p d a t e. The ASUS Update main window appears. 2. Click N e x t.
A8N-VM CSM User's Manual for English Edition
Page 48
...: 1. Locate the BIOS file from the drop-down menu, then click N e x t. 3. The ASUS Update main window appears. 2. Select U p d a t e B I O S f r o m a f i l e option from the O p e n window, then click S a v e. 4. Click Next. 5. Follow the screen instructions to complete the update ... process. Always update the utility to download. From the FTP site, select the BIOS version that you wish to avail all its features. 4. Launch the ASUS Update utility from the Windows® desktop by clicking S t a r t > P r o g r a m s > A S U S > A S U S U p d a t e > A ...
...: 1. Locate the BIOS file from the drop-down menu, then click N e x t. 3. The ASUS Update main window appears. 2. Select U p d a t e B I O S f r o m a f i l e option from the O p e n window, then click S a v e. 4. Click Next. 5. Follow the screen instructions to complete the update ... process. Always update the utility to download. From the FTP site, select the BIOS version that you wish to avail all its features. 4. Launch the ASUS Update utility from the Windows® desktop by clicking S t a r t > P r o g r a m s > A S U S > A S U S U p d a t e > A ...
A8N-VM CSM User's Manual for English Edition
Page 51
... is user-configurable, you can change the value of a field, select it then press to display a list of options. Scroll bar ASUS A8N-VM CSM 2-11 Enter Tab F1 F10 ESC Select Screen Select Item Go to configure system time. Main menu items A solid triangle before each item...A configurable field is enclosed in brackets, and is a brief description of the menu screen is highlighted when selected. Refer to "2.2.7 Pop-up window." 2.2.7 Pop-up window Select a menu item then press to malfunction. Press the Up/Down arrow keys or / keys to display the other items (Advanced, Power,...
... is user-configurable, you can change the value of a field, select it then press to display a list of options. Scroll bar ASUS A8N-VM CSM 2-11 Enter Tab F1 F10 ESC Select Screen Select Item Go to configure system time. Main menu items A solid triangle before each item...A configurable field is enclosed in brackets, and is a brief description of the menu screen is highlighted when selected. Refer to "2.2.7 Pop-up window." 2.2.7 Pop-up window Select a menu item then press to malfunction. Press the Up/Down arrow keys or / keys to display the other items (Advanced, Power,...

A8N-VM CSM User's Manual for English Edition
Page 77
... off. Exit & Discard Changes Select this option only if you do not want to save the changes while exiting. After selecting this option, a confirmation window appears. ASUS A8N-VM CSM 2-37 When you select this option or if you to the Setup program. Exit & Save Changes Once you are finished making your selections, choose this... to discard the selections you made changes to discard any changes and load the previously saved values. Discard Changes This option allows you press , a confirmation window appears.
... off. Exit & Discard Changes Select this option only if you do not want to save the changes while exiting. After selecting this option, a confirmation window appears. ASUS A8N-VM CSM 2-37 When you select this option or if you to the Setup program. Exit & Save Changes Once you are finished making your selections, choose this... to discard the selections you made changes to discard any changes and load the previously saved values. Discard Changes This option allows you press , a confirmation window appears.

A8N-VM CSM User's Manual for English Edition
Page 80
...D r i v e r s menu if Autorun is NOT enabled in your hardware. • Motherboard settings and hardware options vary. Visit the ASUS website(www.asus.com) for reference only. Click an icon to display support CD/motherboard information Click an item to locate the file ASSETUP.EXE from the... BIN folder. 3.1 Installing an operating system This motherboard supports Windows® 2000/XP operating systems (OS). Refer to your OS ...
...D r i v e r s menu if Autorun is NOT enabled in your hardware. • Motherboard settings and hardware options vary. Visit the ASUS website(www.asus.com) for reference only. Click an icon to display support CD/motherboard information Click an item to locate the file ASSETUP.EXE from the... BIN folder. 3.1 Installing an operating system This motherboard supports Windows® 2000/XP operating systems (OS). Refer to your OS ...

A8N-VM CSM User's Manual for English Edition
Page 82
... utility allows you keep your computer in healthy operating condition. ASUS Screen Saver Installs the ASUS screen saver. ASUS PC Probe II This smart utility monitors the fan speed, CPU temperature, and system voltages, and alerts you of any ...in Portable Document Format (PDF). This utility requires an Internet connection either through a network or an Internet Service Provider (ISP). ASUS Cool 'n' Quiet Utility This item installs the ASUS Cool 'n' Quiet utility. 3-4 Chapter 3: Software support 3.2.3 Utilities menu The Utilities menu shows the applications and other software that ...
... utility allows you keep your computer in healthy operating condition. ASUS Screen Saver Installs the ASUS screen saver. ASUS PC Probe II This smart utility monitors the fan speed, CPU temperature, and system voltages, and alerts you of any ...in Portable Document Format (PDF). This utility requires an Internet connection either through a network or an Internet Service Provider (ISP). ASUS Cool 'n' Quiet Utility This item installs the ASUS Cool 'n' Quiet utility. 3-4 Chapter 3: Software support 3.2.3 Utilities menu The Utilities menu shows the applications and other software that ...

A8N-VM CSM User's Manual for English Edition
Page 83
... Serial ATA (SATA) RAID driver disk. Anti-virus utility The anti-virus utility scans, identifies, and removes computer viruses. ASUS A8N-VM CSM 3-5 Microsoft® Windows® XP Service Pack 2 already includes Microsoft® DirectX® 9.0c. The screen display and utilities option may not...you to make a RAID driver disk. If your computer. Microsoft DirectX 9.0c The Microsoft® DirectX® 9.0c is Microsoft® Windows® XP Service Pack 2-embedded, skip Microsoft® DirectX® 9.0c installation. View the online help for different operating system versions. ...
... Serial ATA (SATA) RAID driver disk. Anti-virus utility The anti-virus utility scans, identifies, and removes computer viruses. ASUS A8N-VM CSM 3-5 Microsoft® Windows® XP Service Pack 2 already includes Microsoft® DirectX® 9.0c. The screen display and utilities option may not...you to make a RAID driver disk. If your computer. Microsoft DirectX 9.0c The Microsoft® DirectX® 9.0c is Microsoft® Windows® XP Service Pack 2-embedded, skip Microsoft® DirectX® 9.0c installation. View the online help for different operating system versions. ...

A8N-VM CSM English Manual E2216
Page 4
... Contents Chapter 2: BIOS setup 2.1 Managing and updating your BIOS 2-2 2.1.1 Creating a bootable floppy disk 2-2 2.1.2 ASUS EZ Flash utility 2-3 2.1.3 AFUDOS utility 2-4 2.1.4 ASUS Update utility 2-6 2.2 BIOS setup program 2-9 2.2.1 BIOS menu screen 2-10 2.2.2 Menu bar 2-10 2.2.3 Navigation ...keys 2-10 2.2.4 Menu items 2-11 2.2.5 Sub-menu items 2-11 2.2.6 Configuration fields 2-11 2.2.7 Pop-up window 2-11 2.2.8 Scroll bar 2-11 ...
... Contents Chapter 2: BIOS setup 2.1 Managing and updating your BIOS 2-2 2.1.1 Creating a bootable floppy disk 2-2 2.1.2 ASUS EZ Flash utility 2-3 2.1.3 AFUDOS utility 2-4 2.1.4 ASUS Update utility 2-6 2.2 BIOS setup program 2-9 2.2.1 BIOS menu screen 2-10 2.2.2 Menu bar 2-10 2.2.3 Navigation ...keys 2-10 2.2.4 Menu items 2-11 2.2.5 Sub-menu items 2-11 2.2.6 Configuration fields 2-11 2.2.7 Pop-up window 2-11 2.2.8 Scroll bar 2-11 ...

A8N-VM CSM English Manual E2216
Page 34
... SATA4 ® GND RSATA_RXN3 RSATA_RXP3 GND RSATA_TXN3 RSATA_TXP3 GND GND RSATA_RXN1 RSATA_RXP1 GND RSATA_TXN1 RSATA_TXP1 GND A8N-VM CSM SATA connectors SATA1 SATA3 Important note on Serial ATA Install the Windows® 2000 Service Pack 4 or the Windows® XP Service Pack1 before using Serial ATA. Serial ATA connectors (7-pin SATA1, SATA2, SATA3, SATA4) These...
... SATA4 ® GND RSATA_RXN3 RSATA_RXP3 GND RSATA_TXN3 RSATA_TXP3 GND GND RSATA_RXN1 RSATA_RXP1 GND RSATA_TXN1 RSATA_TXP1 GND A8N-VM CSM SATA connectors SATA1 SATA3 Important note on Serial ATA Install the Windows® 2000 Service Pack 4 or the Windows® XP Service Pack1 before using Serial ATA. Serial ATA connectors (7-pin SATA1, SATA2, SATA3, SATA4) These...

A8N-VM CSM English Manual E2216
Page 42
... o p p y D i s k window appears. A S U S E Z F l a s h (Updates the BIOS using the ASUS Update or AFUDOS utilities. 2.1.1 Creating a bootable floppy disk 1. b. Select C r e a t e a n M S - c. DOS environment a. Insert the Windows® 2000 CD to the floppy disk drive. D O S s t a r t u p d i s k from the Windows® desktop, then select M y C o m p u t e r. Windows® 2000 environment To create a set of ...floppy disk. Copy the original motherboard BIOS using a floppy disk during POST.) ASUS EZ Flash and ASUS CrashFree BIOS 2 only support VGA/RGB output. b. Do either one of...
... o p p y D i s k window appears. A S U S E Z F l a s h (Updates the BIOS using the ASUS Update or AFUDOS utilities. 2.1.1 Creating a bootable floppy disk 1. b. Select C r e a t e a n M S - c. DOS environment a. Insert the Windows® 2000 CD to the floppy disk drive. D O S s t a r t u p d i s k from the Windows® desktop, then select M y C o m p u t e r. Windows® 2000 environment To create a set of ...floppy disk. Copy the original motherboard BIOS using a floppy disk during POST.) ASUS EZ Flash and ASUS CrashFree BIOS 2 only support VGA/RGB output. b. Do either one of...

A8N-VM CSM English Manual E2216
Page 46
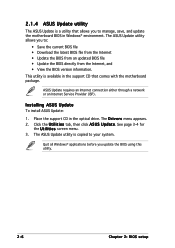
The ASUS Update utility allows you to manage, save, and update the motherboard BIOS in Windows® environment. Place the support CD in the support CD that allows you to: • Save the current BIOS file • Download... is available in the optical drive. Installing ASUS Update To install ASUS Update: 1. ASUS Update requires an Internet connection either through a network or an Internet Service Provider (ISP). 2.1.4 ASUS Update utility The ASUS Update is a utility that comes with the motherboard package. Quit all Windows® applications before you update the BIOS using...
The ASUS Update utility allows you to manage, save, and update the motherboard BIOS in Windows® environment. Place the support CD in the support CD that allows you to: • Save the current BIOS file • Download... is available in the optical drive. Installing ASUS Update To install ASUS Update: 1. ASUS Update requires an Internet connection either through a network or an Internet Service Provider (ISP). 2.1.4 ASUS Update utility The ASUS Update is a utility that comes with the motherboard package. Quit all Windows® applications before you update the BIOS using...

A8N-VM CSM English Manual E2216
Page 47
Select U p d a t e B I n t e r n e t option from the Windows® desktop by clicking S t a r t > P r o g r a m s > A S U S > A S U S U p d a t e > A S U S U p d a t e. ASUS A8N-VM CSM 2-7 Select the ASUS FTP site t h e I O S f r o m 3. Click N e x t. The ASUS Update main window appears. 2. Launch the ASUS Update utility from the nearest you to avoid network drop-down menu, then click traffic, or click A u t o S e l e c t. Updating the BIOS through the Internet To update the BIOS through the Internet: 1. N e x t.
Select U p d a t e B I n t e r n e t option from the Windows® desktop by clicking S t a r t > P r o g r a m s > A S U S > A S U S U p d a t e > A S U S U p d a t e. ASUS A8N-VM CSM 2-7 Select the ASUS FTP site t h e I O S f r o m 3. Click N e x t. The ASUS Update main window appears. 2. Launch the ASUS Update utility from the nearest you to avoid network drop-down menu, then click traffic, or click A u t o S e l e c t. Updating the BIOS through the Internet To update the BIOS through the Internet: 1. N e x t.

A8N-VM CSM English Manual E2216
Page 48
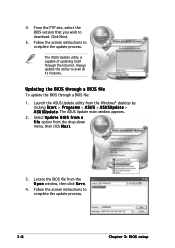
... utility is capable of updating itself through a BIOS file: 1. Launch the ASUS Update utility from the drop-down menu, then click N e x t. 3. Locate the BIOS file from the O p e n window, then click S a v e. 4. Updating the BIOS through a BIOS file To update the BIOS through the Internet. Follow the screen instructions to download. From the FTP... process. 2-8 Chapter 2: BIOS setup Always update the utility to complete the update process. Click Next. 5. 4. Follow the screen instructions to avail all its features. The ASUS Update main window appears. 2.
... utility is capable of updating itself through a BIOS file: 1. Launch the ASUS Update utility from the drop-down menu, then click N e x t. 3. Locate the BIOS file from the O p e n window, then click S a v e. 4. Updating the BIOS through a BIOS file To update the BIOS through the Internet. Follow the screen instructions to download. From the FTP... process. 2-8 Chapter 2: BIOS setup Always update the utility to complete the update process. Click Next. 5. 4. Follow the screen instructions to avail all its features. The ASUS Update main window appears. 2.

A8N-VM CSM English Manual E2216
Page 51
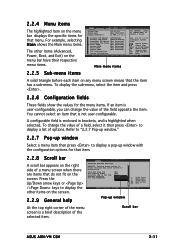
... of a field, select it then press to PCI VGA Palette Snooping PCI IDE BusMaster [No] [64] [Yes] [Disabled] [Enabled] Pop-up window with the configuration options for that item. 2.2.8 Scroll bar A scroll bar appears on the right side of the selected item. Enter Tab F1 F10 ESC... a menu item then press to display a pop-up window At the top right corner of the menu screen is not user-configurable. Plug And Play O/S PCI Latency Timer Allocate IRQ to display a list of the field opposite the item. Scroll bar ASUS A8N-VM CSM 2-11 For example, selecting M a i n shows the Main...
... of a field, select it then press to PCI VGA Palette Snooping PCI IDE BusMaster [No] [64] [Yes] [Disabled] [Enabled] Pop-up window with the configuration options for that item. 2.2.8 Scroll bar A scroll bar appears on the right side of the selected item. Enter Tab F1 F10 ESC... a menu item then press to display a pop-up window At the top right corner of the menu screen is not user-configurable. Plug And Play O/S PCI Latency Timer Allocate IRQ to display a list of the field opposite the item. Scroll bar ASUS A8N-VM CSM 2-11 For example, selecting M a i n shows the Main...

A8N-VM CSM English Manual E2216
Page 77
...if you want to save your changes before exiting. After selecting this option, a confirmation window appears. Load Setup Defaults This option allows you to save the changes that you made and restore the previously saved values. ASUS A8N-VM CSM 2-37 Select [ O k ] to the CMOS RAM. Exit & Save Changes Once...save the changes while exiting. If you to load default values. Press to the non-volatile RAM. When you press , a confirmation window appears. An onboard backup battery sustains the CMOS RAM so it stays on the Setup menus. When you select this option or if ...
...if you want to save your changes before exiting. After selecting this option, a confirmation window appears. Load Setup Defaults This option allows you to save the changes that you made and restore the previously saved values. ASUS A8N-VM CSM 2-37 Select [ O k ] to the CMOS RAM. Exit & Save Changes Once...save the changes while exiting. If you to load default values. Press to the non-volatile RAM. When you press , a confirmation window appears. An onboard backup battery sustains the CMOS RAM so it stays on the Setup menus. When you select this option or if ...

A8N-VM CSM English Manual E2216
Page 80
Double-click the A S S E T U P . Visit the ASUS website(www.asus.com) for updates. 3.2.1 Running the support CD Place the support CD to run the CD. 3-2 Chapter 3: Software support Click an icon to display support CD/... the support CD are subject to maximize the features of the support CD to avail all motherboard features. 3.1 Installing an operating system This motherboard supports Windows® 2000/XP operating systems (OS). Always install the latest OS version and corresponding updates to change at any time without notice. Use the setup...
Double-click the A S S E T U P . Visit the ASUS website(www.asus.com) for updates. 3.2.1 Running the support CD Place the support CD to run the CD. 3-2 Chapter 3: Software support Click an icon to display support CD/... the support CD are subject to maximize the features of the support CD to avail all motherboard features. 3.1 Installing an operating system This motherboard supports Windows® 2000/XP operating systems (OS). Always install the latest OS version and corresponding updates to change at any time without notice. Use the setup...


