
A8N-VM CSM User's Manual for English Edition
Page 4
... 2.1 Managing and updating your BIOS 2-2 2.1.1 Creating a bootable floppy disk 2-2 2.1.2 ASUS EZ Flash utility 2-3 2.1.3 AFUDOS utility 2-4 2.1.4 ASUS Update utility 2-6 2.2 BIOS setup program 2-9 2.2.1 BIOS menu screen 2-10 2.2.2 Menu bar 2-10 2.2.3 Navigation keys 2-10 2.2.4 Menu items 2-11 2.2.5 Sub-menu items 2-11 2.2.6 Configuration fields 2-11 2.2.7 Pop-up window 2-11 2.2.8 Scroll bar 2-11 2.2.9 General ...
... 2.1 Managing and updating your BIOS 2-2 2.1.1 Creating a bootable floppy disk 2-2 2.1.2 ASUS EZ Flash utility 2-3 2.1.3 AFUDOS utility 2-4 2.1.4 ASUS Update utility 2-6 2.2 BIOS setup program 2-9 2.2.1 BIOS menu screen 2-10 2.2.2 Menu bar 2-10 2.2.3 Navigation keys 2-10 2.2.4 Menu items 2-11 2.2.5 Sub-menu items 2-11 2.2.6 Configuration fields 2-11 2.2.7 Pop-up window 2-11 2.2.8 Scroll bar 2-11 2.2.9 General ...

A8N-VM CSM User's Manual for English Edition
Page 43
... then follow screen instructions to a floppy disk, then restart the system. 3. Copy the original or the latest motherboard BIOS file to the bootable floppy disk. 2.1.2 ASUS EZ Flash utility The ASUS EZ Flash feature allows you rename the BIOS file to A8NVMCSM.ROM. When the correct BIOS file is ... successfully. The EZ Flash utility is built-in the BIOS chip so it is your optical drive. error message appears if the correct BIOS file is no floppy disk in the floppy disk. ASUS A8N-VM CSM 2-3 Visit the ASUS website (www.asus.com) to prevent system boot failure! • ...
... then follow screen instructions to a floppy disk, then restart the system. 3. Copy the original or the latest motherboard BIOS file to the bootable floppy disk. 2.1.2 ASUS EZ Flash utility The ASUS EZ Flash feature allows you rename the BIOS file to A8NVMCSM.ROM. When the correct BIOS file is ... successfully. The EZ Flash utility is built-in the BIOS chip so it is your optical drive. error message appears if the correct BIOS file is no floppy disk in the floppy disk. ASUS A8N-VM CSM 2-3 Visit the ASUS website (www.asus.com) to prevent system boot failure! • ...

A8N-VM CSM User's Manual for English Edition
Page 44
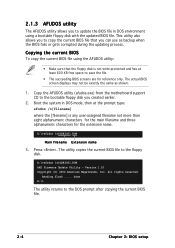
... reference only. A:\>afudos /oOLDBIOS1.ROM Main filename Extension name 3. Copying the current BIOS To copy the current BIOS file using a bootable floppy disk with the updated BIOS file. The actual BIOS screen displays may not be exactly the same as backup when the BIOS fails or gets corrupted during the updating process. Reading flash ..... The utility...
... reference only. A:\>afudos /oOLDBIOS1.ROM Main filename Extension name 3. Copying the current BIOS To copy the current BIOS file using a bootable floppy disk with the updated BIOS file. The actual BIOS screen displays may not be exactly the same as backup when the BIOS fails or gets corrupted during the updating process. Reading flash ..... The utility...
A8N-VM CSM User's Manual for English Edition
Page 46
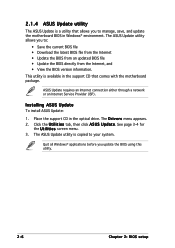
... the U t i l i t i e s screen menu. 3. Quit all Windows® applications before you to: • Save the current BIOS file • Download the latest BIOS file from the Internet • Update the BIOS from an updated BIOS file • Update the BIOS directly from the Internet, and • View the BIOS version information. Installing ASUS Update To install ASUS Update: 1. The ASUS Update...
... the U t i l i t i e s screen menu. 3. Quit all Windows® applications before you to: • Save the current BIOS file • Download the latest BIOS file from the Internet • Update the BIOS from an updated BIOS file • Update the BIOS directly from the Internet, and • View the BIOS version information. Installing ASUS Update To install ASUS Update: 1. The ASUS Update...
A8N-VM CSM User's Manual for English Edition
Page 48
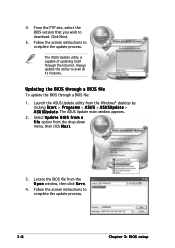
.... Click Next. 5. Select U p d a t e B I O S f r o m a f i l e option from the Windows® desktop by clicking S t a r t > P r o g r a m s > A S U S > A S U S U p d a t e > A S U S U p d a t e. Follow the screen instructions to complete the update process. 2-8 Chapter 2: BIOS setup Launch the ASUS Update utility from the drop-down menu, then click N e x t. 3. The ASUS Update utility is capable of updating itself through a BIOS file: 1. Always update the utility to download. 4. Locate the...
.... Click Next. 5. Select U p d a t e B I O S f r o m a f i l e option from the Windows® desktop by clicking S t a r t > P r o g r a m s > A S U S > A S U S U p d a t e > A S U S U p d a t e. Follow the screen instructions to complete the update process. 2-8 Chapter 2: BIOS setup Launch the ASUS Update utility from the drop-down menu, then click N e x t. 3. The ASUS Update utility is capable of updating itself through a BIOS file: 1. Always update the utility to download. 4. Locate the...
A8N-VM CSM User's Manual for English Edition
Page 49
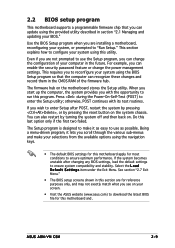
...with the opportunity to ensure system compatibility and stability. This section explains how to use as easy to make your screen. • Visit the ASUS website (www.asus.com) to download the latest BIOS file for most conditions to enter the Setup utility; If the system becomes unstable after POST, restart the system... during the Power-On-Self-Test (POST) to ensure optimum performance. Being a menu-driven program, it as possible. See section "2.7 Exit Menu." • The BIOS setup screens shown in this last option only if the first two failed. ASUS A8N-VM CSM 2-9
...with the opportunity to ensure system compatibility and stability. This section explains how to use as easy to make your screen. • Visit the ASUS website (www.asus.com) to download the latest BIOS file for most conditions to enter the Setup utility; If the system becomes unstable after POST, restart the system... during the Power-On-Self-Test (POST) to ensure optimum performance. Being a menu-driven program, it as possible. See section "2.7 Exit Menu." • The BIOS setup screens shown in this last option only if the first two failed. ASUS A8N-VM CSM 2-9

A8N-VM CSM User's Manual for English Edition
Page 50
... until the desired item is highlighted. 2.2.3 Navigation keys At the bottom right corner of the navigation keys differ from one screen to another. 2-10 Chapter 2: BIOS setup Select Screen Select Item Enter Go to select items in ] Use [ENTER], [TAB] or [SHIFT-TAB] to configure the System...IDE Master Primary IDE Slave Secondary IDE Master Secondary IDE Slave First SATA Second SATA Third SATA Fourth SATA IDE Configuration System Information [ST320410A] [ASUS CD-S520/A] [Not Detected] [Not Detected] [Not Detected] [Not Detected] [Not Detected] [Not Detected] Use [+] or [-] to select a field...
... until the desired item is highlighted. 2.2.3 Navigation keys At the bottom right corner of the navigation keys differ from one screen to another. 2-10 Chapter 2: BIOS setup Select Screen Select Item Enter Go to select items in ] Use [ENTER], [TAB] or [SHIFT-TAB] to configure the System...IDE Master Primary IDE Slave Secondary IDE Master Secondary IDE Slave First SATA Second SATA Third SATA Fourth SATA IDE Configuration System Information [ST320410A] [ASUS CD-S520/A] [Not Detected] [Not Detected] [Not Detected] [Not Detected] [Not Detected] [Not Detected] Use [+] or [-] to select a field...

A8N-VM CSM User's Manual for English Edition
Page 52
... [10:55:25] [Mon 08/29/2005] [1.44M, 3.5 in .] 2-12 Chapter 2: BIOS setup 2.3 Main menu When you enter the BIOS Setup program, the Main menu screen appears, giving you to set the system date. 2.3.3 Legacy Diskette A [1.44M, 3.5 in.] ...Sets the type of the basic system information. Primary IDE Master Primary IDE Slave Secondary IDE Master Secondary IDE Slave First SATA Second SATA Third SATA Fourth SATA IDE Configuration System Information [ST320410A] [ASUS...
... [10:55:25] [Mon 08/29/2005] [1.44M, 3.5 in .] 2-12 Chapter 2: BIOS setup 2.3 Main menu When you enter the BIOS Setup program, the Main menu screen appears, giving you to set the system date. 2.3.3 Legacy Diskette A [1.44M, 3.5 in.] ...Sets the type of the basic system information. Primary IDE Master Primary IDE Slave Secondary IDE Master Secondary IDE Slave First SATA Second SATA Third SATA Fourth SATA IDE Configuration System Information [ST320410A] [ASUS...

A8N-VM CSM User's Manual for English Edition
Page 53
...IDE device information. Configuration options: [Disabled] [Auto] ASUS A8N-VM CSM 2-13 Type LBA/Large Mode Block(Multi-sector Transfer) M PIO Mode DMA Mode Smart Monitoring 32Bit Data Transfer [Auto] [Auto] [Auto] [Auto] [Auto] [Auto] [Enabled] Select Screen Select Item +- These items show N/A if no IDE... Transfer) M [Auto] Enables or disables data multi-sectors transfers. First, Second, Third, and Fourth SATA While entering Setup, the BIOS automatically detects the presence of IDE drive. Select ARMD (ATAPI Removable Media Device) if your device is installed in the system. These ...
...IDE device information. Configuration options: [Disabled] [Auto] ASUS A8N-VM CSM 2-13 Type LBA/Large Mode Block(Multi-sector Transfer) M PIO Mode DMA Mode Smart Monitoring 32Bit Data Transfer [Auto] [Auto] [Auto] [Auto] [Auto] [Auto] [Enabled] Select Screen Select Item +- These items show N/A if no IDE... Transfer) M [Auto] Enables or disables data multi-sectors transfers. First, Second, Third, and Fourth SATA While entering Setup, the BIOS automatically detects the presence of IDE drive. Select ARMD (ATAPI Removable Media Device) if your device is installed in the system. These ...

A8N-VM CSM User's Manual for English Edition
Page 54
...] Enables or disables 32-bit data transfer. Main RAID Setup Serial-ATA 1 Serial-ATA 2 Serial-ATA 3 Serial-ATA 4 BIOS SETUP UTILITY [Enabled] [Enabled] [Enabled] [Enabled] Options Enabled Disabled nVidia RAID Function [Disabled] Select Screen Select Item +- Serial-ATA 1/2/3/4 [Enabled] Configuration options: [Disabled] [Enabled] nVidia RAID Function [Disabled] Configuration options: [Disabled] [Enabled] 2-14...
...] Enables or disables 32-bit data transfer. Main RAID Setup Serial-ATA 1 Serial-ATA 2 Serial-ATA 3 Serial-ATA 4 BIOS SETUP UTILITY [Enabled] [Enabled] [Enabled] [Enabled] Options Enabled Disabled nVidia RAID Function [Disabled] Select Screen Select Item +- Serial-ATA 1/2/3/4 [Enabled] Configuration options: [Disabled] [Enabled] nVidia RAID Function [Disabled] Configuration options: [Disabled] [Enabled] 2-14...

A8N-VM CSM User's Manual for English Edition
Page 55
... Displays the auto-detected system memory. Main BIOS SETUP UTILITY AMIBIOS Version : 0110 Build Date : 09/04/05 Processor Type Speed Count : AMD Athlon(tm) 64 Processor 3200+ : 2020 MHz : 1 System Memory Size : 240 MB Select Screen Select Item F1 General Help F10 Save and... Exit ESC Exit v02.58 (C)Copyright 1985-2004, American Megatrends, Inc. AMI BIOS Displays the auto-detected BIOS information. ASUS A8N-VM CSM 2-15 2.3.6 System Information This menu gives you an overview of the...
... Displays the auto-detected system memory. Main BIOS SETUP UTILITY AMIBIOS Version : 0110 Build Date : 09/04/05 Processor Type Speed Count : AMD Athlon(tm) 64 Processor 3200+ : 2020 MHz : 1 System Memory Size : 240 MB Select Screen Select Item F1 General Help F10 Save and... Exit ESC Exit v02.58 (C)Copyright 1985-2004, American Megatrends, Inc. AMI BIOS Displays the auto-detected BIOS information. ASUS A8N-VM CSM 2-15 2.3.6 System Information This menu gives you an overview of the...

A8N-VM CSM User's Manual for English Edition
Page 56
...disable the AMD Cool 'n' Quiet™ technology feature. Configuration options: [Enabled] [Disabled] 2-16 Chapter 2: BIOS setup Main Advanced BIOS SETUP UTILITY Power Boot Exit AMD Cool 'N' Quiet Configuration JumperFree Configuration CPU Configuration Chipset Onboard Devices Configuration PCI ...PnP USB Configuration Configure AMD Cool 'N' Quiet support Select Screen Select Item Enter Go to Sub Screen F1 ...
...disable the AMD Cool 'n' Quiet™ technology feature. Configuration options: [Enabled] [Disabled] 2-16 Chapter 2: BIOS setup Main Advanced BIOS SETUP UTILITY Power Boot Exit AMD Cool 'N' Quiet Configuration JumperFree Configuration CPU Configuration Chipset Onboard Devices Configuration PCI ...PnP USB Configuration Configure AMD Cool 'N' Quiet support Select Screen Select Item Enter Go to Sub Screen F1 ...
A8N-VM CSM User's Manual for English Edition
Page 58
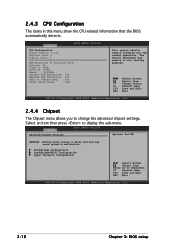
...American Megatrends, Inc. 2.4.4 Chipset The Chipset menu allows you to display the sub-menu. Select Screen Select Item +- NorthBridge Configuration SouthBridge/MCP51 Configuration Hyper Transport Configuration Select Screen Select Item Enter Go to Change Freq. : Yes uCode Patch Level : 0x41 This option ...should remain disabled for NB WARNING: Setting wrong values in this menu show the CPU-related information that the BIOS automatically detects. Advanced BIOS SETUP ...
...American Megatrends, Inc. 2.4.4 Chipset The Chipset menu allows you to display the sub-menu. Select Screen Select Item +- NorthBridge Configuration SouthBridge/MCP51 Configuration Hyper Transport Configuration Select Screen Select Item Enter Go to Change Freq. : Yes uCode Patch Level : 0x41 This option ...should remain disabled for NB WARNING: Setting wrong values in this menu show the CPU-related information that the BIOS automatically detects. Advanced BIOS SETUP ...

A8N-VM CSM User's Manual for English Edition
Page 62
... Buffer Size OnChip VGA Trap Enable [[PCI -> PCI Express] [64 MB] [Disabled] Options PCI -> PCI Express -> IGP IGP -> PCI Express -> PCI Select Screen Select Item +- Change Option F1 General Help F10 Save and Exit ESC Exit v02.58 (C)Copyright 1985-2004, American Megatrends, Inc. 2-22 Chapter... 2: BIOS setup Configuration options: [Disabled] [40ns] [80ns] [160ns] [320ns] [640ns] [1.28us] [2.56us] [5.12us] [10.2us] [20.5 us] [41.0us] [81.9us] [163.8us] [327....
... Buffer Size OnChip VGA Trap Enable [[PCI -> PCI Express] [64 MB] [Disabled] Options PCI -> PCI Express -> IGP IGP -> PCI Express -> PCI Select Screen Select Item +- Change Option F1 General Help F10 Save and Exit ESC Exit v02.58 (C)Copyright 1985-2004, American Megatrends, Inc. 2-22 Chapter... 2: BIOS setup Configuration options: [Disabled] [40ns] [80ns] [160ns] [320ns] [640ns] [1.28us] [2.56us] [5.12us] [10.2us] [20.5 us] [41.0us] [81.9us] [163.8us] [327....

A8N-VM CSM User's Manual for English Edition
Page 64
...MHz] [800 MHz] [1000 MHz] [1200 MHz] [1400 MHz] [1600 MHz] MCP51(SB) to C51G (NB)frequency selection. Select Screen Select Item +- Hyper Transport Configuration Advanced BIOS Setup Utility Hyper Transport C51PV Configuration LDT (K8) to C51PV (NB) Frequency [Auto] LDT (K8) to C51PV (NB) LinkWidth [Auto]...800 MHz] MCP51(SB) to NVIDIA (NB) LinkWidth [8 8 ] LDT (K8) to NVIDIA (NB) LinkWidth [8 8 ] Configuration options: [4 4 ] [8 8 ] [16 16 ] 2-24 Chapter 2: BIOS setup Change Option F1 General Help F10 Save and Exit ESC Exit v02.58 (C)Copyright 1985-2004, American Megatrends, Inc.
...MHz] [800 MHz] [1000 MHz] [1200 MHz] [1400 MHz] [1600 MHz] MCP51(SB) to C51G (NB)frequency selection. Select Screen Select Item +- Hyper Transport Configuration Advanced BIOS Setup Utility Hyper Transport C51PV Configuration LDT (K8) to C51PV (NB) Frequency [Auto] LDT (K8) to C51PV (NB) LinkWidth [Auto]...800 MHz] MCP51(SB) to NVIDIA (NB) LinkWidth [8 8 ] LDT (K8) to NVIDIA (NB) LinkWidth [8 8 ] Configuration options: [4 4 ] [8 8 ] [16 16 ] 2-24 Chapter 2: BIOS setup Change Option F1 General Help F10 Save and Exit ESC Exit v02.58 (C)Copyright 1985-2004, American Megatrends, Inc.

A8N-VM CSM User's Manual for English Edition
Page 66
...and setting the memory size block for boot if your system has a Plug and Play operating system. Select Screen Select Item +- Plug And Play O/S [No] When set to [No], BIOS does not assign an IRQ to PCI VGA card if the card requests for an IRQ. Configuration options:...General Help F10 Save and Exit ESC Exit v02.58 (C)Copyright 1985-2004, American Megatrends, Inc. Configuration options: [No] [Yes] 2-26 Chapter 2: BIOS setup YES: Lets the operating system configure Plug and Play (PnP) devices not required for legacy ISA devices. Configuration options: [Disabled] [Enabled] 2.4.6...
...and setting the memory size block for boot if your system has a Plug and Play operating system. Select Screen Select Item +- Plug And Play O/S [No] When set to [No], BIOS does not assign an IRQ to PCI VGA card if the card requests for an IRQ. Configuration options:...General Help F10 Save and Exit ESC Exit v02.58 (C)Copyright 1985-2004, American Megatrends, Inc. Configuration options: [No] [Yes] 2-26 Chapter 2: BIOS setup YES: Lets the operating system configure Plug and Play (PnP) devices not required for legacy ISA devices. Configuration options: [Disabled] [Enabled] 2.4.6...

A8N-VM CSM User's Manual for English Edition
Page 67
... Controller Mode [HiSpeed] Allows you to set to [Reserved], the IRQ is free for legacy ISA devices. Select Screen Select Item +- If no USB device is disabled. If no USB device is detected, the legacy USB support is...BIOS EHCI Hand-Off [Auto] [HiSpeed] [Enabled] Enables 1.1 USB host controllers. Setting to Auto allows the system to detect the presence of PCI/PnP devices. Palette Snooping [Disabled] When set to [Enabled], the palette snooping feature informs the PCI devices that the latter can function correctly. Configuration options: [Disabled] [Enabled] ASUS A8N-VM CSM...
... Controller Mode [HiSpeed] Allows you to set to [Reserved], the IRQ is free for legacy ISA devices. Select Screen Select Item +- If no USB device is disabled. If no USB device is detected, the legacy USB support is...BIOS EHCI Hand-Off [Auto] [HiSpeed] [Enabled] Enables 1.1 USB host controllers. Setting to Auto allows the system to detect the presence of PCI/PnP devices. Palette Snooping [Disabled] When set to [Enabled], the palette snooping feature informs the PCI devices that the latter can function correctly. Configuration options: [Disabled] [Enabled] ASUS A8N-VM CSM...
A8N-VM CSM User's Manual for English Edition
Page 68
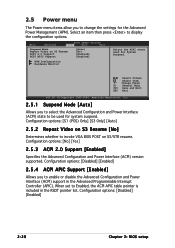
...the Advanced Configuration and Power Interface (ACPI) support in the RSDT pointer list. Configuration options: [Disabled] [Enabled] 2-28 Chapter 2: BIOS setup Configuration options: [Disabled] [Enabled] 2.5.4 ACPI APIC Support [Enabled] Allows you to select the Advanced Configuration and Power Interface (...ACPI) state to be used for System Suspend. Select Screen Select Item +- When set to Enabled, the ACPI APIC table pointer is included in the Advanced Programmable Interrupt Controller (APIC). 2.5 ...
...the Advanced Configuration and Power Interface (ACPI) support in the RSDT pointer list. Configuration options: [Disabled] [Enabled] 2-28 Chapter 2: BIOS setup Configuration options: [Disabled] [Enabled] 2.5.4 ACPI APIC Support [Enabled] Allows you to select the Advanced Configuration and Power Interface (...ACPI) state to be used for System Suspend. Select Screen Select Item +- When set to Enabled, the ACPI APIC table pointer is included in the Advanced Programmable Interrupt Controller (APIC). 2.5 ...

A8N-VM CSM User's Manual for English Edition
Page 69
2.5.5 APM Configuration BIOS SETUP UTILITY Power Power Button Mode [On/Off] Resume On PME# ... When this parameter allows you to enable or disable RTC to generate a wake event while the computer is pressed. Select Screen Select Item +- Power Button Mode [On/Off] Allows the system to turn on the +5VSB lead. Configuration options: [...Off or Suspend when Power button is in Soft-off mode. Configuration options: [Disabled] [Enabled] ASUS A8N-VM CSM 2-29 Configuration options: [On/Off] [Suspend] Resume On PME# [Disabled] When set to generate a wake event while the computer...
2.5.5 APM Configuration BIOS SETUP UTILITY Power Power Button Mode [On/Off] Resume On PME# ... When this parameter allows you to enable or disable RTC to generate a wake event while the computer is pressed. Select Screen Select Item +- Power Button Mode [On/Off] Allows the system to turn on the +5VSB lead. Configuration options: [...Off or Suspend when Power button is in Soft-off mode. Configuration options: [Disabled] [Enabled] ASUS A8N-VM CSM 2-29 Configuration options: [On/Off] [Suspend] Resume On PME# [Disabled] When set to generate a wake event while the computer...
A8N-VM CSM English Manual E2216
Page 44
...The AFUDOS utility allows you to update the BIOS file in DOS mode, then at the prompt type: afudos /o[filename] where the [filename] is not write-protected and has at least 600 KB free space to save the file. • The succeeding BIOS screens are for the extension name. Copying the ...current BIOS To copy the current BIOS file using a bootable floppy disk with the updated BIOS file. The utility copies the current BIOS file to the floppy disk. All rights reserved.
...The AFUDOS utility allows you to update the BIOS file in DOS mode, then at the prompt type: afudos /o[filename] where the [filename] is not write-protected and has at least 600 KB free space to save the file. • The succeeding BIOS screens are for the extension name. Copying the ...current BIOS To copy the current BIOS file using a bootable floppy disk with the updated BIOS file. The utility copies the current BIOS file to the floppy disk. All rights reserved.


