

Motherboard DIY Troubleshooting Guide
Page 2
...' benefit, without the express written permission of ASUSTeK COMPUTER INC. ("ASUS"). Product Name: ASUS A7VL-VM Manual Revision: 1.04 E726 Release Date: March 2001 2 ASUS A7VL-VM User's Manual ASUS PROVIDES THIS MANUAL "AS IS" WITHOUT WARRANTY OF ANY KIND, EITHER... EXPRESS OR IMPLIED, INCLUDING BUT NOT LIMITED TO THE IMPLIED WARRANTIES OR CONDITIONS OF MERCHANTABILITY OR FITNESS FOR A PARTICULAR PURPOSE. Copyright © 2001 ASUSTeK COMPUTER INC. For previous or updated manuals, BIOS...
...' benefit, without the express written permission of ASUSTeK COMPUTER INC. ("ASUS"). Product Name: ASUS A7VL-VM Manual Revision: 1.04 E726 Release Date: March 2001 2 ASUS A7VL-VM User's Manual ASUS PROVIDES THIS MANUAL "AS IS" WITHOUT WARRANTY OF ANY KIND, EITHER... EXPRESS OR IMPLIED, INCLUDING BUT NOT LIMITED TO THE IMPLIED WARRANTIES OR CONDITIONS OF MERCHANTABILITY OR FITNESS FOR A PARTICULAR PURPOSE. Copyright © 2001 ASUSTeK COMPUTER INC. For previous or updated manuals, BIOS...

Motherboard DIY Troubleshooting Guide
Page 4
... 7 2. FEATURES 8 2.1 The ASUS A7VL-VM 8 2.1.1 Specifications 8 2.1.2 Special Features 10 2.1.3 Optional Components 10 2.1.4 Performance Features 10 2.1.5 Intelligence 11 2.2 Motherboard Components 12 2.2.1 Component Locations 13 3. CONTENTS 1. BIOS SETUP 39 4.1 Managing and Updating Your BIOS 39 4.1.1 Upon First Use of the Computer System 39 4.1.2 Updating BIOS Procedures 40 4.2 BIOS Setup Program 42 4.2.1 BIOS Menu Bar 43 4.2.2 Legend Bar 43 4 ASUS A7VL-VM User's Manual
... 7 2. FEATURES 8 2.1 The ASUS A7VL-VM 8 2.1.1 Specifications 8 2.1.2 Special Features 10 2.1.3 Optional Components 10 2.1.4 Performance Features 10 2.1.5 Intelligence 11 2.2 Motherboard Components 12 2.2.1 Component Locations 13 3. CONTENTS 1. BIOS SETUP 39 4.1 Managing and Updating Your BIOS 39 4.1.1 Upon First Use of the Computer System 39 4.1.2 Updating BIOS Procedures 40 4.2 BIOS Setup Program 42 4.2.1 BIOS Menu Bar 43 4.2.2 Legend Bar 43 4 ASUS A7VL-VM User's Manual

Motherboard DIY Troubleshooting Guide
Page 7
... utilities (1) This Motherboard User's Manual ASUS A7VL-VM User's Manual 7 INTRODUCTION 2. SOFTWARE SETUP 6. If you discover damaged or missing items, contact your package is divided into the following sections: 1. FEATURES 3. APPENDIX Manual information and checklist Production information and specifications Intructions on setting up the motherboard. BIOS SETUP 5. Package Contents (1) ASUS Motherboard (1) 40-pin 80-conductor...
... utilities (1) This Motherboard User's Manual ASUS A7VL-VM User's Manual 7 INTRODUCTION 2. SOFTWARE SETUP 6. If you discover damaged or missing items, contact your package is divided into the following sections: 1. FEATURES 3. APPENDIX Manual information and checklist Production information and specifications Intructions on setting up the motherboard. BIOS SETUP 5. Package Contents (1) ASUS Motherboard (1) 40-pin 80-conductor...

Motherboard DIY Troubleshooting Guide
Page 8
2. FEA TURES Specifications 2. FEATURES 2.1 The ASUS A7VL-VM The ASUS A7VL-VM motherboard is enabled. and PCI 2.2. up to allow manual adjustment of PC133/PC100 / VC133 Virtual Channel Memory (VCM) SDRAM; Easy-to-use DIP switches instead ..., such as DVD-ROM, CD-ROM, CD-R/RW, LS-120, and Tape Backup drives. • Wake-On-LAN Connector: Supports Wake-On-LAN activity through BIOS setup when JumperFree™ mode is carefully designed for the demanding PC user who wants advanced features processed by the fastest processors. 2.1.1 Specifications • AMD...
2. FEA TURES Specifications 2. FEATURES 2.1 The ASUS A7VL-VM The ASUS A7VL-VM motherboard is enabled. and PCI 2.2. up to allow manual adjustment of PC133/PC100 / VC133 Virtual Channel Memory (VCM) SDRAM; Easy-to-use DIP switches instead ..., such as DVD-ROM, CD-ROM, CD-R/RW, LS-120, and Tape Backup drives. • Wake-On-LAN Connector: Supports Wake-On-LAN activity through BIOS setup when JumperFree™ mode is carefully designed for the demanding PC user who wants advanced features processed by the fastest processors. 2.1.1 Specifications • AMD...

Motherboard DIY Troubleshooting Guide
Page 9
ASUS A7VL-VM User's Manual 9 FEATURES • PC Health Monitoring: Provides an easy way to examine and manage system status information, such as CPU and systerm voltages, temperatures, and fan status through BIOS, which can support Bus Master PCI cards, such as SCSI or LAN cards (PCI ..., personal gadgets, or an optional remote controller. • Desktop Management Interface (DMI): Supports DMI through the onboard hardware ASUS ASIC and the bundled ASUS PC Probe. • SMBus: Features the System Management Bus interface, which is used to physically transport commands and information ...
ASUS A7VL-VM User's Manual 9 FEATURES • PC Health Monitoring: Provides an easy way to examine and manage system status information, such as CPU and systerm voltages, temperatures, and fan status through BIOS, which can support Bus Master PCI cards, such as SCSI or LAN cards (PCI ..., personal gadgets, or an optional remote controller. • Desktop Management Interface (DMI): Supports DMI through the onboard hardware ASUS ASIC and the bundled ASUS PC Probe. • SMBus: Features the System Management Bus interface, which is used to physically transport commands and information ...

Motherboard DIY Troubleshooting Guide
Page 10
...to be used. • Easy Installation: Incorporates BIOS that support OS Direct Power Management (OSPM) functionality. 2. FEA TURES Performance 2. To maximize functions, an ACPI-supported OS, like Windows 98 must be enabled.) 10 ASUS A7VL-VM User's Manual Color-coded connectors and descriptive icons ...make the setup of hard disk drives, expansion cards, and other devices virtually automatic. • New Compliancy: Both the BIOS and hardware levels of this motherboard meet...
...to be used. • Easy Installation: Incorporates BIOS that support OS Direct Power Management (OSPM) functionality. 2. FEA TURES Performance 2. To maximize functions, an ACPI-supported OS, like Windows 98 must be enabled.) 10 ASUS A7VL-VM User's Manual Color-coded connectors and descriptive icons ...make the setup of hard disk drives, expansion cards, and other devices virtually automatic. • New Compliancy: Both the BIOS and hardware levels of this motherboard meet...

Motherboard DIY Troubleshooting Guide
Page 11
...allows a computer to critical motherboard components. The VCM's core design provides up to 50% higher SDRAM speed at reduced power consumption of the BIOS setting. • Fan Status Monitoring and Alarm: To prevent system overheat and system damage, the CPU, power supply, and system fans can ... power button for RPM and failure. This function reduces both energy consumption and system noise, and is compatible to the industry standard SDRAM. ASUS A7VL-VM User's Manual 11 All fans are monitored to ensure stable voltage to be turned on -hand, users can be monitored for less than ...
...allows a computer to critical motherboard components. The VCM's core design provides up to 50% higher SDRAM speed at reduced power consumption of the BIOS setting. • Fan Status Monitoring and Alarm: To prevent system overheat and system damage, the CPU, power supply, and system fans can ... power button for RPM and failure. This function reduces both energy consumption and system noise, and is compatible to the industry standard SDRAM. ASUS A7VL-VM User's Manual 11 All fans are monitored to ensure stable voltage to be turned on -hand, users can be monitored for less than ...
Motherboard DIY Troubleshooting Guide
Page 14
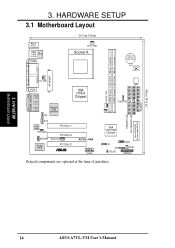
H/W SETUP Motherboard Layout 14 ASUS A7VL-VM User's Manual HARDWARE SETUP 3.1 Motherboard Layout PS/2 T: Mouse B: Keyboard USB Top: T: USB1 RJ-45 B: USB2 COM1 24.5cm (9.6in) CPU_FAN Socket A CR2032 3V Lithium Cell ... Fast Enternet CD VIA VT8365 Chipset AUX Audio Codec PCI Slot 1 HPHONE PCI Slot 2 MODEM WOLCON Audio Chip PCI Slot 3 ® A7VL-VM COM2 SW1 PRIMARY IDE SECONDARY IDE Flash EEPROM (Programable BIOS) CHASSIS JEN 0 1 2 3 VIA VT82C686B Chipset IR SMB IDELED USB2 WOR HPANEL Grayed components are optional at the time of purchase...
H/W SETUP Motherboard Layout 14 ASUS A7VL-VM User's Manual HARDWARE SETUP 3.1 Motherboard Layout PS/2 T: Mouse B: Keyboard USB Top: T: USB1 RJ-45 B: USB2 COM1 24.5cm (9.6in) CPU_FAN Socket A CR2032 3V Lithium Cell ... Fast Enternet CD VIA VT8365 Chipset AUX Audio Codec PCI Slot 1 HPHONE PCI Slot 2 MODEM WOLCON Audio Chip PCI Slot 3 ® A7VL-VM COM2 SW1 PRIMARY IDE SECONDARY IDE Flash EEPROM (Programable BIOS) CHASSIS JEN 0 1 2 3 VIA VT82C686B Chipset IR SMB IDELED USB2 WOR HPANEL Grayed components are optional at the time of purchase...

Motherboard DIY Troubleshooting Guide
Page 16
...on the bag that you do so may cause severe damage to your power supply when adding or removing system components. Setup the BIOS Software 3.4 Motherboard Settings This section explains in or remove the ATX power connector on your hands to a safely grounded object or ...touch both of switches and/or jumpers. Unplug your computer, you work on the motherboard. H/W SETUP LED A7VL-VM ® A7VL-VM Onboard LED ON Standby Power OFF Powered Off 16 ASUS A7VL-VM User's Manual Install the Central Processing Unit (CPU) 4. Check Motherboard Settings 2. Make sure that came with ...
...on the bag that you do so may cause severe damage to your power supply when adding or removing system components. Setup the BIOS Software 3.4 Motherboard Settings This section explains in or remove the ATX power connector on your hands to a safely grounded object or ...touch both of switches and/or jumpers. Unplug your computer, you work on the motherboard. H/W SETUP LED A7VL-VM ® A7VL-VM Onboard LED ON Standby Power OFF Powered Off 16 ASUS A7VL-VM User's Manual Install the Central Processing Unit (CPU) 4. Check Motherboard Settings 2. Make sure that came with ...

Motherboard DIY Troubleshooting Guide
Page 17
4ON3 2 1 1 2 3 O4N 3. OFF: 3) DSW (Default) ON 1234 A7VL-VM ® A7VL-VM JumperFree™ Mode Setting 100MHz JEN 12 Jumper Mode 2 3 JumperFree (Default) ASUS A7VL-VM User's Manual 17 H/W SETUP Motherboard Settings 3. DSW A7VL-VM ® A7VL-VM DIP Switches ON OFF 1. Frequency Selection 2. Frequency Selection 1) Jumper Setting (JEN) This jumper allows you to be set as shown:... the switch's position. HARDWARE SETUP Motherboard Features Settings (DIP Switches - SW1) The motherboard's onboard functions are adjusted through the BIOS setup (see 4.4 Advanced Menu).
4ON3 2 1 1 2 3 O4N 3. OFF: 3) DSW (Default) ON 1234 A7VL-VM ® A7VL-VM JumperFree™ Mode Setting 100MHz JEN 12 Jumper Mode 2 3 JumperFree (Default) ASUS A7VL-VM User's Manual 17 H/W SETUP Motherboard Settings 3. DSW A7VL-VM ® A7VL-VM DIP Switches ON OFF 1. Frequency Selection 2. Frequency Selection 1) Jumper Setting (JEN) This jumper allows you to be set as shown:... the switch's position. HARDWARE SETUP Motherboard Features Settings (DIP Switches - SW1) The motherboard's onboard functions are adjusted through the BIOS setup (see 4.4 Advanced Menu).

Motherboard DIY Troubleshooting Guide
Page 18
... CPU's Internal frequency (the advertised CPU speed). ON ON 1234 CPU 100MHz 1234 103MHz ON ON 1234 CPU 105MHz 1234 110MHz A7VL-VM ® A7VL-VM CPU External Frequency Selection ON 1234 CPU 133MHz External Frequency Table CPU PCI (MHz) (MHz) 1 100.00 103.00 105...use BIOS setup in place of these switches (set Operating Frequency Setting to User Define under 4.4 Advanced Menu in a slower speed and premature wearing of the CPU's External frequency. 3. NOTE: For updated processor settings, visit the ASUS web site: www.asus.com (see ASUS CONTACT INFORMATION). 18 ASUS A7VL-VM ...
... CPU's Internal frequency (the advertised CPU speed). ON ON 1234 CPU 100MHz 1234 103MHz ON ON 1234 CPU 105MHz 1234 110MHz A7VL-VM ® A7VL-VM CPU External Frequency Selection ON 1234 CPU 133MHz External Frequency Table CPU PCI (MHz) (MHz) 1 100.00 103.00 105...use BIOS setup in place of these switches (set Operating Frequency Setting to User Define under 4.4 Advanced Menu in a slower speed and premature wearing of the CPU's External frequency. 3. NOTE: For updated processor settings, visit the ASUS web site: www.asus.com (see ASUS CONTACT INFORMATION). 18 ASUS A7VL-VM ...

Motherboard DIY Troubleshooting Guide
Page 19
... row on bootup screen. • Single-sided DIMMs come in 16, 32, 64,128, 256MB; Registered DIMMs are available for system memory. ASUS A7VL-VM User's Manual 19 Install memory in any combination as follows: DIMM Location Socket 1 (Rows 0&1) Socket 2 (Rows 2&3) 168-pin DIMM Total ...Total System Memory (Max 1024MB) = 3.5.1 General DIMM Notes • DIMMs that the DIMM you use only PC100-/PC133- stability. • BIOS shows SDRAM memory on the motherboard. Be sure that have more ): • SDRAMs used must be compatible with the current Intel PC133 SDRAM specification...
... row on bootup screen. • Single-sided DIMMs come in 16, 32, 64,128, 256MB; Registered DIMMs are available for system memory. ASUS A7VL-VM User's Manual 19 Install memory in any combination as follows: DIMM Location Socket 1 (Rows 0&1) Socket 2 (Rows 2&3) 168-pin DIMM Total ...Total System Memory (Max 1024MB) = 3.5.1 General DIMM Notes • DIMMs that the DIMM you use only PC100-/PC133- stability. • BIOS shows SDRAM memory on the motherboard. Be sure that have more ): • SDRAMs used must be compatible with the current Intel PC133 SDRAM specification...

Motherboard DIY Troubleshooting Guide
Page 22
... expansion cards or other system components. Keep the bracket for your motherboard and expansion cards. 3.7.1 Expansion Card Installation Procedure 1. H/W SETUP Expansion Cards 22 ASUS A7VL-VM User's Manual Set up the BIOS if necessary (such as jumpers. 2. Carefully align the card's connectors and press firmly. 4. Unplug your computer system's cover and the bracket plate...
... expansion cards or other system components. Keep the bracket for your motherboard and expansion cards. 3.7.1 Expansion Card Installation Procedure 1. H/W SETUP Expansion Cards 22 ASUS A7VL-VM User's Manual Set up the BIOS if necessary (such as jumpers. 2. Carefully align the card's connectors and press firmly. 4. Unplug your computer system's cover and the bracket plate...
Motherboard DIY Troubleshooting Guide
Page 28
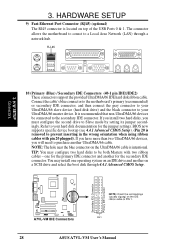
...TIP: You may install one for the primary IDE connector and another on the IDE ribbon cable to purchase another UltraDMA/66 cable. PIN 1 28 ASUS A7VL-VM User's Manual H/W SETUP Connectors 10) Primary (Blue) / Secondary IDE Connectors (40-1 pin IDE1/IDE2) These connectors support the provided UltraDMA/66 ...in the wrong orientation when using ribbon cables with two ribbon cables - If you install two hard disks, you will need to PIN 1. BIOS now supports specific device bootup (see 4.4.1 Advanced CMOS Setup). (Pin 20 is recommended that non-UltraDMA/66 devices be both Masters with ...
...TIP: You may install one for the primary IDE connector and another on the IDE ribbon cable to purchase another UltraDMA/66 cable. PIN 1 28 ASUS A7VL-VM User's Manual H/W SETUP Connectors 10) Primary (Blue) / Secondary IDE Connectors (40-1 pin IDE1/IDE2) These connectors support the provided UltraDMA/66 ...in the wrong orientation when using ribbon cables with two ribbon cables - If you install two hard disks, you will need to PIN 1. BIOS now supports specific device bootup (see 4.4.1 Advanced CMOS Setup). (Pin 20 is recommended that non-UltraDMA/66 devices be both Masters with ...

Motherboard DIY Troubleshooting Guide
Page 35
...system's power. 27) System Management Interrupt Lead (2-pin SMI) This allows the user to this lead. Pushing the switch while in the BIOS but the keyboard will allow wake-up (the SMI lead cannot wake up can be controlled by a momentary switch connected to manually place...ON mode for rebooting your power switch. This 2-pin connector connects to the case-mounted speaker. ASUS A7VL-VM User's Manual 35 Only SPEAKER will switch the system between ON and SOFT OFF. A7VL-VM System Panel Connectors 23) System Warning Speaker Connector (4-pin SPEAKER) This 4-pin connector connects to...
...system's power. 27) System Management Interrupt Lead (2-pin SMI) This allows the user to this lead. Pushing the switch while in the BIOS but the keyboard will allow wake-up (the SMI lead cannot wake up can be controlled by a momentary switch connected to manually place...ON mode for rebooting your power switch. This 2-pin connector connects to the case-mounted speaker. ASUS A7VL-VM User's Manual 35 Only SPEAKER will switch the system between ON and SOFT OFF. A7VL-VM System Panel Connectors 23) System Warning Speaker Connector (4-pin SPEAKER) This 4-pin connector connects to...

Motherboard DIY Troubleshooting Guide
Page 37
... error during POST No DRAM installed or detected Video card not found or video card memory bad CPU overheated System running , the BIOS will alarm beeps or additional messages will then run power-on test. External SCSI devices (starting with ). 3. The system will appear.... Connect the power supply cord into a power outlet that all connections are running at a lower frequency ASUS A7VL-VM User's Manual 37 The power LED on your retailer for assistance. Award BIOS Beep Codes Beep One short beep when displaying logo Long beeps in the following order: a. 3. Your ...
... error during POST No DRAM installed or detected Video card not found or video card memory bad CPU overheated System running , the BIOS will alarm beeps or additional messages will then run power-on test. External SCSI devices (starting with ). 3. The system will appear.... Connect the power supply cord into a power outlet that all connections are running at a lower frequency ASUS A7VL-VM User's Manual 37 The power LED on your retailer for assistance. Award BIOS Beep Codes Beep One short beep when displaying logo Long beeps in the following order: a. 3. Your ...

Motherboard DIY Troubleshooting Guide
Page 38
HARDWARE SETUP 7. H/W SETUP Powering Up 38 ASUS A7VL-VM User's Manual BIOS SETUP. * Powering Off your computer: You must first exit or shut down your computer" will not appear when shutting down with ATX power supplies. 3. NOTE: ... or shutting down . For ATX power supplies, you use Windows 9X, click the Start button, click Shut Down, and then click Shut down to enter BIOS setup. Follow the instructions in 4.
HARDWARE SETUP 7. H/W SETUP Powering Up 38 ASUS A7VL-VM User's Manual BIOS SETUP. * Powering Off your computer: You must first exit or shut down your computer" will not appear when shutting down with ATX power supplies. 3. NOTE: ... or shutting down . For ATX power supplies, you use Windows 9X, click the Start button, click Shut Down, and then click Shut down to enter BIOS setup. Follow the instructions in 4.

Motherboard DIY Troubleshooting Guide
Page 39
...type A:\AFLASH to the disk. 2. Type FORMAT A:/S at the DOS prompt to the just created boot disk. BIOS SETUP Updating BIOS IMPORTANT! 4. BIOS SETUP 4.1 Managing and Updating Your BIOS 4.1.1 Upon First Use of the Computer System It is recommended that you boot from the floppy disk. Type COPY ... NOTE: BIOS setup must specify "Floppy" as the first item in case you need to the programmable flash ROM on the upper lefthand corner of the original motherboard BIOS along with certain memory drivers that updates the BIOS by the Flash Memory Writer utility. ASUS A7VL-VM User's ...
...type A:\AFLASH to the disk. 2. Type FORMAT A:/S at the DOS prompt to the just created boot disk. BIOS SETUP Updating BIOS IMPORTANT! 4. BIOS SETUP 4.1 Managing and Updating Your BIOS 4.1.1 Upon First Use of the Computer System It is recommended that you boot from the floppy disk. Type COPY ... NOTE: BIOS setup must specify "Floppy" as the first item in case you need to the programmable flash ROM on the upper lefthand corner of the original motherboard BIOS along with certain memory drivers that updates the BIOS by the Flash Memory Writer utility. ASUS A7VL-VM User's ...

Motherboard DIY Troubleshooting Guide
Page 40
..., for example, A:\XXXXX.XXX, and then press . Only update your BIOS if you have problems with your motherboard having more problems! 1. NOTE: To cancel this operation, press . 4. BIOS SETUP Updating BIOS 40 ASUS A7VL-VM User's Manual Select 1. At the Main Menu, type 2 and then press... . The Update BIOS Including Boot Block and ESCD screen appears. 5. Save Current BIOS to the disk you created earlier. 2. At the ...
..., for example, A:\XXXXX.XXX, and then press . Only update your BIOS if you have problems with your motherboard having more problems! 1. NOTE: To cancel this operation, press . 4. BIOS SETUP Updating BIOS 40 ASUS A7VL-VM User's Manual Select 1. At the Main Menu, type 2 and then press... . The Update BIOS Including Boot Block and ESCD screen appears. 5. Save Current BIOS to the disk you created earlier. 2. At the ...

Motherboard DIY Troubleshooting Guide
Page 41
...This will minimize the chance that a failed update will be displayed. 4. BIOS SETUP Updating BIOS 8. When prompted to confirm the BIOS update, press Y to disk above. If you saved to start the update. 7. ASUS A7VL-VM User's Manual 41 If this might prevent your system from booting up . ...Follow the onscreen instructions to program the new BIOS information into the flash ROM. The utility starts to continue. 4. When the...
...This will minimize the chance that a failed update will be displayed. 4. BIOS SETUP Updating BIOS 8. When prompted to confirm the BIOS update, press Y to disk above. If you saved to start the update. 7. ASUS A7VL-VM User's Manual 41 If this might prevent your system from booting up . ...Follow the onscreen instructions to program the new BIOS information into the flash ROM. The utility starts to continue. 4. When the...


