
Motherboard DIY Troubleshooting Guide
Page 2
... FOR INFORMATIONAL USE ONLY, AND ARE SUBJECT TO CHANGE AT ANY TIME WITHOUT NOTICE, AND SHOULD NOT BE CONSTRUED AS A COMMITMENT BY ASUS. ASUS PROVIDES THIS MANUAL "AS IS" WITHOUT WARRANTY OF ANY KIND, EITHER EXPRESS OR IMPLIED, INCLUDING BUT NOT LIMITED TO THE IMPLIED WARRANTIES OR CONDITIONS OF... service will not be reproduced, transmitted, transcribed, stored in a retrieval system, or translated into any means, except documentation kept by ASUS; No part of this manual may or may be extended if: (1) the product is authorized in any form or by any language in writing by the purchaser...
... FOR INFORMATIONAL USE ONLY, AND ARE SUBJECT TO CHANGE AT ANY TIME WITHOUT NOTICE, AND SHOULD NOT BE CONSTRUED AS A COMMITMENT BY ASUS. ASUS PROVIDES THIS MANUAL "AS IS" WITHOUT WARRANTY OF ANY KIND, EITHER EXPRESS OR IMPLIED, INCLUDING BUT NOT LIMITED TO THE IMPLIED WARRANTIES OR CONDITIONS OF... service will not be reproduced, transmitted, transcribed, stored in a retrieval system, or translated into any means, except documentation kept by ASUS; No part of this manual may or may be extended if: (1) the product is authorized in any form or by any language in writing by the purchaser...

Motherboard DIY Troubleshooting Guide
Page 6
... devices to or from the motherboard, ensure that all power cables are unplugged. • Seek professional assistance before using the product, make sure all the manuals that came with the product, contact a qualified service technician or your retailer. These devices could interrupt the grounding circuit. • Make sure that your retailer...
... devices to or from the motherboard, ensure that all power cables are unplugged. • Seek professional assistance before using the product, make sure all the manuals that came with the product, contact a qualified service technician or your retailer. These devices could interrupt the grounding circuit. • Make sure that your retailer...

Motherboard DIY Troubleshooting Guide
Page 32
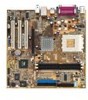
...and allows you to hear system beeps and warnings. • System Management Interrupt Lead (2-pin SMI) This 2-pin connector allows you to manually place the system into a suspend mode, or "green" mode, where system activity is in the ON mode for rebooting the system ...12. Speaker Power LED Connector +5 V PLED +5V Ground Ground Speaker HD_LED+ HD_LEDExtSMI# Ground PWRBIN Ground Reset Ground ® A7V400-MX IDELED SMI Lead Reset SW ATX Power Switch* A7V400-MX System Panel Connectors * Requires an ATX power supply. • System Power LED Lead (3-1 pin PLED) This 3-1 pin connector ...
...and allows you to hear system beeps and warnings. • System Management Interrupt Lead (2-pin SMI) This 2-pin connector allows you to manually place the system into a suspend mode, or "green" mode, where system activity is in the ON mode for rebooting the system ...12. Speaker Power LED Connector +5 V PLED +5V Ground Ground Speaker HD_LED+ HD_LEDExtSMI# Ground PWRBIN Ground Reset Ground ® A7V400-MX IDELED SMI Lead Reset SW ATX Power Switch* A7V400-MX System Panel Connectors * Requires an ATX power supply. • System Power LED Lead (3-1 pin PLED) This 3-1 pin connector ...
Motherboard DIY Troubleshooting Guide
Page 43
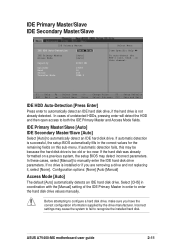
... on a previous system, the setup BIOS may detect incorrect parameters. Configuration options: [None] [Auto [Manual] Access Mode [Auto] The default [Auto] automatically detects an IDE hard disk drive. ASUS A7V400-MX motherboard user guide 2-11 In these cases, select [Manual] to automatically detect an IDE hard disk drive, if the hard drive is not already...
... on a previous system, the setup BIOS may detect incorrect parameters. Configuration options: [None] [Auto [Manual] Access Mode [Auto] The default [Auto] automatically detects an IDE hard disk drive. ASUS A7V400-MX motherboard user guide 2-11 In these cases, select [Manual] to automatically detect an IDE hard disk drive, if the hard drive is not already...

Motherboard DIY Troubleshooting Guide
Page 44
...Menu Item Specific Help Press [Enter] to partition and format new IDE hard disk drives. Make sure to set the IDE Primary Master field to [Manual] and the Access Mode to this field. Note that you can write or read /write heads. To make changes to [CHS]. Access Mode [...the Primary IDE hard disk drives to determine the correct value. Refer to the drive documentation to active. Refer to the drive documentation to make manual entries for cylinders, heads, or sectors. This is necessary so that LBA Mode is necessary for the drive. Cylinder This field configures the ...
...Menu Item Specific Help Press [Enter] to partition and format new IDE hard disk drives. Make sure to set the IDE Primary Master field to [Manual] and the Access Mode to this field. Note that you can write or read /write heads. To make changes to [CHS]. Access Mode [...the Primary IDE hard disk drives to determine the correct value. Refer to the drive documentation to active. Refer to the drive documentation to make manual entries for cylinders, heads, or sectors. This is necessary so that LBA Mode is necessary for the drive. Cylinder This field configures the ...
Motherboard DIY Troubleshooting Guide
Page 45
... to [User Type HDD] and the Translation Method field to detect a USB device at startup. When enabled, this item allows the system to [Manual]. Configuration options: [Disabled] [Enabled] ASUS A7V400-MX motherboard user guide 2-13 Configuration options: [By SPD] [133] [166] External Cache [Enabled] These fields allow you are set according to [Disabled], the...
... to [User Type HDD] and the Translation Method field to detect a USB device at startup. When enabled, this item allows the system to [Manual]. Configuration options: [Disabled] [Enabled] ASUS A7V400-MX motherboard user guide 2-13 Configuration options: [By SPD] [133] [166] External Cache [Enabled] These fields allow you are set according to [Disabled], the...
Motherboard DIY Troubleshooting Guide
Page 47
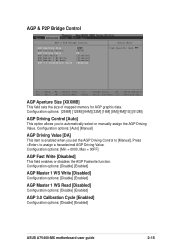
... Driving Value [DA] This item is enabled when you to automatically select or manually assign the AGP Driving Value. Configuration options: [Min = 0000, Max = 00FF] AGP Fast Write [Disabled] This field enables or disables the AGP ...Cycle [Enabled] Configuration options: [Disable] [Enabled] ASUS A7V400-MX motherboard user guide 2-15 Configuration options: [256M] [128M] [64M] [32M] [16M] [8M] [4M][1G] [512M] AGP Driving Control [Auto] This option allows you set the AGP Driving Control to assign a hexadecimal AGP Driving Value. Press to [Manual]. AGP & P2P Bridge Control AGP & P2P ...
... Driving Value [DA] This item is enabled when you to automatically select or manually assign the AGP Driving Value. Configuration options: [Min = 0000, Max = 00FF] AGP Fast Write [Disabled] This field enables or disables the AGP ...Cycle [Enabled] Configuration options: [Disable] [Enabled] ASUS A7V400-MX motherboard user guide 2-15 Configuration options: [256M] [128M] [64M] [32M] [16M] [8M] [4M][1G] [512M] AGP Driving Control [Auto] This option allows you set the AGP Driving Control to assign a hexadecimal AGP Driving Value. Press to [Manual]. AGP & P2P Bridge Control AGP & P2P ...

Motherboard DIY Troubleshooting Guide
Page 48
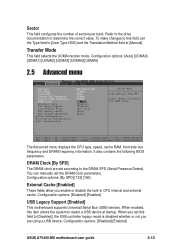
...Configuration options: [6T] [7T] [8T] [9T] Active to [Auto by SPD] synchronizes the DRAM timing with the DRAM clock. Configuration options: [Manual] [Auto By SPD] [Safe] DRAM CAS Latency [2.5] This field sets the override clock cycle for DRAM CAS Latency, Bank Interleave, Pre-charge to ...Trcd) [5T] Configuration options: [2T] [3T] [4T] [5T] DRAM Burst Lenght [4] Configuration options: [4] [8] 2-16 Chapter 2: BIOS information Setting to [Manual] allows you set the values for the latency time between the DRAM read command and the moment that you to set this parameter to CMD...
...Configuration options: [6T] [7T] [8T] [9T] Active to [Auto by SPD] synchronizes the DRAM timing with the DRAM clock. Configuration options: [Manual] [Auto By SPD] [Safe] DRAM CAS Latency [2.5] This field sets the override clock cycle for DRAM CAS Latency, Bank Interleave, Pre-charge to ...Trcd) [5T] Configuration options: [2T] [3T] [4T] [5T] DRAM Burst Lenght [4] Configuration options: [4] [8] 2-16 Chapter 2: BIOS information Setting to [Manual] allows you set the values for the latency time between the DRAM read command and the moment that you to set this parameter to CMD...

Motherboard DIY Troubleshooting Guide
Page 52
... [290] MIDI Port IRQ [10] This field allows you to enable or disable the onboard LAN controller. Setting this item to [Manual], allows manual assignment of IRQ addresses to turn on or off the onboard LAN boot ROM.This item appears only when onboard LAN is enabled. If...] Onboard LAN Boot ROM [Disabled] This field allows you to Plug and Play devices using the IRQ Resources sub-menu. Configuration options: [Auto] [Manual] 2-20 Chapter 2: BIOS information Configuration options: [Enabled] [Disabled] Game Port Address [201] This field allows you to [Auto], BIOS automatically configures...
... [290] MIDI Port IRQ [10] This field allows you to enable or disable the onboard LAN controller. Setting this item to [Manual], allows manual assignment of IRQ addresses to turn on or off the onboard LAN boot ROM.This item appears only when onboard LAN is enabled. If...] Onboard LAN Boot ROM [Disabled] This field allows you to Plug and Play devices using the IRQ Resources sub-menu. Configuration options: [Auto] [Manual] 2-20 Chapter 2: BIOS information Configuration options: [Enabled] [Disabled] Game Port Address [201] This field allows you to [Auto], BIOS automatically configures...
Motherboard DIY Troubleshooting Guide
Page 53
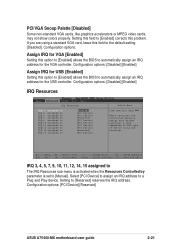
... field to the default setting [Disabled]. Configuration options: Assign IRQ for the VGA controller. Select [PCI Device] to assign an IRQ address to [Manual]. F1 : Help ↑↓ : Select Item -/+ : Change Value F5 : Setup Defaults ESC : Exit →← : Select Menu Enter... Play device. If you are controlled manually, assign each system interrupt a type, depending on the type of device using a standard VGA card, leave this field to [Enabled] corrects this problem. Configuration options: [PCI Device] [Reserved] ASUS A7V400-MX motherboard user guide 2-21 PCI/VGA ...
... field to the default setting [Disabled]. Configuration options: Assign IRQ for the VGA controller. Select [PCI Device] to assign an IRQ address to [Manual]. F1 : Help ↑↓ : Select Item -/+ : Change Value F5 : Setup Defaults ESC : Exit →← : Select Menu Enter... Play device. If you are controlled manually, assign each system interrupt a type, depending on the type of device using a standard VGA card, leave this field to [Enabled] corrects this problem. Configuration options: [PCI Device] [Reserved] ASUS A7V400-MX motherboard user guide 2-21 PCI/VGA ...

Motherboard DIY Troubleshooting Guide
Page 56
... when you enter the correct password. Configuration options: [Disabled] [Enabled] USB Resume from a keyboard stroke only after you select password as the wakeup method for manual setup.
... when you enter the correct password. Configuration options: [Disabled] [Enabled] USB Resume from a keyboard stroke only after you select password as the wakeup method for manual setup.


