A7V400-MX SE user's manual for English version
Page 3
...vi About this guide vii A7V400-MX SE specifications summary viii Chapter 1: Product introduction 1.1 1.2 1.3 1.4 1.5 1.6 1.7 1.8 1.9 1.10 Welcome 1-2 Package contents 1-2 Special features 1-2 1.3.1 Product highlights 1-2 1.3.2 Innovative ASUS features 1-4 Before you proceed 1-5 Motherboard overview 1-6 1.5.1 Motherboard layout 1-6 1.5.2 Placement direction 1-7 1.5.3 Screw holes 1-7 Central Processing Unit (CPU 1-8 1.6.1 Overview 1-8 1.6.2 Installing the CPU 1-8 System memory 1-9 1.7.1 Overview 1-9 1.7.2 Memory configurations 1-9 1.7.3 Installing a DIMM 1-13 1.7.4 Removing...
...vi About this guide vii A7V400-MX SE specifications summary viii Chapter 1: Product introduction 1.1 1.2 1.3 1.4 1.5 1.6 1.7 1.8 1.9 1.10 Welcome 1-2 Package contents 1-2 Special features 1-2 1.3.1 Product highlights 1-2 1.3.2 Innovative ASUS features 1-4 Before you proceed 1-5 Motherboard overview 1-6 1.5.1 Motherboard layout 1-6 1.5.2 Placement direction 1-7 1.5.3 Screw holes 1-7 Central Processing Unit (CPU 1-8 1.6.1 Overview 1-8 1.6.2 Installing the CPU 1-8 System memory 1-9 1.7.1 Overview 1-9 1.7.2 Memory configurations 1-9 1.7.3 Installing a DIMM 1-13 1.7.4 Removing...
A7V400-MX SE user's manual for English version
Page 4
... and updating your BIOS 2-2 2.1.1 Creating a bootable floppy disk 2-2 2.1.2 AwardBIOS Flash Utility 2-3 2.1.3 ASUS CrashFree BIOS utility 2-4 2.1.4 ASUS EZ Flash utility 2-4 2.1.5 ASUS Update utility 2-5 2.2 BIOS beep codes 2-7 2.3 BIOS setup program 2-7 2.3.1 BIOS menu bar 2-8 2.3.2 Legend bar 2-8 2.4 Main menu 2-10 2.5 Advanced menu 2-15 2.5.1 CPU Configuration 2-15 2.5.2 Memory Configuration 2-16 2.5.3 Chipset 2-17 2.5.4 PCIPnP 2-19 2.5.5 Onboard Devices Configuration 2-20 2.5.6 USB...
... and updating your BIOS 2-2 2.1.1 Creating a bootable floppy disk 2-2 2.1.2 AwardBIOS Flash Utility 2-3 2.1.3 ASUS CrashFree BIOS utility 2-4 2.1.4 ASUS EZ Flash utility 2-4 2.1.5 ASUS Update utility 2-5 2.2 BIOS beep codes 2-7 2.3 BIOS setup program 2-7 2.3.1 BIOS menu bar 2-8 2.3.2 Legend bar 2-8 2.4 Main menu 2-10 2.5 Advanced menu 2-15 2.5.1 CPU Configuration 2-15 2.5.2 Memory Configuration 2-16 2.5.3 Chipset 2-17 2.5.4 PCIPnP 2-19 2.5.5 Onboard Devices Configuration 2-20 2.5.6 USB...

A7V400-MX SE user's manual for English version
Page 8
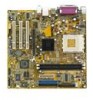
A7V400-MX SE specifications summary CPU Socket A for AMD Athlon™ XP/Sempron™ processors Thoroughbred/Barton core support Chipset VIA KM400A VIA VT8237 (no RAID support) Front Side Bus (FSB) 400/333/266/200 MHz Memory 2 x 184-pin DDR DIMM sockets support up to maximum 2 GB unbuffered DDR400*/333/266/200 non-ECC DDR... SDRAM memory *may run only at 333 MHz (DDR333) Expansion slots 3 x PCI 1 x AGP 8X/4X (1.5V only) Storage • 2 x IDE connectors support up to four UltraATA133/100/...
A7V400-MX SE specifications summary CPU Socket A for AMD Athlon™ XP/Sempron™ processors Thoroughbred/Barton core support Chipset VIA KM400A VIA VT8237 (no RAID support) Front Side Bus (FSB) 400/333/266/200 MHz Memory 2 x 184-pin DDR DIMM sockets support up to maximum 2 GB unbuffered DDR400*/333/266/200 non-ECC DDR... SDRAM memory *may run only at 333 MHz (DDR333) Expansion slots 3 x PCI 1 x AGP 8X/4X (1.5V only) Storage • 2 x IDE connectors support up to four UltraATA133/100/...

A7V400-MX SE user's manual for English version
Page 13
...for details. SoundMAX Digital Audio System can output 5.1 channel surround sound and features state-of system memory using DDR 333/266/ 200 DIMMs. The fast 333 MHz memory bus delivers the required bandwidth for details. USB 2.0 technology The motherboard implements the Universal Serial ... for details. See page 1-20. ASUS A7V400-MX SE 1-3 See page 1-22 for details. See page 1-20. The S/PDIF technology turns your computer into a high-end entertainment system with USB 1.1. DDR memory support Employing the Double Data Rate (DDR) memory technology, the motherboard supports up to ...
...for details. SoundMAX Digital Audio System can output 5.1 channel surround sound and features state-of system memory using DDR 333/266/ 200 DIMMs. The fast 333 MHz memory bus delivers the required bandwidth for details. USB 2.0 technology The motherboard implements the Universal Serial ... for details. See page 1-20. ASUS A7V400-MX SE 1-3 See page 1-22 for details. See page 1-20. The S/PDIF technology turns your computer into a high-end entertainment system with USB 1.1. DDR memory support Employing the Double Data Rate (DDR) memory technology, the motherboard supports up to ...
A7V400-MX SE user's manual for English version
Page 19
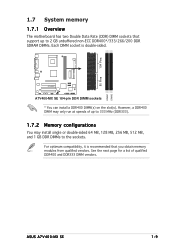
A7V400-MX SE A7V400-MX SE 184-pin DDR DIMM sockets * You can install a DDR400 DIMM(s) on the slot(s). For optimum compatibility, it is double-sided. 104 Pins 80 Pins 1.7 System memory 1.7.1 Overview The motherboard has two Double Data Rate (DDR) DIMM sockets that you obtain memory modules from... qualified vendors. See the next page for a list of up to 333 MHz (DDR333). 1.7.2 Memory configurations You may install single or double-sided 64 MB, 128 MB, 256 MB, 512 MB,... DIMM may only run at speeds of qualified DDR400 and DDR333 DIMM vendors. DIMM1 DIMM2 ASUS A7V400-MX SE 1-9
A7V400-MX SE A7V400-MX SE 184-pin DDR DIMM sockets * You can install a DDR400 DIMM(s) on the slot(s). For optimum compatibility, it is double-sided. 104 Pins 80 Pins 1.7 System memory 1.7.1 Overview The motherboard has two Double Data Rate (DDR) DIMM sockets that you obtain memory modules from... qualified vendors. See the next page for a list of up to 333 MHz (DDR333). 1.7.2 Memory configurations You may install single or double-sided 64 MB, 128 MB, 256 MB, 512 MB,... DIMM may only run at speeds of qualified DDR400 and DDR333 DIMM vendors. DIMM1 DIMM2 ASUS A7V400-MX SE 1-9

A7V400-MX SE user's manual for English version
Page 28
... during the boot process and enter BIOS setup to pins 1-2. You can clear the CMOS memory of date, time, and system setup parameters by erasing the CMOS RTC RAM data. 2. A7V400-MX SE CLRTC 12 23 Clear CMOS Normal A7V400-MX SE Clear RTC RAM (Default) 1-18 Chapter 1: Product introduction To erase the RTC RAM: 1. Clear RTC...
... during the boot process and enter BIOS setup to pins 1-2. You can clear the CMOS memory of date, time, and system setup parameters by erasing the CMOS RTC RAM data. 2. A7V400-MX SE CLRTC 12 23 Clear CMOS Normal A7V400-MX SE Clear RTC RAM (Default) 1-18 Chapter 1: Product introduction To erase the RTC RAM: 1. Clear RTC...
A7V400-MX SE user's manual for English version
Page 39
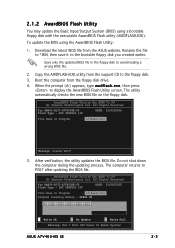
...the floppy disk drive. 4. e x e, then press to Program : a7v4se02.bin Program Flashing Memory - 0FE00 OK 111122223333444455556666777788889999000011112222333344445555666677778888999900001111222233334444555566667777888899990000111122221111222233334444555566667777888899990000111122223333 111122223333 Write OK 111122223333 No Update 111122223333 Write Fail Warning: Don't Turn ... the computer from the ASUS website. Save only the updated BIOS file in the floppy disk to avoid loading a wrong BIOS file. 2. ASUS A7V400-MX SE 2-3 AwardBIOS Flash Utility for ASUS V1.09 (C) Phoenix ...
...the floppy disk drive. 4. e x e, then press to Program : a7v4se02.bin Program Flashing Memory - 0FE00 OK 111122223333444455556666777788889999000011112222333344445555666677778888999900001111222233334444555566667777888899990000111122221111222233334444555566667777888899990000111122223333 111122223333 Write OK 111122223333 No Update 111122223333 Write Fail Warning: Don't Turn ... the computer from the ASUS website. Save only the updated BIOS file in the floppy disk to avoid loading a wrong BIOS file. 2. ASUS A7V400-MX SE 2-3 AwardBIOS Flash Utility for ASUS V1.09 (C) Phoenix ...
A7V400-MX SE user's manual for English version
Page 43
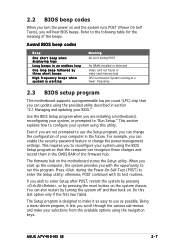
...pressing , or by pressing the reset button on . Press during POST No DRAM installed or detected Video card not found or video card memory bad CPU overheated; You can enable the security password feature or change the configuration of the beeps. The firmware hub on and the system... beep followed by turning the system off and then back on the system chassis. Do this last option only if the first two failed. ASUS A7V400-MX SE 2-7 Even if you are installing a motherboard, reconfiguring your selections from the available options using the BIOS Setup program so that you to enter...
...pressing , or by pressing the reset button on . Press during POST No DRAM installed or detected Video card not found or video card memory bad CPU overheated; You can enable the security password feature or change the configuration of the beeps. The firmware hub on and the system... beep followed by turning the system off and then back on the system chassis. Do this last option only if the first two failed. ASUS A7V400-MX SE 2-7 Even if you are installing a motherboard, reconfiguring your selections from the available options using the BIOS Setup program so that you to enter...
A7V400-MX SE user's manual for English version
Page 45
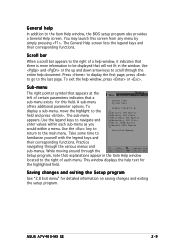
... BIOS setup program also provides a General Help screen. Saving changes and exiting the Setup program See "2.8 Exit menu" for the highlighted field. ASUS A7V400-MX SE 2-9 General help In addition to Installed Memory familiarize yourself with the legend keys and their corresponding functions. Scroll bar When a scroll bar appears to the right of a help window...
... BIOS setup program also provides a General Help screen. Saving changes and exiting the Setup program See "2.8 Exit menu" for the highlighted field. ASUS A7V400-MX SE 2-9 General help In addition to Installed Memory familiarize yourself with the legend keys and their corresponding functions. Scroll bar When a scroll bar appears to the right of a help window...

A7V400-MX SE user's manual for English version
Page 46
... year. Configuration options: [None] [360K, 5.25 in.] [1.2M , 5.25 in.] [720K , 3.5 in.] [1.44M, 3.5 in.] [2.88M, 3.5 in.] Installed Memory [XXX MB] This field automatically displays the amount of floppy drive installed. Use the key to 2099). 2.4 Main menu System Time System Date Legacy Diskette...30 : 30 Wed, Jan 05 2003 [1.44M, 3.5 in .] Sets the type of conventional memory detected by the system during the boot process. 2-10 Chapter 2: BIOS setup Legacy Diskette A [1.44M, 3.5 in .] [ST321122A] [ASUS CDS520/A] [None] [None] [None] [None] 256MB Select Menu Item Specific Help Change ...
... year. Configuration options: [None] [360K, 5.25 in.] [1.2M , 5.25 in.] [720K , 3.5 in.] [1.44M, 3.5 in.] [2.88M, 3.5 in.] Installed Memory [XXX MB] This field automatically displays the amount of floppy drive installed. Use the key to 2099). 2.4 Main menu System Time System Date Legacy Diskette...30 : 30 Wed, Jan 05 2003 [1.44M, 3.5 in .] Sets the type of conventional memory detected by the system during the boot process. 2-10 Chapter 2: BIOS setup Legacy Diskette A [1.44M, 3.5 in .] [ST321122A] [ASUS CDS520/A] [None] [None] [None] [None] 256MB Select Menu Item Specific Help Change ...

A7V400-MX SE user's manual for English version
Page 51
... ↑↓ : Select Item -/+ : Change Value F5 : Setup Defaults ESC : Exit →← : Select Menu Enter : Select Sub-menu F10 : Save and Exit ASUS A7V400-MX SE 2-15 CPU Configuration Memory Configuration Chipset PCIPnP Onboard Devices Configuration USB Configuration Select Menu Item Specific Help Press [Enter] to change the settings for the CPU and other...
... ↑↓ : Select Item -/+ : Change Value F5 : Setup Defaults ESC : Exit →← : Select Menu Enter : Select Sub-menu F10 : Save and Exit ASUS A7V400-MX SE 2-15 CPU Configuration Memory Configuration Chipset PCIPnP Onboard Devices Configuration USB Configuration Select Menu Item Specific Help Press [Enter] to change the settings for the CPU and other...
A7V400-MX SE user's manual for English version
Page 52
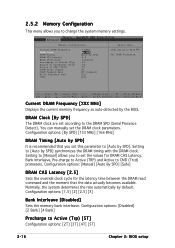
... by SPD] synchronizes the DRAM timing with the DRAM clock. Configuration options: [1.5] [2] [2.5] [3] Bank Interleave [Disabled] Sets the memory bank interleave. Memory Configuration Current DRAM Frequency DRAM Clock DRAM Timing DRAM CAS Latency Bank Interleave Pre-charge to Active (Trp) Active to Precharge (Tras)...: Exit →← : Select Menu Enter : Select Sub-menu F10 : Save and Exit Current DRAM Frequency [XXX MHz] Displays the current memory frequency as auto-detected by the BIOS. You can manually set this parameter to Active (Trp) [5T] Configuration options: [2T] [3T] [4T...
... by SPD] synchronizes the DRAM timing with the DRAM clock. Configuration options: [1.5] [2] [2.5] [3] Bank Interleave [Disabled] Sets the memory bank interleave. Memory Configuration Current DRAM Frequency DRAM Clock DRAM Timing DRAM CAS Latency Bank Interleave Pre-charge to Active (Trp) Active to Precharge (Tras)...: Exit →← : Select Menu Enter : Select Sub-menu F10 : Save and Exit Current DRAM Frequency [XXX MHz] Displays the current memory frequency as auto-detected by the BIOS. You can manually set this parameter to Active (Trp) [5T] Configuration options: [2T] [3T] [4T...
A7V400-MX SE user's manual for English version
Page 54
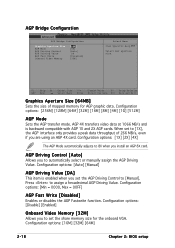
... with AGP 1X and 2X AGP cards. Press to automatically select or manually assign the AGP Driving Value. Configuration options: [Disable] [Enabled] Onboard Video Memory [32M] Allows you are using an AGP 4X card. When set to [Manual]. F1 : Help ↑↓ : Select Item -/+ : Change... transfer mode. AGP Bridge Configuration AGP Bridge Configuration Graphics Aperture Size AGP Mode AGP Driving Control AGP Driving Value AGP Fast Write Onboard Video Memory [64M] [4X] [Auto] DA [Disabled] [32M] Select Menu Item Specific Help Select AGP aperture size. AGP Driving Control [Auto...
... with AGP 1X and 2X AGP cards. Press to automatically select or manually assign the AGP Driving Value. Configuration options: [Disable] [Enabled] Onboard Video Memory [32M] Allows you are using an AGP 4X card. When set to [Manual]. F1 : Help ↑↓ : Select Item -/+ : Change... transfer mode. AGP Bridge Configuration AGP Bridge Configuration Graphics Aperture Size AGP Mode AGP Driving Control AGP Driving Value AGP Fast Write Onboard Video Memory [64M] [4X] [Auto] DA [Disabled] [32M] Select Menu Item Specific Help Select AGP aperture size. AGP Driving Control [Auto...


