
User Guide
Page 2
.... SERVICE AND SUPPORT Visit our multi-language web site at http://support.asus.com 2 ASUS All-in-One PC In each product. This limit also applies to infringe. Products and corporate names appearing in this manual may or may not be registered trademarks or copyrights of their respective companies...ANY OF THE FOLLOWING: (1) THIRD-PARTY CLAIMS AGAINST YOU FOR DAMAGES; (2) LOSS OF, OR DAMAGE TO, YOUR RECORDS OR DATA; ASUS PROVIDES THIS MANUAL "AS IS"WITHOUT WARRANTY OF ANY KIND, EITHER EXPRESS OR IMPLIED, INCLUDING BUT NOT LIMITED TO THE IMPLIED WARRANTIES OR CONDITIONS OF MERCHANTABILITY...
.... SERVICE AND SUPPORT Visit our multi-language web site at http://support.asus.com 2 ASUS All-in-One PC In each product. This limit also applies to infringe. Products and corporate names appearing in this manual may or may not be registered trademarks or copyrights of their respective companies...ANY OF THE FOLLOWING: (1) THIRD-PARTY CLAIMS AGAINST YOU FOR DAMAGES; (2) LOSS OF, OR DAMAGE TO, YOUR RECORDS OR DATA; ASUS PROVIDES THIS MANUAL "AS IS"WITHOUT WARRANTY OF ANY KIND, EITHER EXPRESS OR IMPLIED, INCLUDING BUT NOT LIMITED TO THE IMPLIED WARRANTIES OR CONDITIONS OF MERCHANTABILITY...

User Guide
Page 3
Contents About this manual...6 Conventions used in this manual 7 Typography...7 Icons...8 Safety information...9 Setting up your system 9 Care during use...9 Sound Pressure Warning 11 DC Fan Warning...11 Package contents...12 Chapter 1: Hardware Setup Getting to know your ASUS All-in-One PC 13 Front view...13 Side views...16 ...Left side view...16 Right side view...16 Rear view...18 Chapter 2: Using your ASUS All-in-One PC Placing on the desktop 21 Setting up your ASUS All-in-One PC 22 Connecting the wired keyboard and mouse 22 Connecting the wireless keyboard and mouse ...
Contents About this manual...6 Conventions used in this manual 7 Typography...7 Icons...8 Safety information...9 Setting up your system 9 Care during use...9 Sound Pressure Warning 11 DC Fan Warning...11 Package contents...12 Chapter 1: Hardware Setup Getting to know your ASUS All-in-One PC 13 Front view...13 Side views...16 ...Left side view...16 Right side view...16 Rear view...18 Chapter 2: Using your ASUS All-in-One PC Placing on the desktop 21 Setting up your ASUS All-in-One PC 22 Connecting the wired keyboard and mouse 22 Connecting the wireless keyboard and mouse ...

User Guide
Page 6
...4: Recovering your system This chapter provides recovery options for your ASUS All-in-One PC. 6 ASUS All-in -One PC. Appendices This section includes notices and safety statements for your ASUS All-in -One PC Chapter 5: Upgrading your ASUS All-in-One PC This chapter guides you with Windows®...; 10 This chapter provides an overview of using your ASUS All-in -One PC. About this manual This manual provides information about the hardware ...
...4: Recovering your system This chapter provides recovery options for your ASUS All-in-One PC. 6 ASUS All-in -One PC. Appendices This section includes notices and safety statements for your ASUS All-in -One PC Chapter 5: Upgrading your ASUS All-in-One PC This chapter guides you with Windows®...; 10 This chapter provides an overview of using your ASUS All-in -One PC. About this manual This manual provides information about the hardware ...
User Guide
Page 7
...that you safe while performing tasks and prevent damage to complete a task. Italic = This indicates sections that must be selected. WARNING! ASUS All-in this manual, some texts are presented as follows: IMPORTANT! Typography Bold =This indicates a menu or an item that can refer to in -...One PC 7 Conventions used in this manual To highlight key information in this manual. NOTE: This message contains additional information and tips that ...
...that you safe while performing tasks and prevent damage to complete a task. Italic = This indicates sections that must be selected. WARNING! ASUS All-in this manual, some texts are presented as follows: IMPORTANT! Typography Bold =This indicates a menu or an item that can refer to in -...One PC 7 Conventions used in this manual To highlight key information in this manual. NOTE: This message contains additional information and tips that ...
User Guide
Page 8
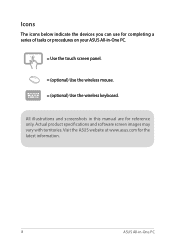
Icons The icons below indicate the devices you can use for completing a series of tasks or procedures on your ASUS All-in this manual are for the latest information. 8 ASUS All-in-One PC All illustrations and screenshots in -One PC. = Use the touch screen panel. = (optional) Use the wireless mouse. = (optional) Use the wireless keyboard. Visit the ASUS website at www.asus.com for reference only. Actual product specifications and software screen images may vary with territories.
Icons The icons below indicate the devices you can use for completing a series of tasks or procedures on your ASUS All-in this manual are for the latest information. 8 ASUS All-in-One PC All illustrations and screenshots in -One PC. = Use the touch screen panel. = (optional) Use the wireless mouse. = (optional) Use the wireless keyboard. Visit the ASUS website at www.asus.com for reference only. Actual product specifications and software screen images may vary with territories.
User Guide
Page 20
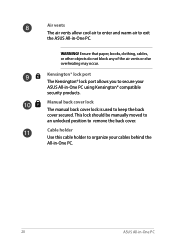
... lock The manual back cover lock is used to remove the back cover. Cable holder Use this cable holder to organize your ASUS All-in-One PC using Kensington® compatible security products. WARNING! Ensure that paper, books, clothing, cables, or other objects do not block any of ...® lock port The Kensington® lock port allows you to secure your cables behind the All-in-One PC. 20 ASUS All-in -One PC. This lock should be manually moved to an unlocked position to keep the back cover secured. Air vents The air vents allow cool air to enter...
... lock The manual back cover lock is used to remove the back cover. Cable holder Use this cable holder to organize your ASUS All-in-One PC using Kensington® compatible security products. WARNING! Ensure that paper, books, clothing, cables, or other objects do not block any of ...® lock port The Kensington® lock port allows you to secure your cables behind the All-in-One PC. 20 ASUS All-in -One PC. This lock should be manually moved to an unlocked position to keep the back cover secured. Air vents The air vents allow cool air to enter...
User Guide
Page 56
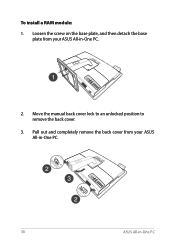
Loosen the screw on the base plate, and then detach the base plate from your ASUS All-in -One PC Move the manual back cover lock to an unlocked position to remove the back cover. 3. Pull out and completely remove the back cover from your ASUS All-in-One PC. 56 ASUS All-in -One PC. 2. To install a RAM module: 1.
Loosen the screw on the base plate, and then detach the base plate from your ASUS All-in -One PC Move the manual back cover lock to an unlocked position to remove the back cover. 3. Pull out and completely remove the back cover from your ASUS All-in-One PC. 56 ASUS All-in -One PC. 2. To install a RAM module: 1.


