
User Manual
Page 3
... selected models 3-7 Eee Amuse...3-7 Eee Sharing...3-8 Eee Xperience...3-8 Eee Tools...3-9 Microsoft® Office Trial...3-10 Digital Zoom Control(on selected models 3-11 Function keys...3-11 Chapter 4: System Recovery System Recovery...4-2 Using Recovery Partition (F9 ... Restricted Wireless Frequency Bands A-6 UL Safety Notices...A-7 REACH Notice...A-8 Power Safety Requirement A-8 Nordic Lithium Cautions (for lithium-ion batteries A-9 Copyright Information...A-11 Limitation of Liability...A-12 Service and Support...A-12 ASUS Eee PC iii
... selected models 3-7 Eee Amuse...3-7 Eee Sharing...3-8 Eee Xperience...3-8 Eee Tools...3-9 Microsoft® Office Trial...3-10 Digital Zoom Control(on selected models 3-11 Function keys...3-11 Chapter 4: System Recovery System Recovery...4-2 Using Recovery Partition (F9 ... Restricted Wireless Frequency Bands A-6 UL Safety Notices...A-7 REACH Notice...A-8 Power Safety Requirement A-8 Nordic Lithium Cautions (for lithium-ion batteries A-9 Copyright Information...A-11 Limitation of Liability...A-12 Service and Support...A-12 ASUS Eee PC iii
User Manual
Page 17
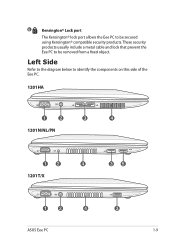
6 Kensington® Lock port The Kensington® lock port allows the Eee PC to be removed from a fixed object. These security products usually include a metal cable and lock that prevent the Eee PC to identify the components on this side of the Eee PC. 1201HA 1 1 1 2 1201N/NL/PN 4 23 4 5 6 4 23 4 5 6 3 4 HDMI 12 4 12 4 1201T/X HDMI 35 35 1 2 4 3 1 2 4 3 ASUS Eee PC 1-9 Left Side Refer to the diagram below to be secured using Kensington® compatible security products.
6 Kensington® Lock port The Kensington® lock port allows the Eee PC to be removed from a fixed object. These security products usually include a metal cable and lock that prevent the Eee PC to identify the components on this side of the Eee PC. 1201HA 1 1 1 2 1201N/NL/PN 4 23 4 5 6 4 23 4 5 6 3 4 HDMI 12 4 12 4 1201T/X HDMI 35 35 1 2 4 3 1 2 4 3 ASUS Eee PC 1-9 Left Side Refer to the diagram below to be secured using Kensington® compatible security products.
User Manual
Page 18
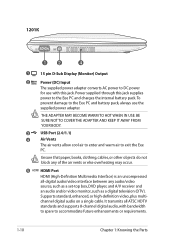
...KEEP IT AWAY FROM YOUR BODY. 3 USB Port (2.0/1.1) 4 Air Vents The air vents allow cool air to enter and warm air to exit the Eee PC. It transmits all -digital audio/video interface between any of the air vents or else overheating may occur. 5 HDMI HDMI Port HDMI (High-Definition ...to the Eee PC and battery pack, always use the supplied power adapter. Ensure that paper, books, clothing, cables, or other objects do not block any audio/video source, such as a set-top box, DVD player, and A/V receiver and an audio and/or video monitor, such as a digital television (DTV). 1201K 12 4 1...
...KEEP IT AWAY FROM YOUR BODY. 3 USB Port (2.0/1.1) 4 Air Vents The air vents allow cool air to enter and warm air to exit the Eee PC. It transmits all -digital audio/video interface between any of the air vents or else overheating may occur. 5 HDMI HDMI Port HDMI (High-Definition ...to the Eee PC and battery pack, always use the supplied power adapter. Ensure that paper, books, clothing, cables, or other objects do not block any audio/video source, such as a set-top box, DVD player, and A/V receiver and an audio and/or video monitor, such as a digital television (DTV). 1201K 12 4 1...

User Manual
Page 31
Click Connect. 10. Click Close to the Internet. Click Connect to connect to finish the configuration. 11. Select Connect to the Internet and click Next. 8. 7. ASUS Eee PC 2-9 Enter your user name and password. Click the network icon in the taskbar and click the connection you just created. 12. Select Broadband (PPPoE) and click Next. 9. Enter your User name and, Password, and Connection name.
Click Connect. 10. Click Close to the Internet. Click Connect to connect to finish the configuration. 11. Select Connect to the Internet and click Next. 8. 7. ASUS Eee PC 2-9 Enter your user name and password. Click the network icon in the taskbar and click the connection you just created. 12. Select Broadband (PPPoE) and click Next. 9. Enter your User name and, Password, and Connection name.
User Manual
Page 44
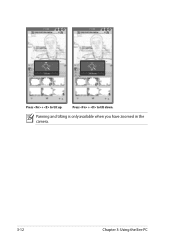
Panning and tilting is only available when you have zoomed in the camera. 3-12 Chapter 3: Using the Eee PC Press + to tilt down. Press + to tilt up.
Panning and tilting is only available when you have zoomed in the camera. 3-12 Chapter 3: Using the Eee PC Press + to tilt down. Press + to tilt up.


