User Guide
Page 15
... speakers, USB microphones, and USB hubs. d USB 2.0 port Connect your Macintosh to FireWire devices (including digital videocameras and hard disk drives). Chapter 2 Getting to Know Your Power Mac G5 15 The FireWire 400 port supports data rates of 100, 200, and 400 megabits per second (Mbps). a pulsing light indicates... on your Macintosh through the headphone jack. With some Apple displays, you can also touch or press the display's power button to put it to sleep, or wake it again to turn on . Optical drive Your Power Mac G5 has a DVD+R DL/DVD±RW/CD-RW SuperDrive...
... speakers, USB microphones, and USB hubs. d USB 2.0 port Connect your Macintosh to FireWire devices (including digital videocameras and hard disk drives). Chapter 2 Getting to Know Your Power Mac G5 15 The FireWire 400 port supports data rates of 100, 200, and 400 megabits per second (Mbps). a pulsing light indicates... on your Macintosh through the headphone jack. With some Apple displays, you can also touch or press the display's power button to put it to sleep, or wake it again to turn on . Optical drive Your Power Mac G5 has a DVD+R DL/DVD±RW/CD-RW SuperDrive...
User Guide
Page 18
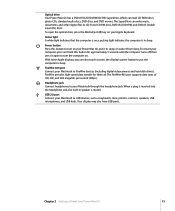
Internal Expansion Options Optical drive DDR2 SDRAM slots Battery Top hard disk drive bay Bottom hard disk drive bay Slots 2-4: PCI Express Slot 1: PCI Express graphics (graphics card installed) 18 Chapter 2 Getting to Know Your Power Mac G5
Internal Expansion Options Optical drive DDR2 SDRAM slots Battery Top hard disk drive bay Bottom hard disk drive bay Slots 2-4: PCI Express Slot 1: PCI Express graphics (graphics card installed) 18 Chapter 2 Getting to Know Your Power Mac G5
User Guide
Page 19
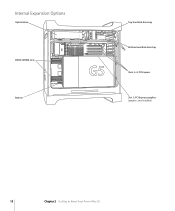
... Chapter 2 Getting to expand your computer has trouble starting up to replace the battery. Hard disk drive bays Your Power Mac G5 comes with a DVD+R DL/DVD±RW/CD-RW SuperDrive. Battery Your Power Mac G5 uses a battery. You can have up , or the system date and time are frequently..., 533 MHz memory by inserting DDR2 SDRAM DIMMs in pairs in the memory slots. Optical drive Your Power Mac G5 comes with a hard disk drive installed in the bottom hard disk drive bay. DDR2 SDRAM slots Your Power Mac G5 has 8 DDR2 SDRAM slots. You can install PCI cards in the PCI Express graphics slot...
... Chapter 2 Getting to expand your computer has trouble starting up to replace the battery. Hard disk drive bays Your Power Mac G5 comes with a DVD+R DL/DVD±RW/CD-RW SuperDrive. Battery Your Power Mac G5 uses a battery. You can have up , or the system date and time are frequently..., 533 MHz memory by inserting DDR2 SDRAM DIMMs in pairs in the memory slots. Optical drive Your Power Mac G5 comes with a hard disk drive installed in the bottom hard disk drive bay. DDR2 SDRAM slots Your Power Mac G5 has 8 DDR2 SDRAM slots. You can install PCI cards in the PCI Express graphics slot...

User Guide
Page 32
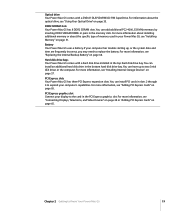
... 400 (4-pin) FireWire 800 (9-pin) 32 Chapter 3 Using Your Power Mac G5 Connecting With FireWire FireWire is a high-speed data transfer system that lets you easily connect and disconnect external devices-such as digital music players, digital video (DV) cameras, printers, scanners, and hard disk drives. FireWire 800 port FireWire 400 ports Your computer includes...
... 400 (4-pin) FireWire 800 (9-pin) 32 Chapter 3 Using Your Power Mac G5 Connecting With FireWire FireWire is a high-speed data transfer system that lets you easily connect and disconnect external devices-such as digital music players, digital video (DV) cameras, printers, scanners, and hard disk drives. FireWire 800 port FireWire 400 ports Your computer includes...

User Guide
Page 33
... www.apple.com/support. Using FireWire Devices With FireWire you connect the hard disk drive to your Power Mac G5. See "FireWire Target Disk Mode," next, for updated software drivers. Chapter 3 Using Your Power Mac G5 33 Then use FireWire to connect your Power Mac G5 to another computer. If the other computer is running any software that has Mac OS X on your desktop...
... www.apple.com/support. Using FireWire Devices With FireWire you connect the hard disk drive to your Power Mac G5. See "FireWire Target Disk Mode," next, for updated software drivers. Chapter 3 Using Your Power Mac G5 33 Then use FireWire to connect your Power Mac G5 to another computer. If the other computer is running any software that has Mac OS X on your desktop...

User Guide
Page 50
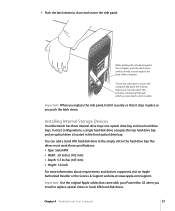
8 Pull the front fan assembly out of the computer. Note: You do not need to remove the front fan assembly to remove. Pull the fan assembly completely out of the computer, and then set it easier to replace or install optical or hard disk drives or PCI Express cards. 50 Chapter 4 Working Inside Your Computer Important: When you remove the fan assembly, the metal divider panel at the top of the assembly may offer some resistance. Pulling the fan slightly away from this divider makes it aside.
8 Pull the front fan assembly out of the computer. Note: You do not need to remove the front fan assembly to remove. Pull the fan assembly completely out of the computer, and then set it easier to replace or install optical or hard disk drives or PCI Express cards. 50 Chapter 4 Working Inside Your Computer Important: When you remove the fan assembly, the metal divider panel at the top of the assembly may offer some resistance. Pulling the fan slightly away from this divider makes it aside.
User Guide
Page 57
Important: Use the original Apple cables that it is located in the front optical drive bay. Important: When you replace the side panel, hold it securely so that came with your Power Mac G5 when you can add a Serial ATA hard disk drive to close the latch. The drives must meet these specifications: Â Type: Serial ATA Â Width...
Important: Use the original Apple cables that it is located in the front optical drive bay. Important: When you replace the side panel, hold it securely so that came with your Power Mac G5 when you can add a Serial ATA hard disk drive to close the latch. The drives must meet these specifications: Â Type: Serial ATA Â Width...

User Guide
Page 58
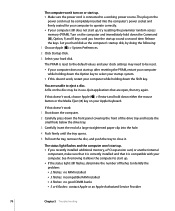
... in the lower hard drive bay. Install the four drive guides into the lower drive bay 58 Chapter 4 Working Inside Your Computer To avoid damaging the drive, take care not to attach the power and data cables. Installing Serial ATA Drives Your Macintosh can install a second Serial ATA drive in the top hard drive bay. To install a hard disk drive: 1 Open your...
... in the lower hard drive bay. Install the four drive guides into the lower drive bay 58 Chapter 4 Working Inside Your Computer To avoid damaging the drive, take care not to attach the power and data cables. Installing Serial ATA Drives Your Macintosh can install a second Serial ATA drive in the top hard drive bay. To install a hard disk drive: 1 Open your...

User Guide
Page 59
... Your Computer 59 Drive guides Connect the power cable and the smaller data cable to the hard disk drive. Drive guides 4 To replace the drive in the top drive bay: Â If a hard drive is installed in the lower drive bay, remove it before replacing the hard drive in the top drive bay. Â Pull the original drive out of the drive bay by dropping...
... Your Computer 59 Drive guides Connect the power cable and the smaller data cable to the hard disk drive. Drive guides 4 To replace the drive in the top drive bay: Â If a hard drive is installed in the lower drive bay, remove it before replacing the hard drive in the top drive bay. Â Pull the original drive out of the drive bay by dropping...

User Guide
Page 60
Disconnect the power cable from the top hard disk and pull the cable down to secure the drive. 6 Connect the power cable and the Serial ATA data cable to the hard disk drive. 7 Replace the side panel, following the directions that begin on page 56. Connect the middle power cable connector to the top drive, and the bottom cable...
Disconnect the power cable from the top hard disk and pull the cable down to secure the drive. 6 Connect the power cable and the Serial ATA data cable to the hard disk drive. 7 Replace the side panel, following the directions that begin on page 56. Connect the middle power cable connector to the top drive, and the bottom cable...
User Guide
Page 70
...hard disk as the computer's startup disk, by doing the following: 1 Choose Apple () > System Preferences. 2 Click Startup Disk. 3 Select your computer. The PRAM is reset to the default values and your Apple Keyboard. If that doesn't work, choose Apple () > Restart and hold down the front panel covering the front of the drive..., P, and R keys until the tray opens. 5 Pull out the tray, remove the disc, and push the tray to a working power source. If that are unable to identify the problem:  2 flashes: no RAM installed  3 flashes: incompatible RAM installed ...
...hard disk as the computer's startup disk, by doing the following: 1 Choose Apple () > System Preferences. 2 Click Startup Disk. 3 Select your computer. The PRAM is reset to the default values and your Apple Keyboard. If that doesn't work, choose Apple () > Restart and hold down the front panel covering the front of the drive..., P, and R keys until the tray opens. 5 Pull out the tray, remove the disc, and push the tray to a working power source. If that are unable to identify the problem:  2 flashes: no RAM installed  3 flashes: incompatible RAM installed ...
User Guide
Page 108
... a printer 24 to -Point Protocol 92, 94, 97 power button 9, 15 power cord 6 power socket 17 PPPoE 92 configuration 97 connections 91 preferences. G general maintenance 85 H hard disk drive 19 headphone jack 15, 35, 80 I iDVD 37 installing applications 75 battery 68 Classic support 75 Mac OS 9 75 Mac OS X 75 memory 51 PCI Express cards 66...
... a printer 24 to -Point Protocol 92, 94, 97 power button 9, 15 power cord 6 power socket 17 PPPoE 92 configuration 97 connections 91 preferences. G general maintenance 85 H hard disk drive 19 headphone jack 15, 35, 80 I iDVD 37 installing applications 75 battery 68 Classic support 75 Mac OS 9 75 Mac OS X 75 memory 51 PCI Express cards 66...


