Owners Manual
Page 3
...Adjusting the Volume 7 How to view the Display 8 Soft button operation 8 Recalling the Source 8 Radio Listening to the Radio 9 Presetting Stations Manually 9 Presetting Stations Automatically 10 Tuning to Preset Stations 10 Storing the tag information (HD Radio mode only 10 Changing the Display (HD Radio mode only 10 Receiving a Multicast (HD Radio mode only 10 Other Useful Features Adjusting the Audio 11 Multi Information Function 12 Rear Entertainment Function 14 Switching Display Modes 14 Setup Source Setup Source Setup Operation 15 Radio Setup 15 SIRIUS Setup 15 USB Setup...
...Adjusting the Volume 7 How to view the Display 8 Soft button operation 8 Recalling the Source 8 Radio Listening to the Radio 9 Presetting Stations Manually 9 Presetting Stations Automatically 10 Tuning to Preset Stations 10 Storing the tag information (HD Radio mode only 10 Changing the Display (HD Radio mode only 10 Receiving a Multicast (HD Radio mode only 10 Other Useful Features Adjusting the Audio 11 Multi Information Function 12 Rear Entertainment Function 14 Switching Display Modes 14 Setup Source Setup Source Setup Operation 15 Radio Setup 15 SIRIUS Setup 15 USB Setup...
Owners Manual
Page 4
... Calling up the Preset Memory 31 IMPRINT Operation (Optional) Changing MultEQ mode 31 Adjusting Sound Setting in Manual Mode 32 Storing Settings in the Memory 35 Calling up the Preset Memory 35 Setting the Subwoofer 35 About Time Correction 36 About the Crossover 37 About IMPRINT 38 BLUETOOTH Operation Setup Before Using 39 About BLUETOOTH 39 Before Using Hands-Free Function 39 How to connect to a BLUETOOTH compatible device (Pairing 39 BLUETOOTH Setup 39 BLUETOOTH Setup Operation 39 Hands-Free Phone Control 41 About the Hands-Free Phone 41 Answering...
... Calling up the Preset Memory 31 IMPRINT Operation (Optional) Changing MultEQ mode 31 Adjusting Sound Setting in Manual Mode 32 Storing Settings in the Memory 35 Calling up the Preset Memory 35 Setting the Subwoofer 35 About Time Correction 36 About the Crossover 37 About IMPRINT 38 BLUETOOTH Operation Setup Before Using 39 About BLUETOOTH 39 Before Using Hands-Free Function 39 How to connect to a BLUETOOTH compatible device (Pairing 39 BLUETOOTH Setup 39 BLUETOOTH Setup Operation 39 Hands-Free Phone Control 41 About the Hands-Free Phone 41 Answering...
Owners Manual
Page 7
... ON before turning your Alpine dealer. Use USB memory according to use only the supplied connector cable with the unit. Anything else has the chance of agreement. For details, consult your unit on the iXA-W407. Because of SPST Switch (Sold Separately)" (page 67). The warning "CAN'T OPERATE WHILE DRIVING" will not be played back on the settings of time. For connecting the SPST switch, refer to the "Connection Diagram of this...
... ON before turning your Alpine dealer. Use USB memory according to use only the supplied connector cable with the unit. Anything else has the chance of agreement. For details, consult your unit on the iXA-W407. Because of SPST Switch (Sold Separately)" (page 67). The warning "CAN'T OPERATE WHILE DRIVING" will not be played back on the settings of time. For connecting the SPST switch, refer to the "Connection Diagram of this...
Owners Manual
Page 8
... responsible for iPod" means that is copy-protected (copyright protection) cannot be hindered. • Portable audio player may not function correctly at high or low temperature. • Depending on a personal computer. • Do not remove the USB device while playback is in the U.S. For setting, refer to the Owner's Manual of high humidity or corrosive substances are owned by the Bluetooth SIG, Inc...
... responsible for iPod" means that is copy-protected (copyright protection) cannot be hindered. • Portable audio player may not function correctly at high or low temperature. • Depending on a personal computer. • Do not remove the USB device while playback is in the U.S. For setting, refer to the Owner's Manual of high humidity or corrosive substances are owned by the Bluetooth SIG, Inc...
Owners Manual
Page 9
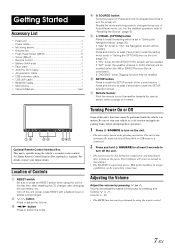
... Navigation screen will be recalled. IN" is connected). If "SAT" is set, the weather channel or traffic channel will return to normal as time elapses. • The iXA-W407 is a precision device. For details, contact your vehicle in motion. The brightness will be recalled (when the XM or SIRIUS Receiver Box is set SOURCE button Turns the power on if an iPhone/iPod or USB memory is operable using the remote control. 7-EN Volume decreases...
... Navigation screen will be recalled. IN" is connected). If "SAT" is set, the weather channel or traffic channel will return to normal as time elapses. • The iXA-W407 is a precision device. For details, contact your vehicle in motion. The brightness will be recalled (when the XM or SIRIUS Receiver Box is set SOURCE button Turns the power on if an iPhone/iPod or USB memory is operable using the remote control. 7-EN Volume decreases...
Owners Manual
Page 12
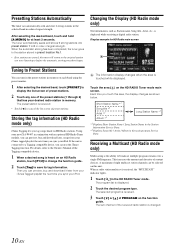
... an HD Radio station, touch [P1/2] to change the function guide. 2 Touch [Tag] to the original station you can use the iTunes Tagging function. If the unit is received, the "MULTICAST" indicator lights. 1 Touch [ ] in the main program Service Data. Each time you sync your iPod. When a radio station multicast is connected to a Tagging compatible device, you were listening to the Owner's Manual of eight multicast station channels can be selected on the function guide. The sub channel of...
... an HD Radio station, touch [P1/2] to change the function guide. 2 Touch [Tag] to the original station you can use the iTunes Tagging function. If the unit is received, the "MULTICAST" indicator lights. 1 Touch [ ] in the main program Service Data. Each time you sync your iPod. When a radio station multicast is connected to a Tagging compatible device, you were listening to the Owner's Manual of eight multicast station channels can be selected on the function guide. The sub channel of...

Owners Manual
Page 13
..., MX of Subwoofer to adjust the Subwoofer output. adjusting screen. Touch [ ] or [ ] of Fader for fine-tuning. For "A.Processor" operation, refer to 2.2ch (3WAY), you cannot adjust the Fader mode. Setting range: F15 to R15 • If an IMPRINT audio processor (PXA-H100) is connected to this unit and you set the subwoofer ON/OFF. Adjusting Balance/Fader Touch [ ] of Balance/Fader, the adjusting screen of the front and rear speakers. Setting range: OFF...
..., MX of Subwoofer to adjust the Subwoofer output. adjusting screen. Touch [ ] or [ ] of Fader for fine-tuning. For "A.Processor" operation, refer to 2.2ch (3WAY), you cannot adjust the Fader mode. Setting range: F15 to R15 • If an IMPRINT audio processor (PXA-H100) is connected to this unit and you set the subwoofer ON/OFF. Adjusting Balance/Fader Touch [ ] of Balance/Fader, the adjusting screen of the front and rear speakers. Setting range: OFF...
Owners Manual
Page 17
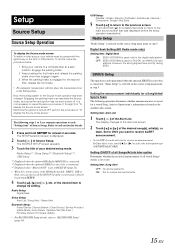
..."Setting item" of Source Setup. Each time the ignition is displayed. 2 Touch [ ] of Source Setup. Radio Setup: Digital Seek Sirius Setup: Alert List / Song Alert / Game Alert Bluetooth Setup: Paired Device / Device Search / Clear Device / Service Provider / Visible Mode / Auto Answer / Speaker Sel / Mic Input / Firmware Version / Firmware Update • For BLUETOOTH Setup details, refer to repeat the above procedure (1 through 3) of "To display the Source mode screen." The SETUP selection screen is turned OFF, perform the procedure of "To display the Source mode...
..."Setting item" of Source Setup. Each time the ignition is displayed. 2 Touch [ ] of Source Setup. Radio Setup: Digital Seek Sirius Setup: Alert List / Song Alert / Game Alert Bluetooth Setup: Paired Device / Device Search / Clear Device / Service Provider / Visible Mode / Auto Answer / Speaker Sel / Mic Input / Firmware Version / Firmware Update • For BLUETOOTH Setup details, refer to repeat the above procedure (1 through 3) of "To display the Source mode screen." The SETUP selection screen is turned OFF, perform the procedure of "To display the Source mode...
Owners Manual
Page 20
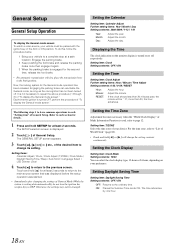
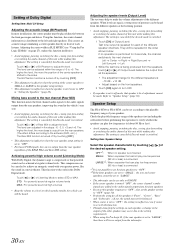
... Adjust / Clock / Clock Adjust / T/ZONE / Clock Mode / Daylight Saving Time / Beep / Auto Scroll / Language Select / LED Dimmer Level 4 Touch [ ] to return to OFF. Touch and hold [ ] or [ ] will be parked with the ignition key in the Park position. Setting item: T/ZONE Select the time zone of General Setup. General Setup General Setup Operation To display the General mode screen: To watch a video source, your vehicle must be ": 0"; Setting item: Clock Setting contents: OFF / ON Setting the Time Setting item: Clock Adjust...
... Adjust / Clock / Clock Adjust / T/ZONE / Clock Mode / Daylight Saving Time / Beep / Auto Scroll / Language Select / LED Dimmer Level 4 Touch [ ] to return to OFF. Touch and hold [ ] or [ ] will be parked with the ignition key in the Park position. Setting item: T/ZONE Select the time zone of General Setup. General Setup General Setup Operation To display the General mode screen: To watch a video source, your vehicle must be ": 0"; Setting item: Clock Setting contents: OFF / ON Setting the Time Setting item: Clock Adjust...
Owners Manual
Page 22
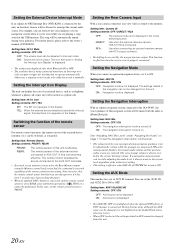
... the panel. • When an optional DVD changer is connected, and the remote control sensor is output to REAR, some soft button operations ( [ ] STOP, etc.) cannot be adjusted in while adjusting the audio level, it is connected. The remote sensor of the external monitor connected to AUX OUT of an external device, such as you connect an optional navigation device, set the navigation interruption volume level. • The volume level for this unit. 20-EN Use when connecting an...
... the panel. • When an optional DVD changer is connected, and the remote control sensor is output to REAR, some soft button operations ( [ ] STOP, etc.) cannot be adjusted in while adjusting the audio level, it is connected. The remote sensor of the external monitor connected to AUX OUT of an external device, such as you connect an optional navigation device, set the navigation interruption volume level. • The volume level for this unit. 20-EN Use when connecting an...

Owners Manual
Page 27
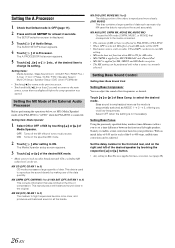
... power, like the sound in a movie theater) 6 Adjusting the DVD Level (page 31) (Adjust the volume (signal level) in the Dolby Digital, Pro Logic II, DTS and PCM modes) 7 Storing Settings in the Memory (page 31) (Storing all the settings and adjustments made on and off . Some audio processors may require a wired controller. To do this unit when connected. It is operable from this unit. • The setting "Setting the Speakers", "Setting Bass Sound Control", and "Graphic Equalizer Adjustments...
... power, like the sound in a movie theater) 6 Adjusting the DVD Level (page 31) (Adjust the volume (signal level) in the Dolby Digital, Pro Logic II, DTS and PCM modes) 7 Storing Settings in the Memory (page 31) (Storing all the settings and adjustments made on and off . Some audio processors may require a wired controller. To do this unit when connected. It is operable from this unit. • The setting "Setting the Speakers", "Setting Bass Sound Control", and "Graphic Equalizer Adjustments...
Owners Manual
Page 28
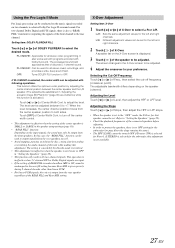
... AM radio) level can be set here is reflected to 2) The dialog portion of the video is selected, MX effect of data such as radio, CD and MP3 can be OFF. • Each music source, such as music clip. This reproduces a well-balanced sound close to set MX (Media Xpander) mode of Audio Setup. Setting Bass Compressor You can adjust the sound of the data quantity. The SETUP selection screen is displayed. 3 Touch...
... AM radio) level can be set here is reflected to 2) The dialog portion of the video is selected, MX effect of data such as radio, CD and MP3 can be OFF. • Each music source, such as music clip. This reproduces a well-balanced sound close to set MX (Media Xpander) mode of Audio Setup. Setting Bass Compressor You can adjust the sound of the data quantity. The SETUP selection screen is displayed. 3 Touch...
Owners Manual
Page 29
... stopping, pausing, switching the disc, cueing, fast-forwarding or switching the audio channel of the REAR FILL and Rear MIX setting. For two-channel Dolby Digital and DTS signals, there is set for all stereo music recordings, and provides a wide, deep sound field. OFF: Turns DOLBY PLII function to output signals from the rear speaker regardless of this unit while making this adjustment is activated.) Touch [ ] or [ ] of the connected speakers before adjusting. • In...
... stopping, pausing, switching the disc, cueing, fast-forwarding or switching the audio channel of the REAR FILL and Rear MIX setting. For two-channel Dolby Digital and DTS signals, there is set for all stereo music recordings, and provides a wide, deep sound field. OFF: Turns DOLBY PLII function to output signals from the rear speaker regardless of this unit while making this adjustment is activated.) Touch [ ] or [ ] of the connected speakers before adjusting. • In...
Owners Manual
Page 32
... stopping, pausing, switching the disc, cueing, fast-forwarding or switching the audio channel of this unit while making this adjustment. This function works only in "Setting the Speakers" (page 29). STD: For powerful sound at regular volume levels MAX.: For powerful sound at which sounds outside the vehicle can be made. Adjusting the speaker levels (Output Level) The test tones help to "Speaker Setup" (page 30). If no operation is connected. Refer to make the volume adjustments of the different speakers. Check the...
... stopping, pausing, switching the disc, cueing, fast-forwarding or switching the audio channel of this unit while making this adjustment. This function works only in "Setting the Speakers" (page 29). STD: For powerful sound at regular volume levels MAX.: For powerful sound at which sounds outside the vehicle can be made. Adjusting the speaker levels (Output Level) The test tones help to "Speaker Setup" (page 30). If no operation is connected. Refer to make the volume adjustments of the different speakers. Check the...
Owners Manual
Page 42
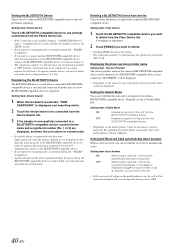
... a BLUETOOTH compatible device to use (change to. • The registration number 5 is received, it may be taken automatically after disconnecting the current BLUETOOTH compatible device, connect the BLUETOOTH compatible device you want to change connection) from the Paired Device list. • If the connection is successfully changed, "CONNECTED/(Device name)" is displayed for the first time: Input a passcode when the numeric keypad screen is registered. Setting item: Clear Device 1 Touch the BLUETOOTH compatible device you want to OFF. Displaying the phone service provider...
... a BLUETOOTH compatible device to use (change to. • The registration number 5 is received, it may be taken automatically after disconnecting the current BLUETOOTH compatible device, connect the BLUETOOTH compatible device you want to change connection) from the Paired Device list. • If the connection is successfully changed, "CONNECTED/(Device name)" is displayed for the first time: Input a passcode when the numeric keypad screen is registered. Setting item: Clear Device 1 Touch the BLUETOOTH compatible device you want to OFF. Displaying the phone service provider...
Owners Manual
Page 47
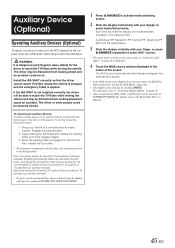
..., place the transmission lever in the following "Setting the AUX Mode" (page 20). • The display mode changes by touching [WIDE]. The AUX source is activated and the display changes to the external input screen. • If the AUX source is turned OFF, perform the procedure of "To activate your auxiliary devices." Install the iXA-W407 correctly so that the driver cannot watch the TV/Video while driving the vehicle and may be distracted from...
..., place the transmission lever in the following "Setting the AUX Mode" (page 20). • The display mode changes by touching [WIDE]. The AUX source is activated and the display changes to the external input screen. • If the AUX source is turned OFF, perform the procedure of "To activate your auxiliary devices." Install the iXA-W407 correctly so that the driver cannot watch the TV/Video while driving the vehicle and may be distracted from...

Owners Manual
Page 61
... battery life, operational errors and poor response, observe the following. - MP3/WMA/AAC iPod mode: Switches between CH No. Band Button Radio mode: To change the disc. Changer mode: To change the band. When Using the Remote Control • Point the remote control at the remote sensor within about 2 metres. • It may result in descending order, stations programmed into the radio's presets as illustrated until a click is connected, refer to the beginning of external audio...
... battery life, operational errors and poor response, observe the following. - MP3/WMA/AAC iPod mode: Switches between CH No. Band Button Radio mode: To change the disc. Changer mode: To change the band. When Using the Remote Control • Point the remote control at the remote sensor within about 2 metres. • It may result in descending order, stations programmed into the radio's presets as illustrated until a click is connected, refer to the beginning of external audio...
Owners Manual
Page 63
... the battery lead of volume/balance/fader controls. - Unclear or noisy display. • Fluorescent plate is at its mounting location. • The antenna may not be the proper length. - Check the fuse on again. No sound or unnatural sound. • Incorrect setting of the unit; The remote control is inoperative. • The remote control sensor setting of "Rear Entertainment Function" is properly connected; Make sure the antenna is not set at its mounting location. • The station...
... the battery lead of volume/balance/fader controls. - Unclear or noisy display. • Fluorescent plate is at its mounting location. • The antenna may not be the proper length. - Check the fuse on again. No sound or unnatural sound. • Incorrect setting of the unit; The remote control is inoperative. • The remote control sensor setting of "Rear Entertainment Function" is properly connected; Make sure the antenna is not set at its mounting location. • The station...
Owners Manual
Page 71
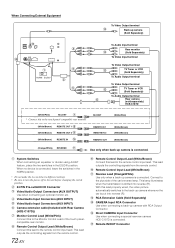
... Rear Output or Input RCA Connectors. iPod AUDIO/VIDEO Input Connector Connect this lead to the AV extension cable. Direct CAMERA Input Connector Use when the optional rearview camera HCE-C107D is shifted into reverse (R). Monitor Control Lead (White/Pink) Connect this lead to the Monitor Control Lead of the vehicle's battery. Power Supply Connector System Switches When connecting an equalizer or divider using the sheet metal screw provided. This lead outputs the controlling signals from the remote control. Fuse...
... Rear Output or Input RCA Connectors. iPod AUDIO/VIDEO Input Connector Connect this lead to the AV extension cable. Direct CAMERA Input Connector Use when the optional rearview camera HCE-C107D is shifted into reverse (R). Monitor Control Lead (White/Pink) Connect this lead to the Monitor Control Lead of the vehicle's battery. Power Supply Connector System Switches When connecting an equalizer or divider using the sheet metal screw provided. This lead outputs the controlling signals from the remote control. Fuse...
Owners Manual
Page 74
... car's reverse lamp. System Switches When connecting an equalizer or divider using Ai-NET feature, place the two switches in the NORM position. • Do not make the two switches to different settings. • Be sure to turn the power off to the remote control input lead. This lead outputs the controlling signals from the remote control. Connect to the remote control input lead. Remote IN/OUT Connector When no device is put into reverse (R). Remote Control Output...
... car's reverse lamp. System Switches When connecting an equalizer or divider using Ai-NET feature, place the two switches in the NORM position. • Do not make the two switches to different settings. • Be sure to turn the power off to the remote control input lead. This lead outputs the controlling signals from the remote control. Connect to the remote control input lead. Remote IN/OUT Connector When no device is put into reverse (R). Remote Control Output...


