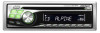
Owners Manual
Page 2
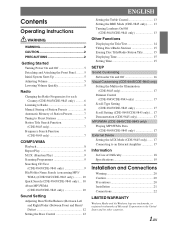
... (CDE-9845/CDE-9843 only 10 Sound Setting Adjusting Bass/Treble/Balance (Between Left and Right)/Fader (Between Front and Rear)/ Defeat 12 Setting the Bass Control 12 Setting the Treble Control 13 Setting the BBE Mode (CDE-9845 only) ....... 13 Turning Loudness On/Off (CDE-9843/CDE-9841 only 13 Other Functions Displaying the Title/Text 14 Titling Discs/Radio Stations 15 Erasing Disc Title/Radio Station Title 15 Displaying Time 15 Setting Time 15 SETUP Sound Customizing Subwoofer On and Off 16 Visual Customizing (CDE-9845/CDE...
... (CDE-9845/CDE-9843 only 10 Sound Setting Adjusting Bass/Treble/Balance (Between Left and Right)/Fader (Between Front and Rear)/ Defeat 12 Setting the Bass Control 12 Setting the Treble Control 13 Setting the BBE Mode (CDE-9845 only) ....... 13 Turning Loudness On/Off (CDE-9843/CDE-9841 only 13 Other Functions Displaying the Title/Text 14 Titling Discs/Radio Stations 15 Erasing Disc Title/Radio Station Title 15 Displaying Time 15 Setting Time 15 SETUP Sound Customizing Subwoofer On and Off 16 Visual Customizing (CDE-9845/CDE...
Owners Manual
Page 3
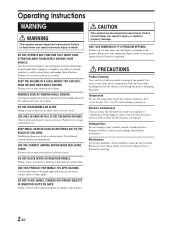
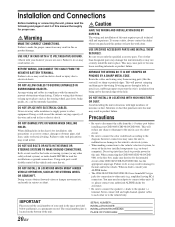
... your Alpine dealer or the nearest Alpine Service Station for repairing. Return it to evaporate. Viewing the display may result in personal injury or damage to do so may result in injury or material property damage. Failure to the product. USE THIS PRODUCT FOR MOBILE 12V APPLICATIONS. Playing a bad disc could severely damage the playback mechanism. KEEP THE VOLUME AT A LEVEL WHERE...
... your Alpine dealer or the nearest Alpine Service Station for repairing. Return it to evaporate. Viewing the display may result in personal injury or damage to do so may result in injury or material property damage. Failure to the product. USE THIS PRODUCT FOR MOBILE 12V APPLICATIONS. Playing a bad disc could severely damage the playback mechanism. KEEP THE VOLUME AT A LEVEL WHERE...
Owners Manual
Page 4
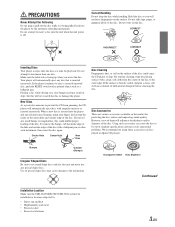
... vibrations 3-EN Transparent Sheet Disc Stabilizer Continued Installation Location Make sure the CDE-9845/CDE-9843/CDE-9841 will automatically eject discs with irregular surfaces or inserted incorrectly. New Discs As a protective measure to insert a disc into the player by the automatic reloading mechanism. If you feel around the inside edge of the hole and outside edge of standard specifications and may result in a solution...
... vibrations 3-EN Transparent Sheet Disc Stabilizer Continued Installation Location Make sure the CDE-9845/CDE-9843/CDE-9841 will automatically eject discs with irregular surfaces or inserted incorrectly. New Discs As a protective measure to insert a disc into the player by the automatic reloading mechanism. If you feel around the inside edge of the hole and outside edge of standard specifications and may result in a solution...
Owners Manual
Page 6
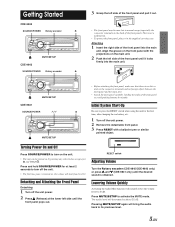
... main unit. 2 Push the left side of the front panel until the desired sound is not a malfunction. • To protect the front panel, place it in normal usage (especially the connector terminals on by 20 dB. The audio level will instantly lower the volume level by pressing any other button except eject c and TITLE . Lowering Volume Quickly Activating the Audio Mute function will decrease by mistake. Turning Power On...
... main unit. 2 Push the left side of the front panel until the desired sound is not a malfunction. • To protect the front panel, place it in normal usage (especially the connector terminals on by 20 dB. The audio level will instantly lower the volume level by pressing any other button except eject c and TITLE . Lowering Volume Quickly Activating the Audio Mute function will decrease by mistake. Turning Power On...

Owners Manual
Page 7
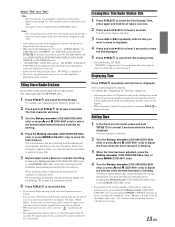
... a station in a preset memory which already has a station, the current station will change the setting. Radio CDE-9845 SOURCE/ TUNE/ POWER A.ME BAND Rotary encoder g f MUTE/SETUP Preset buttons (1 through 6) CDE-9843 SOURCE/ TUNE/ POWER A.ME BAND Rotary encoder g f MUTE/SETUP CDE-9841 SOURCE/ TUNE/ POWER A.ME BAND Preset buttons (1 through 6) g f Preset buttons (1 through 6) that you want to store the station on the display when a stereo FM station is tuned in. The display shows the band, preset no. Distance mode: Both strong and weak stations will be cleared every time...
... a station in a preset memory which already has a station, the current station will change the setting. Radio CDE-9845 SOURCE/ TUNE/ POWER A.ME BAND Rotary encoder g f MUTE/SETUP Preset buttons (1 through 6) CDE-9843 SOURCE/ TUNE/ POWER A.ME BAND Rotary encoder g f MUTE/SETUP CDE-9841 SOURCE/ TUNE/ POWER A.ME BAND Preset buttons (1 through 6) g f Preset buttons (1 through 6) that you want to store the station on the display when a stereo FM station is tuned in. The display shows the band, preset no. Distance mode: Both strong and weak stations will be cleared every time...
Owners Manual
Page 9
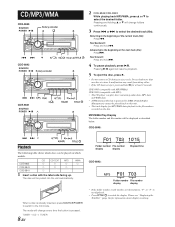
... numbers recorded on this unit. • The track display for MP3/WMA data playback is pressed. Please see "Displaying the Title/Text" (page 14) for at a time. Pressing and holding 8 or 9 will change folders continuously. 3 Press g or f to select the desired folder. CD CD-TEXT MP3 WMA CDE-9845 \ \ \ \ CDE-9843 \ \ \ CDE-9841 \ 1 Insert a disc with MP3): • The CD-player can be played...
... numbers recorded on this unit. • The track display for MP3/WMA data playback is pressed. Please see "Displaying the Title/Text" (page 14) for at a time. Pressing and holding 8 or 9 will change folders continuously. 3 Press g or f to select the desired folder. CD CD-TEXT MP3 WMA CDE-9845 \ \ \ \ CDE-9843 \ \ \ CDE-9841 \ 1 Insert a disc with MP3): • The CD-player can be played...
Owners Manual
Page 13
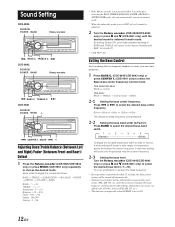
TREBLE C. f CDE-9841 SOURCE/ POWER BAND 4 g CENTER f. A narrower setting will boost a wide range of BASS and TREBLE will be adjusted. 2 Turn the Rotary encoder (CDE-9845/CDE-9843 only) or press 4 and 3 (CDE-9841 only) until the setting is set to select the Bass (bass center frequency) Control mode. Each press changes the modes as follows: BASS → TREBLE → SUBWOOFER* → BALANCE → FADER → DEFEAT → VOLUME → BASS BASS: -7 ~ +10 TREBLE: -7 ~ +7 Subwoofer : 0 ~ +15 Balance : L15 ~ R15 Fader : R15 ~ F15 Defeat : ON/OFF...
TREBLE C. f CDE-9841 SOURCE/ POWER BAND 4 g CENTER f. A narrower setting will boost a wide range of BASS and TREBLE will be adjusted. 2 Turn the Rotary encoder (CDE-9845/CDE-9843 only) or press 4 and 3 (CDE-9841 only) until the setting is set to select the Bass (bass center frequency) Control mode. Each press changes the modes as follows: BASS → TREBLE → SUBWOOFER* → BALANCE → FADER → DEFEAT → VOLUME → BASS BASS: -7 ~ +10 TREBLE: -7 ~ +7 Subwoofer : 0 ~ +15 Balance : L15 ~ R15 Fader : R15 ~ F15 Defeat : ON/OFF...
Owners Manual
Page 14
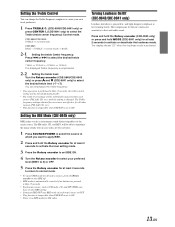
... 3 (CDE-9841 only) to ON. The display shows "LD" when the loudness mode is set to select the desired treble level (-7~+7). The Treble frequency settings adjusted for one source are effective for all music sources, press the Rotary encoder to turn BBE off automatically. • The treble level settings will be individually memorized for each music source to OFF. • This function is inoperable when DEFEAT is activated. Setting the BBE Mode (CDE-9845 only) BBE makes...
... 3 (CDE-9841 only) to ON. The display shows "LD" when the loudness mode is set to select the desired treble level (-7~+7). The Treble frequency settings adjusted for one source are effective for all music sources, press the Rotary encoder to turn BBE off automatically. • The treble level settings will be individually memorized for each music source to OFF. • This function is inoperable when DEFEAT is activated. Setting the BBE Mode (CDE-9845 only) BBE makes...
Owners Manual
Page 15
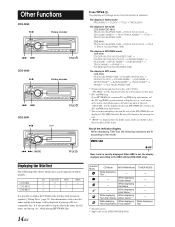
... displayed. While displaying File Name - *2 - g f MODE TITLE Bass Level is ignored. Text information, such as the disc name and the track name, will change every time the button is possible to display the folder name, the file name, and the tag, etc., while playing MP3/WMA files. 14-EN Indicator/ Mode CD Mode MP3/WMA Mode TUNER MODE While displaying Title - - *2 - It is set, the display changes according to the CDE...
... displayed. While displaying File Name - *2 - g f MODE TITLE Bass Level is ignored. Text information, such as the disc name and the track name, will change every time the button is possible to display the folder name, the file name, and the tag, etc., while playing MP3/WMA files. 14-EN Indicator/ Mode CD Mode MP3/WMA Mode TUNER MODE While displaying Title - - *2 - It is set, the display changes according to the CDE...
Owners Manual
Page 16
... disc name and track name. The time indication will reset to another clock/watch or radio time announcement, press and hold the Rotary encoder (CDE-9845/ CDE-9843 only) or press and hold MODE (CDE-9841 only) for at least 2 seconds while the time is displayed. 4 Press and hold TITLE for MP3/WMA discs. 1 Press TITLE and select the Title Display. The time is displayed. The time can be manually set...
... disc name and track name. The time indication will reset to another clock/watch or radio time announcement, press and hold the Rotary encoder (CDE-9845/ CDE-9843 only) or press and hold MODE (CDE-9841 only) for at least 2 seconds while the time is displayed. 4 Press and hold TITLE for MP3/WMA discs. 1 Press TITLE and select the Title Display. The time is displayed. The time can be manually set...
Owners Manual
Page 17
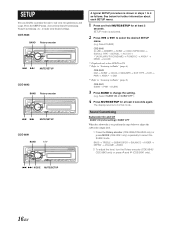
... 1 to normal mode. g f MODE MUTE/SETUP 16-EN SETUP You can flexibly customize the unit to suit your desired settings. CDE-9841 SUBW → PWR → SUBW 3 Press BAND to select the SUBW mode. From the SETUP menu, choose from Sound Customizing, Visual Customizing, etc., to Radio" (page 6). BASS → TREBLE → SUBWOOFER → BALANCE → FADER → DEFEAT → VOLUME → BASS 2 To adjust the level, turn the Rotary encoder (CDE-9845/ CDE-9843 only...
... 1 to normal mode. g f MODE MUTE/SETUP 16-EN SETUP You can flexibly customize the unit to suit your desired settings. CDE-9841 SUBW → PWR → SUBW 3 Press BAND to select the SUBW mode. From the SETUP menu, choose from Sound Customizing, Visual Customizing, etc., to Radio" (page 6). BASS → TREBLE → SUBWOOFER → BALANCE → FADER → DEFEAT → VOLUME → BASS 2 To adjust the level, turn the Rotary encoder (CDE-9845/ CDE-9843 only...
Owners Manual
Page 18
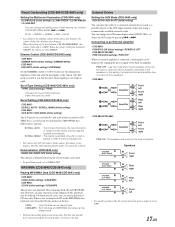
... for the display and sound. • To quit Demo mode, set . You can change the lighting color of the four buttons is GREEN, the others is RED. The disc titles input manually (page 15) cannot be difficult. Speakers SPEAKER RIGHT FRONT Front right SPEAKER RIGHT REAR SPEAKER LEFT REAR SPEAKER LEFT FRONT Rear right Rear left Front left Front right PWR ON : The speakers are used to drive an external amplifier connected to DEMO OFF. BLUE → GREEN...
... for the display and sound. • To quit Demo mode, set . You can change the lighting color of the four buttons is GREEN, the others is RED. The disc titles input manually (page 15) cannot be difficult. Speakers SPEAKER RIGHT FRONT Front right SPEAKER RIGHT REAR SPEAKER LEFT REAR SPEAKER LEFT FRONT Rear right Rear left Front left Front right PWR ON : The speakers are used to drive an external amplifier connected to DEMO OFF. BLUE → GREEN...
Owners Manual
Page 19
... cleaner disc. After the error indication disappears, insert the disc again. POWER-IC is very dirty. - Securely re-mount the unit. • The disc is switched to receive stations. • No antenna or open connection in the DX mode. • If the area you encounter a problem, please turn the power off . - replace with MP3. Check your nearest ALPINE dealer. Make sure the antenna is already in the format supported by this device. * CDE...
... cleaner disc. After the error indication disappears, insert the disc again. POWER-IC is very dirty. - Securely re-mount the unit. • The disc is switched to receive stations. • No antenna or open connection in the DX mode. • If the area you encounter a problem, please turn the power off . - replace with MP3. Check your nearest ALPINE dealer. Make sure the antenna is already in the format supported by this device. * CDE...
Owners Manual
Page 20
... change without notice. ** CDE-9845/CDE-9843: When you choose "AREA 2" in the section "Changing the Radio Frequencies for each Country" (page 6), the tuning range is activated due to within operation range. UNSUPORT (CDE-9843 only) • The disc is not compatible with the unit. ERROR • Mechanism error. 1) Press the c button and eject the CD. Specifications FM TUNER SECTION Tuning Range Mono Usable Sensitivity 50 dB Quieting Sensitivity Alternate Channel Selectivity...
... change without notice. ** CDE-9845/CDE-9843: When you choose "AREA 2" in the section "Changing the Radio Frequencies for each Country" (page 6), the tuning range is activated due to within operation range. UNSUPORT (CDE-9843 only) • The disc is not compatible with the unit. ERROR • Mechanism error. 1) Press the c button and eject the CD. Specifications FM TUNER SECTION Tuning Range Mono Usable Sensitivity 50 dB Quieting Sensitivity Alternate Channel Selectivity...
Owners Manual
Page 21
... the manual to contact, damage or obstruct pipes, fuel lines, tanks or electrical wiring. Never connect left and right channel speaker cables to the speaker (-) terminal. Arrange wiring and cables in compliance with high incidence of moisture or dust. DO NOT USE BOLTS OR NUTS IN THE BRAKE OR STEERING SYSTEMS TO MAKE GROUND CONNECTIONS. DO NOT INSTALL IN LOCATIONS WHICH MIGHT HINDER VEHICLE OPERATION...
... the manual to contact, damage or obstruct pipes, fuel lines, tanks or electrical wiring. Never connect left and right channel speaker cables to the speaker (-) terminal. Arrange wiring and cables in compliance with high incidence of moisture or dust. DO NOT USE BOLTS OR NUTS IN THE BRAKE OR STEERING SYSTEMS TO MAKE GROUND CONNECTIONS. DO NOT INSTALL IN LOCATIONS WHICH MIGHT HINDER VEHICLE OPERATION...
Owners Manual
Page 22
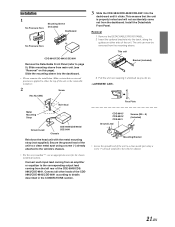
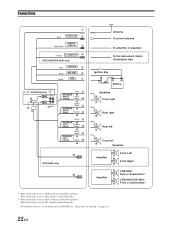
.... Face Plate Metal Mounting Strap * Ground Lead CDE-9845/CDE-9843/ CDE-9841 Chassis Reinforce the head unit with the metal mounting strap (not supplied). Connect all other leads of the CDE9845/CDE-9843/CDE-9841 according to the corresponding output lead coming from main unit. (see "Removal" on either the top of the CDE-9845/CDE9843/CDE-9841. Connect each input lead coming from the left rear of the unit or the removable...
.... Face Plate Metal Mounting Strap * Ground Lead CDE-9845/CDE-9843/ CDE-9841 Chassis Reinforce the head unit with the metal mounting strap (not supplied). Connect all other leads of the CDE9845/CDE-9843/CDE-9841 according to the corresponding output lead coming from main unit. (see "Removal" on either the top of the CDE-9845/CDE9843/CDE-9841. Connect each input lead coming from the left rear of the unit or the removable...
Owners Manual
Page 23
... & White ( , (CDE-9845 only) , Antenna To power antenna To amplifier or equalizer To the instrument cluster illumination lead Ignition Key Battery Speakers Front right Rear right Rear left Front left Speakers Amplifier Front Left Front Right Amplifier CDE-9845: Rear or Subwoofers∗1 CDE-9843/CDE-9841: Front or Subwoofers∗2 *1 When Subwoofer is set to OFF: Output is from Rear speakers. When Subwoofer is set to ON: Output is from Subwoofer. Connections 1 Blue POWER ANT 2 REMOTE Blue/White TURN-ON 3 Orange ILLUMINATION 4 (CDE-9845/CDE-9843...
... & White ( , (CDE-9845 only) , Antenna To power antenna To amplifier or equalizer To the instrument cluster illumination lead Ignition Key Battery Speakers Front right Rear right Rear left Front left Speakers Amplifier Front Left Front Right Amplifier CDE-9845: Rear or Subwoofers∗1 CDE-9843/CDE-9841: Front or Subwoofers∗2 *1 When Subwoofer is set to OFF: Output is from Rear speakers. When Subwoofer is set to ON: Output is from Subwoofer. Connections 1 Blue POWER ANT 2 REMOTE Blue/White TURN-ON 3 Orange ILLUMINATION 4 (CDE-9845/CDE-9843...
Owners Manual
Page 24
... for input of audio from the unit as a portable player), using the sheet metal screw provided. 8 Power Supply Connector 9 Right Front (+) Speaker Output Lead (Gray) ! To prevent external noise from entering the audio system. • Locate the unit and route the leads at least 10cm away from the car harness. • Keep the battery power leads as far away from other leads as possible. • Connect the...
... for input of audio from the unit as a portable player), using the sheet metal screw provided. 8 Power Supply Connector 9 Right Front (+) Speaker Output Lead (Gray) ! To prevent external noise from entering the audio system. • Locate the unit and route the leads at least 10cm away from the car harness. • Keep the battery power leads as far away from other leads as possible. • Connect the...
Owners Manual
Page 25
..., improper connections, improper operation or failure to contain an excessive amount of the product. 5 Service performed by an unauthorized person, company or association. 6 Any product which has the serial number defaced, altered or removed. 7 ...repairs are covered only in the U.S.A. Accordingly, limitations as to offer this warranty stamped upon installation by Alpine within the United States, Puerto Rico or Canada. 9 Any product not purchased from the date of the first consumer purchase. [LIFETIME TAPE HEAD WARRANTY: All Alpine Car Audio analog tape heads excluding Video tape heads...
..., improper connections, improper operation or failure to contain an excessive amount of the product. 5 Service performed by an unauthorized person, company or association. 6 Any product which has the serial number defaced, altered or removed. 7 ...repairs are covered only in the U.S.A. Accordingly, limitations as to offer this warranty stamped upon installation by Alpine within the United States, Puerto Rico or Canada. 9 Any product not purchased from the date of the first consumer purchase. [LIFETIME TAPE HEAD WARRANTY: All Alpine Car Audio analog tape heads excluding Video tape heads...
Owners Manual
Page 27
Please register your product with us so we contact you better. DYes 2. DYes 2. ffffblLPINE. Customer Care Registration li,ccii+J.l0if. DYes 2. D No ..J e D No aw: w ::J: E-mail Address May we can serve you bye-mail? 1. First name: Last name: _ Home address Street address City State/Provo Zip Code May we contact you at this number? 1. For easy on-line registration, go to "\flfw'\f'Woalpine-usa.com/registration" Thank you at this address? 1. D No Phone number May we contact you for choosing Alpine!
Please register your product with us so we contact you better. DYes 2. DYes 2. ffffblLPINE. Customer Care Registration li,ccii+J.l0if. DYes 2. D No ..J e D No aw: w ::J: E-mail Address May we can serve you bye-mail? 1. First name: Last name: _ Home address Street address City State/Provo Zip Code May we contact you at this number? 1. For easy on-line registration, go to "\flfw'\f'Woalpine-usa.com/registration" Thank you at this address? 1. D No Phone number May we contact you for choosing Alpine!


