Owner's Manual (english)
Page 3
... source 18 SETUP Setting 18 BLUETOOTH Setting (CDE-123 only 19 Setting the BLUETOOTH Connection 19 General Setting 19 Set your favorite source to the FAV button (FAV SETUP 19 Playing MP3/WMA/AAC Data (PLAY MODE).....19 Turning Mute Mode On/Off (INT MUTE 19 Setting the AUX REAR Setup Mode (AUX-R SET) (CDE-123 only 19 Setting the AUX SETUP Mode 20 Setting the AUX Level (AUX GAIN 20 Setting the AUX REAR Level (AUX-R GAIN) (CDE-123 only 20 Connecting to an External Amplifier (POWER IC 20 Demonstration 20 Display Setting 21 Dimmer Control 21 Scroll Type Setting 21 Scroll Setting...
... source 18 SETUP Setting 18 BLUETOOTH Setting (CDE-123 only 19 Setting the BLUETOOTH Connection 19 General Setting 19 Set your favorite source to the FAV button (FAV SETUP 19 Playing MP3/WMA/AAC Data (PLAY MODE).....19 Turning Mute Mode On/Off (INT MUTE 19 Setting the AUX REAR Setup Mode (AUX-R SET) (CDE-123 only 19 Setting the AUX SETUP Mode 20 Setting the AUX Level (AUX GAIN 20 Setting the AUX REAR Level (AUX-R GAIN) (CDE-123 only 20 Connecting to an External Amplifier (POWER IC 20 Demonstration 20 Display Setting 21 Dimmer Control 21 Scroll Type Setting 21 Scroll Setting...
Owner's Manual (english)
Page 6
..., etc.) can result in serious injury or death. Swallowing them can be displayed even though the disc has been inserted correctly, push the RESET switch with water only. USE THE CORRECT AMPERE RATING WHEN REPLACING FUSES. HALT USE IMMEDIATELY IF A PROBLEM APPEARS. Return it to your Alpine dealer or the nearest Alpine Service Station for the moisture to your dealer if you have...
..., etc.) can result in serious injury or death. Swallowing them can be displayed even though the disc has been inserted correctly, push the RESET switch with water only. USE THE CORRECT AMPERE RATING WHEN REPLACING FUSES. HALT USE IMMEDIATELY IF A PROBLEM APPEARS. Return it to your Alpine dealer or the nearest Alpine Service Station for the moisture to your dealer if you have...
Owner's Manual (english)
Page 8
... Nokia mobile phones can be displayed, however characters may not function correctly at high or low temperature. • Use only certified USB Flash Memory Devices. Playable audio file formats are trademarks of SiriusXM Radio Inc. This device will control Pandora when connected to the USB connection terminal on a personal computer. • Do not remove the USB device while playback is in a location where driver operation will not be a danger while driving. is...
... Nokia mobile phones can be displayed, however characters may not function correctly at high or low temperature. • Use only certified USB Flash Memory Devices. Playable audio file formats are trademarks of SiriusXM Radio Inc. This device will control Pandora when connected to the USB connection terminal on a personal computer. • Do not remove the USB device while playback is in a location where driver operation will not be a danger while driving. is...
Owner's Manual (english)
Page 9
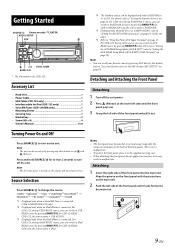
... become hot in "Setting the AUX REAR Setup Mode (AUX-R SET)" (refer to turn off the unit power. 2 Press e (Release) at least 2 seconds to "Setting the Pandora Source" on page 17. TUNER SIRIUSXM*1 DISC USB FRONT*2/iPod FRONT*3 PANDORA F*4 BT AUDIO*5 AUXILIARY*6 TUNER *1 Displayed only when a SiriusXM Tuner is connected. (CDE-124SXM/CDE-123 only) *2 Displayed only when no iPod/iPhone is connected. For CDE-123, during iPod FRONT source, you can switch to AUX REAR source by pressing any...
... become hot in "Setting the AUX REAR Setup Mode (AUX-R SET)" (refer to turn off the unit power. 2 Press e (Release) at least 2 seconds to "Setting the Pandora Source" on page 17. TUNER SIRIUSXM*1 DISC USB FRONT*2/iPod FRONT*3 PANDORA F*4 BT AUDIO*5 AUXILIARY*6 TUNER *1 Displayed only when a SiriusXM Tuner is connected. (CDE-124SXM/CDE-123 only) *2 Displayed only when no iPod/iPhone is connected. For CDE-123, during iPod FRONT source, you can switch to AUX REAR source by pressing any...
Owner's Manual (english)
Page 10
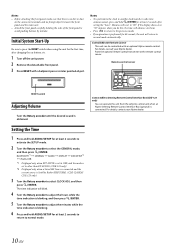
... main unit. • Attach the front panel carefully, holding the sides of the front panel to other than BT AUDIO. (CDE-123 only) *2 Displayed only when a SiriusXM Tuner is connected and the current source is performed for at the remote control sensor. BLUETOOTH*1 GENERAL AUDIO DISPLAY SXM SETUP*2 iPod & USB *1 Displayed only when INT MUTE is set to OFF, and the mode is set to avoid pushing buttons by...
... main unit. • Attach the front panel carefully, holding the sides of the front panel to other than BT AUDIO. (CDE-123 only) *2 Displayed only when a SiriusXM Tuner is connected and the current source is performed for at the remote control sensor. BLUETOOTH*1 GENERAL AUDIO DISPLAY SXM SETUP*2 iPod & USB *1 Displayed only when INT MUTE is set to OFF, and the mode is set to avoid pushing buttons by...

Owner's Manual (english)
Page 11
... in a preset memory which you store a station in Radio mode to activate Frequency search mode. 2 Turn the Rotary encoder to select the desired frequency. 3 Press ENTER to store the station. They will change while the automatic memory is displayed. 2 Press and hold ENTER for CDE-123. Note • If no operation is displayed. F1 (FM1) F2 (FM2) AM F1 (FM1) 3 Press TUNE...
... in a preset memory which you store a station in Radio mode to activate Frequency search mode. 2 Turn the Rotary encoder to select the desired frequency. 3 Press ENTER to store the station. They will change while the automatic memory is displayed. 2 Press and hold ENTER for CDE-123. Note • If no operation is displayed. F1 (FM1) F2 (FM2) AM F1 (FM1) 3 Press TUNE...
Owner's Manual (english)
Page 14
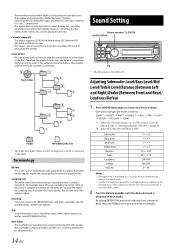
... CDE-123. Root folder Folder MP3/WMA/AAC File * The folder No./ folder Name will return to the disc. This device cannot correctly play back discs in the folder. Terminology Bit rate This is OFF. Encoding Converting music CDs, WAVE (AIFF) files, and other standards that the writing software writes them to the factory defaults. 14-EN Subwoofer Bass level Mid level Treble level Balance...
... CDE-123. Root folder Folder MP3/WMA/AAC File * The folder No./ folder Name will return to the disc. This device cannot correctly play back discs in the folder. Terminology Bit rate This is OFF. Encoding Converting music CDs, WAVE (AIFF) files, and other standards that the writing software writes them to the factory defaults. 14-EN Subwoofer Bass level Mid level Treble level Balance...
Owner's Manual (english)
Page 15
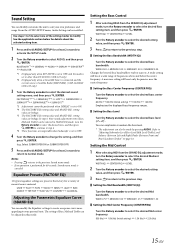
... the displayed bass frequency ranges. Setting the Bass Level Turn the Rotary encoder to select the desired bass level (-7~+7)*. Setting the Mid Control 1 After selecting MID from the 3BAND EQ adjustment mode, turn the Rotary encoder to select the desired Bass setting item, and then press ENTER. See the applicable section below the center frequency. Equalizer Presets (FACTORY EQ) 10 typical equalizer settings are inoperable when Subwoofer is Satellite Radio (SIRIUSXM). (CDE-124SXM/ CDE-123 only) 3 Turn the Rotary...
... the displayed bass frequency ranges. Setting the Bass Level Turn the Rotary encoder to select the desired bass level (-7~+7)*. Setting the Mid Control 1 After selecting MID from the 3BAND EQ adjustment mode, turn the Rotary encoder to select the desired Bass setting item, and then press ENTER. See the applicable section below the center frequency. Equalizer Presets (FACTORY EQ) 10 typical equalizer settings are inoperable when Subwoofer is Satellite Radio (SIRIUSXM). (CDE-124SXM/ CDE-123 only) 3 Turn the Rotary...
Owner's Manual (english)
Page 17
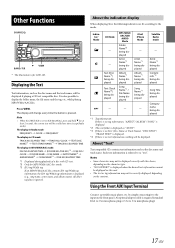
... Name*1 being displayed iPod/ iPhone Mode - Satellite Radio mode - Using the Front AUX Input Terminal Connect a portable music player, etc. The display will change every time the button is displayed (e.g., song name, artist name, and album name). by simply connecting it to display the folder name, the file name and the tag, etc., while playing MP3/WMA/AAC files. The display in Radio mode: FREQUENCY CLOCK FREQUENCY The display in CD mode: TRACK NO./ELAPSED TIME TRACK...
... Name*1 being displayed iPod/ iPhone Mode - Satellite Radio mode - Using the Front AUX Input Terminal Connect a portable music player, etc. The display will change every time the button is displayed (e.g., song name, artist name, and album name). by simply connecting it to display the folder name, the file name and the tag, etc., while playing MP3/WMA/AAC files. The display in Radio mode: FREQUENCY CLOCK FREQUENCY The display in CD mode: TRACK NO./ELAPSED TIME TRACK...
Owner's Manual (english)
Page 18
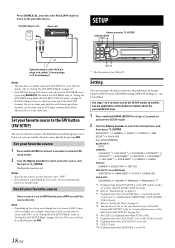
... the source directly. BLUETOOTH*1 GENERAL AUDIO*2 DISPLAY SXM SETUP*3 iPod & USB (e.g. Main unit SETUP Rotary encoder/ /ENTER AUDIO/SETUP FAV or Optional adapter cable (RCA pin plugs [red, white] 3.5ø miniplugs) or (3.5ø miniplugs). Set your own preferences and usage. The favorite source is set a source to FAV, it may interfere with driving operations, therefore, avoid connecting an AUX input terminal and a Flash Memory Device at least 2 seconds to activate FAV setup mode. 2 Turn the...
... the source directly. BLUETOOTH*1 GENERAL AUDIO*2 DISPLAY SXM SETUP*3 iPod & USB (e.g. Main unit SETUP Rotary encoder/ /ENTER AUDIO/SETUP FAV or Optional adapter cable (RCA pin plugs [red, white] 3.5ø miniplugs) or (3.5ø miniplugs). Set your own preferences and usage. The favorite source is set a source to FAV, it may interfere with driving operations, therefore, avoid connecting an AUX input terminal and a Flash Memory Device at least 2 seconds to activate FAV setup mode. 2 Turn the...
Owner's Manual (english)
Page 19
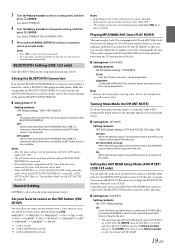
...: Set this item when BLUETOOTH INTERFACE (KCE-250BT) is connected. (Hands-free Phone is available, but the BT Audio source is connected. When the BLUETOOTH INTERFACE is received from device, the AUX source volume will return to normal mode. Select POWER IC ON or POWER IC OFF.) 5 Press and hold AUDIOSETUP for 60 seconds, the unit will be connected to the BLUETOOTH interface connector at least 2 seconds to return to normal mode automatically. Turning Mute Mode...
...: Set this item when BLUETOOTH INTERFACE (KCE-250BT) is connected. (Hands-free Phone is available, but the BT Audio source is connected. When the BLUETOOTH INTERFACE is received from device, the AUX source volume will return to normal mode. Select POWER IC ON or POWER IC OFF.) 5 Press and hold AUDIOSETUP for 60 seconds, the unit will be connected to the BLUETOOTH interface connector at least 2 seconds to return to normal mode automatically. Turning Mute Mode...
Owner's Manual (english)
Page 20
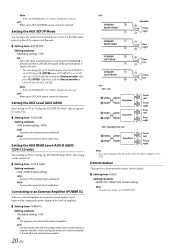
...: CDE-123: Amplifier Amplifier Front left Front right Rear left Rear right CDE-124SXM/CDE-122: Amplifier Front left Front right Note • No sound is produced by the system when the power output is set , PMD is displayed on the unit. OFF: When set to DEMO OFF. Setting the AUX SETUP Mode You can change the AUX NAME display when AUX SETUP is connected. Press ENTER when AUX SETUP is set , PMD is connected, sound quality can be selected. Connecting to...
...: CDE-123: Amplifier Amplifier Front left Front right Rear left Rear right CDE-124SXM/CDE-122: Amplifier Front left Front right Note • No sound is produced by the system when the power output is set , PMD is displayed on the unit. OFF: When set to DEMO OFF. Setting the AUX SETUP Mode You can change the AUX NAME display when AUX SETUP is connected. Press ENTER when AUX SETUP is set , PMD is connected, sound quality can be selected. Connecting to...

Owner's Manual (english)
Page 22
... cannot be displayed with "L" before channel No. You can be displayed. 2 Input the passcode using this item, turn the ignition key off the Pandora source. Setting item: PANDORA Setting contents: ON (Initial setting) / OFF ON: The Pandora source can unlock a channel or change the passcode using the Rotary encoder. iPod/iPhone and USB Setting "iPod & USB" is entered one digit at a time with passcode protection. For example, if you select 10FILE in...
... cannot be displayed with "L" before channel No. You can be displayed. 2 Input the passcode using this item, turn the ignition key off the Pandora source. Setting item: PANDORA Setting contents: ON (Initial setting) / OFF ON: The Pandora source can unlock a channel or change the passcode using the Rotary encoder. iPod/iPhone and USB Setting "iPod & USB" is entered one digit at a time with passcode protection. For example, if you select 10FILE in...
Owner's Manual (english)
Page 26
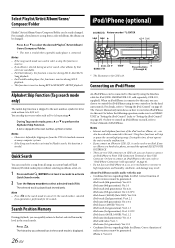
... search mode. About iPod/iPhone models usable with video: Ver.1.3 iPod nano (1st generation): Ver.1.3.1 • Confirmed devices regarding Made for skipping are from all songs in a car, as a hands-free phone, you can choose to connect an iPod/iPhone to Owner's Manual of earlier versions cannot be easily changed . During Tag search mode, press or to "Setting the iPod Control" on itself, refer to Front USB Connection Terminal or Rear USB Connector. Select...
... search mode. About iPod/iPhone models usable with video: Ver.1.3 iPod nano (1st generation): Ver.1.3.1 • Confirmed devices regarding Made for skipping are from all songs in a car, as a hands-free phone, you can choose to connect an iPod/iPhone to Owner's Manual of earlier versions cannot be easily changed . During Tag search mode, press or to "Setting the iPod Control" on itself, refer to Front USB Connection Terminal or Rear USB Connector. Select...

Owner's Manual (english)
Page 32
... stored in memory. Checking the SiriusXM Radio ID Number To subscribe to the SiriusXM Satellite Radio service, it is necessary to replace an existing alert item, select "REPLACE" by turning Rotary encoder, and then press ENTER, the existing alert list stored in memory is displayed. Tuning Channels using the Rotary encoder. Note • If no operation is perform for 10 seconds, the setting mode is not...
... stored in memory. Checking the SiriusXM Radio ID Number To subscribe to the SiriusXM Satellite Radio service, it is necessary to replace an existing alert item, select "REPLACE" by turning Rotary encoder, and then press ENTER, the existing alert list stored in memory is displayed. Tuning Channels using the Rotary encoder. Note • If no operation is perform for 10 seconds, the setting mode is not...
Owner's Manual (english)
Page 34
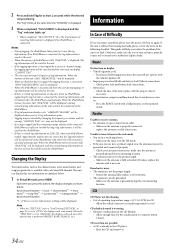
... off , then on CDE-123, when two iPod/iPhone models supporting the tag function are in cable. - replace with a new one. replace the antenna or cable if necessary. make sure the rest of operating temperature range +50°C (+120°F) for the condensation to this button, the display changes as shown below . 1 In SiriusXM mode, press VIEW. Extend the antenna fully; Each time you encounter a problem, please turn the power off . - Allow the vehicle...
... off , then on CDE-123, when two iPod/iPhone models supporting the tag function are in cable. - replace with a new one. replace the antenna or cable if necessary. make sure the rest of operating temperature range +50°C (+120°F) for the condensation to this button, the display changes as shown below . 1 In SiriusXM mode, press VIEW. Extend the antenna fully; Each time you encounter a problem, please turn the power off . - Allow the vehicle...
Owner's Manual (english)
Page 36
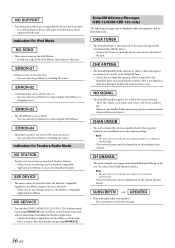
... mode by pressing SOURCE with input text information that the antenna cable is either damaged or not connected correctly to a location with the Tuner. - NO SERVICE • You switched CDE-124SXM/CDE-123/CDE-122 to this unit. Visit www.siriusxm.com for iPhone. Use a Flash Memory device with an iPhone or iPod touch connected, without launching or installing the Pandora Application. - Connect the Tuner or check the Tuner connection to channel 1 automatically. - Press any personalized Pandora Stations. - Replace...
... mode by pressing SOURCE with input text information that the antenna cable is either damaged or not connected correctly to a location with the Tuner. - NO SERVICE • You switched CDE-124SXM/CDE-123/CDE-122 to this unit. Visit www.siriusxm.com for iPhone. Use a Flash Memory device with an iPhone or iPod touch connected, without launching or installing the Pandora Application. - Connect the Tuner or check the Tuner connection to channel 1 automatically. - Press any personalized Pandora Stations. - Replace...
Owner's Manual (english)
Page 39
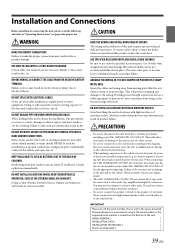
... to connect the color coded leads according to do so may result in fire or electric shock. Be sure to use a rubber grommet to the fuse box, make the proper connections may result in metal, use only the specified accessory parts. If wiring passes through a hole in fire, etc. DO NOT INSTALL IN LOCATIONS WITH HIGH MOISTURE OR DUST. When connecting the CDE-124SXM/CDE-123/CDE...
... to connect the color coded leads according to do so may result in fire or electric shock. Be sure to use a rubber grommet to the fuse box, make the proper connections may result in metal, use only the specified accessory parts. If wiring passes through a hole in fire, etc. DO NOT INSTALL IN LOCATIONS WITH HIGH MOISTURE OR DUST. When connecting the CDE-124SXM/CDE-123/CDE...

Owner's Manual (english)
Page 41
... even when Flash Memory is switched. • After changing the unit to a source other than the USB iPod, remove the iPod/iPhone. If the iPod/iPhone is removed in the USB iPod mode, data may stop charging when another cables. 41-EN CDE-123, supplied) Cable (sold separately) When connect to Rear USB Connector (CDE-123 only) Connect the USB cable to the Rear USB connector of the current source, and it again. If the Flash Memory is connected, remove the iPod/iPhone once, then connect it again, or reset the iPod. •...
... even when Flash Memory is switched. • After changing the unit to a source other than the USB iPod, remove the iPod/iPhone. If the iPod/iPhone is removed in the USB iPod mode, data may stop charging when another cables. 41-EN CDE-123, supplied) Cable (sold separately) When connect to Rear USB Connector (CDE-123 only) Connect the USB cable to the Rear USB connector of the current source, and it again. If the Flash Memory is connected, remove the iPod/iPhone once, then connect it again, or reset the iPod. •...
Owner's Manual (english)
Page 43
... iPod/ iPhone. AUX-R OFF : When set to "Setting the AUX REAR Setup Mode (AUX-R SET) (CDE-123 only)" on the vehicle. If a USB cable other leads as possible. • Connect the ground lead securely to the Owner's Manual of the car chassis. • If you add an optional noise suppressor, connect it as far away from an external device (such as possible. Do not use an iPod/iPhone, Interface cable for iPod connection is left . Front/Subwoofer Output...
... iPod/ iPhone. AUX-R OFF : When set to "Setting the AUX REAR Setup Mode (AUX-R SET) (CDE-123 only)" on the vehicle. If a USB cable other leads as possible. • Connect the ground lead securely to the Owner's Manual of the car chassis. • If you add an optional noise suppressor, connect it as far away from an external device (such as possible. Do not use an iPod/iPhone, Interface cable for iPod connection is left . Front/Subwoofer Output...


