
User Manual
Page 3
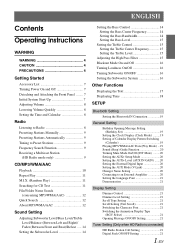
...On and Off 7 Detaching and Attaching the Front Panel ........ 7 Initial System Start-Up 7 Adjusting Volume 8 Lowering Volume Quickly 8 Setting the Time and Calendar 8 Radio Listening to Radio 8 Presetting Stations Manually 9 Presetting Stations Automatically 9 Tuning to Preset Stations 9 Frequency...Displaying the Text 17 Displaying Time 18 SETUP Bluetooth Setting Setting the Bluetooth IN Connection 19 General Setting Birthday Opening Message Setting (Birthday Set 19 Setting the Clock Display (Clock Mode) .........19 Setting of Calendar Display Pattern Switching (Calendar 19 Playing...
...On and Off 7 Detaching and Attaching the Front Panel ........ 7 Initial System Start-Up 7 Adjusting Volume 8 Lowering Volume Quickly 8 Setting the Time and Calendar 8 Radio Listening to Radio 8 Presetting Stations Manually 9 Presetting Stations Automatically 9 Tuning to Preset Stations 9 Frequency...Displaying the Text 17 Displaying Time 18 SETUP Bluetooth Setting Setting the Bluetooth IN Connection 19 General Setting Birthday Opening Message Setting (Birthday Set 19 Setting the Clock Display (Clock Mode) .........19 Setting of Calendar Display Pattern Switching (Calendar 19 Playing...
User Manual
Page 4
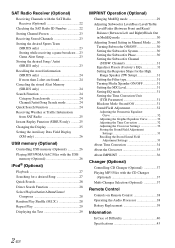
...32 Adjusting the Graphic Equalizer Curve ...........32 Adjusting the Time Correction 32 Adjusting the Crossover Settings 32 Storing the Sound Field Adjustment Settings 33 Recalling the Stored Sound Field Adjustment Settings 33 About Time Correction 34 About the Crossover 35 About IMPRINT 36 Changer (Optional)...Function 24 Receiving Weather or Traffic Information from SAT Radio 25 Instant Replay Function (SIRIUS only) ......... 25 Changing the Display 25 Setting the Auxiliary Data Field Display (XM only 26 USB memory (Optional) Controlling USB memory (Optional 26 Playing MP3/WMA/AAC ...
...32 Adjusting the Graphic Equalizer Curve ...........32 Adjusting the Time Correction 32 Adjusting the Crossover Settings 32 Storing the Sound Field Adjustment Settings 33 Recalling the Stored Sound Field Adjustment Settings 33 About Time Correction 34 About the Crossover 35 About IMPRINT 36 Changer (Optional)...Function 24 Receiving Weather or Traffic Information from SAT Radio 25 Instant Replay Function (SIRIUS only) ......... 25 Changing the Display 25 Setting the Auxiliary Data Field Display (XM only 26 USB memory (Optional) Controlling USB memory (Optional 26 Playing MP3/WMA/AAC ...
User Manual
Page 8
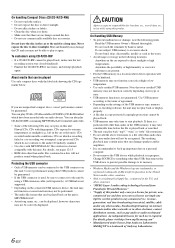
... even if data, etc., is not guaranteed. Heat and humidity may take time to the terms of agreement. • Depending on the settings of high humidity or corrosive substances are trademarks, or registered trademarks of Microsoft Corporation in the car exposed to a file other electronic content distribution ...systems, such as pay-audio or audio-on this product in the U.S. CAUTION Alpine accepts no bumps around the disc. • Do not use this unit. Do not subject USB memory to play CD-Rs (CD-...
... even if data, etc., is not guaranteed. Heat and humidity may take time to the terms of agreement. • Depending on the settings of high humidity or corrosive substances are trademarks, or registered trademarks of Microsoft Corporation in the car exposed to a file other electronic content distribution ...systems, such as pay-audio or audio-on this product in the U.S. CAUTION Alpine accepts no bumps around the disc. • Do not use this unit. Do not subject USB memory to play CD-Rs (CD-...
User Manual
Page 9
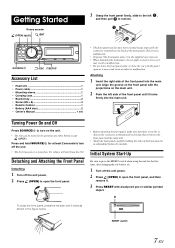
...; Power cable 1 • Mounting sleeve 1 • Carrying case 1 • Bracket key 2 • Screw (M5 × 8 4 • Remote Control 1 • Battery (AAA size 2 • Owner's Manual 1 set • The front panel may become hot in an accident or malfunction.
...; Power cable 1 • Mounting sleeve 1 • Carrying case 1 • Bracket key 2 • Screw (M5 × 8 4 • Remote Control 1 • Battery (AAA size 2 • Owner's Manual 1 set • The front panel may become hot in an accident or malfunction.
User Manual
Page 10
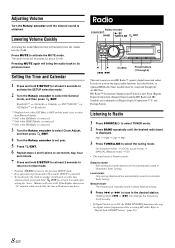
...Manufactured Under License From iBiquity Digital Corporation. Listening to Radio 1 Press SOURCE/ to select TUNER mode. 2 Press BAND repeatedly until the desired sound is set month, day, hour and minute. 7 Press and hold F/SETUP for at least 2 seconds to return to normal mode. • Pressing /ESC.... • To synchronize the clock to another clock/watch or radio time announcement, press and hold /ENT for at least 2 seconds after setting the "hour". Press MUTE to activate the MUTE mode. Pressing MUTE again will change the frequency continuously. • If Digital Seek is obtained...
...Manufactured Under License From iBiquity Digital Corporation. Listening to Radio 1 Press SOURCE/ to select TUNER mode. 2 Press BAND repeatedly until the desired sound is set month, day, hour and minute. 7 Press and hold F/SETUP for at least 2 seconds to return to normal mode. • Pressing /ESC.... • To synchronize the clock to another clock/watch or radio time announcement, press and hold /ENT for at least 2 seconds after setting the "hour". Press MUTE to activate the MUTE mode. Pressing MUTE again will change the frequency continuously. • If Digital Seek is obtained...

User Manual
Page 12
...or SIRIUS Radio is connected. *2 Displayed only when the iPod is connected and AUX+ Setup is set to OFF, refer to "Setting the AUX+ Setup Mode" (page 20). *3 Displayed only when the AUX+ Setup is set to ON, refer to "Setting the AUX+ Setup Mode" (page 20). *4 Displayed only when Bluetooth IN is... set to ADAPTER, refer to "Bluetooth Setting" (page 19). *5 Only when the CD changer is already inserted, press SOURCE/ to switch to ...
...or SIRIUS Radio is connected. *2 Displayed only when the iPod is connected and AUX+ Setup is set to OFF, refer to "Setting the AUX+ Setup Mode" (page 20). *3 Displayed only when the AUX+ Setup is set to ON, refer to "Setting the AUX+ Setup Mode" (page 20). *4 Displayed only when Bluetooth IN is... set to ADAPTER, refer to "Bluetooth Setting" (page 19). *5 Only when the CD changer is already inserted, press SOURCE/ to switch to ...
User Manual
Page 13
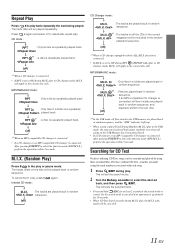
... the track being played. play in CD changer mode, M.I .X. function is made using their recorded titles. If an MP3 compatible CD changer is set to deactivate repeat play , press 5 again. This will apply to the current disc only. Press 4 again and select off to ON during M.I...desired track, and then press /ENT. CD Changer mode : : The tracks are played back in random sequence. : The tracks on the disc will set to select the function mode (RPT/M.I .X. For discs without CD Text, searches are repeatedly played back. : A disc is repeatedly played back. *2 ...
... the track being played. play in CD changer mode, M.I .X. function is made using their recorded titles. If an MP3 compatible CD changer is set to deactivate repeat play , press 5 again. This will apply to the current disc only. Press 4 again and select off to ON during M.I...desired track, and then press /ENT. CD Changer mode : : The tracks are played back in random sequence. : The tracks on the disc will set to select the function mode (RPT/M.I .X. For discs without CD Text, searches are repeatedly played back. : A disc is repeatedly played back. *2 ...
User Manual
Page 16
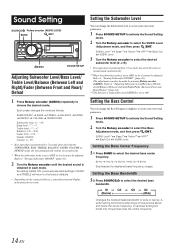
... Q1 Q2 Q3 Q4 Changes the boosted bass bandwidth to select the desired bass bandwidth. Setting the Bass Bandwidth 3-2 Press SOURCE/ to wide or narrow. By setting Defeat ON, previously adjusted settings of frequencies above and below the center frequency. Refer to select the desired bass center frequency... is obtained in each mode. Refer to "Turning Subwoofer ON/OFF" (page 16). 2 Turn the Rotary encoder until the desired sound is set to OFF, its level cannot be adjusted. SUBW. Level 3 Turn the Rotary encoder to select the desired subwoofer level (0~+15). • ...
... Q1 Q2 Q3 Q4 Changes the boosted bass bandwidth to select the desired bass bandwidth. Setting the Bass Bandwidth 3-2 Press SOURCE/ to wide or narrow. By setting Defeat ON, previously adjusted settings of frequencies above and below the center frequency. Refer to select the desired bass center frequency... is obtained in each mode. Refer to "Turning Subwoofer ON/OFF" (page 16). 2 Turn the Rotary encoder until the desired sound is set to OFF, its level cannot be adjusted. SUBW. Level 3 Turn the Rotary encoder to select the desired subwoofer level (0~+15). • ...

User Manual
Page 17
... Bass*10 Treble*10 HPF*10 Black Out SUBW. You can also be individually memorized for each source (FM, AM, CD, etc.) until the setting is set to normal mode. • If no operation is performed for at least 2 seconds to return to ON. 15-EN Refer to select the High ... encoder to select the desired treble center frequency. 10 kHz 12.5 kHz 15 kHz 17.5 kHz 10 kHz Emphasizes the displayed treble frequency ranges. Setting the Treble Level 3-2*8Turn the Rotary encoder to "Adjusting Subwoofer Level/Bass Level/Treble Level/Balance (Between Left and Right)/Fader (Between Front and ...
... Bass*10 Treble*10 HPF*10 Black Out SUBW. You can also be individually memorized for each source (FM, AM, CD, etc.) until the setting is set to normal mode. • If no operation is performed for at least 2 seconds to return to ON. 15-EN Refer to select the High ... encoder to select the desired treble center frequency. 10 kHz 12.5 kHz 15 kHz 17.5 kHz 10 kHz Emphasizes the displayed treble frequency ranges. Setting the Treble Level 3-2*8Turn the Rotary encoder to "Adjusting Subwoofer Level/Bass Level/Treble Level/Balance (Between Left and Right)/Fader (Between Front and ...
User Manual
Page 18
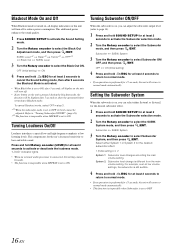
... Black Out Adjustment mode, and then press /ENT. Subwoofer SUBW. This additional power enhances the sound quality. 1 Press SOUND SETUP to activate the Sound Setting mode. 2 Turn the Rotary encoder to select Subwoofer ON/ OFF, and then press /ENT. Subwoofer SUBW. System mode, and then press /ENT....Black Out SUBW. "LOUD" indicator lights. • When an external audio processor is connected, this unit will turn off to reduce power consumption. Setting the Subwoofer System When the subwoofer is on , you can select either System 1 or System 2 for 15 seconds, the unit will return to ...
... Black Out Adjustment mode, and then press /ENT. Subwoofer SUBW. This additional power enhances the sound quality. 1 Press SOUND SETUP to activate the Sound Setting mode. 2 Turn the Rotary encoder to select Subwoofer ON/ OFF, and then press /ENT. Subwoofer SUBW. System mode, and then press /ENT....Black Out SUBW. "LOUD" indicator lights. • When an external audio processor is connected, this unit will turn off to reduce power consumption. Setting the Subwoofer System When the subwoofer is on , you can select either System 1 or System 2 for 15 seconds, the unit will return to ...
User Manual
Page 19
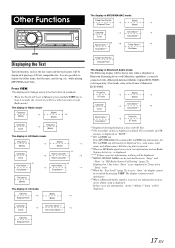
...etc., while playing MP3/WMA/AAC files. It is correctly connected with CD Text. *2 The root folder of disc is set to the Owner's Manual of KCE-300BT. Elapsed Time (Blank) (Blank) Calendar Clock Text (Disc Name) * 1 ...is pressed. • When the Text Scroll is displayed. Displayed in 1 line when "Short" is set, displayed in Bluetooth Audio mode: The Following display will be displayed. *5 RADIO STATION NAME can be displayed...The root folder of a disc with a Bluetooth Interface Module (Alpine KCE-300BT) (sold separately). Elapsed Time The display in CD mode: Track No.
...etc., while playing MP3/WMA/AAC files. It is correctly connected with CD Text. *2 The root folder of disc is set to the Owner's Manual of KCE-300BT. Elapsed Time (Blank) (Blank) Calendar Clock Text (Disc Name) * 1 ...is pressed. • When the Text Scroll is displayed. Displayed in 1 line when "Short" is set, displayed in Bluetooth Audio mode: The Following display will be displayed. *5 RADIO STATION NAME can be displayed...The root folder of a disc with a Bluetooth Interface Module (Alpine KCE-300BT) (sold separately). Elapsed Time The display in CD mode: Track No.
User Manual
Page 21
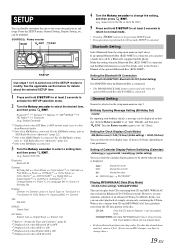
... INT Mute*6 AUX+ Setup AUX+ Name*7 AUX IN GAIN*7 Digital AUX D.AUX Name*8 AUX IN AUX Name*9 Changer Name Power IC Language Set Demo Birthday Set Display: Dimmer Dimmer Level Font Select BGV Select Scroll Type Text Scroll Opening MSG Dimmer XM: XM ADF SIRIUS: Game Alert HD Radio: Station... Box is displayed. SETUP You can select the clock display type, 12-hour or 24-hour, depending on your preference. For the XM Radio setting, refer to set "mm" (Month), and then press /ENT. Turn the Rotary encoder again to "SAT Radio Receiver (Optional)" (page 22). *3 Only when SIRIUS Radio ...
... INT Mute*6 AUX+ Setup AUX+ Name*7 AUX IN GAIN*7 Digital AUX D.AUX Name*8 AUX IN AUX Name*9 Changer Name Power IC Language Set Demo Birthday Set Display: Dimmer Dimmer Level Font Select BGV Select Scroll Type Text Scroll Opening MSG Dimmer XM: XM ADF SIRIUS: Game Alert HD Radio: Station... Box is displayed. SETUP You can select the clock display type, 12-hour or 24-hour, depending on your preference. For the XM Radio setting, refer to set "mm" (Month), and then press /ENT. Turn the Rotary encoder again to "SAT Radio Receiver (Optional)" (page 22). *3 Only when SIRIUS Radio ...
User Manual
Page 22
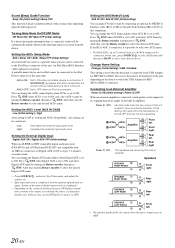
... device and an iPod cannot be connected to ON. AUX+ OFF : Set to OFF when an iPod is input to drive an external amplifier. Setting the External Digital Input Digital AUX ON / Digital AUX OFF (Initial setting) When an ALPINE Ai-NET compatible digital audio processor (PXA-H701) and a DVD player ...(DVE-5207) not compatible with Ai-NET are driven by the built-in amplifier. In this setting can be connected to the iPod Direct connector of this...
... device and an iPod cannot be connected to ON. AUX+ OFF : Set to OFF when an iPod is input to drive an external amplifier. Setting the External Digital Input Digital AUX ON / Digital AUX OFF (Initial setting) When an ALPINE Ai-NET compatible digital audio processor (PXA-H701) and a DVD player ...(DVE-5207) not compatible with Ai-NET are driven by the built-in amplifier. In this setting can be connected to the iPod Direct connector of this...

User Manual
Page 23
...setup main menu in step 2. In addition, all words of the vehicle ON. Switching the Animation Display Type (BGV Select) BGV Select OFF (Initial setting) / BGV Select TYPE 1 / TYPE 2 / TYPE 3 / TYPE 4 You can select your favorite animation display for the HD Radio station name ...with various patterns, which when enabled displays opening messages for Digital Radio Station. Display Setting Display is too bright at a time. Scroll Type Setting TYPE1 / TYPE2 (Initial setting) Choose from 4 types. Tuner Setting (Only when HD Radio is connected) HD Radio is selected on December 25th (...
...setup main menu in step 2. In addition, all words of the vehicle ON. Switching the Animation Display Type (BGV Select) BGV Select OFF (Initial setting) / BGV Select TYPE 1 / TYPE 2 / TYPE 3 / TYPE 4 You can select your favorite animation display for the HD Radio station name ...with various patterns, which when enabled displays opening messages for Digital Radio Station. Display Setting Display is too bright at a time. Scroll Type Setting TYPE1 / TYPE2 (Initial setting) Choose from 4 types. Tuner Setting (Only when HD Radio is connected) HD Radio is selected on December 25th (...
User Manual
Page 24
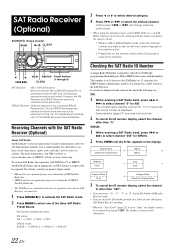
...-clear music, sports, news and talk, coast-to SAT Radio programming. appears in XM or SIRIUS Radio mode, enter the Channel number you nearest Alpine dealer. * XM and its corresponding logos are trademarks of XM Satellite Radio Inc. * SIRIUS and its corresponding logos are operative only when a SAT... XM mode: XM 1 XM 2 XM 3 XM 1 SIRIUS mode: SIRIUS 1 SIRIUS 2 SIRIUS 3 SIRIUS 1 Checking the SAT Radio ID Number A unique Radio ID number is set to receive the Channel. Category Name Channel No./Channel Name 3 To cancel the ID number display, select the channel to call up with the numeric...
...-clear music, sports, news and talk, coast-to SAT Radio programming. appears in XM or SIRIUS Radio mode, enter the Channel number you nearest Alpine dealer. * XM and its corresponding logos are trademarks of XM Satellite Radio Inc. * SIRIUS and its corresponding logos are operative only when a SAT... XM mode: XM 1 XM 2 XM 3 XM 1 SIRIUS mode: SIRIUS 1 SIRIUS 2 SIRIUS 3 SIRIUS 1 Checking the SAT Radio ID Number A unique Radio ID number is set to receive the Channel. Category Name Channel No./Channel Name 3 To cancel the ID number display, select the channel to call up with the numeric...
User Manual
Page 25
... desired band. 2 Press the channel preset button that team are stored in each band (XM1, XM2 and XM3 for XM; Game Update (Initial setting) Game Initial Game Update: Game Initial: The ALERT display interrupts by game progress (change of the available leagues SIRIUS covers. Bluetooth*1 HD Radio*4 ...General Display Bluetooth XM*2/SIRIUS*3 *1 Displayed only when INT Mute is OFF and the mode is set to other than Bluetooth Audio. *2 Only when XM Radio is connected. *3 Only when SIRIUS Radio is connected. *4 Only when HD Radio is ...
... desired band. 2 Press the channel preset button that team are stored in each band (XM1, XM2 and XM3 for XM; Game Update (Initial setting) Game Initial Game Update: Game Initial: The ALERT display interrupts by game progress (change of the available leagues SIRIUS covers. Bluetooth*1 HD Radio*4 ...General Display Bluetooth XM*2/SIRIUS*3 *1 Displayed only when INT Mute is OFF and the mode is set to other than Bluetooth Audio. *2 Only when XM Radio is connected. *3 Only when SIRIUS Radio is connected. *4 Only when HD Radio is ...

User Manual
Page 26
...List appears after DELETE MODE has been displayed. 3 Turn the Rotary encoder to select a list you press and hold /ENT for 10 seconds, the setting mode is displayed. Category Search mode 3 Turn the Rotary encoder to select the desired Category, and then press /ENT. 4 Turn the Rotary encoder to...(s) are found 1 Turn the Rotary encoder to select the desired information. 2 Press /ENT. • If no operation is performed for 10 seconds, the setting mode is performed for programs by Category, Channel, Artist or Song. 1 Press /ENT in XM or SIRIUS mode to activate Quick Search mode. 2 Turn the...
...List appears after DELETE MODE has been displayed. 3 Turn the Rotary encoder to select a list you press and hold /ENT for 10 seconds, the setting mode is displayed. Category Search mode 3 Turn the Rotary encoder to select the desired Category, and then press /ENT. 4 Turn the Rotary encoder to...(s) are found 1 Turn the Rotary encoder to select the desired information. 2 Press /ENT. • If no operation is performed for 10 seconds, the setting mode is performed for programs by Category, Channel, Artist or Song. 1 Press /ENT in XM or SIRIUS mode to activate Quick Search mode. 2 Turn the...
User Manual
Page 27
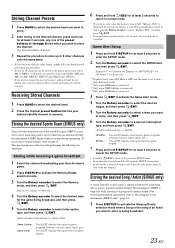
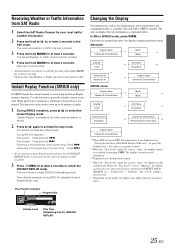
...least 2 seconds. • Channel other than Weather or Traffic can also be stored and recalled. The received weather or traffic channel is set to activate the play mode. This function can display this information is saved using the Instant Replay memory function. Time display example during ... the display scrolls only once after any time. Each time you continue to press Fast forward until the end, the INSTANT REPLAY mode is set to select the Instant Replay mode. Use this button, the display changes as shown below . The stored Weather or Traffic channel will be ...
...least 2 seconds. • Channel other than Weather or Traffic can also be stored and recalled. The received weather or traffic channel is set to activate the play mode. This function can display this information is saved using the Instant Replay memory function. Time display example during ... the display scrolls only once after any time. Each time you continue to press Fast forward until the end, the INSTANT REPLAY mode is set to select the Instant Replay mode. Use this button, the display changes as shown below . The stored Weather or Traffic channel will be ...
User Manual
Page 28
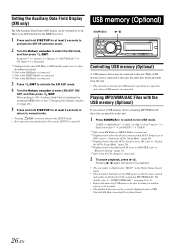
... ON/ OFF, and then press /ENT. Bluetooth*1 HD Radio*4 General Display Bluetooth XM*2/SIRIUS*3 *1 Displayed only when INT Mute is OFF and the mode is set to ADAPTER, refer to the previous SETUP mode. • If no operation is performed for 60 seconds, SETUP is canceled. With a USB memory device connected... to "CD/MP3/WMA/AAC" on pages 10 to 13. • Before disconnecting USB memory, be sure to change to another source or set to the USB mode. When setting to ON, Auxiliary Data Field is displayed by pressing VIEW (refer to the "Changing the Display" section on page 25.). 5 Press and...
... ON/ OFF, and then press /ENT. Bluetooth*1 HD Radio*4 General Display Bluetooth XM*2/SIRIUS*3 *1 Displayed only when INT Mute is OFF and the mode is set to ADAPTER, refer to the previous SETUP mode. • If no operation is performed for 60 seconds, SETUP is canceled. With a USB memory device connected... to "CD/MP3/WMA/AAC" on pages 10 to 13. • Before disconnecting USB memory, be sure to change to another source or set to the USB mode. When setting to ON, Auxiliary Data Field is displayed by pressing VIEW (refer to the "Changing the Display" section on page 25.). 5 Press and...
User Manual
Page 29
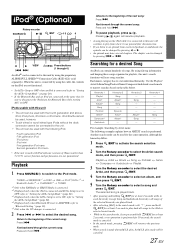
...to select the Artist search mode, and then press /ENT. iPods usable with the following example explains how an ARTIST search is connected (refer to "Setting the AUX+ Setup Mode" on the table below. Fast forward through the current song: Press and hold . 3 To pause playback, press / .... By using the proprietary ALPINE FULL SPEED™ Connection Cable (KCE-422i) (sold separately). Another search mode can be used for 10 seconds, the search mode is canceled. •...
...to select the Artist search mode, and then press /ENT. iPods usable with the following example explains how an ARTIST search is connected (refer to "Setting the AUX+ Setup Mode" on the table below. Fast forward through the current song: Press and hold . 3 To pause playback, press / .... By using the proprietary ALPINE FULL SPEED™ Connection Cable (KCE-422i) (sold separately). Another search mode can be used for 10 seconds, the search mode is canceled. •...


