Owner Manual
Page 3
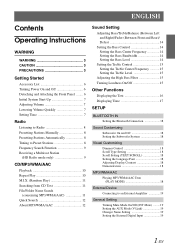
ENGLISH Contents Operating Instructions WARNING WARNING 3 CAUTION 3 PRECAUTIONS 3 Getting Started Accessory List 6 Turning Power On and Off 6 Detaching and Attaching the Front Panel ........ 6 Initial System Start-Up 7 Adjusting Volume 7 Lowering Volume Quickly 7 Setting Time 7 Radio Listening to Radio 8 Presetting Stations Manually 8 Presetting Stations Automatically 8 Tuning to Preset Stations 8 Frequency Search Function 9 Receiving a Multicast Station (HD Radio mode only 9 CD/MP3/WMA/AAC Playback 10 Repeat Play 10 M.I.X. (Random Play 11 Searching from CD Text 11 File/...
ENGLISH Contents Operating Instructions WARNING WARNING 3 CAUTION 3 PRECAUTIONS 3 Getting Started Accessory List 6 Turning Power On and Off 6 Detaching and Attaching the Front Panel ........ 6 Initial System Start-Up 7 Adjusting Volume 7 Lowering Volume Quickly 7 Setting Time 7 Radio Listening to Radio 8 Presetting Stations Manually 8 Presetting Stations Automatically 8 Tuning to Preset Stations 8 Frequency Search Function 9 Receiving a Multicast Station (HD Radio mode only 9 CD/MP3/WMA/AAC Playback 10 Repeat Play 10 M.I.X. (Random Play 11 Searching from CD Text 11 File/...
Owner Manual
Page 4
... the stored Alert Memory (SIRIUS only 22 Search Function 22 Category Search mode 22 Channel/Artist/Song Search mode 22 Quick Search Function 22 Receiving Weather or Traffic Information from SAT Radio 23 Instant Replay Function (SIRIUS only) ......... 23 Changing the Display 23 Setting the Auxiliary Data Field Display ....... 23 iPod® (Optional) Playback 24 Searching for a desired Song 24 Quick Search 25 Direct Search Function 25 Select Playlist/Artist...
... the stored Alert Memory (SIRIUS only 22 Search Function 22 Category Search mode 22 Channel/Artist/Song Search mode 22 Quick Search Function 22 Receiving Weather or Traffic Information from SAT Radio 23 Instant Replay Function (SIRIUS only) ......... 23 Changing the Display 23 Setting the Auxiliary Data Field Display ....... 23 iPod® (Optional) Playback 24 Searching for a desired Song 24 Quick Search 25 Direct Search Function 25 Select Playlist/Artist...

Owner Manual
Page 5
... product. Playing a bad disc could severely damage the playback mechanism. Maintenance If you are not sure.) Failure to your Alpine dealer or the nearest Alpine Service Station for repairing. Return it to do so may result in an accident. DO NOT OPERATE ANY FUNCTION THAT TAKES YOUR ATTENTION AWAY FROM SAFELY DRIVING YOUR VEHICLE. LISTENING AT LOUD VOLUME LEVELS IN A CAR MAY ALSO...
... product. Playing a bad disc could severely damage the playback mechanism. Maintenance If you are not sure.) Failure to your Alpine dealer or the nearest Alpine Service Station for repairing. Return it to do so may result in an accident. DO NOT OPERATE ANY FUNCTION THAT TAKES YOUR ATTENTION AWAY FROM SAFELY DRIVING YOUR VEHICLE. LISTENING AT LOUD VOLUME LEVELS IN A CAR MAY ALSO...

Owner Manual
Page 6
..., push the RESET switch with a clean, soft cloth from jamming, "ERROR" is displayed if discs with a ballpoint pen or other such instrument, then insert the disc again. For routine cleaning, wipe the playing surface with a pointed object such as a ballpoint pen. Transparent Sheet Disc Stabilizer Installation Location Make sure this unit will be installed in skips, but this could cause the CD player to feel...
..., push the RESET switch with a clean, soft cloth from jamming, "ERROR" is displayed if discs with a ballpoint pen or other such instrument, then insert the disc again. For routine cleaning, wipe the playing surface with a pointed object such as a ballpoint pen. Transparent Sheet Disc Stabilizer Installation Location Make sure this unit will be installed in skips, but this could cause the CD player to feel...
Owner Manual
Page 9
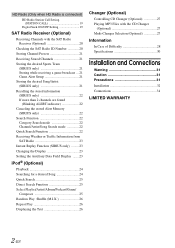
... the desired sound is canceled. • To synchronize the clock to its previous level. Lowering Volume Quickly Activating the Audio Mute function will instantly lower the volume level by about 20 dB. Connectable to activate the MUTE mode. Controllable with Remote Control This unit can be used. Point the optional remote control transmitter at least 2 seconds to activate the SETUP selection mode. 2 Turn the Rotary encoder to select CLOCK ADJUST, and then press / /ENT. 3 Turn the Rotary encoder to set hour...
... the desired sound is canceled. • To synchronize the clock to its previous level. Lowering Volume Quickly Activating the Audio Mute function will instantly lower the volume level by about 20 dB. Connectable to activate the MUTE mode. Controllable with Remote Control This unit can be used. Point the optional remote control transmitter at least 2 seconds to activate the SETUP selection mode. 2 Turn the Rotary encoder to select CLOCK ADJUST, and then press / /ENT. 3 Turn the Rotary encoder to set hour...
Owner Manual
Page 10
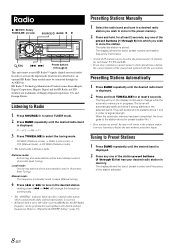
..., preset number and station frequency memorized. • A total of the station preset buttons (1 through 6) This unit cannot receive HD Radio™ signals (digital terrestrial radio). Manual mode: The frequency is displayed. 2 Press any one of 18 stations can be automatically tuned in (Automatic Seek Tuning). The tuner will be stored in the preset memory (6 stations for at least 2 seconds. When the automatic memory has been completed, the tuner goes to the station stored in the selected...
..., preset number and station frequency memorized. • A total of the station preset buttons (1 through 6) This unit cannot receive HD Radio™ signals (digital terrestrial radio). Manual mode: The frequency is displayed. 2 Press any one of 18 stations can be automatically tuned in (Automatic Seek Tuning). The tuner will be stored in the preset memory (6 stations for at least 2 seconds. When the automatic memory has been completed, the tuner goes to the station stored in the selected...
Owner Manual
Page 12
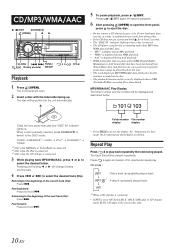
... panel manually and "DISC IN" indicator lights up . Folder number File number display display • Press TITLE to select the desired track (file). Repeat Play Press 4 to open . 2 Insert a disc with the label side facing up . TUNER XM/SIRIUS*1 DISC iPod*2 CHANGER*3 TUNER *1 Only when XM Radio or Sirius Radio is connected. *2 Only when the iPod is connected. *3 Only when the CD changer is already inserted, press SOURCE/ to switch to deactivate repeat play back repeatedly the track being played...
... panel manually and "DISC IN" indicator lights up . Folder number File number display display • Press TITLE to select the desired track (file). Repeat Play Press 4 to open . 2 Insert a disc with the label side facing up . TUNER XM/SIRIUS*1 DISC iPod*2 CHANGER*3 TUNER *1 Only when XM Radio or Sirius Radio is connected. *2 Only when the iPod is connected. *3 Only when the CD changer is already inserted, press SOURCE/ to switch to deactivate repeat play back repeatedly the track being played...
Owner Manual
Page 16
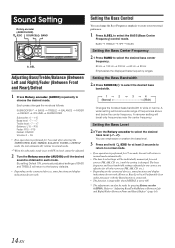
Each press changes the mode as follows: SUBWOOFER*1 BASS TREBLE BALANCE DEFEAT VOLUME SUBWOOFER FADER Subwoofer: 0 ~ +15 Bass level: -7 ~ +7 Treble level: -7 ~ +7 Balance: L15 ~ R15 Fader: R15 ~ F15 Defeat: ON/OFF Volume: 0 ~ 35 • If no operation is obtained in each source (FM, AM, CD, etc.) until the desired sound is performed for all other sources (FM, AM, CD, etc.). • Depending on the connected devices, some functions and display indications do not work . Setting the Bass Control You can also...
Each press changes the mode as follows: SUBWOOFER*1 BASS TREBLE BALANCE DEFEAT VOLUME SUBWOOFER FADER Subwoofer: 0 ~ +15 Bass level: -7 ~ +7 Treble level: -7 ~ +7 Balance: L15 ~ R15 Fader: R15 ~ F15 Defeat: ON/OFF Volume: 0 ~ 35 • If no operation is obtained in each source (FM, AM, CD, etc.) until the desired sound is performed for all other sources (FM, AM, CD, etc.). • Depending on the connected devices, some functions and display indications do not work . Setting the Bass Control You can also...

Owner Manual
Page 18
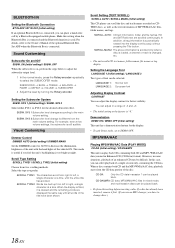
... file name, and the tag, etc., while playing MP3/WMA/AAC files. The display in Radio mode: FREQUENCY CLOCK RADIO STATION NAME*4/5 ARTIST NAME*4 ALBUM NAME*5 SONG NAME*4 FREQUENCY The display in CD mode: TRACK NO./ELAPSED TIME TRACK NO./CLOCK TEXT (DISC NAME)*1 TEXT (TRACK NAME)*1 TRACK NO./ELAPSED TIME The display in SETUP mode. Press TITLE. "DISC TEXT"/"TRACK TEXT" is displayed for changer. *2 ID3 tag/WMA tag If an...
... file name, and the tag, etc., while playing MP3/WMA/AAC files. The display in Radio mode: FREQUENCY CLOCK RADIO STATION NAME*4/5 ARTIST NAME*4 ALBUM NAME*5 SONG NAME*4 FREQUENCY The display in CD mode: TRACK NO./ELAPSED TIME TRACK NO./CLOCK TEXT (DISC NAME)*1 TEXT (TRACK NAME)*1 TRACK NO./ELAPSED TIME The display in SETUP mode. Press TITLE. "DISC TEXT"/"TRACK TEXT" is displayed for changer. *2 ID3 tag/WMA tag If an...
Owner Manual
Page 19
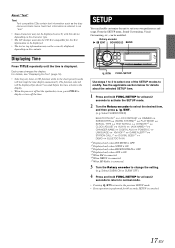
... not be displayed correctly with this device, depending on , press TITLE to display or turn off the time. /RTN FUNC./SETUP Use steps 1 to 4 to select one of the SETUP modes to change the setting. (e.g. Each press changes the display. Select SUBWOOFER) BLUETOOTH IN*1 LCD CONTRAST DIMMER SUBWOOFER (SUBW. Rotary encoder / /ENT SOURCE/ BAND Displaying Time Press TITLE repeatedly until the time is connected. 3 Turn the Rotary encoder to modify. About "Text" Text: Text compatible CDs contain...
... not be displayed correctly with this device, depending on , press TITLE to display or turn off the time. /RTN FUNC./SETUP Use steps 1 to 4 to select one of the SETUP modes to change the setting. (e.g. Each press changes the display. Select SUBWOOFER) BLUETOOTH IN*1 LCD CONTRAST DIMMER SUBWOOFER (SUBW. Rotary encoder / /ENT SOURCE/ BAND Displaying Time Press TITLE repeatedly until the time is connected. 3 Turn the Rotary encoder to modify. About "Text" Text: Text compatible CDs contain...
Owner Manual
Page 20
... audible. SUBWOOFER BASS TREBLE BALANCE FADER DEFEAT VOLUME SUBWOOFER 2 Adjust the level by a Bluetooth-equipped mobile phone. Setting the Subwoofer System SUBW. SYS 1 (Initial setting) / SUBW. SUBW. This mode is useful if you prefer. SCROLL TYPE2: Words are built up from left , a single character at a time, until all tag information is automatically rotated into the display continuously, without pressing the Title button. Demonstration DEMO ON / DEMO OFF (Initial setting) This unit has...
... audible. SUBWOOFER BASS TREBLE BALANCE FADER DEFEAT VOLUME SUBWOOFER 2 Adjust the level by a Bluetooth-equipped mobile phone. Setting the Subwoofer System SUBW. SYS 1 (Initial setting) / SUBW. SUBW. This mode is useful if you prefer. SCROLL TYPE2: Words are built up from left , a single character at a time, until all tag information is automatically rotated into the display continuously, without pressing the Title button. Demonstration DEMO ON / DEMO OFF (Initial setting) This unit has...

Owner Manual
Page 21
... left Rear right POWER IC ON : The speakers are connected, set Digital AUX to ON to enjoy 5.1-channel surround sound. • Press SOURCE/ , and select the DIGITAL-AUX mode, and adjust the volume, etc. • Depending on the device to which the USB Adapter for Digital Radio Station. Press / /ENT when AUX IN is changed to another one. Changer Name Setting CHANGER (Initial Setting) / USB / PORTABLE This setting is used for the HD Radio station name can change the AUX name display when AUX...
... left Rear right POWER IC ON : The speakers are connected, set Digital AUX to ON to enjoy 5.1-channel surround sound. • Press SOURCE/ , and select the DIGITAL-AUX mode, and adjust the volume, etc. • Depending on the device to which the USB Adapter for Digital Radio Station. Press / /ENT when AUX IN is changed to another one. Changer Name Setting CHANGER (Initial Setting) / USB / PORTABLE This setting is used for the HD Radio station name can change the AUX name display when AUX...

Owner Manual
Page 22
... SIRIUS mode: S1 S2 S3 S1 Checking the SAT Radio ID Number A unique Radio ID number is connected via satellite. The unit alternately displays channel No. SAT Radio Receiver (Optional) Rotary encoder / /ENT SOURCE/ BAND 12 3 Press or to select desired category. 4 Press or to the SIRIUS Receiver's Owner's Manual. If the channel number is 3 digits, the Channel is automatically received after the channel number has been input. /ESC /RTN FUNC./SETUP Preset buttons TITLE (1 through 6) SAT Receiver: SIRIUS Receiver: XM or SIRIUS Receiver...
... SIRIUS mode: S1 S2 S3 S1 Checking the SAT Radio ID Number A unique Radio ID number is connected via satellite. The unit alternately displays channel No. SAT Radio Receiver (Optional) Rotary encoder / /ENT SOURCE/ BAND 12 3 Press or to select desired category. 4 Press or to the SIRIUS Receiver's Owner's Manual. If the channel number is 3 digits, the Channel is automatically received after the channel number has been input. /ESC /RTN FUNC./SETUP Preset buttons TITLE (1 through 6) SAT Receiver: SIRIUS Receiver: XM or SIRIUS Receiver...

Owner Manual
Page 23
... using the interruption ALERT display while receiving other programming. This function becomes effective after you store a channel in a preset memory which you want to store, and then press / /ENT. 5 Turn the Rotary encoder to select an interruption type, and then press / /ENT. Once stored, game times and scores for that has your favorite team's game. 2 Press FUNC./SETUP to activate the function mode. 3 Press 1 to activate...
... using the interruption ALERT display while receiving other programming. This function becomes effective after you store a channel in a preset memory which you want to store, and then press / /ENT. 5 Turn the Rotary encoder to select an interruption type, and then press / /ENT. Once stored, game times and scores for that has your favorite team's game. 2 Press FUNC./SETUP to activate the function mode. 3 Press 1 to activate...
Owner Manual
Page 29
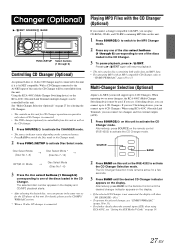
... the Remote Control until the desired changer indicator appears on the connected source. • Press BAND to switch the Disc mode in the same way as the CD changer. 1 Press SOURCE/ to activate the CHANGER mode. • The source indicator varies depending on the display. • If the selected CD Changer is connected. Playing MP3 Files with the CD Changer (Optional) If you can operate in the Changer mode. 2 Press FUNC./SETUP to activate Disc Select mode. Using the KCA-400C (Multi-Changer Switching device...
... the Remote Control until the desired changer indicator appears on the connected source. • Press BAND to switch the Disc mode in the same way as the CD changer. 1 Press SOURCE/ to activate the CHANGER mode. • The source indicator varies depending on the display. • If the selected CD Changer is connected. Playing MP3 Files with the CD Changer (Optional) If you can operate in the Changer mode. 2 Press FUNC./SETUP to activate Disc Select mode. Using the KCA-400C (Multi-Changer Switching device...
Owner Manual
Page 30
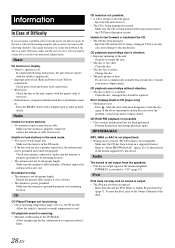
... disc has scratches. - Perform finalization and attempt playback again. The CD format is output. • The iPod has not been recognized. - iPod iPod does not play and no output signal of the internal amplifier. - If connected following instructions in the CD Player Operation section. replace with the vehicle's ignition off. • Improper power lead (Red) and battery lead (Yellow) connections. - Make sure the antenna is poorly grounded. - Extend the antenna fully; CD CD Player/Changer...
... disc has scratches. - Perform finalization and attempt playback again. The CD format is output. • The iPod has not been recognized. - iPod iPod does not play and no output signal of the internal amplifier. - If connected following instructions in the CD Player Operation section. replace with the vehicle's ignition off. • Improper power lead (Red) and battery lead (Yellow) connections. - Make sure the antenna is poorly grounded. - Extend the antenna fully; CD CD Player/Changer...
Owner Manual
Page 31
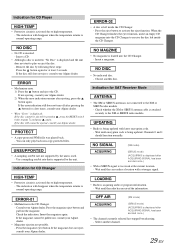
... or SIRIUS antenna cable is attached securely to the XM or SIRIUS radio module. - The indication will disappear when the temperature returns to normal operating range. • Malfunction in the CD Changer. - Check the indication. If the magazine does not eject, consult your Alpine dealer. • Magazine ejection not possible. - Channels 0 and 1 should function normally. (XM mode) (SIRIUS mode) (ACQUIRING is displayed after ejecting, press the button again. Select another disc...
... or SIRIUS antenna cable is attached securely to the XM or SIRIUS radio module. - The indication will disappear when the temperature returns to normal operating range. • Malfunction in the CD Changer. - Check the indication. If the magazine does not eject, consult your Alpine dealer. • Magazine ejection not possible. - Channels 0 and 1 should function normally. (XM mode) (SIRIUS mode) (ACQUIRING is displayed after ejecting, press the button again. Select another disc...
Owner Manual
Page 33
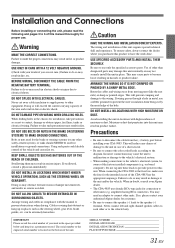
... due to electrical shorts. Failure to make sure the fuse for the intended circuit of the CDA-9883 has the appropriate amperage. Installation and Connections Before installing or connecting the unit, please read the following and pages 3 to 5 of this manual thoroughly for proper use only the specified accessory parts. DO NOT INSTALL IN LOCATIONS WHICH MIGHT HINDER VEHICLE OPERATION, SUCH AS THE STEERING WHEEL...
... due to electrical shorts. Failure to make sure the fuse for the intended circuit of the CDA-9883 has the appropriate amperage. Installation and Connections Before installing or connecting the unit, please read the following and pages 3 to 5 of this manual thoroughly for proper use only the specified accessory parts. DO NOT INSTALL IN LOCATIONS WHICH MIGHT HINDER VEHICLE OPERATION, SUCH AS THE STEERING WHEEL...
Owner Manual
Page 37
.... Make sure the connection is made to bare metal and is turned on or in the EQ/DIV position. FULL SPEED™ Connection Cable (KCE-422i) (sold separately) iPod Direct Connector Control iPod signals Connect this lead to the positive (+) post of the vehicle's battery. Switched Power Lead (Ignition) (Red) Connect this lead to an open terminal on the vehicle's fuse box or another device (CD Changer, Equalizer, HD Radio™ TUNER...
.... Make sure the connection is made to bare metal and is turned on or in the EQ/DIV position. FULL SPEED™ Connection Cable (KCE-422i) (sold separately) iPod Direct Connector Control iPod signals Connect this lead to the positive (+) post of the vehicle's battery. Switched Power Lead (Ignition) (Red) Connect this lead to an open terminal on the vehicle's fuse box or another device (CD Changer, Equalizer, HD Radio™ TUNER...
Owner Manual
Page 39
... repairs are pleased to offer this warranty stamped upon installation by negligence, misuse, improper operation or failure to you may not apply to follow instructions contained in the Canada. THE TERM "INCIDENTAL DAMAGES" REFERS TO EXPENSES OF TRANSPORTING THE PRODUCT TO THE ALPINE SERVICE CENTER, LOSS OF THE ORIGINAL PURCHASER'S TIME, LOSS OF THE USE OF THE PRODUCT, BUS...
... repairs are pleased to offer this warranty stamped upon installation by negligence, misuse, improper operation or failure to you may not apply to follow instructions contained in the Canada. THE TERM "INCIDENTAL DAMAGES" REFERS TO EXPENSES OF TRANSPORTING THE PRODUCT TO THE ALPINE SERVICE CENTER, LOSS OF THE ORIGINAL PURCHASER'S TIME, LOSS OF THE USE OF THE PRODUCT, BUS...


