Owners Manual
Page 6
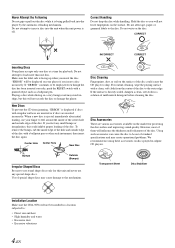
... CD player to skip. Use of standard specifications and may create operational problems. We recommend not using these accessories on the surface. For routine cleaning, wipe the playing surface with a pointed object such as a ballpoint pen. Transparent Sheet Disc Stabilizer Installation Location Make sure the CDA-9856... Hold the disc so you feel around the inside edge of the hole and outside edge of them will not be installed in Alpine CD players. Bumps Outside (Bumps) Irregular Shaped Discs Be sure to the mechanism. Playing a disc while driving on a very bumpy road...
... CD player to skip. Use of standard specifications and may create operational problems. We recommend not using these accessories on the surface. For routine cleaning, wipe the playing surface with a pointed object such as a ballpoint pen. Transparent Sheet Disc Stabilizer Installation Location Make sure the CDA-9856... Hold the disc so you feel around the inside edge of the hole and outside edge of them will not be installed in Alpine CD players. Bumps Outside (Bumps) Irregular Shaped Discs Be sure to the mechanism. Playing a disc while driving on a very bumpy road...

Owners Manual
Page 7
.... To customers using CD-R/CD-RW • If a CD-R/CD-RW cannot be played Use only compact discs with MP3/WMA files written in the car or the unit for private, noncommercial use and does not convey a license nor imply any right to use commercially available disc accessories. For details, please... car or this product in any other media), broadcasting/streaming via internet, intranets and/or other networks or in the U.S. On handling Compact Discs (CD/CD-R/CD-RW) • Do not touch the surface. • Do not expose the disc to direct sunlight. • Do not affix stickers or labels...
.... To customers using CD-R/CD-RW • If a CD-R/CD-RW cannot be played Use only compact discs with MP3/WMA files written in the car or the unit for private, noncommercial use and does not convey a license nor imply any right to use commercially available disc accessories. For details, please... car or this product in any other media), broadcasting/streaming via internet, intranets and/or other networks or in the U.S. On handling Compact Discs (CD/CD-R/CD-RW) • Do not touch the surface. • Do not expose the disc to direct sunlight. • Do not affix stickers or labels...
Owners Manual
Page 31
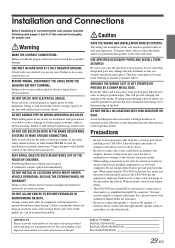
... may result in fire or electric shock. Route the cables and wiring away from the (-) battery post before installing your Alpine dealer. • The CDA-9856 uses female RCA-type jacks for this unit requires special technical skill and experience. This will exceed the current carrying capacity... so may need an adaptor to connect other or to the vehicle body. You may result in metal, use only the specified accessory parts. Warning MAKE THE CORRECT CONNECTIONS. Swallowing them may obstruct forward vision or hamper movement etc. Caution HAVE THE WIRING AND INSTALLATION...
... may result in fire or electric shock. Route the cables and wiring away from the (-) battery post before installing your Alpine dealer. • The CDA-9856 uses female RCA-type jacks for this unit requires special technical skill and experience. This will exceed the current carrying capacity... so may need an adaptor to connect other or to the vehicle body. You may result in metal, use only the specified accessory parts. Warning MAKE THE CORRECT CONNECTIONS. Swallowing them may obstruct forward vision or hamper movement etc. Caution HAVE THE WIRING AND INSTALLATION...
Owners Manual
Page 32
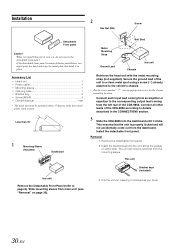
... lead coming from the dashboard. Remove the detachable front panel. 2. The unit can now be mounted within 35 degrees of the CDA-9856. Installation 2 Hex Nut (M5) Screw Detachable Front panel Caution When you install this unit in your car, do so. 30... screw (*1) already attached to front. Bracket keys (Included) 3. Pull the unit out, keeping it in the CONNECTlONS section. 3 Slide the CDA-9856 into the unit, along the guides on page 30). Accessory List • Head unit 1 • Power cable 1 • Mounting sleeve 1 • Carrying case 1 • Bracket key 2 ...
... lead coming from the dashboard. Remove the detachable front panel. 2. The unit can now be mounted within 35 degrees of the CDA-9856. Installation 2 Hex Nut (M5) Screw Detachable Front panel Caution When you install this unit in your car, do so. 30... screw (*1) already attached to front. Bracket keys (Included) 3. Pull the unit out, keeping it in the CONNECTlONS section. 3 Slide the CDA-9856 into the unit, along the guides on page 30). Accessory List • Head unit 1 • Power cable 1 • Mounting sleeve 1 • Carrying case 1 • Bracket key 2 ...
Owners Manual
Page 35
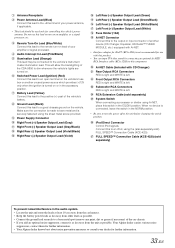
...for further information. 33-EN This will allow the backlighting of the CDA-9856 to dim whenever the vehicle's lights are turned on the vehicle. ... the switch position. Your Alpine dealer carries various noise suppressors, contact them for further information. • Your Alpine dealer knows best about noise...is turned on the vehicle's fuse box or another device (CD Changer, Equalizer, HD Radio™ TUNER MODULE, etc.) equipped with Ai-NET. •...On Lead (Blue/White) Connect this switch in the accessory position. When no device is left. RCA Extension Cable (sold ) FULL ...
...for further information. 33-EN This will allow the backlighting of the CDA-9856 to dim whenever the vehicle's lights are turned on the vehicle. ... the switch position. Your Alpine dealer carries various noise suppressors, contact them for further information. • Your Alpine dealer knows best about noise...is turned on the vehicle's fuse box or another device (CD Changer, Equalizer, HD Radio™ TUNER MODULE, etc.) equipped with Ai-NET. •...On Lead (Blue/White) Connect this switch in the accessory position. When no device is left. RCA Extension Cable (sold ) FULL ...
