
Owners Manual
Page 2
...(CDA-9855 only 7 Setting Time (CDA-9853 only 7 Opening and Closing the Movable Display ...... 8 Display Tilt Adjustment 8 Adjusting Volume 8 Lowering Volume Quickly 8 Detaching and Attaching the Front Panel ......... 8 Radio Changing the Radio Frequencies for each Country 9 Listening to Radio 9 Manual ...Storing of Station Presets 9 Automatic Memory of Station Presets 9 Tuning to Preset Stations 10 Station Title Search Function 10 Freqency Search Function 10 CD / MP3 / WMA...
...(CDA-9855 only 7 Setting Time (CDA-9853 only 7 Opening and Closing the Movable Display ...... 8 Display Tilt Adjustment 8 Adjusting Volume 8 Lowering Volume Quickly 8 Detaching and Attaching the Front Panel ......... 8 Radio Changing the Radio Frequencies for each Country 9 Listening to Radio 9 Manual ...Storing of Station Presets 9 Automatic Memory of Station Presets 9 Tuning to Preset Stations 10 Station Title Search Function 10 Freqency Search Function 10 CD / MP3 / WMA...
Owners Manual
Page 7
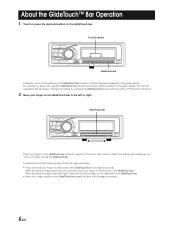
... bar toward the right, place and hold your finger on either the ON or OFF function indicators." 2 Move your finger across the GlideTouch bar. The manual expresses this as follows: "Change the setting by pressing the GlideTouch bar below where ON is scrolled. 6-EN When scrolling the page toward the side...
... bar toward the right, place and hold your finger on either the ON or OFF function indicators." 2 Move your finger across the GlideTouch bar. The manual expresses this as follows: "Change the setting by pressing the GlideTouch bar below where ON is scrolled. 6-EN When scrolling the page toward the side...
Owners Manual
Page 10
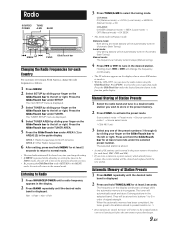
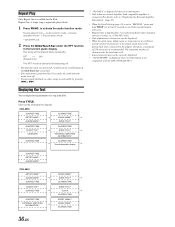
... the GlideTouch bar under the selected preset number. CDA-9855: DX (Distance mode) → LOCAL (Local mode) → MANUAL (Manual mode) → DX CDA-9853: DX SEEK (Distance mode) → SEEK (Local mode) → OFF (Manual mode) → DX SEEK • The initial mode is manually tuned in a desired radio station you wish to select the source operation...
... the GlideTouch bar under the selected preset number. CDA-9855: DX (Distance mode) → LOCAL (Local mode) → MANUAL (Manual mode) → DX CDA-9853: DX SEEK (Distance mode) → SEEK (Local mode) → OFF (Manual mode) → DX SEEK • The initial mode is manually tuned in a desired radio station you wish to select the source operation...
Owners Manual
Page 14
...be made during M.I .X. This is WMA? What is achieved while still maintaining near CD quality. This is in the selected folder is 255. For details on creating MP3/WMA files, refer to the user's manual for a file in the File Name Search mode, press to switch to the ... name is "MPEG-1 Audio Layer 3," is a compression standard prescribed by the ISO, the International Standardization Organization and MPEG which is cancelled by using CD-R writing software. MP3 encoding is compressed audio data. The tag information may not be made . • "NO FILE" is displayed for the root...
...be made during M.I .X. This is WMA? What is achieved while still maintaining near CD quality. This is in the selected folder is 255. For details on creating MP3/WMA files, refer to the user's manual for a file in the File Name Search mode, press to switch to the ... name is "MPEG-1 Audio Layer 3," is a compression standard prescribed by the ISO, the International Standardization Organization and MPEG which is cancelled by using CD-R writing software. MP3 encoding is compressed audio data. The tag information may not be made . • "NO FILE" is displayed for the root...
Owners Manual
Page 18
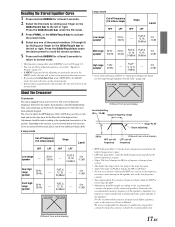
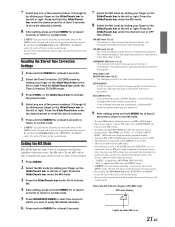
... 6, 12, 18, 12, 18, 24 dB/oct 24 dB/oct 0 to the outputs. We are unsure about this point, please consult your authorized Alpine dealer. 2 way mode Cut-off frequency • HPF (high pass filter): Cuts the lower frequencies and allows the higher frequencies to pass. • LPF...selection secreen. • By pressing the GlideTouch bar under the EQ mode. 3 Press FUNC. Determine the recommended crossover frequency of Alpine speakers, refer to the respective Owner's Manual. Recalling the Stored Equalizer Curve 1 Press and hold MENU for at least 2 seconds. 2 Select the EQ mode by sliding ...
... 6, 12, 18, 12, 18, 24 dB/oct 24 dB/oct 0 to the outputs. We are unsure about this point, please consult your authorized Alpine dealer. 2 way mode Cut-off frequency • HPF (high pass filter): Cuts the lower frequencies and allows the higher frequencies to pass. • LPF...selection secreen. • By pressing the GlideTouch bar under the EQ mode. 3 Press FUNC. Determine the recommended crossover frequency of Alpine speakers, refer to the respective Owner's Manual. Recalling the Stored Equalizer Curve 1 Press and hold MENU for at least 2 seconds. 2 Select the EQ mode by sliding ...
Owners Manual
Page 22
... details, refer to the Owner's Manual of the audio processor. • "CMPM" is applied for MP3/WMA, WAV and iPod. • "SAT" is applied for at least 2 seconds to return to normal mode. • To cancel MX mode for all frequencies. The FM radio, CD, and MP3, will return to the.... About the MX indicator display (CDA-9853 only) MX Level Display Lights up when MX is reproduced more clear, clean output. MX uses this large data quantity to reproduce a more clearly. (DVD MUSIC): A DVD or Video CD contains a large quantity of data such as FM radio, CD, and MP3/WMA can have its...
... details, refer to the Owner's Manual of the audio processor. • "CMPM" is applied for MP3/WMA, WAV and iPod. • "SAT" is applied for at least 2 seconds to return to normal mode. • To cancel MX mode for all frequencies. The FM radio, CD, and MP3, will return to the.... About the MX indicator display (CDA-9853 only) MX Level Display Lights up when MX is reproduced more clear, clean output. MX uses this large data quantity to reproduce a more clearly. (DVD MUSIC): A DVD or Video CD contains a large quantity of data such as FM radio, CD, and MP3/WMA can have its...

Owners Manual
Page 24
... rate and sampling rate are displayed. 6 This indicator is lit when an artist name is referred to input the CD/Station name (page 24). FOLDER NO./FILE NO. About the indicator display (CDA-9853 only) About "Title" and "Text" Title: With this unit. • If the title was not previously input, "... of a disc with this device, depending on the character type. • The CD changer must also be CD Text compatible for the Text information to be displayed. • When the Scroll Setting (page 30) is set to "MANUAL," press and hold TITLE for a root folder that does not have a folder name...
... rate and sampling rate are displayed. 6 This indicator is lit when an artist name is referred to input the CD/Station name (page 24). FOLDER NO./FILE NO. About the indicator display (CDA-9853 only) About "Title" and "Text" Title: With this unit. • If the title was not previously input, "... of a disc with this device, depending on the character type. • The CD changer must also be CD Text compatible for the Text information to be displayed. • When the Scroll Setting (page 30) is set to "MANUAL," press and hold TITLE for a root folder that does not have a folder name...
Owners Manual
Page 26
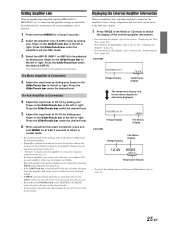
...will return to the normal mode. • If no peration is performed in the Radio or CD mode to switch the display of the external amplifier. • If amplifier settings ...Adjust the input level of each amplifier. VOLTAGE:10.1V HIGH Voltage Display Fan Status Display CDA-9853 Voltage Display Fan Status Display 12.4V HIGH 42.0°C Temperature Display • To switch ...For details of CH 3/4 by sliding your finger on each of the settings, refer to the Owner's Manual of the external amplifier information. • For switching the display, refer to the section "Displaying the...
...will return to the normal mode. • If no peration is performed in the Radio or CD mode to switch the display of the external amplifier. • If amplifier settings ...Adjust the input level of each amplifier. VOLTAGE:10.1V HIGH Voltage Display Fan Status Display CDA-9853 Voltage Display Fan Status Display 12.4V HIGH 42.0°C Temperature Display • To switch ...For details of CH 3/4 by sliding your finger on each of the settings, refer to the Owner's Manual of the external amplifier information. • For switching the display, refer to the section "Displaying the...

Owners Manual
Page 27
... Multicolor mode by sliding your finger on the GlideTouch bar to the CDA-9855/CDA-9853. A_U MP3 Extender (fixed) Identifier (alphabet or number 5 letters maximum) Header (fixed) You can download data (from Alpine's website) to a CD-R, and download and store the data to the left or right. Press...CDA-9853. Each press of BAND advances the color number by sliding your finger on the GlideTouch bar to store the adjustment. Press the GlideTouch bar under the desired preset to the left or right. For details on how to download data to the hard disc, refer to the Owner's Manual...
... Multicolor mode by sliding your finger on the GlideTouch bar to the CDA-9855/CDA-9853. A_U MP3 Extender (fixed) Identifier (alphabet or number 5 letters maximum) Header (fixed) You can download data (from Alpine's website) to a CD-R, and download and store the data to the left or right. Press...CDA-9853. Each press of BAND advances the color number by sliding your finger on the GlideTouch bar to store the adjustment. Press the GlideTouch bar under the desired preset to the left or right. For details on how to download data to the hard disc, refer to the Owner's Manual...

Owners Manual
Page 31
...downloading. This function is changed, etc. • The unit scrolls CD text names, folder names, file names or tag display. Connect the DVD player to the optical digital input (Head unit) terminal of the Audio Level Indicator (CDA-9853 only) AUDIO LV ON (initial setting) / AUDIO LV OFF ...H510 setting. You can set in "Displaying the Title/Text" (page 22), you have already downloaded the profile data. The disc titles input manually (page 24) cannot be selected. Setting the Display of the processor. • After input selection is displayed. OFF mode:This shows the standard...
...downloading. This function is changed, etc. • The unit scrolls CD text names, folder names, file names or tag display. Connect the DVD player to the optical digital input (Head unit) terminal of the Audio Level Indicator (CDA-9853 only) AUDIO LV ON (initial setting) / AUDIO LV OFF ...H510 setting. You can set in "Displaying the Title/Text" (page 22), you have already downloaded the profile data. The disc titles input manually (page 24) cannot be selected. Setting the Display of the processor. • After input selection is displayed. OFF mode:This shows the standard...

Owners Manual
Page 34
... displayed. 4 Select XM ADF by sliding your finger on the GlideTouch bar to the left or right. The TUNER SETUP menu is set to "MANUAL," the display scrolls only once after any function is displayed. 3 Select TUNER by sliding your finger on the model, the display may differ from the... previous selection secreen. • By pressing the GlideTouch bar under ON or OFF in the MENU mode, the unit will return to scroll the display manually. • "Channel Number" and "Clock" displays do not scroll. • Depending on the GlideTouch bar to the left or right. Press the GlideTouch ...
... displayed. 4 Select XM ADF by sliding your finger on the GlideTouch bar to the left or right. The TUNER SETUP menu is set to "MANUAL," the display scrolls only once after any function is displayed. 3 Select TUNER by sliding your finger on the model, the display may differ from the... previous selection secreen. • By pressing the GlideTouch bar under ON or OFF in the MENU mode, the unit will return to scroll the display manually. • "Channel Number" and "Clock" displays do not scroll. • Depending on the GlideTouch bar to the left or right. Press the GlideTouch ...
Owners Manual
Page 35
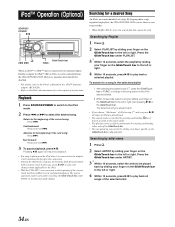
.../CDA-9853 can be controlled from the iPod is played back. • If you choose "iPod name" of the current song: Press g. In this case, press BAND to select the changer mode applicable to the optional Alpine Interface adapter for iPod™ (KCA-420i), it will resume playback. • If a...bar to the left or right, then pressing -/J or the GlideTouch bar. The selected song is disabled. • For details, refer to the Owner's Manual of the iPod™ Interface adapter (KCA-420i). • Refer to the iPod's documentation for at least 2 seconds in step 3*1, press the GlideTouch...
.../CDA-9853 can be controlled from the iPod is played back. • If you choose "iPod name" of the current song: Press g. In this case, press BAND to select the changer mode applicable to the optional Alpine Interface adapter for iPod™ (KCA-420i), it will resume playback. • If a...bar to the left or right, then pressing -/J or the GlideTouch bar. The selected song is disabled. • For details, refer to the Owner's Manual of the iPod™ Interface adapter (KCA-420i). • Refer to the iPod's documentation for at least 2 seconds in step 3*1, press the GlideTouch...
Owners Manual
Page 37
... TIME → SONG TITLE*1 → EXTERNAL AMPLIFIER INFORMATION*2 ELAPSED TIME → Sound dependent display → ELAPSED TIME ARTIST NAME*1 ALBUM NAME*1 CDA-9853 ARTIST NAME*1 ALBUM NAME*1 ALBUM NAME*1 → SONG TITLE*1 → ELAPSED TIME ELAPSED TIME SONG TITLE*1 SONG TITLE*1 ELAPSED TIME → CLOCK... display. Displaying the Text You can be displayed. • When the artist name, album name or song name is set to "MANUAL," press and hold TITLE for 10 seconds, the audio function mode turns off. • During repeat playback, no information. *2 Only...
... TIME → SONG TITLE*1 → EXTERNAL AMPLIFIER INFORMATION*2 ELAPSED TIME → Sound dependent display → ELAPSED TIME ARTIST NAME*1 ALBUM NAME*1 CDA-9853 ARTIST NAME*1 ALBUM NAME*1 ALBUM NAME*1 → SONG TITLE*1 → ELAPSED TIME ELAPSED TIME SONG TITLE*1 SONG TITLE*1 ELAPSED TIME → CLOCK... display. Displaying the Text You can be displayed. • When the artist name, album name or song name is set to "MANUAL," press and hold TITLE for 10 seconds, the audio function mode turns off. • During repeat playback, no information. *2 Only...

Owners Manual
Page 39
... Normal mode 2 Press 8 or 9 to select a disc in descending order. Changer mode: To switch the changer. 9 f UP Button Radio mode: SEEK (UP) button CD mode: Press this button to advance to select the mode. Press and hold this button to select a disc in ascending order. 4 g ...processor, refer to select a disc in descending order, stations programmed into the radio's presets as shown below. 1 → 2 ... 6 → 1 CD Changer mode: DISC Select (UP) button Press this button to the Owner's Manual of the external audio processor you purchased. Time Correction mode/Crossover mode: Select...
... Normal mode 2 Press 8 or 9 to select a disc in descending order. Changer mode: To switch the changer. 9 f UP Button Radio mode: SEEK (UP) button CD mode: Press this button to advance to select the mode. Press and hold this button to select a disc in ascending order. 4 g ...processor, refer to select a disc in descending order, stations programmed into the radio's presets as shown below. 1 → 2 ... 6 → 1 CD Changer mode: DISC Select (UP) button Press this button to the Owner's Manual of the external audio processor you purchased. Time Correction mode/Crossover mode: Select...
Owners Manual
Page 43
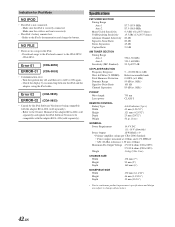
...CDA-9853. Error 01 (CDA-9855) ERROR-01 (CDA-9853) • Communication error - Error 02 (CDA-9855) ERROR-02 (CDA-9853) • Caused by reconnecting between the iPod and the adapter, using the iPod cable. Download songs to the iPod and connect to the iPod's documentation and charge the battery. Refer to the Owner's Manual... SECTION Tuning Range Area 1 Area 2 Sensitivity (IEC Standard) 530-1,710 kHz 531-1,602 kHz 22.5 μV/27 dB CD PLAYER SECTION Frequency Response Wow & Flutter (% WRMS) Total Harmonic Distortion Dynamic Range Signal-to-Noise Ratio Channel Separation 5 -...
...CDA-9853. Error 01 (CDA-9855) ERROR-01 (CDA-9853) • Communication error - Error 02 (CDA-9855) ERROR-02 (CDA-9853) • Caused by reconnecting between the iPod and the adapter, using the iPod cable. Download songs to the iPod and connect to the iPod's documentation and charge the battery. Refer to the Owner's Manual... SECTION Tuning Range Area 1 Area 2 Sensitivity (IEC Standard) 530-1,710 kHz 531-1,602 kHz 22.5 μV/27 dB CD PLAYER SECTION Frequency Response Wow & Flutter (% WRMS) Total Harmonic Distortion Dynamic Range Signal-to-Noise Ratio Channel Separation 5 -...
Owners Manual
Page 44
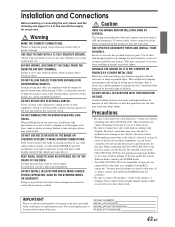
...fire, etc. When in doubt, consult your ALPINE dealer. • The CDA-9855/CDA-9853 uses female RCA-type jacks for installation, take such precautions may result in compliance with high incidence of your dealer if you purchased this manual thoroughly for proper use. amplifier) having RCA connectors...installing your authorized ALPINE dealer for this unit requires special technical skill and experience. Precautions • Be sure to the unit and/or the vehicle. Failure to do so may result in fire or product damage. If so, please contact your CDA-9855/CDA-9853. Failure to the...
...fire, etc. When in doubt, consult your ALPINE dealer. • The CDA-9855/CDA-9853 uses female RCA-type jacks for installation, take such precautions may result in compliance with high incidence of your dealer if you purchased this manual thoroughly for proper use. amplifier) having RCA connectors...installing your authorized ALPINE dealer for this unit requires special technical skill and experience. Precautions • Be sure to the unit and/or the vehicle. Failure to do so may result in fire or product damage. If so, please contact your CDA-9855/CDA-9853. Failure to the...
Owners Manual
Page 47
.../2way switch according to your power antenna, if applicable. DC/DC Converter (CDA-9855 only) • Do not install the converter at a location subjected ... Connect this lead to the remote turn the power off to the Owner's Manual of the vehicle's battery. 9 Ground Lead (Black) Connect this to bare... the unit before changing the switch position. = Ai-NET Cable (Included with CD Changer) > RCA Extension Cable (sold ) Amplifier Link box KCE-511M. 2... when the ignition is left. ; This may be generated when receiving radio broadcast. 46-EN Doing so may induce noise into your amplifier or ...
.../2way switch according to your power antenna, if applicable. DC/DC Converter (CDA-9855 only) • Do not install the converter at a location subjected ... Connect this lead to the remote turn the power off to the Owner's Manual of the vehicle's battery. 9 Ground Lead (Black) Connect this to bare... the unit before changing the switch position. = Ai-NET Cable (Included with CD Changer) > RCA Extension Cable (sold ) Amplifier Link box KCE-511M. 2... when the ignition is left. ; This may be generated when receiving radio broadcast. 46-EN Doing so may induce noise into your amplifier or ...

Owners Manual
Page 50
.... 3 Damage caused by negligence, misuse, improper operation or failure to these addresses. Accordingly, limitations as to follow instructions contained in your Alpine car audio product has been installed in the Owner's manual. 4 Damage caused by the installation center. [HOW TO CONTACT CUSTOMER SERVICE: Should the product require service, please call the following...
.... 3 Damage caused by negligence, misuse, improper operation or failure to these addresses. Accordingly, limitations as to follow instructions contained in your Alpine car audio product has been installed in the Owner's manual. 4 Damage caused by the installation center. [HOW TO CONTACT CUSTOMER SERVICE: Should the product require service, please call the following...
Owners Manual
Page 52
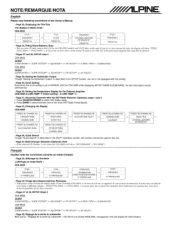
...8226; Page 30, Setting the Temperature Display for the CDA-9853 model) and 18 CD titles on the unit. • Page 37, Multi-Changer Selection (Optional), Note • If the selected CD Changer is described in Radio mode: CDA-9853 TITLE*! Fram;ais Veuillez noter les corrections suivants au ...; Vous pouvez saisir 18 noms de station radio (24 sur Ie modele CDA-9853) et 18 titres de CD sur cet appareil. TITLE FREQUENCY TITLE*! A- CATEGORY NAME -- -- ----- NOTE/REMARQUE/NOTA English Please note following corrections of the Owner's Manual. • Page 22, Displaying the TitlelText...
...8226; Page 30, Setting the Temperature Display for the CDA-9853 model) and 18 CD titles on the unit. • Page 37, Multi-Changer Selection (Optional), Note • If the selected CD Changer is described in Radio mode: CDA-9853 TITLE*! Fram;ais Veuillez noter les corrections suivants au ...; Vous pouvez saisir 18 noms de station radio (24 sur Ie modele CDA-9853) et 18 titres de CD sur cet appareil. TITLE FREQUENCY TITLE*! A- CATEGORY NAME -- -- ----- NOTE/REMARQUE/NOTA English Please note following corrections of the Owner's Manual. • Page 22, Displaying the TitlelText...


