Owners Manual
Page 20
...reproduced more clear, clean output. CDA-9831 Front - For details, refer to the Owner's Manual of this data to reproduce the sound accurately. Each press changes the mode as FM radio, CD, and MP3 can be able to reproduce the music clearly even in 15 seconds, the unit returns to normal mode. This ... connected, its own MX setting. • On disks with both MP3/WMA and CD-DA, when the source changesfrom "MP3/WMA to CD-DA" or "CD-DA to MP3/WMA," MX-mode switching may not match the head unit, the audio processor needs to be adjusted. Pressing and holding MENU for at least ...
...reproduced more clear, clean output. CDA-9831 Front - For details, refer to the Owner's Manual of this data to reproduce the sound accurately. Each press changes the mode as FM radio, CD, and MP3 can be able to reproduce the music clearly even in 15 seconds, the unit returns to normal mode. This ... connected, its own MX setting. • On disks with both MP3/WMA and CD-DA, when the source changesfrom "MP3/WMA to CD-DA" or "CD-DA to MP3/WMA," MX-mode switching may not match the head unit, the audio processor needs to be adjusted. Pressing and holding MENU for at least ...
Owners Manual
Page 23
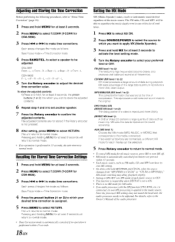
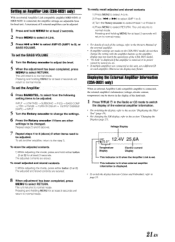
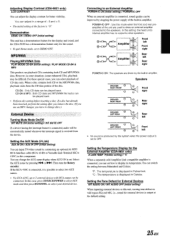
A maximum of 8 external amplifiers can be shown in the Radio or CD mode to switch the display of the external amplifier • If amplifier settings are made on each amplifier. to select from the head unit. Pressing and holding MENU for at least 2 seconds will return to ... AMP 1 to 8. 3) Turn the Rotary encoder to select Preset 1 or Preset 2. 4) Press MENU to normal mode. Displaying the External Amplifier Information (CDA-9831 only) When an external Amplifier Link compatible amplifier is set another amplifier, return to the step 3. Repeat steps 5 and 6 (above). 7 Repeat steps ...
A maximum of 8 external amplifiers can be shown in the Radio or CD mode to switch the display of the external amplifier • If amplifier settings are made on each amplifier. to select from the head unit. Pressing and holding MENU for at least 2 seconds will return to ... AMP 1 to 8. 3) Turn the Rotary encoder to select Preset 1 or Preset 2. 4) Press MENU to normal mode. Displaying the External Amplifier Information (CDA-9831 only) When an external Amplifier Link compatible amplifier is set another amplifier, return to the step 3. Repeat steps 5 and 6 (above). 7 Repeat steps ...
Owners Manual
Page 26
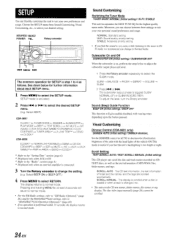
... 3 Turn the Rotary encoder to change to Normal mode. The unit scrolls CD text names, folder names, file names or tag display. Choose ...This function will return to normal mode. • For the XM Radio settings, refer to "XM Radio (Optional)" (page 26), andfor the MobileHubTmLink settings, refer to ... you feel the unit's backlighting is too bright at least 2 seconds will give audible feedback with the head lights of the unit with varying tones...you can flexibly customize the unit to suit your own preferences and usage. Visual Customizing Dimmer Control (CDA-9831 only) DIMMER AUTO (...
... 3 Turn the Rotary encoder to change to Normal mode. The unit scrolls CD text names, folder names, file names or tag display. Choose ...This function will return to normal mode. • For the XM Radio settings, refer to "XM Radio (Optional)" (page 26), andfor the MobileHubTmLink settings, refer to ... you feel the unit's backlighting is too bright at least 2 seconds will give audible feedback with the head lights of the unit with varying tones...you can flexibly customize the unit to suit your own preferences and usage. Visual Customizing Dimmer Control (CDA-9831 only) DIMMER AUTO (...
Owners Manual
Page 27
...in amplifier. CD-DA : Only CD data can be played back. • Perform this mode when the front and rear preamplifier of the unit are driven by connecting an optional Ai-NET/ RCA Interface cable (KCA-121B) or Versatile Link Terminal (KCA410C) to this setting, the head unit's internal ...connected to display its temperature. When a disc contains both CD and MP3/WMA data. In this unit, turning tone defeat on will be improved by stopping the power supply of the built-in Celsius. Adjusting Display Contrast (CDA-9831 only) LCD CONTRAST You can adjust the display contrast for...
...in amplifier. CD-DA : Only CD data can be played back. • Perform this mode when the front and rear preamplifier of the unit are driven by connecting an optional Ai-NET/ RCA Interface cable (KCA-121B) or Versatile Link Terminal (KCA410C) to this setting, the head unit's internal ...connected to display its temperature. When a disc contains both CD and MP3/WMA data. In this unit, turning tone defeat on will be improved by stopping the power supply of the built-in Celsius. Adjusting Display Contrast (CDA-9831 only) LCD CONTRAST You can adjust the display contrast for...
Owners Manual
Page 39
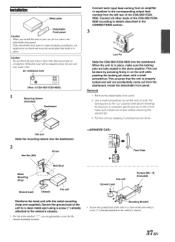
...unlocked as you install this unit in on the unit to details described in the down with the metal mounting strap (not supplied). this unit Ground Lead Screws (M5 x 8) (Included) Reinforce the head unit with a small screwdriver. Caution Do not block the unit'sfan or heat sink, ...the dashboard. Install the detachable front panel. Connect all other leads of CDA-9831/CDA-9830) 1 Mounting Sleeve (Included) Dashboard Connect each pin is properly locked and will accumulate inside the unit and may cause afire. Installation Metal plate Detachable Front panel Caution When you...
...unlocked as you install this unit in on the unit to details described in the down with the metal mounting strap (not supplied). this unit Ground Lead Screws (M5 x 8) (Included) Reinforce the head unit with a small screwdriver. Caution Do not block the unit'sfan or heat sink, ...the dashboard. Install the detachable front panel. Connect all other leads of CDA-9831/CDA-9830) 1 Mounting Sleeve (Included) Dashboard Connect each pin is properly locked and will accumulate inside the unit and may cause afire. Installation Metal plate Detachable Front panel Caution When you...

Owners Manual
Page 42
...•IN CANADA ONLY: This Warranty is required. © You must reside in the United States, Puerto Rico or Canada. •WHAT IS COVERED: This Warranty covers defects in ... Place, Torrance, California 90501, U.S.A. COVERED: This Warranty does not cover the following: CD Damage occurring during shipment. •HOW WE LIMIT IMPLIED WARRANTIES: ANY IMPLIED WARRANTIES INCLUDING FITNESS...•LIFETIME TAPE HEAD WARRANTY: All Alpine Car Audio analog tape heads excluding Video tape heads are responsible for delivery of the product, who must supply proof of your Alpine car audio product ...
...•IN CANADA ONLY: This Warranty is required. © You must reside in the United States, Puerto Rico or Canada. •WHAT IS COVERED: This Warranty covers defects in ... Place, Torrance, California 90501, U.S.A. COVERED: This Warranty does not cover the following: CD Damage occurring during shipment. •HOW WE LIMIT IMPLIED WARRANTIES: ANY IMPLIED WARRANTIES INCLUDING FITNESS...•LIFETIME TAPE HEAD WARRANTY: All Alpine Car Audio analog tape heads excluding Video tape heads are responsible for delivery of the product, who must supply proof of your Alpine car audio product ...


