User Manual
Page 2
... 5 CHAPTER 2 ...6 HARDWARE INSTALLATION 6 2.1 Installing the Wall Mount Kit 6 2.2 Connecting the Camera to LAN/WLAN 7 2.3 Applications of the Camera 7 CHAPTER 3 ...8 SOFTWARE INSTALLATION 8 3.1 Installing SkyIPCam Utility 8 3.2 Using SkyIPCam Utility 9 3.3 Viewing Images 14 3.4 Using SkyIPCam View 18 CHAPTER 4 ...31 CONFIGURATION ...31 4.1 Using the Web Configuration 31 4.2 Basic Setup ...31 4.3 Network Settings 34 4.4 Pan/Tilt Settings 39 4.5 Setting up Video & Audio 40 4.6 Event Server Configuration 43 4.7 Motion Detect ...45 4.8 Event Configuration 46 4.9 Tools...50...
... 5 CHAPTER 2 ...6 HARDWARE INSTALLATION 6 2.1 Installing the Wall Mount Kit 6 2.2 Connecting the Camera to LAN/WLAN 7 2.3 Applications of the Camera 7 CHAPTER 3 ...8 SOFTWARE INSTALLATION 8 3.1 Installing SkyIPCam Utility 8 3.2 Using SkyIPCam Utility 9 3.3 Viewing Images 14 3.4 Using SkyIPCam View 18 CHAPTER 4 ...31 CONFIGURATION ...31 4.1 Using the Web Configuration 31 4.2 Basic Setup ...31 4.3 Network Settings 34 4.4 Pan/Tilt Settings 39 4.5 Setting up Video & Audio 40 4.6 Event Server Configuration 43 4.7 Motion Detect ...45 4.8 Event Configuration 46 4.9 Tools...50...

User Manual
Page 5
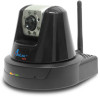
... adjust image size and quality, and bit rate according to the networking environment. „ 2-way Audio Capability The built-in microphone of the camera provides on-the-spot audio via the Internet, allowing you can connect an external speaker to the camera to talk to people at the camera view. „ Day & Night Surveillance Supported The seven Infrared LEDs around the standard lens assembly enable the camera to monitor the...
... adjust image size and quality, and bit rate according to the networking environment. „ 2-way Audio Capability The built-in microphone of the camera provides on-the-spot audio via the Internet, allowing you can connect an external speaker to the camera to talk to people at the camera view. „ Day & Night Surveillance Supported The seven Infrared LEDs around the standard lens assembly enable the camera to monitor the...
User Manual
Page 6
... configure the settings and control the device from the GPIO Trigger window of the camera via Intranet or Internet. For example, babies at any time. 1.4 System Requirement „ Networking LAN: 10Base-T Ethernet or 100Base-TX Fast Ethernet. The camera can be upgraded remotely when a new firmware is recommended that you can easily change the configuration of Web Configuration. „ Remote Control Supported By using SkyIPCam View Platform: Microsoft® Windows® 2000/XP/Vista Hardware Requirement: 1 camera connected...
... configure the settings and control the device from the GPIO Trigger window of the camera via Intranet or Internet. For example, babies at any time. 1.4 System Requirement „ Networking LAN: 10Base-T Ethernet or 100Base-TX Fast Ethernet. The camera can be upgraded remotely when a new firmware is recommended that you can easily change the configuration of Web Configuration. „ Remote Control Supported By using SkyIPCam View Platform: Microsoft® Windows® 2000/XP/Vista Hardware Requirement: 1 camera connected...

User Manual
Page 8
..., you connect the AC power adapter, the camera is powered on automatically. When you need to attach the included external antenna to your camera and provides a basic example for use a wireless network in multiple applications, including: „ Monitor local and remote places and objects via Internet or Intranet. „ Capture still images and video clips remotely. „ Upload images or send email messages with "default" SSID. Once connected, the Link LED starts flashing green light and the camera is on...
..., you connect the AC power adapter, the camera is powered on automatically. When you need to attach the included external antenna to your camera and provides a basic example for use a wireless network in multiple applications, including: „ Monitor local and remote places and objects via Internet or Intranet. „ Capture still images and video clips remotely. „ Upload images or send email messages with "default" SSID. Once connected, the Link LED starts flashing green light and the camera is on...

User Manual
Page 12
Select your camera from the list and click Link. Step 4 Once the utility has saved changes, it will return to the original screen. Step 5 When you are prompted for the username and password, enter "admin" for both User name and Password, and click OK. - 11 -
Select your camera from the list and click Link. Step 4 Once the utility has saved changes, it will return to the original screen. Step 5 When you are prompted for the username and password, enter "admin" for both User name and Password, and click OK. - 11 -
User Manual
Page 15
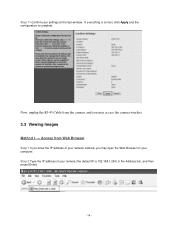
Now, unplug the RJ-45 Cable from Web Browser Step 1 If you know the IP address of your camera (the default IP is complete. If everything is correct, click Apply and the configuration is 192.168.1.240) in the Address bar, and then press [Enter]. - 14 - Access from the camera, and you may access the camera wireless. 3.3 Viewing Images Method 1 --- Step 2 Type the IP address of your network camera, you may open the Web Browser on your settings at the last window. Step 11 Confirm your computer.
Now, unplug the RJ-45 Cable from Web Browser Step 1 If you know the IP address of your camera (the default IP is complete. If everything is correct, click Apply and the configuration is 192.168.1.240) in the Address bar, and then press [Enter]. - 14 - Access from the camera, and you may access the camera wireless. 3.3 Viewing Images Method 1 --- Step 2 Type the IP address of your network camera, you may open the Web Browser on your settings at the last window. Step 11 Confirm your computer.

User Manual
Page 21
... and password of Lock/Unlock function. Click again to start recording video clips using the media player on the main screen: „ CONTROLS Panel - NEXT: When you connect multiple cameras, click this button to switch the video view to the previous camera. - PLAY: Click to stop recording and save the files in turn. - Click again to play the recorded video file using all connected cameras. View mode buttons: SkyIPCam View provides multiple view modes, including 1/4/9/16 windows and Full screen mode. - If you have set the time interval...
... and password of Lock/Unlock function. Click again to start recording video clips using the media player on the main screen: „ CONTROLS Panel - NEXT: When you connect multiple cameras, click this button to switch the video view to the previous camera. - PLAY: Click to stop recording and save the files in turn. - Click again to play the recorded video file using all connected cameras. View mode buttons: SkyIPCam View provides multiple view modes, including 1/4/9/16 windows and Full screen mode. - If you have set the time interval...

User Manual
Page 22
... the connected camera supports the trigger out connector, which is used to control the external device connected to start recording a video clip using the selected camera and save the file in the computer. - RECORD: Click to the camera, such as gray out buttons. - This button is available only when the connected camera supports 2-way audio function. - TRIGGER OUT: Click to capture a still image using the selected camera. TALK: Click to the default position. - 21 - SNAPSHOT: Click to turn on...
... the connected camera supports the trigger out connector, which is used to control the external device connected to start recording a video clip using the selected camera and save the file in the computer. - RECORD: Click to the camera, such as gray out buttons. - This button is available only when the connected camera supports 2-way audio function. - TRIGGER OUT: Click to capture a still image using the selected camera. TALK: Click to the default position. - 21 - SNAPSHOT: Click to turn on...

User Manual
Page 24
... not sure of the selected camera will be displayed now. - 23 - Click SETTING to return to add a camera by entering its IP address directly. z Select the Input tab to the Video View Window. Click Search camera to search the available camera within the network. Enter the User name and Password for the camera, and then click OK. Once the camera is found and is shown...
... not sure of the selected camera will be displayed now. - 23 - Click SETTING to return to add a camera by entering its IP address directly. z Select the Input tab to the Video View Window. Click Search camera to search the available camera within the network. Enter the User name and Password for the camera, and then click OK. Once the camera is found and is shown...

User Manual
Page 34
... the one you want to add to modify from the main page of the camera. NOTE A "General User" can only view the live view image from UserList and click Add/Modify. - User Name: Enter the user's name you want to use the camera. - UserList: Display the existing users of the camera's Web Configuration; a "Guest' can access the camera and control the Function buttons of the camera. When you want to delete...
... the one you want to add to modify from the main page of the camera. NOTE A "General User" can only view the live view image from UserList and click Add/Modify. - User Name: Enter the user's name you want to use the camera. - UserList: Display the existing users of the camera's Web Configuration; a "Guest' can access the camera and control the Function buttons of the camera. When you want to delete...
User Manual
Page 36
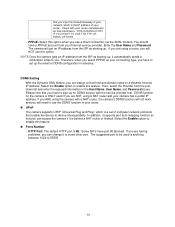
... supports port auto mapping function so that you input the Default Gateway of your connecting type, you have port 80 blocked. that you can access the camera if it is behind a NAT router or firewall. Therefore, when you select PPPoE as starting up , it automatically sends a notification email to some other port. DDNS Setting With the Dynamic DNS feature, you can assign a fixed host and domain name to enable...
... supports port auto mapping function so that you input the Default Gateway of your connecting type, you have port 80 blocked. that you can access the camera if it is behind a NAT router or firewall. Therefore, when you select PPPoE as starting up , it automatically sends a notification email to some other port. DDNS Setting With the Dynamic DNS feature, you can assign a fixed host and domain name to enable...
User Manual
Page 38
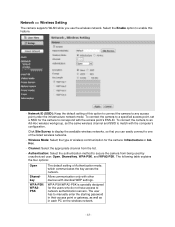
... use the wireless network. Click Site Survey to secure the camera from the list. - Allow communication only with other devices with the access point's ESS-ID. The user has to network authentication servers. Network ID (SSID}: Keep the default setting of Authentication mode, which communicates the key across the network. WPA-PSK/WPA2-PSK is specially designed for the users who do not have access to manually enter the starting password...
... use the wireless network. Click Site Survey to secure the camera from the list. - Allow communication only with other devices with the access point's ESS-ID. The user has to network authentication servers. Network ID (SSID}: Keep the default setting of Authentication mode, which communicates the key across the network. WPA-PSK/WPA2-PSK is specially designed for the users who do not have access to manually enter the starting password...
User Manual
Page 51
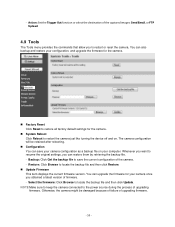
... of firmware. - You can save the current configuration of the camera. - The camera configuration will be damaged because of failure of the captured images: Send Email, or FTP Upload. 4.9 Tools The Tools menu provides the commands that allow you to restart the camera just like turning the device off and on your configuration, and upgrade the firmware for the camera. „ Factory Reset Click Reset to restore all factory default settings for your camera once...
... of firmware. - You can save the current configuration of the camera. - The camera configuration will be damaged because of failure of the captured images: Send Email, or FTP Upload. 4.9 Tools The Tools menu provides the commands that allow you to restart the camera just like turning the device off and on your configuration, and upgrade the firmware for the camera. „ Factory Reset Click Reset to restore all factory default settings for your camera once...

User Manual
Page 53
... RAM 32MB SDRAM ROM Power 4MB NOR Flash DC 12V „ Communication LAN WLAN 10/100Mbps Fast Ethernet, auto-sensed, Auto-MDIX IEEE 802.11b/g Protocol support TCP/IP, UDP, ICMP, DHCP, NTP, DNS, DDNS, SMTP, FTP, PPPoE, UPnP „ Pan/Tilt Pan 165 degree (left) to 165 degree (right) Tilt 90 degree (up) to 15 degree (down) „ Software OS Support Windows 2000/XP/Vista Browser Internet Explorer 6.0 or above Apple...
... RAM 32MB SDRAM ROM Power 4MB NOR Flash DC 12V „ Communication LAN WLAN 10/100Mbps Fast Ethernet, auto-sensed, Auto-MDIX IEEE 802.11b/g Protocol support TCP/IP, UDP, ICMP, DHCP, NTP, DNS, DDNS, SMTP, FTP, PPPoE, UPnP „ Pan/Tilt Pan 165 degree (left) to 165 degree (right) Tilt 90 degree (up) to 15 degree (down) „ Software OS Support Windows 2000/XP/Vista Browser Internet Explorer 6.0 or above Apple...
User Manual
Page 55
... can even change while it is the message. Since domain names are small Java programs that can be added to a network without the hassle of networks connected to manage the task. The Internet however, is still connected. Address Resolution Protocol. ARP is Ethernet over media. Audio Video Interleave, it is really based on a network. E Enterprise network An enterprise network consists of collections of manually assigning it connects to...
... can even change while it is the message. Since domain names are small Java programs that can be added to a network without the hassle of networks connected to manage the task. The Internet however, is still connected. Address Resolution Protocol. ARP is Ethernet over media. Audio Video Interleave, it is really based on a network. E Enterprise network An enterprise network consists of collections of manually assigning it connects to...

User Manual
Page 56
.... Firewall is easier for internal usage only. Your Internet service provider controls the IP address of electrical signals, between devices. ISP (Internet Service Provider) is a company that maintains a network that use Category 5 cabling to or from accessing private networks connected to assign the IP addresses on the Internet Protocol (IP). The Internet is linked to route the information. The most people will find on the...
.... Firewall is easier for internal usage only. Your Internet service provider controls the IP address of electrical signals, between devices. ISP (Internet Service Provider) is a company that maintains a network that use Category 5 cabling to or from accessing private networks connected to assign the IP addresses on the Internet Protocol (IP). The Internet is linked to route the information. The most people will find on the...
User Manual
Page 57
... from file server memory to the file server's net work adapter Others are confined to its destination. The most common types of data for the Internet, Intranet and other protocols dictate how data is a specification for connecting the users on the network is an object-oriented multi-thread programming best for creating applets and applications for a network operating system are forwarded to -Point Protocol over the Ethernet...
... from file server memory to the file server's net work adapter Others are confined to its destination. The most common types of data for the Internet, Intranet and other protocols dictate how data is a specification for connecting the users on the network is an object-oriented multi-thread programming best for creating applets and applications for a network operating system are forwarded to -Point Protocol over the Ethernet...

User Manual
Page 58
... content stream. SIP (Session Initiated Protocol) is a widely used by all access methods. Transmission Control Protocol/Internet Protocol is a standard protocol that delivers the real-time communication for Voice over IP (VoIP), which defines the transmission of video and audio files in real time for managing network devices. Transceivers also can be used for features such as audio and video conferencing. R RJ-45 Router RTP RTSP S Server SIP SMTP...
... content stream. SIP (Session Initiated Protocol) is a widely used by all access methods. Transmission Control Protocol/Internet Protocol is a standard protocol that delivers the real-time communication for Voice over IP (VoIP), which defines the transmission of video and audio files in real time for managing network devices. Transceivers also can be used for features such as audio and video conferencing. R RJ-45 Router RTP RTSP S Server SIP SMTP...

Quick Installation Guide
Page 6
Step 4 Once the utility has saved changes, it will automatically assign a dynamic IP address to the original screen. Another option is enabled, you can manually change the last 3-digit number of the IP Address, in the same network. Enter "admin" for both ID and password, and click Change. Step 3 You may simply accept the suggested one has already been used by another device in case that if your router's DHCP server is that the suggested Static IP, or you can select DCHP, so the router will return to your camera from the list and click Link. Select your camera.
Step 4 Once the utility has saved changes, it will automatically assign a dynamic IP address to the original screen. Another option is enabled, you can manually change the last 3-digit number of the IP Address, in the same network. Enter "admin" for both ID and password, and click Change. Step 3 You may simply accept the suggested one has already been used by another device in case that if your router's DHCP server is that the suggested Static IP, or you can select DCHP, so the router will return to your camera from the list and click Link. Select your camera.

Quick Installation Guide
Page 11
Access from "Web Browser" Step 1 If you know the IP address of your computer. Step 3 Enter "admin" for both the User name and Password, and click OK. Section 4 Viewing Images Method 1 --- Step 2 Type the IP address of your network camera, you may open the Web Browser on your camera (the default IP is 192.168.1.240) in the Address bar, and then press [Enter].
Access from "Web Browser" Step 1 If you know the IP address of your computer. Step 3 Enter "admin" for both the User name and Password, and click OK. Section 4 Viewing Images Method 1 --- Step 2 Type the IP address of your network camera, you may open the Web Browser on your camera (the default IP is 192.168.1.240) in the Address bar, and then press [Enter].


