
User Guide
Page 2
... Blvd., Milpitas, CA 95035. Changes The material in some jurisdictions. All rights reserved. Microsoft and Windows are trademarks of Adaptec, Inc., which may be registered in this document is for information only and is subject to its accuracy, Adaptec, Inc. assumes no liability resulting from the use of this document, or from errors or omissions in any form...
... Blvd., Milpitas, CA 95035. Changes The material in some jurisdictions. All rights reserved. Microsoft and Windows are trademarks of Adaptec, Inc., which may be registered in this document is for information only and is subject to its accuracy, Adaptec, Inc. assumes no liability resulting from the use of this document, or from errors or omissions in any form...
User Guide
Page 3
Limited 1-Year Hardware Warranty 1 Adaptec, Inc. ("Adaptec") warrants to the purchaser of this warranty. 4 For more information on how to obtain warranty service, write or telephone Adaptec at the purchaser's expense to an authorized Adaptec service facility or to Adaptec. 2 Repair or replacement parts or products will be furnished on an exchange basis and will be new or reconditioned. iii IN THE EVENT THIS...
Limited 1-Year Hardware Warranty 1 Adaptec, Inc. ("Adaptec") warrants to the purchaser of this warranty. 4 For more information on how to obtain warranty service, write or telephone Adaptec at the purchaser's expense to an authorized Adaptec service facility or to Adaptec. 2 Repair or replacement parts or products will be furnished on an exchange basis and will be new or reconditioned. iii IN THE EVENT THIS...
User Guide
Page 4
... to Part 15 of the following two conditions: (1) this device may not cause harmful interference and (2) this device must accept any interference received, including interference that interference will not occur in a residential installation. EN61000-4-3 (1998) Radiated immunity ٛ - EN61000-4-4 (1995) Electrical fast transients/burst: ±1 kV AC, ±0.5 kV I /O cable and power cable to ensure compliance of this unit...
... to Part 15 of the following two conditions: (1) this device may not cause harmful interference and (2) this device must accept any interference received, including interference that interference will not occur in a residential installation. EN61000-4-3 (1998) Radiated immunity ٛ - EN61000-4-4 (1995) Electrical fast transients/burst: ±1 kV AC, ±0.5 kV I /O cable and power cable to ensure compliance of this unit...
User Guide
Page 5
... 2 System Requirements 2 Getting Started Checklist 3 Preparing the Disk Drive for Installation 3 Installing a Disk Drive 3 Installing the Device Driver-Windows 98SE Only 5 Connecting and Powering On 6 Preparing the Disk Drive for Use 7 Setting up Removable option - -Windows 98SE Only 7 Connecting and Disconnecting Your Enclosure 8 Troubleshooting 9 About USB Technology 10 About SATA Technology 10 ® This User's Guide explains how to install and connect your Adaptec ACS-300 Combo eSATA/USB 2.0 Hard Disk Drive Enclosure, and provides a brief overview of USB and...
... 2 System Requirements 2 Getting Started Checklist 3 Preparing the Disk Drive for Installation 3 Installing a Disk Drive 3 Installing the Device Driver-Windows 98SE Only 5 Connecting and Powering On 6 Preparing the Disk Drive for Use 7 Setting up Removable option - -Windows 98SE Only 7 Connecting and Disconnecting Your Enclosure 8 Troubleshooting 9 About USB Technology 10 About SATA Technology 10 ® This User's Guide explains how to install and connect your Adaptec ACS-300 Combo eSATA/USB 2.0 Hard Disk Drive Enclosure, and provides a brief overview of USB and...
User Guide
Page 6
... 2.0 Enclosure supports 3.5-inch SATA I (1.5Gbps) and SATA II (3.0Gbps) hard disk drives. Kit Contents ƒ Adaptec ACS-300 Combo USB/eSATA Enclosure ƒ One enclosure stand ƒ One power adapter ƒ One high-quality USB cable ƒ One high-quality eSATA cable ƒ One bag of screws ƒ CD, including device drivers and documentation A disk drive is not included in this kit. System Requirements To successfully install and use your Adaptec ACS-300 enclosure, your...
... 2.0 Enclosure supports 3.5-inch SATA I (1.5Gbps) and SATA II (3.0Gbps) hard disk drives. Kit Contents ƒ Adaptec ACS-300 Combo USB/eSATA Enclosure ƒ One enclosure stand ƒ One power adapter ƒ One high-quality USB cable ƒ One high-quality eSATA cable ƒ One bag of screws ƒ CD, including device drivers and documentation A disk drive is not included in this kit. System Requirements To successfully install and use your Adaptec ACS-300 enclosure, your...
User Guide
Page 7
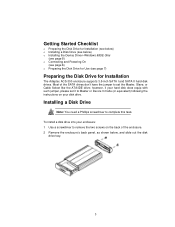
..., or Cable Select like the ATA/IDE drive; Most of the enclosure. 2 Remove the enclosure's back panel, as shown below ) o Installing the Device Driver-Windows 98SE Only (see page 5) o Connecting and Powering On (see page 6) o Preparing the Disk Drive for Use (see page 7) Preparing the Disk Drive for Installation (see below) o Installing a Disk Drive (see below , and slide out the disk drive tray. 3 Getting Started Checklist o Preparing the Disk Drive for Installation The Adaptec ACS-300 enclosure supports 3.5-inch SATA I and SATA II hard disk drives.
..., or Cable Select like the ATA/IDE drive; Most of the enclosure. 2 Remove the enclosure's back panel, as shown below ) o Installing the Device Driver-Windows 98SE Only (see page 5) o Connecting and Powering On (see page 6) o Preparing the Disk Drive for Use (see page 7) Preparing the Disk Drive for Installation (see below) o Installing a Disk Drive (see below , and slide out the disk drive tray. 3 Getting Started Checklist o Preparing the Disk Drive for Installation The Adaptec ACS-300 enclosure supports 3.5-inch SATA I and SATA II hard disk drives.
User Guide
Page 8
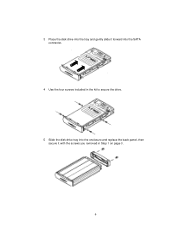
3 Place the disk drive into the tray and gently slide it forward into the SATA connector. 4 Use the four screws included in the kit to secure the drive. 5 Slide the disk drive tray into the enclosure and replace the back panel, then secure it with the screws you removed in Step 1 on page 3. 4
3 Place the disk drive into the tray and gently slide it forward into the SATA connector. 4 Use the four screws included in the kit to secure the drive. 5 Slide the disk drive tray into the enclosure and replace the back panel, then secure it with the screws you removed in Step 1 on page 3. 4
User Guide
Page 9
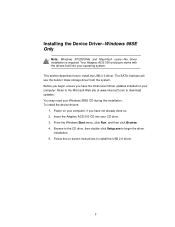
... the most recent driver updates installed on -screen instructions to download updates. Refer to the Microsoft Web site at www.microsoft.com to install the USB 2.0 driver. 5 You may need your CD drive. 3. Before you begin the driver installation. 5. Installing the Device Driver-Windows 98SE Only Note: Windows XP/2000/Me and Macintosh users-No driver installation is required. Your Adaptec ACS-300 enclosure works with the drivers built into your Windows 98SE CD during...
... the most recent driver updates installed on -screen instructions to download updates. Refer to the Microsoft Web site at www.microsoft.com to install the USB 2.0 driver. 5 You may need your CD drive. 3. Before you begin the driver installation. 5. Installing the Device Driver-Windows 98SE Only Note: Windows XP/2000/Me and Macintosh users-No driver installation is required. Your Adaptec ACS-300 enclosure works with the drivers built into your Windows 98SE CD during...
User Guide
Page 10
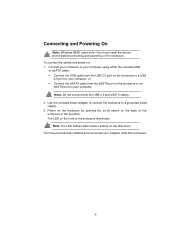
Connecting and Powering On Note: Windows 98SE users only-You must install the device drivers before connecting and powering on : 1. To connect the cables and power on the enclosure. Note: The LED flashes when there's activity on the enclosure to the I position. Note: Do not connect both the USB 2.0 and eSATA cables. 2 Use the included power adapter to connect the enclosure to a grounded power supply. 3 Power on the enclosure by pushing the on/off switch on your computer...
Connecting and Powering On Note: Windows 98SE users only-You must install the device drivers before connecting and powering on : 1. To connect the cables and power on the enclosure. Note: The LED flashes when there's activity on the enclosure to the I position. Note: Do not connect both the USB 2.0 and eSATA cables. 2 Use the included power adapter to connect the enclosure to a grounded power supply. 3 Power on the enclosure by pushing the on/off switch on your computer...
User Guide
Page 11
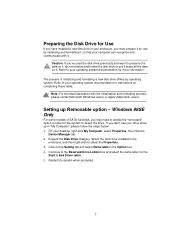
Expand the Disk Drive category. The process of SATA hard disk, you may need to enable the "removable" option in order for the system to your operating system documentation for instructions on completing these tasks. Note: For technical assistance with it. Windows 98SE Only For some models of initializing and formatting a new disk drive differs by initializing and formatting it, so that your computer can recognize and communicate with the initialization and formatting process...
Expand the Disk Drive category. The process of SATA hard disk, you may need to enable the "removable" option in order for the system to your operating system documentation for instructions on completing these tasks. Note: For technical assistance with it. Windows 98SE Only For some models of initializing and formatting a new disk drive differs by initializing and formatting it, so that your computer can recognize and communicate with the initialization and formatting process...
User Guide
Page 12
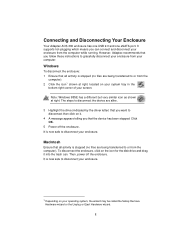
... OK. 5 Power off the enclosure. However, Adaptec recommends that the device has been stopped. Windows To disconnect the enclosure: 1 Ensure that all activity is stopped (no files are alike. 3 Highlight the drive (indicated by the driver letter) that you that you can . It is now safe to disconnect your operating system, the wizard may be called the Safely Remove Hardware wizard...
... OK. 5 Power off the enclosure. However, Adaptec recommends that the device has been stopped. Windows To disconnect the enclosure: 1 Ensure that all activity is stopped (no files are alike. 3 Highlight the drive (indicated by the driver letter) that you that you can . It is now safe to disconnect your operating system, the wizard may be called the Safely Remove Hardware wizard...

User Guide
Page 13
... Device Manager tab. To workaround the issue, make sure the enclosure is NTSF, Windows may not detect the enclosure with some SATA add-on when starting up the computer. 9 Select the enclosure, then click the Remove button at the bottom of the disk drive installed in the Adaptec ACS-300 is powered on card. b. If you are using Windows with a yellow exclamation mark beside it . Troubleshooting If you have problems installing or using your Adaptec ACS...
... Device Manager tab. To workaround the issue, make sure the enclosure is NTSF, Windows may not detect the enclosure with some SATA add-on when starting up the computer. 9 Select the enclosure, then click the Remove button at the bottom of the disk drive installed in the Adaptec ACS-300 is powered on card. b. If you are using Windows with a yellow exclamation mark beside it . Troubleshooting If you have problems installing or using your Adaptec ACS...
User Guide
Page 14
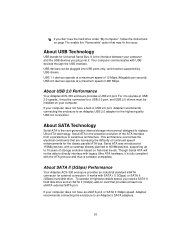
... communicates with SATA I (1.5Gbps) or SATA II (3Gbps) hard disk drive. This architecture overcomes the electrical constraints that are increasing the difficulty of the ATA interface from a parallel bus to serial bus architecture. Though Serial ATA will not be supported by USB drivers. To operate in USB 2.0 port, Adaptec recommends connecting the enclosure to an Adaptec USB 2.0 adapter for the classic parallel ATA bus. USB 1.1 devices operate at least one eSATA external SATA port. For...
... communicates with SATA I (1.5Gbps) or SATA II (3Gbps) hard disk drive. This architecture overcomes the electrical constraints that are increasing the difficulty of the ATA interface from a parallel bus to serial bus architecture. Though Serial ATA will not be supported by USB drivers. To operate in USB 2.0 port, Adaptec recommends connecting the enclosure to an Adaptec USB 2.0 adapter for the classic parallel ATA bus. USB 1.1 devices operate at least one eSATA external SATA port. For...

User Guide
Page 15
Adaptec and the Adaptec logo are trademarks of Adaptec, Inc. Part Number: CDP-00145-01-A Rev A 02/06 Adaptec, Inc. 691 South Milpitas Boulevard Milpitas, CA 95035 USA ©2006 Adaptec, Inc. which may be registered in some jurisdictions. All rights reserved.
Adaptec and the Adaptec logo are trademarks of Adaptec, Inc. Part Number: CDP-00145-01-A Rev A 02/06 Adaptec, Inc. 691 South Milpitas Boulevard Milpitas, CA 95035 USA ©2006 Adaptec, Inc. which may be registered in some jurisdictions. All rights reserved.


