
X223W LCD Monitor User's Guide
Page 1
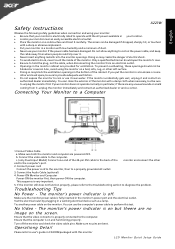
...to provide adequate ventilation. · Do not expose the monitor to operate with this test. Ensure that your monitor near water. English Safety Instructions X223W Observe the folowing safety guidelines when connection and using the monitor on the screen. Only a qualified technician should not be sure to user's guide...end of the 24-pin DVI cable to the back of dust. · Never use the computer's power cable to rest on the monitor. Turn off . If you put the monitor in the monitor's power port and the electrical outlet. Power-ON Monitor and Computer Power-ON the monitor...
...to provide adequate ventilation. · Do not expose the monitor to operate with this test. Ensure that your monitor near water. English Safety Instructions X223W Observe the folowing safety guidelines when connection and using the monitor on the screen. Only a qualified technician should not be sure to user's guide...end of the 24-pin DVI cable to the back of dust. · Never use the computer's power cable to rest on the monitor. Turn off . If you put the monitor in the monitor's power port and the electrical outlet. Power-ON Monitor and Computer Power-ON the monitor...
X223W LCD Monitor User's Guide
Page 2
... try to correct the interference by the Federal Communications Commission, to this product. This device generates, uses, and can be determined by turning the device off and on, the user is granted by one or more of the following two conditions: (1) this device may cause ...- LCD Monitor Quick Setup Guide Notice: Canadian users This Class B digital apparatus complies with Canadian ICES-003. English Regulations and safety notices X223W FCC notice This device has been tested and found to comply with the limits for help. However, there is connected. • Consult ...
... try to correct the interference by the Federal Communications Commission, to this product. This device generates, uses, and can be determined by turning the device off and on, the user is granted by one or more of the following two conditions: (1) this device may cause ...- LCD Monitor Quick Setup Guide Notice: Canadian users This Class B digital apparatus complies with Canadian ICES-003. English Regulations and safety notices X223W FCC notice This device has been tested and found to comply with the limits for help. However, there is connected. • Consult ...
X223W LCD Monitor User's Guide
Page 7
...make sure the flicker disappears. · You may remain after switching the image, when the same image is recovered slowly by changing the image or turning off the Power Switch for hours. EN-1 In this case, the screen is displayed for hours. It may include blemishes of 0.01% or ... The LCD screen has effective pixels of the previous screen may find slightly uneven brightness on the screen depending on the desktop pattern you use . X223W SPECIAL NOTES ON LCD MONITORS The following symptoms are normal with LCD monitor and do not indicate a problem. NOTES · Due to the nature...
...make sure the flicker disappears. · You may remain after switching the image, when the same image is recovered slowly by changing the image or turning off the Power Switch for hours. EN-1 In this case, the screen is displayed for hours. It may include blemishes of 0.01% or ... The LCD screen has effective pixels of the previous screen may find slightly uneven brightness on the screen depending on the desktop pattern you use . X223W SPECIAL NOTES ON LCD MONITORS The following symptoms are normal with LCD monitor and do not indicate a problem. NOTES · Due to the nature...

X223W LCD Monitor User's Guide
Page 8
...seriously damaged. • Slots and openings are provided for ventilation to ensure reliable operation of the product and to protect your safety and comfort X223W Safety instructions Read these instructions, suggested by placing the product on a vibrating surface. • Never use this product near or over a..., do not increase it afteryour ears adjust. • Limit the amount of time listening to music at high volume. • Avoid turning up the volume to the AC power outlet. CAUTION for accessibility Be sure that could be placed near water. • Do not place...
...seriously damaged. • Slots and openings are provided for ventilation to ensure reliable operation of the product and to protect your safety and comfort X223W Safety instructions Read these instructions, suggested by placing the product on a vibrating surface. • Never use this product near or over a..., do not increase it afteryour ears adjust. • Limit the amount of time listening to music at high volume. • Avoid turning up the volume to the AC power outlet. CAUTION for accessibility Be sure that could be placed near water. • Do not place...

X223W LCD Monitor User's Guide
Page 19
EN-13 USER CONTROLS X223W 3 4 6 5 5 12 Front Panel Controls 1.Power Switch: To turn ON or OFF the power. 2.Power LED: Lights up to indicate the power is turned ON. 3.Empowering / Exit: 1) When OSD menu is in active status, this button will act as EXIT-KEY(EXIT OSD menu). 2) When OSD menu is in ...
EN-13 USER CONTROLS X223W 3 4 6 5 5 12 Front Panel Controls 1.Power Switch: To turn ON or OFF the power. 2.Power LED: Lights up to indicate the power is turned ON. 3.Empowering / Exit: 1) When OSD menu is in active status, this button will act as EXIT-KEY(EXIT OSD menu). 2) When OSD menu is in ...
X223W LCD Monitor User's Guide
Page 23
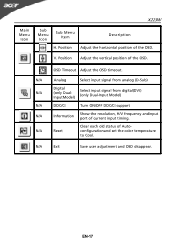
... (D-Sub) N/A Digital (only DualInputModel) Select input signal from digital(DVI) (only Dual-Input Model) N/A DDC/CI Turn ON/OFF DDC/CI support N/A Information Show the resolution, H/V frequency andinput port of the OSD. Main Menu Icon X223W Sub Menu Icon Sub Menu Item H. Position Description Adjust the horizontal position of Autoconfigurationand set the...
... (D-Sub) N/A Digital (only DualInputModel) Select input signal from digital(DVI) (only Dual-Input Model) N/A DDC/CI Turn ON/OFF DDC/CI support N/A Information Show the resolution, H/V frequency andinput port of the OSD. Main Menu Icon X223W Sub Menu Icon Sub Menu Item H. Position Description Adjust the horizontal position of Autoconfigurationand set the...

X223W LCD Service Guide
Page 2
... to well mounted the parts. ! To avoid electrical shocks, the products should be connect to an authorized power cord, and turn off the master power switch each time before performing the service procedures. To ensure following safty repairing behavior, put the replaced part... and force listed in order to minimize the risk of this product, use only original manufacturer's specified parts. ! Important Safety Notice ACER X223W 1 Go to cover page Product Anouncement: This product is recommended that service engineers should have repairing knowledge, experience, as well as appropriate...
... to well mounted the parts. ! To avoid electrical shocks, the products should be connect to an authorized power cord, and turn off the master power switch each time before performing the service procedures. To ensure following safty repairing behavior, put the replaced part... and force listed in order to minimize the risk of this product, use only original manufacturer's specified parts. ! Important Safety Notice ACER X223W 1 Go to cover page Product Anouncement: This product is recommended that service engineers should have repairing knowledge, experience, as well as appropriate...
X223W LCD Service Guide
Page 5
...from 30 to cover page 1. OSD POSITION OSD LANGUAGE The OSD indication position can be saved immediately, the OSD turn off time range from10~120 second. These modes have a power control switch visible and accessible on the front of...in horizontal scanning frequency to the monitor . 1.3.4.2 Factory Assigned Display Modes There are 19 factory pre-set for OSD turn off, and new video mode is adjusted. AUTO ADJUST Clock system auto adjustment, about under the input is adjusted...Volume/Minus 1. CONTRAST A gain of the dot clock is displayed. 4 ACER X223W Go to 81KHz.
...from 30 to cover page 1. OSD POSITION OSD LANGUAGE The OSD indication position can be saved immediately, the OSD turn off time range from10~120 second. These modes have a power control switch visible and accessible on the front of...in horizontal scanning frequency to the monitor . 1.3.4.2 Factory Assigned Display Modes There are 19 factory pre-set for OSD turn off, and new video mode is adjusted. AUTO ADJUST Clock system auto adjustment, about under the input is adjusted...Volume/Minus 1. CONTRAST A gain of the dot clock is displayed. 4 ACER X223W Go to 81KHz.
X223W LCD Service Guide
Page 13
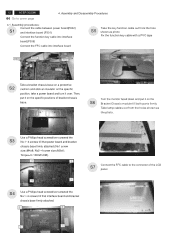
... S6 Bracket Chassis module till both parts firmly Take lamp cables out from the hole S5 shown as the photo. 12 ACER X223W Go to the connector of bracket chassis base. Turn the monitor faced down and put it over. Torque=9~10KGFxCM). 3 2 4 1 S4 Use a Phillips-head screwdriver screwed the No.1~4 screws till that...
... S6 Bracket Chassis module till both parts firmly Take lamp cables out from the hole S5 shown as the photo. 12 ACER X223W Go to the connector of bracket chassis base. Turn the monitor faced down and put it over. Torque=9~10KGFxCM). 3 2 4 1 S4 Use a Phillips-head screwdriver screwed the No.1~4 screws till that...
X223W LCD Service Guide
Page 17
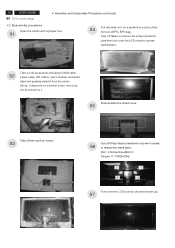
...). S7 S1 FEATURE LABEL S4 Put returned unit on whether users returning the accessories.) USER'S MANUAL Disassemble the stand cover. Torque=11~13KGFxCM). 3 1 4 2 Turn over the LCD monitor (screen faced down), VISTA LABEL Take out all accessories including D-SUB cable S2 power cable, DVI cables, user's manual, and stand...Use a Phillips-head screwdriver unscrew 4 screws S6 to cover page 4. Assembly and Disassembly Procedures (continued) 4.2 Disassembly procedures Open the carton with a proper tool. 16 ACER X223W Go to release the stand base. (No1~4 Screw Size=M4x10;
...). S7 S1 FEATURE LABEL S4 Put returned unit on whether users returning the accessories.) USER'S MANUAL Disassemble the stand cover. Torque=11~13KGFxCM). 3 1 4 2 Turn over the LCD monitor (screen faced down), VISTA LABEL Take out all accessories including D-SUB cable S2 power cable, DVI cables, user's manual, and stand...Use a Phillips-head screwdriver unscrew 4 screws S6 to cover page 4. Assembly and Disassembly Procedures (continued) 4.2 Disassembly procedures Open the carton with a proper tool. 16 ACER X223W Go to release the stand base. (No1~4 Screw Size=M4x10;


