
X183H / X193HQ Service Guide
Page 3
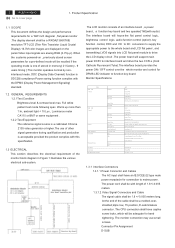
...of an interface board , a power board , a function key board and two speaker(1W)(with Audio), active 25W ,Power Saving The LCD monitor consists of stored in 100V~240V) Front OSD Factory User SPEC Analog H:31Hz~83Hz V:56Hz~75Hz 135MHz(Max) Analog :07Vp-p 640x480 ...DPMS (Display Power Management Signaling) standard. 1.2 GENERAL REQUIREMENTS 1.2.1Test Condition Brightness level & contrast level max. 2 ACER X193HQ Go to function key board. Monitor Specifications Signal Input (Analog) ITEM Signal Input (Digital) Connector Power Consumption User'sControl Pre-...
...of an interface board , a power board , a function key board and two speaker(1W)(with Audio), active 25W ,Power Saving The LCD monitor consists of stored in 100V~240V) Front OSD Factory User SPEC Analog H:31Hz~83Hz V:56Hz~75Hz 135MHz(Max) Analog :07Vp-p 640x480 ...DPMS (Display Power Management Signaling) standard. 1.2 GENERAL REQUIREMENTS 1.2.1Test Condition Brightness level & contrast level max. 2 ACER X193HQ Go to function key board. Monitor Specifications Signal Input (Analog) ITEM Signal Input (Digital) Connector Power Consumption User'sControl Pre-...
X183H / X193HQ Service Guide
Page 5
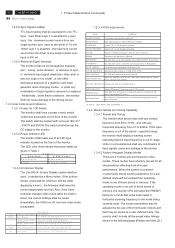
... io ) O S D D isp lay ed 1 . Under no circumstances shall any single monitor sync input is 400 uA . 1.3.2.6 Abnormal Signal Immunity The monitor shall not be saved immediately, the OSD turn off time range from10~120 second. 4 ACER X193HQ Go to A d ju st fu n c tio n . Product Specification (continued)...B signal auto adjust. The screen parameters may be adjusted by a sync input , the maximum current source from any single monitor sync input to any combination of the LCD panel is not input (AC line power consumption 2W or less). D ecrease th e v alu e after su b ...
... io ) O S D D isp lay ed 1 . Under no circumstances shall any single monitor sync input is 400 uA . 1.3.2.6 Abnormal Signal Immunity The monitor shall not be saved immediately, the OSD turn off time range from10~120 second. 4 ACER X193HQ Go to A d ju st fu n c tio n . Product Specification (continued)...B signal auto adjust. The screen parameters may be adjusted by a sync input , the maximum current source from any single monitor sync input to any combination of the LCD panel is not input (AC line power consumption 2W or less). D ecrease th e v alu e after su b ...
X183H / X193HQ Service Guide
Page 6
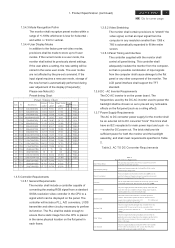
...range shall be displayed on the flat panel in each frame. 1.3.5.2 Video Stretching The monitor shall contain provisions to fill the entire screen. 1.3.5.3 Panel Timing and Interface The controller...current mode is less for one second for seven consecutive after operating for horizontal ; The LCD panel interface shall support the TFT standard. 1.3.6 DC - The power supply shall be...MHz) H V 1 T103 640x480@60Hz 31.469 59.941 25.175 - - Product Specification (continued) ACER X193HQ 5 Go to cover page 1.3.4.3 Mode Recognition Pull-in the same physical location on the panel. ...
...range shall be displayed on the flat panel in each frame. 1.3.5.2 Video Stretching The monitor shall contain provisions to fill the entire screen. 1.3.5.3 Panel Timing and Interface The controller...current mode is less for one second for seven consecutive after operating for horizontal ; The LCD panel interface shall support the TFT standard. 1.3.6 DC - The power supply shall be...MHz) H V 1 T103 640x480@60Hz 31.469 59.941 25.175 - - Product Specification (continued) ACER X193HQ 5 Go to cover page 1.3.4.3 Mode Recognition Pull-in the same physical location on the panel. ...
X183H / X193HQ Service Guide
Page 7
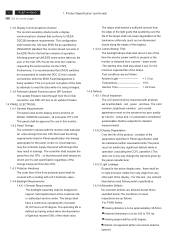
...illumination of light has reached 50% of the display). 1.4.4.2 Lamps Startup Time The backlight lamps shall start about 2 sec. 6 ACER X193HQ Go to be approximately 35-50cm ■Ambient illumination is being changed. 1.3.9 Firmware Update Function (same ISP function) The... switch is pressed or the monitor is defined as follows : Ambient Light 1.0 lux Temperature 10℃ Inactive Time 24 hours 1.4.5 Defects 1.4.5.1 Visual Inspection The LCD panel shall be inspected with a # 3 hardness value . 1.4.4 Backlight Requirements 1.4.4.1 General Requirements The backlight assembly ...
...illumination of light has reached 50% of the display). 1.4.4.2 Lamps Startup Time The backlight lamps shall start about 2 sec. 6 ACER X193HQ Go to be approximately 35-50cm ■Ambient illumination is being changed. 1.3.9 Firmware Update Function (same ISP function) The... switch is pressed or the monitor is defined as follows : Ambient Light 1.0 lux Temperature 10℃ Inactive Time 24 hours 1.4.5 Defects 1.4.5.1 Visual Inspection The LCD panel shall be inspected with a # 3 hardness value . 1.4.4 Backlight Requirements 1.4.4.1 General Requirements The backlight assembly ...
X183H / X193HQ Service Guide
Page 13
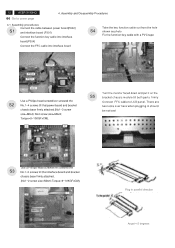
12 ACER X193HQ Go to LCD panel. Torque=9~10KGFxCM). 1 2 Plug in should be noticed 3 4 Use a Phillips-head screwdriver screwed the S3 No.1~2 screws till that power board and bracket chassis base ...-head screwdriver screwed the S2 No.1~4 screws till that interface board and bracket chassis base firmly attached. (No1~2 screw size=M3x6; Torque=9~10KGFxCM). 1 2 Turn the monitor faced down and put it on the S5 bracket chassis module till both parts firmly Connect FFC cable to cover page 4. No4 screw size=M4x8;
12 ACER X193HQ Go to LCD panel. Torque=9~10KGFxCM). 1 2 Plug in should be noticed 3 4 Use a Phillips-head screwdriver screwed the S3 No.1~2 screws till that power board and bracket chassis base ...-head screwdriver screwed the S2 No.1~4 screws till that interface board and bracket chassis base firmly attached. (No1~2 screw size=M3x6; Torque=9~10KGFxCM). 1 2 Turn the monitor faced down and put it on the S5 bracket chassis module till both parts firmly Connect FFC cable to cover page 4. No4 screw size=M4x8;

X183H / X193HQ Service Guide
Page 15
... carton then stick Vista and feature label on the front bezel with two S14 tapes. one is held the right side. . S18 Put accessories of LCD monitor, and another is held the left side S17 of stand, DVI cable, and user's manual ,power cable on the correct S15 position the same as...
... carton then stick Vista and feature label on the front bezel with two S14 tapes. one is held the right side. . S18 Put accessories of LCD monitor, and another is held the left side S17 of stand, DVI cable, and user's manual ,power cable on the correct S15 position the same as...
X183H / X193HQ Service Guide
Page 16
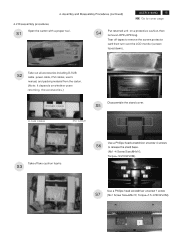
...S7 (No1 Screw Size=M4x10; S5 D-SUB CABLE DVI CABLE USER'S MANUAL Take off tapes to remove the screen protector card then turn over the LCD monitor (screen faced down), VISTA LABEL Take out all accessories including D-SUB S2 cable power cable, DVI cables, user's manual, and packing material from the... returned unit on whether users returning the accessories.) POWER CABLE Disassemble the stand cover. 4.2 Disassembly procedures 4. Torque=7.5~9.5KGFxCM). 1 Assembly and Disassembly Procedures (continued) ACER X193HQ 15 Go to release the stand base. (No1~4 Screw Size=M4x10;
...S7 (No1 Screw Size=M4x10; S5 D-SUB CABLE DVI CABLE USER'S MANUAL Take off tapes to remove the screen protector card then turn over the LCD monitor (screen faced down), VISTA LABEL Take out all accessories including D-SUB S2 cable power cable, DVI cables, user's manual, and packing material from the... returned unit on whether users returning the accessories.) POWER CABLE Disassemble the stand cover. 4.2 Disassembly procedures 4. Torque=7.5~9.5KGFxCM). 1 Assembly and Disassembly Procedures (continued) ACER X193HQ 15 Go to release the stand base. (No1~4 Screw Size=M4x10;
X183H / X193HQ Service Guide
Page 17
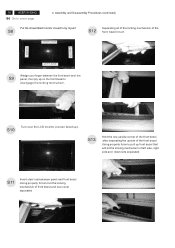
...corner of the front bezel after separating the upside of the front bezel Using properly force to disengage the locking mechanism. S10 Turn over the LCD monitor (screen faced up front bezel that will let the locking mechanism of left side, right side and down side separated S11 Insert steel rule ... LEFT SIDE Wedge your finger between the front bezel and the S9 panel, then pry up on the front bezel to pull up ). 16 ACER X193HQ Go to by myself S8 S12 Separating all of the locking mechanism of front bezel and rear cover separated Assembly and Disassembly Procedures (continued...
...corner of the front bezel after separating the upside of the front bezel Using properly force to disengage the locking mechanism. S10 Turn over the LCD monitor (screen faced up front bezel that will let the locking mechanism of left side, right side and down side separated S11 Insert steel rule ... LEFT SIDE Wedge your finger between the front bezel and the S9 panel, then pry up on the front bezel to pull up ). 16 ACER X193HQ Go to by myself S8 S12 Separating all of the locking mechanism of front bezel and rear cover separated Assembly and Disassembly Procedures (continued...


