

User Manual
Page 2
... names or trademarks are registered trademarks of Acer Incorporated. Acer Projector X1161P/X1161PA/X1161PN/X112/X1261P/X1261PN Series User's Guide Original Issue: 11/2012 Changes may be made periodically to their respective companies. No part of Acer Incorporated. Copyright © 2012. Such...or transmitted, in this manual or supplementary documents and publications. Acer Projector X1161P/X1161PA/X1161PN/X112/X1261P/X1261PN Series Model number Serial number Date of purchase Place of purchase Acer and the Acer logo are used herein for identification purposes only and belong ...
... names or trademarks are registered trademarks of Acer Incorporated. Acer Projector X1161P/X1161PA/X1161PN/X112/X1261P/X1261PN Series User's Guide Original Issue: 11/2012 Changes may be made periodically to their respective companies. No part of Acer Incorporated. Copyright © 2012. Such...or transmitted, in this manual or supplementary documents and publications. Acer Projector X1161P/X1161PA/X1161PN/X112/X1261P/X1261PN Series Model number Serial number Date of purchase Place of purchase Acer and the Acer logo are used herein for identification purposes only and belong ...
User Manual
Page 3
... instructions carefully. iii Information for cleaning. The openings should never be sure to the equipment operator as close to unplug the power cord from the projector. • If the system has multiple sources of any kind onto or into this document for future reference. These openings must not be blocked by...
... instructions carefully. iii Information for cleaning. The openings should never be sure to the equipment operator as close to unplug the power cord from the projector. • If the system has multiple sources of any kind onto or into this document for future reference. These openings must not be blocked by...
User Manual
Page 5
...104 ºF. • Locations where the altitudes are covered by a qualified technician to restore the product to qualified service personnel. Consult your projector. Keep them out of the reach of small children. The bright may hurt your eyes. • Turn on . At least 50cm clearance ...all servicing to normal condition. v Product servicing Do not attempt to service this product from walls and free flow of air around the projector is necessary. • Locations where temperatures may become excessively high, such as opening or removing covers may expose you to dangerous voltage ...
...104 ºF. • Locations where the altitudes are covered by a qualified technician to restore the product to qualified service personnel. Consult your projector. Keep them out of the reach of small children. The bright may hurt your eyes. • Turn on . At least 50cm clearance ...all servicing to normal condition. v Product servicing Do not attempt to service this product from walls and free flow of air around the projector is necessary. • Locations where temperatures may become excessively high, such as opening or removing covers may expose you to dangerous voltage ...
User Manual
Page 6
... shutter or remove the lens cap when the projector is on end vertically. Only use acer ceiling mount kit for inspection. • Do not face the projector lens to suitable qualified professional service personnel. • Do not stand the projector on . • Do not block the projector lens with dirt or dust. • Do not...
... shutter or remove the lens cap when the projector is on end vertically. Only use acer ceiling mount kit for inspection. • Do not face the projector lens to suitable qualified professional service personnel. • Do not stand the projector on . • Do not block the projector lens with dirt or dust. • Do not...
User Manual
Page 7
... information, check www.lamprecycle.org For more information on the Waste from Electrical and Electronics Equipment (WEEE) regulations, visit http://www.acer-group.com/public/ Sustainability/sustainability01.htm Mercury advisory For projectors or electronic products containing an LCD/CRT monitor or display: "Lamp(s) contain Mercury, Dispose Properly." For more information, contact the...
... information, check www.lamprecycle.org For more information on the Waste from Electrical and Electronics Equipment (WEEE) regulations, visit http://www.acer-group.com/public/ Sustainability/sustainability01.htm Mercury advisory For projectors or electronic products containing an LCD/CRT monitor or display: "Lamp(s) contain Mercury, Dispose Properly." For more information, contact the...
User Manual
Page 8
...clean the unit. • Use under "Replacing the Lamp". viii First things first Usage Notes Do: • Turn off , please ensure the projector completes its cooling cycle before cleaning. • Use a soft cloth moistened with mild detergent to clean the display housing. • Disconnect the ... • Reset the "Lamp Hour Reset" function from the Onscreen display "Management" menu after replacing the lamp module. • When switching the projector off the product before disconnecting power. • Turn on the unit provided for a long period of your eyes. • To reduce the risk...
...clean the unit. • Use under "Replacing the Lamp". viii First things first Usage Notes Do: • Turn off , please ensure the projector completes its cooling cycle before cleaning. • Use a soft cloth moistened with mild detergent to clean the display housing. • Disconnect the ... • Reset the "Lamp Hour Reset" function from the Onscreen display "Management" menu after replacing the lamp module. • When switching the projector off the product before disconnecting power. • Turn on the unit provided for a long period of your eyes. • To reduce the risk...
User Manual
Page 9
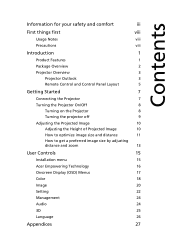
...Package Overview 2 Projector Overview 3 Projector Outlook 3 Remote Control and Control Panel Layout 5 Getting Started 7 Connecting the Projector 7 Turning the Projector On/Off 8 Turning on the Projector 8 Turning the projector off 9 ...Adjusting the Projected Image 10 Adjusting the Height of Projected Image 10 How to optimize image size and distance 11 How to get a preferred image size by adjusting distance and zoom 13 User Controls 15 Installation menu 15 Acer...
...Package Overview 2 Projector Overview 3 Projector Outlook 3 Remote Control and Control Panel Layout 5 Getting Started 7 Connecting the Projector 7 Turning the Projector On/Off 8 Turning on the Projector 8 Turning the projector off 9 ...Adjusting the Projected Image 10 Adjusting the Height of Projected Image 10 How to optimize image size and distance 11 How to get a preferred image size by adjusting distance and zoom 13 User Controls 15 Installation menu 15 Acer...
User Manual
Page 11
... DLP® projector. Outstanding features include: • DLP® technology • X1161P/X1161PA/X1161PN/X112 series: Native 800 x 600 SVGA resolution X1261P/X1261PN series: Native 1024 x 768 XGA resolution 4:3 / 16:9 aspect ratio supported • Acer ColorBoost technology delivers...consumption and economy (ECO) mode extends lamp life • Acer EcoProjeciton Technology delivers Intelligent power management approach and physical efficiency improvement • Empowering Key reveals Acer Empowering Technology utilities (Acer eView, eTimer, ePower, e3D Management) for easy adjustment ...
... DLP® projector. Outstanding features include: • DLP® technology • X1161P/X1161PA/X1161PN/X112 series: Native 800 x 600 SVGA resolution X1261P/X1261PN series: Native 1024 x 768 XGA resolution 4:3 / 16:9 aspect ratio supported • Acer ColorBoost technology delivers...consumption and economy (ECO) mode extends lamp life • Acer EcoProjeciton Technology delivers Intelligent power management approach and physical efficiency improvement • Empowering Key reveals Acer Empowering Technology utilities (Acer eView, eTimer, ePower, e3D Management) for easy adjustment ...
User Manual
Page 12
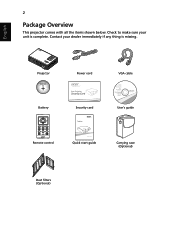
Projector XXXXXX 3V Battery Power cord VGA cable Security card User's guide Remote control Quick start guide Carrying case (Optional) Dust filters (Optional) Contact your unit is missing. English 2 Package Overview This projector comes with all the items shown below. Check to make sure your dealer immediately if any thing is complete.
Projector XXXXXX 3V Battery Power cord VGA cable Security card User's guide Remote control Quick start guide Carrying case (Optional) Dust filters (Optional) Contact your unit is missing. English 2 Package Overview This projector comes with all the items shown below. Check to make sure your dealer immediately if any thing is complete.
User Manual
Page 13
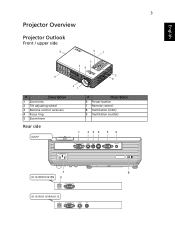
English 3 Projector Overview Projector Outlook Front / upper side 8 6 7 5 3 4 9 3 8 2 1 # Description 1 Zoom lens 2 Tilt adjusting wheel 3 Remote control receivers 4 Focus ring 5 Zoom lever Rear side X261P # Description 6 Power button 7 Remote control 8 Ventilation (inlet) 9 Ventilation (outlet) 1 234 56 VGA IN S-VIDEO VIDEO RS232 VGA OUT AUDIO IN 7 8 X1161PN/X1261PN 9 VGA IN X1161P/X1161PA/X112 VGA IN S-VIDEO VIDEO
English 3 Projector Overview Projector Outlook Front / upper side 8 6 7 5 3 4 9 3 8 2 1 # Description 1 Zoom lens 2 Tilt adjusting wheel 3 Remote control receivers 4 Focus ring 5 Zoom lever Rear side X261P # Description 6 Power button 7 Remote control 8 Ventilation (inlet) 9 Ventilation (outlet) 1 234 56 VGA IN S-VIDEO VIDEO RS232 VGA OUT AUDIO IN 7 8 X1161PN/X1261PN 9 VGA IN X1161P/X1161PA/X112 VGA IN S-VIDEO VIDEO
User Manual
Page 15
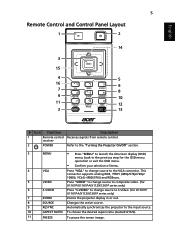
... Layout 1 2 14 3 15 4 5 16 6 7 8 9 10 11 12 2 13 # Icon Function Description 1 Remote control Receives signals from remote control. receiver 2 POWER Refer to the "Turning the Projector On/Off" section. 3 MENU • Press "MENU" to launch the Onscreen display (OSD) menu, back to the previous step for X1161P/ X1161PA/X112/X1261P series...
... Layout 1 2 14 3 15 4 5 16 6 7 8 9 10 11 12 2 13 # Icon Function Description 1 Remote control Receives signals from remote control. receiver 2 POWER Refer to the "Turning the Projector On/Off" section. 3 MENU • Press "MENU" to launch the Onscreen display (OSD) menu, back to the previous step for X1161P/ X1161PA/X112/X1261P series...
User Manual
Page 16
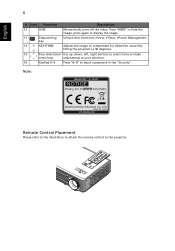
... again to input a password in the "Security". key 14 KEYSTONE Adjusts the image to compensate for distortion caused by tilting the projector (± 40 degrees). 15 Four directional Use up, down, left, right buttons to select items or make select keys adjustments .... 16 KeyPad 0~9 Press "0~9" to display the image. 13 Empowering Unique Acer functions: eView, eTimer, ePower Management. Note: Remote Control Placement Please refer to the illustration to attach the remote control to the projector. English 6 # Icon Function Description 12 HIDE Momentarily turns off the video...
... again to input a password in the "Security". key 14 KEYSTONE Adjusts the image to compensate for distortion caused by tilting the projector (± 40 degrees). 15 Four directional Use up, down, left, right buttons to select items or make select keys adjustments .... 16 KeyPad 0~9 Press "0~9" to display the image. 13 Empowering Unique Acer functions: eView, eTimer, ePower Management. Note: Remote Control Placement Please refer to the illustration to attach the remote control to the projector. English 6 # Icon Function Description 12 HIDE Momentarily turns off the video...
User Manual
Page 17
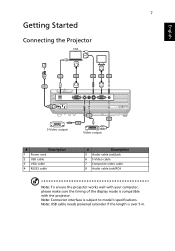
English 7 Getting Started Connecting the Projector VGA RS232 USB D-Sub D-Sub 2 3 4 3 5 1 D-Sub D-Sub VGA IN S-VIDEO VIDEO RS232 VGA OUT AUDIO IN USB RW S-Video output Y 7 8 6 Y Video output # Description 1 Power cord 2 ...USB cable 3 VGA cable 4 RS232 cable # Description 5 Audio cable jack/jack 6 S-Video cable 7 Composite video cable 8 Audio cable jack/RCA Note: To ensure the projector works well with your computer, please make sure the timing of the display mode is over 5 m. Note: USB cable needs powered extender if the length...
English 7 Getting Started Connecting the Projector VGA RS232 USB D-Sub D-Sub 2 3 4 3 5 1 D-Sub D-Sub VGA IN S-VIDEO VIDEO RS232 VGA OUT AUDIO IN USB RW S-Video output Y 7 8 6 Y Video output # Description 1 Power cord 2 ...USB cable 3 VGA cable 4 RS232 cable # Description 5 Audio cable jack/jack 6 S-Video cable 7 Composite video cable 8 Audio cable jack/RCA Note: To ensure the projector works well with your computer, please make sure the timing of the display mode is over 5 m. Note: USB cable needs powered extender if the length...
User Manual
Page 18
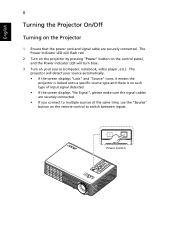
... turn blue. 3 Turn on your source automatically. • If the screen displays "Lock" and "Source" icons, it means the projector is locked onto a specific source type and there is no such type of input signal detected. • If the screen displays "No Signal", please ...make sure the signal cables are securely connected. English 8 Turning the Projector On/Off Turning on the Projector 1 Ensure that the power cord and signal cable are securely connected. • If you connect to multiple sources at the same time, use...
... turn blue. 3 Turn on your source automatically. • If the screen displays "Lock" and "Source" icons, it means the projector is locked onto a specific source type and there is no such type of input signal detected. • If the screen displays "No Signal", please ...make sure the signal cables are securely connected. English 8 Turning the Projector On/Off Turning on the Projector 1 Ensure that the power cord and signal cable are securely connected. • If you connect to multiple sources at the same time, use...
User Manual
Page 19
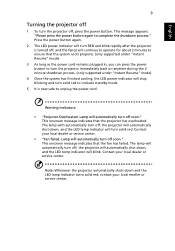
... temp indicator will automatically turn off soon." Contact your local dealer or service center. English 9 Turning the projector off 1 To turn solid red. Lamp will turn the projector off soon." This message appears: "Please press the power button again to unplug the power cord. Warning indicators...supported under "Instant Resume" mode) 3 As long as the power cord remains plugged in, you can press the power button to turn the projector immediately back on anytime during the 2minute shutdown process. (only supported under "Instant Resume" mode) 4 Once the system has finished cooling, ...
... temp indicator will automatically turn off soon." Contact your local dealer or service center. English 9 Turning the projector off 1 To turn solid red. Lamp will turn the projector off soon." This message appears: "Please press the power button again to unplug the power cord. Warning indicators...supported under "Instant Resume" mode) 3 As long as the power cord remains plugged in, you can press the power button to turn the projector immediately back on anytime during the 2minute shutdown process. (only supported under "Instant Resume" mode) 4 Once the system has finished cooling, ...
User Manual
Page 20
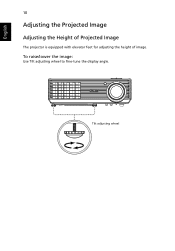
To raise/lower the image: Use Tilt adjusting wheel to fine-tune the display angle. English 10 Adjusting the Projected Image Adjusting the Height of Projected Image The projector is equipped with elevator feet for adjusting the height of image. Tilt adjusting wheel
To raise/lower the image: Use Tilt adjusting wheel to fine-tune the display angle. English 10 Adjusting the Projected Image Adjusting the Height of Projected Image The projector is equipped with elevator feet for adjusting the height of image. Tilt adjusting wheel
User Manual
Page 21
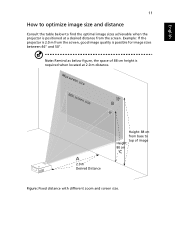
... possible for image sizes between 46" and 50". Note: Remind as below to top of 88 cm height is positioned at 2.0 m distance. Example: If the projector is 2.0 m from base to find the optimal image sizes achievable when the...
... possible for image sizes between 46" and 50". Note: Remind as below to top of 88 cm height is positioned at 2.0 m distance. Example: If the projector is 2.0 m from base to find the optimal image sizes achievable when the...
User Manual
Page 23
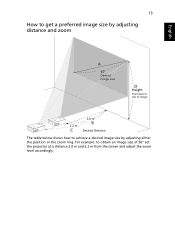
13 How to top of 50" set the projector at a distance 2.0 m and 2.2 m from base to get a preferred image size by adjusting either the position or the zoom ring. For example: to obtain an image size of image 2.2 m C 2.0 m B Desired Distance The table below shows how to achieve a desired image size by adjusting distance and zoom English A 50" Desired image size D Height from the screen and adjust the zoom level accordingly.
13 How to top of 50" set the projector at a distance 2.0 m and 2.2 m from base to get a preferred image size by adjusting either the position or the zoom ring. For example: to obtain an image size of image 2.2 m C 2.0 m B Desired Distance The table below shows how to achieve a desired image size by adjusting distance and zoom English A 50" Desired image size D Height from the screen and adjust the zoom level accordingly.
User Manual
Page 25
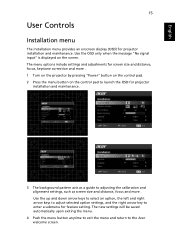
... the menu and return to adjusting the calibration and alignment settings, such as screen size and distance, focus and more . 1 Turn on the projector by pressing "Power" button on the control pad. 2 Press the menu button on the screen. Use the up and down arrow keys to ...the left and right arrow keys to adjust selected option settings, and the right arrow key to enter a submenu for projector installation and maintenance. 3 The background pattern acts as a guide to the Acer welcome screen. English 15 User Controls Installation menu The installation menu provides an onscreen display (OSD) for...
... the menu and return to adjusting the calibration and alignment settings, such as screen size and distance, focus and more . 1 Turn on the projector by pressing "Power" button on the control pad. 2 Press the menu button on the screen. Use the up and down arrow keys to ...the left and right arrow keys to adjust selected option settings, and the right arrow key to enter a submenu for projector installation and maintenance. 3 The background pattern acts as a guide to the Acer welcome screen. English 15 User Controls Installation menu The installation menu provides an onscreen display (OSD) for...
User Manual
Page 26
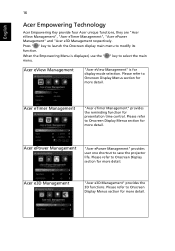
... user one shortcut to Onscreen Display section for more detail. Please refer to save the projector life. English 16 Acer Empowering Technology Acer Empowering Key provide four Acer unique functions, they are "Acer eView Management", "Acer eTimer Management", "Acer ePower Management" and "Acer e3D Management respectively. Please refer to Onscreen Display Menus section for more detail. Please refer...
... user one shortcut to Onscreen Display section for more detail. Please refer to save the projector life. English 16 Acer Empowering Technology Acer Empowering Key provide four Acer unique functions, they are "Acer eView Management", "Acer eTimer Management", "Acer ePower Management" and "Acer e3D Management respectively. Please refer to Onscreen Display Menus section for more detail. Please refer...


