User Manual
Page 2
...or fitness for identification purposes only and belong to your unit should include the serial number, model number and purchase information. Acer Projector X1140/X1140A/X1240/X1340W Series User's Guide Original Issue: 4/2012 Changes may be made periodically to the information in this publication may be ... by photocopy, recording or otherwise, without obligation to the contents hereof and specifically disclaims the implied warranties of this manual or supplementary documents and publications. All Rights Reserved. Record the model number, serial number, purchase date and place of...
...or fitness for identification purposes only and belong to your unit should include the serial number, model number and purchase information. Acer Projector X1140/X1140A/X1240/X1340W Series User's Guide Original Issue: 4/2012 Changes may be made periodically to the information in this publication may be ... by photocopy, recording or otherwise, without obligation to the contents hereof and specifically disclaims the implied warranties of this manual or supplementary documents and publications. All Rights Reserved. Record the model number, serial number, purchase date and place of...
User Manual
Page 11
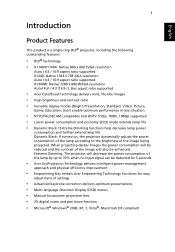
...delivers optimum presentations • Multi-language Onscreen Display (OSD) menus • Manual focus/zoom projection lens • 2X digital zoom and pan move function •... English 1 Introduction Product Features This product is a single-chip DLP® projector, including the following outstanding features: • DLP® technology • X1140/X1140A: Native ... supported X1240: Native 1024 x 768 XGA resolution Auto / 4:3 / 16:9 aspect ratio supported X1340W: Native 1280 x 800 WXGA resolution Auto/ Full / 4:3 /16:9 / L.Box aspect ratio supported • Acer ColorBoost ...
...delivers optimum presentations • Multi-language Onscreen Display (OSD) menus • Manual focus/zoom projection lens • 2X digital zoom and pan move function •... English 1 Introduction Product Features This product is a single-chip DLP® projector, including the following outstanding features: • DLP® technology • X1140/X1140A: Native ... supported X1240: Native 1024 x 768 XGA resolution Auto / 4:3 / 16:9 aspect ratio supported X1340W: Native 1280 x 800 WXGA resolution Auto/ Full / 4:3 /16:9 / L.Box aspect ratio supported • Acer ColorBoost ...
User Manual
Page 12
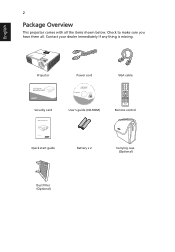
Projector Acer Projector Security Card Security card Power cord VGA cable Acer Projector This CD contains • User's manual • Quick Start Guide • Acrobat® Reader® www.acer.com User's guide (CD-ROM) ENTER BACK PgUp PgDn SD/USB A HDMI/DVI LAN/WiFi USBB Remote control Quick Start Guide Quick start guide Battery x 2 Carrying case (Optional) Dust filter (Optional) English 2 Package Overview This projector comes with all . Check to make sure you have them all the items shown below. Contact your dealer immediately if any thing is missing.
Projector Acer Projector Security Card Security card Power cord VGA cable Acer Projector This CD contains • User's manual • Quick Start Guide • Acrobat® Reader® www.acer.com User's guide (CD-ROM) ENTER BACK PgUp PgDn SD/USB A HDMI/DVI LAN/WiFi USBB Remote control Quick Start Guide Quick start guide Battery x 2 Carrying case (Optional) Dust filter (Optional) English 2 Package Overview This projector comes with all . Check to make sure you have them all the items shown below. Contact your dealer immediately if any thing is missing.

User Manual
Page 25
...or 2 Press "MENU" on the control panel or remote control to launch the OSD for projector installation and maintenance. 3 The background pattern acts as a guide to adjusting the calibration and ... the following options: • Projection mode • Projection Location • Auto keystone • Manual keystone • Language settings • Reset to factory default functions Use the up and down arrow... right arrow keys to adjust selected option settings, and the right arrow key to the Acer welcome screen. The new settings will be saved automatically upon exiting the menu. 5 Press...
...or 2 Press "MENU" on the control panel or remote control to launch the OSD for projector installation and maintenance. 3 The background pattern acts as a guide to adjusting the calibration and ... the following options: • Projection mode • Projection Location • Auto keystone • Manual keystone • Language settings • Reset to factory default functions Use the up and down arrow... right arrow keys to adjust selected option settings, and the right arrow key to the Acer welcome screen. The new settings will be saved automatically upon exiting the menu. 5 Press...

User Manual
Page 31
..."Sharpness" function is unavailable under Auto Keystone setting to move the image up. The Manual Keystone function is not supported under video mode. Position (Vertical Position) Frequency Tracking Manually adjusts image distortion caused by tilting projection (±40 degrees). to move the image ...right. • Press to move the image down. • Press to match the frequency of the display with the graphics card. English 21 Manual Keystone Sharpness H. Changes the projector...
..."Sharpness" function is unavailable under Auto Keystone setting to move the image up. The Manual Keystone function is not supported under video mode. Position (Vertical Position) Frequency Tracking Manually adjusts image distortion caused by tilting projection (±40 degrees). to move the image ...right. • Press to move the image down. • Press to match the frequency of the display with the graphics card. English 21 Manual Keystone Sharpness H. Changes the projector...
User Manual
Page 39
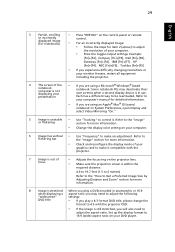
... Zoom" section for more information. • Check and reconfigure the display mode of your computer's manual for more information. 8 Image is still stretched, you experience difficulty changing resolutions or your monitor freezes, restart all equipment including the projector. 4 The screen of your DVD player. Set up the display format to 16:9 (wide...
... Zoom" section for more information. • Check and reconfigure the display mode of your computer's manual for more information. 8 Image is still stretched, you experience difficulty changing resolutions or your monitor freezes, restart all equipment including the projector. 4 The screen of your DVD player. Set up the display format to 16:9 (wide...

User Manual
Page 40
... square. • Press "MENU" on until the lamp module has been replaced. Go to "Image" > "Auto Keystone" or "Image" > "Manual Keystone" to all controls unplug the power cord and wait at least 30 seconds before reconnecting power. 2 Lamp burns out or makes a popping sound When...30 English 9 Image is too small • Adjust the zoom lever on the OSD and adjust the projection direction. Problems with the Projector # Condition Solution 1 The projector stops responding If possible, turn on the control panel or remote control to or further from the screen. • Press "MENU"...
... square. • Press "MENU" on until the lamp module has been replaced. Go to "Image" > "Auto Keystone" or "Image" > "Manual Keystone" to all controls unplug the power cord and wait at least 30 seconds before reconnecting power. 2 Lamp burns out or makes a popping sound When...30 English 9 Image is too small • Adjust the zoom lever on the OSD and adjust the projection direction. Problems with the Projector # Condition Solution 1 The projector stops responding If possible, turn on the control panel or remote control to or further from the screen. • Press "MENU"...


