3D manual
Page 3
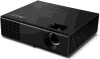
... the image may need to purchase additional software. 4 Ensure you have bought has integrated DLP and NVIDIA 3D technology. English 3 The Acer projector you have the NVIDIA 3D glasses and IR-transmitter. If you will need to set up a 3D environment Once you have installed the drivers, you will be projected at the top of the page that may help...
... the image may need to purchase additional software. 4 Ensure you have bought has integrated DLP and NVIDIA 3D technology. English 3 The Acer projector you have the NVIDIA 3D glasses and IR-transmitter. If you will need to set up a 3D environment Once you have installed the drivers, you will be projected at the top of the page that may help...
3D manual
Page 6
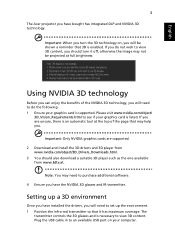
... card supports 3D playback. Select the second menu option on the projector remote control to open the OSD. Note: You may need to purchase additional software. 4 Ensure you have installed the drivers, you will need to do the following. 1 Ensure your graphics card. 2 Press the menu button on the left-hand side of the DLP 3D technology, you will need to set up...
... card supports 3D playback. Select the second menu option on the projector remote control to open the OSD. Note: You may need to purchase additional software. 4 Ensure you have installed the drivers, you will need to do the following. 1 Ensure your graphics card. 2 Press the menu button on the left-hand side of the DLP 3D technology, you will need to set up...
User Manual
Page 5
... darken the image. • Locations near fire alarms. • Locations with all servicing to qualified service personnel. Warning! Do not operate if smoke, strange noise or odor comes out of small children. v Product servicing Do not attempt to service this product from walls and free flow of air around the projector are necessary. • Locations where temperatures may become excessively high, such as opening or removing covers may...
... darken the image. • Locations near fire alarms. • Locations with all servicing to qualified service personnel. Warning! Do not operate if smoke, strange noise or odor comes out of small children. v Product servicing Do not attempt to service this product from walls and free flow of air around the projector are necessary. • Locations where temperatures may become excessively high, such as opening or removing covers may...

User Manual
Page 6
... all changing instructions. • Reset the "Lamp Hour Reset" function from the Onscreen Display "Management" menu after replacing the lamp module. • Do not attempt to disassemble this case contact your dealer for the fan to removing the lamp assembly for ceiling mount installation. The best way is the lamp which has its cooling cycle before turning main power off the main power abruptly or unplug the projector during operation. The only user serviceable part...
... all changing instructions. • Reset the "Lamp Hour Reset" function from the Onscreen Display "Management" menu after replacing the lamp module. • Do not attempt to disassemble this case contact your dealer for the fan to removing the lamp assembly for ceiling mount installation. The best way is the lamp which has its cooling cycle before turning main power off the main power abruptly or unplug the projector during operation. The only user serviceable part...

User Manual
Page 8
... clean the display housing. • Disconnect the power plug from the Onscreen Display "Management" menu after replacing the lamp module. • When switching the projector off the product before disconnecting power. • Turn on the projector first and then the signal sources. • Do not use lens cap when projector is on until the lamp module has been replaced. Warning: • Do not look into the projector's lens when the lamp is in operation...
... clean the display housing. • Disconnect the power plug from the Onscreen Display "Management" menu after replacing the lamp module. • When switching the projector off the product before disconnecting power. • Turn on the projector first and then the signal sources. • Do not use lens cap when projector is on until the lamp module has been replaced. Warning: • Do not look into the projector's lens when the lamp is in operation...
User Manual
Page 9
... 2 Projector Overview 3 Projector Outlook 3 Control Panel 4 Remote Control Layout 5 Getting Started 7 Connecting the Projector 7 Turning the Projector On/Off 8 Turning On the Projector 8 Turning Off the Projector 9 Adjusting the Projected Image 10 Adjusting the Height of the Projected Image 10 How to Optimize Image Size and Distance 11 How to Get a Preferred Image Size by Adjusting Distance and Zoom 13 User Controls 15 Installation Menu 15 Acer Empowering Technology 16 Onscreen Display (OSD) Menus 17 Color 18 Image 20 Setting 22 Management 24 Audio...
... 2 Projector Overview 3 Projector Outlook 3 Control Panel 4 Remote Control Layout 5 Getting Started 7 Connecting the Projector 7 Turning the Projector On/Off 8 Turning On the Projector 8 Turning Off the Projector 9 Adjusting the Projected Image 10 Adjusting the Height of the Projected Image 10 How to Optimize Image Size and Distance 11 How to Get a Preferred Image Size by Adjusting Distance and Zoom 13 User Controls 15 Installation Menu 15 Acer Empowering Technology 16 Onscreen Display (OSD) Menus 17 Color 18 Image 20 Setting 22 Management 24 Audio...
User Manual
Page 11
... a single-chip DLP® projector, including the following outstanding features: • DLP® technology • X1140/X1140A: Native 800 x 600 SVGA resolution Auto / 4:3 / 16:9 aspect ratio supported X1240: Native 1024 x 768 XGA resolution Auto / 4:3 / 16:9 aspect ratio supported X1340W: Native 1280 x 800 WXGA resolution Auto/ Full / 4:3 /16:9 / L.Box aspect ratio supported • Acer ColorBoost technology delivers vivid, life-like images • High brightness and contrast ratio • Versatile display modes (Bright...
... a single-chip DLP® projector, including the following outstanding features: • DLP® technology • X1140/X1140A: Native 800 x 600 SVGA resolution Auto / 4:3 / 16:9 aspect ratio supported X1240: Native 1024 x 768 XGA resolution Auto / 4:3 / 16:9 aspect ratio supported X1340W: Native 1280 x 800 WXGA resolution Auto/ Full / 4:3 /16:9 / L.Box aspect ratio supported • Acer ColorBoost technology delivers vivid, life-like images • High brightness and contrast ratio • Versatile display modes (Bright...

User Manual
Page 15
... change source to the input source. Automatically synchronizes the projector to VGA. To pause the screen image. Zooms the projector display in the "Setting" > "Security" OSD. To change source to S-Video. (No function) Sends signals to your selection. Press "0~9" to the "Turning the Projector On/Off" section. 5 Remote Control Layout English ENTER BACK PgUp PgDn SD/USB A HDMI/DVI LAN/WiFi USBB # Function 1 POWER 2 ASPECT RATIO 3 ZOOM 4 RESYNC 5 Keystone Description Refer to input a password in or out. Adjusts image distortion...
... change source to the input source. Automatically synchronizes the projector to VGA. To pause the screen image. Zooms the projector display in the "Setting" > "Security" OSD. To change source to S-Video. (No function) Sends signals to your selection. Press "0~9" to the "Turning the Projector On/Off" section. 5 Remote Control Layout English ENTER BACK PgUp PgDn SD/USB A HDMI/DVI LAN/WiFi USBB # Function 1 POWER 2 ASPECT RATIO 3 ZOOM 4 RESYNC 5 Keystone Description Refer to input a password in or out. Adjusts image distortion...
User Manual
Page 21
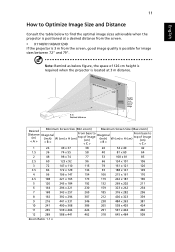
... optimal image sizes achievable when the projector is possible for image sizes between 72" and 79". Note: Remind as below to top of 126 cm height is required when the projector is located at a desired distance from the screen. • X1140/X1140A/X1240 If the projector is 3 m from the screen, good image quality is positioned at 3 m distance. English 11 How to Optimize Image Size and Distance Consult...
... optimal image sizes achievable when the projector is possible for image sizes between 72" and 79". Note: Remind as below to top of 126 cm height is required when the projector is located at a desired distance from the screen. • X1140/X1140A/X1240 If the projector is 3 m from the screen, good image quality is positioned at 3 m distance. English 11 How to Optimize Image Size and Distance Consult...

User Manual
Page 25
... to enter a submenu for feature setting. English 15 User Controls Installation Menu The Installation menu provides an onscreen display (OSD) for projector installation and maintenance. 3 The background pattern acts as a guide to adjusting the calibration and alignment settings, such as screen size and distance, focus and more. 4 The Installation menu includes the following options: • Projection mode • Projection Location • Auto keystone • Manual keystone • Language settings • Reset to factory default functions Use the up and down arrow keys...
... to enter a submenu for feature setting. English 15 User Controls Installation Menu The Installation menu provides an onscreen display (OSD) for projector installation and maintenance. 3 The background pattern acts as a guide to adjusting the calibration and alignment settings, such as screen size and distance, focus and more. 4 The Installation menu includes the following options: • Projection mode • Projection Location • Auto keystone • Manual keystone • Language settings • Reset to factory default functions Use the up and down arrow keys...
User Manual
Page 28
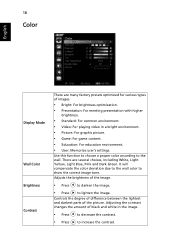
... education environment. • User: Memorize user's settings. It will compensate the color deviation due to the wall color to the wall. Adjusting the contrast changes the amount of the image. • Press to darken the image. • Press to increase the contrast. 18 Color English Display Mode Wall Color Brightness Contrast There are several choices, including White, Light Yellow, Light Blue, Pink and Dark Green. Use this function to choose...
... education environment. • User: Memorize user's settings. It will compensate the color deviation due to the wall color to the wall. Adjusting the contrast changes the amount of the image. • Press to darken the image. • Press to increase the contrast. 18 Color English Display Mode Wall Color Brightness Contrast There are several choices, including White, Light Yellow, Light Blue, Pink and Dark Green. Use this function to choose...
User Manual
Page 29
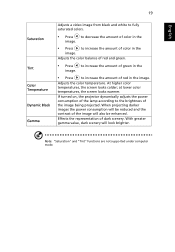
... red and green. • Press to increase the amount of green in the image. at lower color temperatures, the screen looks warmer. Adjusts the color temperature. When projecting darker images the power consumption will be enhanced. If turned on, the projector dynamically adjusts the power consumption of the lamp according to increase the amount of the image will look brighter. Note: "Saturation" and "Tint" functions are not supported under computer mode...
... red and green. • Press to increase the amount of green in the image. at lower color temperatures, the screen looks warmer. Adjusts the color temperature. When projecting darker images the power consumption will be enhanced. If turned on, the projector dynamically adjusts the power consumption of the lamp according to increase the amount of the image will look brighter. Note: "Saturation" and "Tint" functions are not supported under computer mode...
User Manual
Page 30
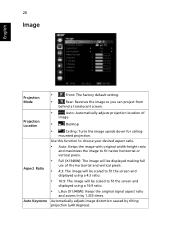
... • Ceiling: Turns the image upside down for ceiling- Auto Keystone • L.Box (X1340W): Keeps the original signal aspect ratio and zooms in by tilting projection (±40 degrees). Automatically adjusts image distortion caused by 1.333 times. Use this function to choose your desired aspect ratio. • Auto: Keeps the image with original width-height ratio and maximizes the image to fit the screen and displayed using a 16:9 ratio. Projection Location • Auto: Automatically adjusts projection location of...
... • Ceiling: Turns the image upside down for ceiling- Auto Keystone • L.Box (X1340W): Keeps the original signal aspect ratio and zooms in by tilting projection (±40 degrees). Automatically adjusts image distortion caused by 1.333 times. Use this function to choose your desired aspect ratio. • Auto: Keeps the image with original width-height ratio and maximizes the image to fit the screen and displayed using a 16:9 ratio. Projection Location • Auto: Automatically adjusts projection location of...
User Manual
Page 33
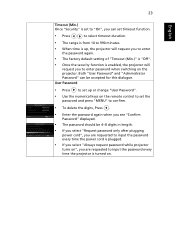
... plugging power cord", you are requested to input the password every time the power cord is plugged. • If you select "Always request password while projector turns on", you are requested to input the password every time the projector is enabled, the projector will request you to enter password when switching on . User Password • Press to set up , the projector will request you to enter the password again. • The factory default setting of...
... plugging power cord", you are requested to input the password every time the power cord is plugged. • If you select "Always request password while projector turns on", you are requested to input the password every time the projector is enabled, the projector will request you to enter password when switching on . User Password • Press to set up , the projector will request you to enter the password again. • The factory default setting of...

User Manual
Page 34
... displays. • Press to change "Administrator Password". • The factory default of "Administrator Password" is turned on, the projector fans operate at full speed continuously to cool down the projector's temperature. If you forget your administrator password, do the following to dim the projector lamp, which is lost, please contact your projector. Management ECO Mode High Altitude Choose "On" to retrieve the administrator password: • Enter the unique 6-digit "Universal Password...
... displays. • Press to change "Administrator Password". • The factory default of "Administrator Password" is turned on, the projector fans operate at full speed continuously to cool down the projector's temperature. If you forget your administrator password, do the following to dim the projector lamp, which is lost, please contact your projector. Management ECO Mode High Altitude Choose "On" to retrieve the administrator password: • Enter the unique 6-digit "Universal Password...
User Manual
Page 38
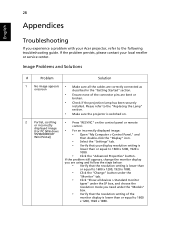
... "Replacing the Lamp" section. • Make sure the projector is switched on. 2 Partial, scrolling • Press "RESYNC" on the control panel or remote or incorrectly control. 28 Appendices English Troubleshooting If you need under the "Models" box. • Verify that the resolution setting of the connector pins are correctly connected as onscreen described in the "Getting Started" section. • Ensure none of the monitor display...
... "Replacing the Lamp" section. • Make sure the projector is switched on. 2 Partial, scrolling • Press "RESYNC" on the control panel or remote or incorrectly control. 28 Appendices English Troubleshooting If you need under the "Models" box. • Verify that the resolution setting of the connector pins are correctly connected as onscreen described in the "Getting Started" section. • Ensure none of the monitor display...
User Manual
Page 39
Refer to flickering bar the "Image" section for more information. • Check and reconfigure the display mode of the • If you are using a Microsoft® Windows® based notebook computer is within the required distance: 4.9 to 19.7 feet (1.5 to 6 meters) Refer to the "How to Get a Preferred Image Size by Adjusting Distance and Zoom" section for more information. • Change the display color setting on your DVD...
Refer to flickering bar the "Image" section for more information. • Check and reconfigure the display mode of the • If you are using a Microsoft® Windows® based notebook computer is within the required distance: 4.9 to 19.7 feet (1.5 to 6 meters) Refer to the "How to Get a Preferred Image Size by Adjusting Distance and Zoom" section for more information. • Change the display color setting on your DVD...

User Manual
Page 40
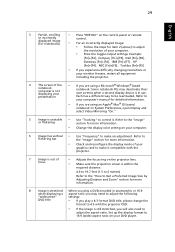
... "Image" > "Projection Mode", "Image" > "Projection Location" on the OSD and adjust the projection direction. Go to open the OSD menu. Go to "Image" > "Auto Keystone" or "Image" > "Manual Keystone" to make a loud popping sound. To replace the lamp, follow the procedures in the "Replacing the Lamp" section. Problems with the Projector # Condition Solution 1 The projector stops responding If possible, turn on until the image becomes square. • Press "MENU" on the control panel or remote control until the lamp module has been replaced...
... "Image" > "Projection Mode", "Image" > "Projection Location" on the OSD and adjust the projection direction. Go to open the OSD menu. Go to "Image" > "Auto Keystone" or "Image" > "Manual Keystone" to make a loud popping sound. To replace the lamp, follow the procedures in the "Replacing the Lamp" section. Problems with the Projector # Condition Solution 1 The projector stops responding If possible, turn on until the image becomes square. • Press "MENU" on the control panel or remote control until the lamp module has been replaced...
User Manual
Page 41
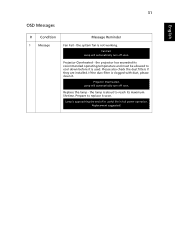
.... Lamp is used. the system fan is clogged with dust, please clean it soon. Lamp will automatically turn off soon. Projector Overheated - Please also check the dust filters if they are installed. Replacement suggested! 31 English OSD Messages # Condition 1 Message Message Reminder Fan Fail - Replace the lamp - If the dust filter is not working. the projector has exceeded its recommended operating temperature and must be allowed to reach its useful life in full power operation. Projector Overheated. Prepare to replace...
.... Lamp is used. the system fan is clogged with dust, please clean it soon. Lamp will automatically turn off soon. Projector Overheated - Please also check the dust filters if they are installed. Replacement suggested! 31 English OSD Messages # Condition 1 Message Message Reminder Fan Fail - Replace the lamp - If the dust filter is not working. the projector has exceeded its recommended operating temperature and must be allowed to reach its useful life in full power operation. Projector Overheated. Prepare to replace...
User Manual
Page 42
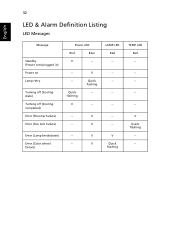
Error (Lamp breakdown) -- failure) V V V Quick flashing TEMP LED Red -- --- -- -- V LAMP LED Red -- ---- -- --- Error (Color wheel -- V -- V Quick flashing --- 32 English LED & Alarm Definition Listing LED Messages Message Standby (Power cord plugged in) Power on Lamp retry Turning off (Cooling state) Turning off (Cooling completed) Error (Thermal failure) Error (Fan lock failure) Power LED Red Blue V -- --- Quick flashing V V Quick flashing -- -- --
Error (Lamp breakdown) -- failure) V V V Quick flashing TEMP LED Red -- --- -- -- V LAMP LED Red -- ---- -- --- Error (Color wheel -- V -- V Quick flashing --- 32 English LED & Alarm Definition Listing LED Messages Message Standby (Power cord plugged in) Power on Lamp retry Turning off (Cooling state) Turning off (Cooling completed) Error (Thermal failure) Error (Fan lock failure) Power LED Red Blue V -- --- Quick flashing V V Quick flashing -- -- --


