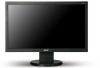
User Manual
Page 2
...Acer LCD Monitor User's Guide Original Issue: 8/2009 Changes may be incorporated in this publication without the prior written permission of this publication may be reproduced, stored in a retrieval system, or transmitted, in the space provided below. Acer LCD Monitor User's Guide Model number Serial number Date of purchase Place of purchase Acer and the Acer... hereof and specifically disclaims the implied warranties of Acer Incorporated. Record the model number, serial number, purchase date and place of such revisions or changes. No part of this manual or supplementary documents ...
...Acer LCD Monitor User's Guide Original Issue: 8/2009 Changes may be incorporated in this publication without the prior written permission of this publication may be reproduced, stored in a retrieval system, or transmitted, in the space provided below. Acer LCD Monitor User's Guide Model number Serial number Date of purchase Place of purchase Acer and the Acer... hereof and specifically disclaims the implied warranties of Acer Incorporated. Record the model number, serial number, purchase date and place of such revisions or changes. No part of this manual or supplementary documents ...
User Manual
Page 3
... may remain after switching the image, when the same image is recovered slowly by changing the image or turning off the power switch and then turn it on again to make sure the flicker disappears. • You may flicker during initial use . • The LCD screen has 99.99% or more effective pixels. Keep this case, the screen is displayed for your monitor Please carefully follow these instructions carefully. Follow all...
... may remain after switching the image, when the same image is recovered slowly by changing the image or turning off the power switch and then turn it on again to make sure the flicker disappears. • You may flicker during initial use . • The LCD screen has 99.99% or more effective pixels. Keep this case, the screen is displayed for your monitor Please carefully follow these instructions carefully. Follow all...
User Manual
Page 4
...openings should never be sure to the equipment operator as they may touch dangerous voltage points or short-out parts that the total iv Accessibility Be sure that the power outlet you . Safe listening To protect your hearing, follow these instructions. • Gradually increase the volume until you can 't hear people speaking near you plug the power cord...protect it could result in installation unless proper ventilation is provided. • Never push objects of power indicated on an unstable cart, stand or table. If you need to disconnect power from the equipment, be ...
...openings should never be sure to the equipment operator as they may touch dangerous voltage points or short-out parts that the total iv Accessibility Be sure that the power outlet you . Safe listening To protect your hearing, follow these instructions. • Gradually increase the volume until you can 't hear people speaking near you plug the power cord...protect it could result in installation unless proper ventilation is provided. • Never push objects of power indicated on an unstable cart, stand or table. If you need to disconnect power from the equipment, be ...

User Manual
Page 5
... change in a grounded power outlet. If power strips are used, the load should not exceed 80% of the power strip's input rating. • This product's power cord is equipped with the supplied power supply cord set , make sure that the new power cord meets the following the operating instructions The grounding pin is properly grounded before inserting the power cord plug. Also, make sure that the total rating of all servicing to qualified service personnel...
... change in a grounded power outlet. If power strips are used, the load should not exceed 80% of the power strip's input rating. • This product's power cord is equipped with the supplied power supply cord set , make sure that the new power cord meets the following the operating instructions The grounding pin is properly grounded before inserting the power cord plug. Also, make sure that the total rating of all servicing to qualified service personnel...

User Manual
Page 6
... operating instructions, since improper adjustment of other products. vi Note: Adjust only those controls that are covered by a qualified technician to restore the product to turn off the device near gas pumps at Acer are very conscious of the environmental effects of our business and strive to identify and provide the best working procedures to environmental protection and views recycling...
... operating instructions, since improper adjustment of other products. vi Note: Adjust only those controls that are covered by a qualified technician to restore the product to turn off the device near gas pumps at Acer are very conscious of the environmental effects of our business and strive to identify and provide the best working procedures to environmental protection and views recycling...
User Manual
Page 7
... work habits, stress, inadequate working in one fixed posture • avoid slouching forward and/or leaning backward • stand up and walk around regularly to achieve maximum comfort. Finding your comfort zone Find your comfort zone by adjusting the viewing angle of physical injury. For more comfortable computer use , consult a physician immediately and inform your sitting height to remove...
... work habits, stress, inadequate working in one fixed posture • avoid slouching forward and/or leaning backward • stand up and walk around regularly to achieve maximum comfort. Finding your comfort zone Find your comfort zone by adjusting the viewing angle of physical injury. For more comfortable computer use , consult a physician immediately and inform your sitting height to remove...

User Manual
Page 8
...; using a task light • changing the display's viewing angle • using a glare-reduction filter • using a display visor, such as possible. • Exercise regularly and maintain a healthy body. Display • Keep your display clean. • Keep your head at a higher level than the top edge of the display so your eyes point downward when looking at the middle of the display. • Adjust the display brightness and/or contrast...
...; using a task light • changing the display's viewing angle • using a glare-reduction filter • using a display visor, such as possible. • Exercise regularly and maintain a healthy body. Display • Keep your display clean. • Keep your head at a higher level than the top edge of the display so your eyes point downward when looking at the middle of the display. • Adjust the display brightness and/or contrast...

User Manual
Page 12
... and environmental requirements in focus that your display is now requested by TCO Development in 1992 and is designed, manufactured and tested according to reduce sight and strain problems. Important parameters are luminance, contrast, resolution, reflectance, colour rendition and image stability. The display you have just purchased carries the TCO'03 Displays label. For more user-friendly direction.
... and environmental requirements in focus that your display is now requested by TCO Development in 1992 and is designed, manufactured and tested according to reduce sight and strain problems. Important parameters are luminance, contrast, resolution, reflectance, colour rendition and image stability. The display you have just purchased carries the TCO'03 Displays label. For more user-friendly direction.
User Manual
Page 13
... Safe listening Warnings Using electrical power Product servicing Additional safety information IT Equipment Recycling Information Disposal instructions Tips and information for comfortable use CE Declaration of Conformity Federal Communications Commission Declaration of Conformity Unpacking Attaching/removing the base Screen position adjustment Connecting the power cord Power saving Display Data Channel (DDC) Connector pin assignment Standard timing table Installation User controls How to adjust a setting Acer eColor Management User Troubleshooting VGA mode DVI mode 1 iii iii iii...
... Safe listening Warnings Using electrical power Product servicing Additional safety information IT Equipment Recycling Information Disposal instructions Tips and information for comfortable use CE Declaration of Conformity Federal Communications Commission Declaration of Conformity Unpacking Attaching/removing the base Screen position adjustment Connecting the power cord Power saving Display Data Channel (DDC) Connector pin assignment Standard timing table Installation User controls How to adjust a setting Acer eColor Management User Troubleshooting VGA mode DVI mode 1 iii iii iii...
User Manual
Page 16
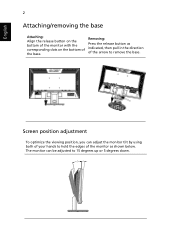
Removing: Press the release button as shown below. The monitor can adjust the monitor tilt by using both of your hands to hold the edges of the monitor as indicated, then pull in the direction of the base. Screen position adjustment To optimize the viewing position, you can be adjusted to remove the base. English 2 Attaching/removing the base Attaching: Align the release button on the bottom of the monitor with the corresponding slots on the bottom of the arrow to 15 degrees up or 5 degrees down.
Removing: Press the release button as shown below. The monitor can adjust the monitor tilt by using both of your hands to hold the edges of the monitor as indicated, then pull in the direction of the base. Screen position adjustment To optimize the viewing position, you can be adjusted to remove the base. English 2 Attaching/removing the base Attaching: Align the release button on the bottom of the monitor with the corresponding slots on the bottom of the arrow to 15 degrees up or 5 degrees down.

User Manual
Page 17
... units using 220/240 V AC: Use a cord set should have the appropriate safety approvals for example, supported resolutions and corresponding timing. No user-adjustment is required. • Plug one end of H05VV-F cord and plug rated 10 A/250 V. The DDC is a communication protocol through which the equipment will be installed. 3 English Connecting the power cord • Check first to make installation easier, so long as indicated by the control signal from "power saving" mode back...
... units using 220/240 V AC: Use a cord set should have the appropriate safety approvals for example, supported resolutions and corresponding timing. No user-adjustment is required. • Plug one end of H05VV-F cord and plug rated 10 A/250 V. The DDC is a communication protocol through which the equipment will be installed. 3 English Connecting the power cord • Check first to make installation easier, so long as indicated by the control signal from "power saving" mode back...
User Manual
Page 19
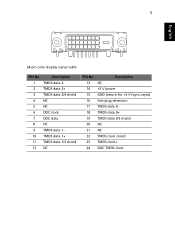
Description 1 TMDS data 2- 2 TMDS data 2+ 3 TMDS data 2/4 shield 4 NC 5 NC 6 DDC clock 7 DDC data 8 NC 9 TMDS data 1- 10 TMDS data 1+ 11 TMDS data 1/3 shield 12 NC PIN No. Description 13 NC 14 +5 V power 15 GND (return for +5 V hsync.vsync) 16 Hot-plug detection 17 TMDS data 0- 18 TMDS data 0+ 19 TMDS data 0/5 shield 20 NC 21 NC 22 TMDS clock shield 23 TMDS clock+ 24 DDC TMDS clock- 5 English 24-pin color display signal cable PIN No.
Description 1 TMDS data 2- 2 TMDS data 2+ 3 TMDS data 2/4 shield 4 NC 5 NC 6 DDC clock 7 DDC data 8 NC 9 TMDS data 1- 10 TMDS data 1+ 11 TMDS data 1/3 shield 12 NC PIN No. Description 13 NC 14 +5 V power 15 GND (return for +5 V hsync.vsync) 16 Hot-plug detection 17 TMDS data 0- 18 TMDS data 0+ 19 TMDS data 0/5 shield 20 NC 21 NC 22 TMDS clock shield 23 TMDS clock+ 24 DDC TMDS clock- 5 English 24-pin color display signal cable PIN No.
User Manual
Page 21
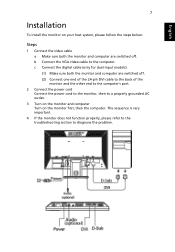
.... English 7 Installation To install the monitor on your host system, please follow the steps below: Steps 1 Connect the video cable a Make sure both the monitor and computer are switched off . (2) Connect one end of the 24-pin DVI cable to the back of the monitor and the other end to the computer's port. 2 Connect the power cord Connect the power cord to the monitor, then to a properly grounded AC outlet. 3 Turn on the monitor...
.... English 7 Installation To install the monitor on your host system, please follow the steps below: Steps 1 Connect the video cable a Make sure both the monitor and computer are switched off . (2) Connect one end of the 24-pin DVI cable to the back of the monitor and the other end to the computer's port. 2 Connect the power cord Connect the power cord to the monitor, then to a properly grounded AC outlet. 3 Turn on the monitor...
User Manual
Page 22
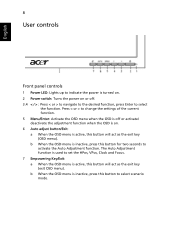
English 8 User controls Front panel controls 1 Power LED: Lights up to indicate the power is active, this button will act as the exit key (exit OSD menu). The Auto Adjustment function is used to activate the Auto Adjustment function. b When the OSD menu is inactive, press this button for two seconds to set the HPos, VPos, Clock and Focus. 7 Empowering Key/Exit: a When the OSD menu is turned on. 2 Power switch: Turns the power on or off or activate...
English 8 User controls Front panel controls 1 Power LED: Lights up to indicate the power is active, this button will act as the exit key (exit OSD menu). The Auto Adjustment function is used to activate the Auto Adjustment function. b When the OSD menu is inactive, press this button for two seconds to set the HPos, VPos, Clock and Focus. 7 Empowering Key/Exit: a When the OSD menu is turned on. 2 Power switch: Turns the power on or off or activate...
User Manual
Page 23
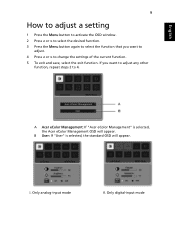
... change the settings of the current function. 5 To exit and save, select the exit function. I. A Acer eColor Management: If "Acer eColor Management" is selected, the standard OSD will appear. Only analog-input mode II. Only digital-input mode B User: If "User" is selected, the Acer eColor Management OSD will appear. English 9 How to adjust a setting 1 Press the Menu button to activate the OSD window. 2 Press < or > to select the desired function. 3 Press the Menu button...
... change the settings of the current function. 5 To exit and save, select the exit function. I. A Acer eColor Management: If "Acer eColor Management" is selected, the standard OSD will appear. Only analog-input mode II. Only digital-input mode B User: If "User" is selected, the Acer eColor Management OSD will appear. English 9 How to adjust a setting 1 Press the Menu button to activate the OSD window. 2 Press < or > to select the desired function. 3 Press the Menu button...
User Manual
Page 24
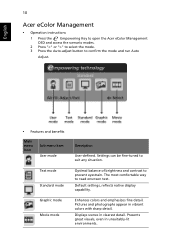
.... The most comfortable way to confirm the mode and run Auto Adjust. • Features and benefits Main menu icon Sub menu item User mode Text mode Standard mode Graphic mode Movie mode Description User-defined. English 10 Acer eColor Management • Operation instructions 1 Press the Empowering Key to open the Acer eColor Management OSD and access the scenario modes. 2 Press "" to select the mode. 3 Press the Auto-adjust button to read onscreen text.
.... The most comfortable way to confirm the mode and run Auto Adjust. • Features and benefits Main menu icon Sub menu item User mode Text mode Standard mode Graphic mode Movie mode Description User-defined. English 10 Acer eColor Management • Operation instructions 1 Press the Empowering Key to open the Acer eColor Management OSD and access the scenario modes. 2 Press "" to select the mode. 3 Press the Auto-adjust button to read onscreen text.

User Manual
Page 25
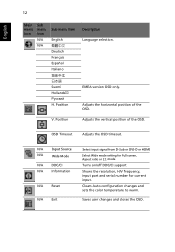
... Adjusts the horizontal position of the OSD (available in analog mode only). V. Sets the color temperature to warm white. ACM ACM (Adaptive Contrast Management) ACM On/Off switch, default Off. User/green Adjusts green intensity. User/blue Adjusts blue intensity. Focus Adjusts picture focus (available in analog mode only). N/A Warm N/A Cool User/red Sets the color temperature to cool white. Adjusts red intensity. Adjusts the background brightness of the screen image. Clock Adjusts the picture clock (available in analog mode only). Position Adjusts the vertical...
... Adjusts the horizontal position of the OSD (available in analog mode only). V. Sets the color temperature to warm white. ACM ACM (Adaptive Contrast Management) ACM On/Off switch, default Off. User/green Adjusts green intensity. User/blue Adjusts blue intensity. Focus Adjusts picture focus (available in analog mode only). N/A Warm N/A Cool User/red Sets the color temperature to cool white. Adjusts red intensity. Adjusts the background brightness of the screen image. Clock Adjusts the picture clock (available in analog mode only). Position Adjusts the vertical...
User Manual
Page 26
Adjusts the horizontal position of the OSD. Position Adjusts the vertical position of the OSD. N/A Input Source N/A Wide Mode N/A DDC/CI N/A Information N/A Reset N/A Exit Select input signal from D-Sub or DVI-D or HDMI Select Wide mode setting for Full screen, Aspect ratio or 1:1 mode Turns on/off DDC/CI support Shows the resolution, H/V frequency, input port and serial number for current input. Saves user changes and closes the OSD. OSD Timeout Adjusts the OSD timeout. V. Clears Auto-configuration changes and sets the color temperature to warm. English 12 Main menu...
Adjusts the horizontal position of the OSD. Position Adjusts the vertical position of the OSD. N/A Input Source N/A Wide Mode N/A DDC/CI N/A Information N/A Reset N/A Exit Select input signal from D-Sub or DVI-D or HDMI Select Wide mode setting for Full screen, Aspect ratio or 1:1 mode Turns on/off DDC/CI support Shows the resolution, H/V frequency, input port and serial number for current input. Saves user changes and closes the OSD. OSD Timeout Adjusts the OSD timeout. V. Clears Auto-configuration changes and sets the color temperature to warm. English 12 Main menu...
User Manual
Page 27
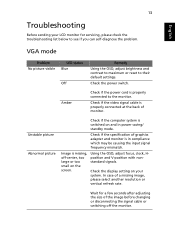
VGA mode Problem No picture visible LED status Blue Off Remedy Using the OSD, adjust brightness and contrast to maximum or reset to the monitor. Amber Check if the power cord is missing, off the monitor. Check the display setting on your LCD monitor for a few seconds after adjusting the size of monitor. Using the OSD, adjust focus, clock, Hposition and V-position with nonstandard signals. Wait for servicing, please check the troubleshooting list below to see if you can self-diagnose the problem. Check if the...
VGA mode Problem No picture visible LED status Blue Off Remedy Using the OSD, adjust brightness and contrast to maximum or reset to the monitor. Amber Check if the power cord is missing, off the monitor. Check the display setting on your LCD monitor for a few seconds after adjusting the size of monitor. Using the OSD, adjust focus, clock, Hposition and V-position with nonstandard signals. Wait for servicing, please check the troubleshooting list below to see if you can self-diagnose the problem. Check if the...
User Manual
Page 28
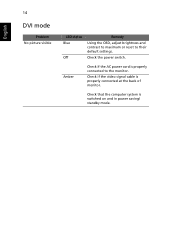
Check if the video signal cable is switched on and in power saving/ standby mode. Amber Check if the AC power cord is properly connected to their default settings. Check that the computer system is properly connected at the back of monitor. English 14 DVI mode Problem No picture visible LED status Blue Off Remedy Using the OSD, adjust brightness and contrast to maximum or reset to the monitor. Check the power switch.
Check if the video signal cable is switched on and in power saving/ standby mode. Amber Check if the AC power cord is properly connected to their default settings. Check that the computer system is properly connected at the back of monitor. English 14 DVI mode Problem No picture visible LED status Blue Off Remedy Using the OSD, adjust brightness and contrast to maximum or reset to the monitor. Check the power switch.

