
User Manual
Page 5
... a distinct change in damage and will often require extensive work by the operating instructions, since improper adjustment of other risks. It v Product servicing Do not attempt to service this product from walls and free flow of air around the projector are necessary. • Locations where temperatures may become excessively high, such as opening or removing covers may expose you to dangerous voltage points or other controls may...
... a distinct change in damage and will often require extensive work by the operating instructions, since improper adjustment of other risks. It v Product servicing Do not attempt to service this product from walls and free flow of air around the projector are necessary. • Locations where temperatures may become excessively high, such as opening or removing covers may expose you to dangerous voltage points or other controls may...

User Manual
Page 6
... dangerous high voltages inside may hurt you. Only use acer ceiling mount kit for ceiling mount installation. It could cause the object to fire. • When switching the projector off . • Do not touch the air outlet grille and bottom plate which has its cooling cycle before turning main power off , please ensure the projector completes its own removable cover. Please be sure to change the lamp when warning messages display...
... dangerous high voltages inside may hurt you. Only use acer ceiling mount kit for ceiling mount installation. It could cause the object to fire. • When switching the projector off . • Do not touch the air outlet grille and bottom plate which has its cooling cycle before turning main power off , please ensure the projector completes its own removable cover. Please be sure to change the lamp when warning messages display...

User Manual
Page 8
... lamp reaches the end of time. viii First Thing First Usage Notes Do: • Turn off the product before cleaning. • Use a soft cloth moistened with mild detergent to clean the display housing. • Disconnect the power plug from the Onscreen Display "Management" menu after replacing the lamp module. • When switching the projector off, please ensure the projector completes its life, it shows warning messages. • Reset the "Lamp Hour Reset...
... lamp reaches the end of time. viii First Thing First Usage Notes Do: • Turn off the product before cleaning. • Use a soft cloth moistened with mild detergent to clean the display housing. • Disconnect the power plug from the Onscreen Display "Management" menu after replacing the lamp module. • When switching the projector off, please ensure the projector completes its life, it shows warning messages. • Reset the "Lamp Hour Reset...
User Manual
Page 9
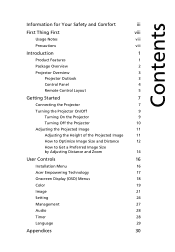
...Overview 3 Projector Outlook 3 Control Panel 4 Remote Control Layout 5 Getting Started 7 Connecting the Projector 7 Turning the Projector On/Off 9 Turning On the Projector 9 Turning Off the Projector 10 Adjusting the Projected Image 11 Adjusting the Height of the Projected Image 11 How to Optimize Image Size and Distance 12 How to Get a Preferred Image Size by Adjusting Distance and Zoom 14 User Controls 16 Installation Menu 16 Acer Empowering Technology 17 Onscreen Display (OSD) Menus 18 Color 19 Image 21 Setting 24 Management 27 Audio 28 Timer 28...
...Overview 3 Projector Outlook 3 Control Panel 4 Remote Control Layout 5 Getting Started 7 Connecting the Projector 7 Turning the Projector On/Off 9 Turning On the Projector 9 Turning Off the Projector 10 Adjusting the Projected Image 11 Adjusting the Height of the Projected Image 11 How to Optimize Image Size and Distance 12 How to Get a Preferred Image Size by Adjusting Distance and Zoom 14 User Controls 16 Installation Menu 16 Acer Empowering Technology 17 Onscreen Display (OSD) Menus 18 Color 19 Image 21 Setting 24 Management 27 Audio 28 Timer 28...

User Manual
Page 11
..., 1080p) supported • Lower power consumption and economy (ECO) mode extends lamp life • Acer EcoProjection Technology delivers Intelligent power management approach and physical efficiency improvement • Empowering Key reveals Acer Empowering Technology functions (Acer eView, eTimer, ePower Management) for easy adjustment of settings • Advanced keystone correction delivers optimum presentations • Multi-language Onscreen Display (OSD) menus • Manual focus projection lens • 2X digital zoom and pan...
..., 1080p) supported • Lower power consumption and economy (ECO) mode extends lamp life • Acer EcoProjection Technology delivers Intelligent power management approach and physical efficiency improvement • Empowering Key reveals Acer Empowering Technology functions (Acer eView, eTimer, ePower Management) for easy adjustment of settings • Advanced keystone correction delivers optimum presentations • Multi-language Onscreen Display (OSD) menus • Manual focus projection lens • 2X digital zoom and pan...

User Manual
Page 13
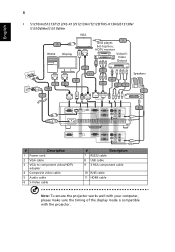
...S-VIDEO AUDIO-R AUDIO IN 1 VGA OUT VGA IN 1 AUDIO IN 2 (S1213/T212/XS-X13/ VGA IN 2 VIDEO AUDIO-L AUDIO OUT 7 89 S1213 S1313W) # Description # Description 1 USB connector 8 Tilt adjusting wheel 2 Monitor loop-through output connector 9 Kensington™ lock port 3 PC analog signal/HDTV/component video input connector 10 LAN (RJ45 port for 10/100M Ethernet) 4 RS232 connector 11 Remote control receiver 5 S-Video input connector Composite video input connector 12 HDMI input connector 6 Audio input connector Audio output connector 13 Audio input connector (L/R) 7 Power...
...S-VIDEO AUDIO-R AUDIO IN 1 VGA OUT VGA IN 1 AUDIO IN 2 (S1213/T212/XS-X13/ VGA IN 2 VIDEO AUDIO-L AUDIO OUT 7 89 S1213 S1313W) # Description # Description 1 USB connector 8 Tilt adjusting wheel 2 Monitor loop-through output connector 9 Kensington™ lock port 3 PC analog signal/HDTV/component video input connector 10 LAN (RJ45 port for 10/100M Ethernet) 4 RS232 connector 11 Remote control receiver 5 S-Video input connector Composite video input connector 12 HDMI input connector 6 Audio input connector Audio output connector 13 Audio input connector (L/R) 7 Power...

User Manual
Page 15
Adjusts image distortion caused by tilting projection (±40 degrees). Press "0~9" to input a password in or out. To change source to VGA. 5 Remote Control Layout English ENTER BACK PgUp PgDn SD/USB A HDMI/DVI LAN/WiFi USBB # Function 1 POWER 2 ASPECT RATIO 3 ZOOM 4 RESYNC 5 Keystone Description Refer to the input source. Automatically synchronizes the projector to the "Turning the Projector On/Off" section. Enables unique Acer functions: eView, eTimer, ePower Management. Zooms the projector display in the...
Adjusts image distortion caused by tilting projection (±40 degrees). Press "0~9" to input a password in or out. To change source to VGA. 5 Remote Control Layout English ENTER BACK PgUp PgDn SD/USB A HDMI/DVI LAN/WiFi USBB # Function 1 POWER 2 ASPECT RATIO 3 ZOOM 4 RESYNC 5 Keystone Description Refer to the input source. Automatically synchronizes the projector to the "Turning the Projector On/Off" section. Enables unique Acer functions: eView, eTimer, ePower Management. Zooms the projector display in the...
User Manual
Page 18
... 1 AUDIO IN 2 AUDIO OUT # Description 1 Power cord 2 VGA cable 3 VGA to component video/HDTV adapter 4 Composite video cable 5 Audio cable 6 S-Video cable # Description 7 RS232 cable 8 USB cable 9 3 RCA component cable 10 RJ45 cable 11 HDMI cable Note: To ensure the projector works well with your computer, please make sure the timing of the display mode is compatible with the projector. English 8 • S1210Hn/S1213/T212/XS-X13/S1213Hn/T212DT/XS-X13HG/S1313W/ S1310WHn/S1313WHn VGA 10 RS232 Display USB 5 DVD player, Set...
... 1 AUDIO IN 2 AUDIO OUT # Description 1 Power cord 2 VGA cable 3 VGA to component video/HDTV adapter 4 Composite video cable 5 Audio cable 6 S-Video cable # Description 7 RS232 cable 8 USB cable 9 3 RCA component cable 10 RJ45 cable 11 HDMI cable Note: To ensure the projector works well with your computer, please make sure the timing of the display mode is compatible with the projector. English 8 • S1210Hn/S1213/T212/XS-X13/S1213Hn/T212DT/XS-X13HG/S1313W/ S1310WHn/S1313WHn VGA 10 RS232 Display USB 5 DVD player, Set...

User Manual
Page 26
English 16 User Controls Installation Menu The Installation menu provides an onscreen display (OSD) for feature setting. The new settings will be saved automatically upon exiting the menu. 5 Press "MENU" anytime to exit the menu and return to enter a submenu for projector installation and maintenance. Use the OSD only when the message "No signal input" is displayed on the screen. 1 Turn on the projector by pressing remote control. (POWER) on the control panel or 2 Press "MENU" on the control panel or remote control to...
English 16 User Controls Installation Menu The Installation menu provides an onscreen display (OSD) for feature setting. The new settings will be saved automatically upon exiting the menu. 5 Press "MENU" anytime to exit the menu and return to enter a submenu for projector installation and maintenance. Use the OSD only when the message "No signal input" is displayed on the screen. 1 Turn on the projector by pressing remote control. (POWER) on the control panel or 2 Press "MENU" on the control panel or remote control to...

User Manual
Page 29
...-X13HG/S1313W/ S1313WHn) Display Mode Wall Color Brightness Contrast There are several choices, including White, Light Yellow, Light Blue, Pink and Dark Green. Controls the degree of difference between the lightest and darkest parts of images. • Bright: For brightness optimization. • Presentation: For meeting presentation with higher brightness. • Standard: For common environment. • Video: For playing video in the image. • Press to...
...-X13HG/S1313W/ S1313WHn) Display Mode Wall Color Brightness Contrast There are several choices, including White, Light Yellow, Light Blue, Pink and Dark Green. Controls the degree of difference between the lightest and darkest parts of images. • Bright: For brightness optimization. • Presentation: For meeting presentation with higher brightness. • Standard: For common environment. • Video: For playing video in the image. • Press to...

User Manual
Page 30
... of red and green. Adjusts a video image from black and white to the brightness of green in the image. Adjusts the green color. At higher color temperatures, the screen looks colder; Adjusts the red color. Adjusts the color balance of the image will look brighter. Tint • Press to increase the amount of color in the image. Note: "Saturation" and "Tint" functions are not supported under computer mode. Adjusts the blue color. If turned on, the projector dynamically adjusts the power...
... of red and green. Adjusts a video image from black and white to the brightness of green in the image. Adjusts the green color. At higher color temperatures, the screen looks colder; Adjusts the red color. Adjusts the color balance of the image will look brighter. Tint • Press to increase the amount of color in the image. Note: "Saturation" and "Tint" functions are not supported under computer mode. Adjusts the blue color. If turned on, the projector dynamically adjusts the power...

User Manual
Page 31
..., the projector reverses the image so that you can project from behind a translucent screen. • Rear-Ceiling: When you select this function, the projector reverses and inverts the image at same time. Adjusts image distortion caused by 1.333 times. Use this function to fit the screen and displayed using a 16:9 ratio. • L.Box (S1310W/T220/XS-W10/S1310WHn/S1313W/ S1313WHn): Keeps the original signal aspect ratio and zooms in...
..., the projector reverses the image so that you can project from behind a translucent screen. • Rear-Ceiling: When you select this function, the projector reverses and inverts the image at same time. Adjusts image distortion caused by 1.333 times. Use this function to fit the screen and displayed using a 16:9 ratio. • L.Box (S1310W/T220/XS-W10/S1310WHn/S1313W/ S1313WHn): Keeps the original signal aspect ratio and zooms in...

User Manual
Page 35
... plugging power cord", you are requested to input the password every time the power cord is plugged. • If you select "Always request password while projector turns on the remote control to set up , the projector will request you to enter the password again. • The factory default setting of "Administrator Password" is "1234". • Select "On" to input the password every time the projector is enabled, the projector will request you to change "User Password". • Use...
... plugging power cord", you are requested to input the password every time the power cord is plugged. • If you select "Always request password while projector turns on the remote control to set up , the projector will request you to enter the password again. • The factory default setting of "Administrator Password" is "1234". • Select "On" to input the password every time the projector is enabled, the projector will request you to change "User Password". • Use...
User Manual
Page 36
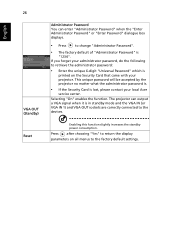
... by the projector no matter what the administrator password is. • If the Security Card is printed on all menus to the factory default settings. Enabling this function slightly increases the standby power consumption. English 26 VGA OUT (Standby) Reset Administrator Password You can output a VGA signal when it is in standby mode and the VGA IN (or VGA IN 1) and VGA OUT sockets are correctly connected to the...
... by the projector no matter what the administrator password is. • If the Security Card is printed on all menus to the factory default settings. Enabling this function slightly increases the standby power consumption. English 26 VGA OUT (Standby) Reset Administrator Password You can output a VGA signal when it is in standby mode and the VGA IN (or VGA IN 1) and VGA OUT sockets are correctly connected to the...

User Manual
Page 37
... "Enter Administrator Password" dialogue box is displayed. LAN Setting (for S1210Hn/ S1213Hn/ T212DT/XSX13HG/ S1310WHn/ S1313WHn) To control the projector remotely: 1 Enter the Projector IP address in this table. LAN Reset (for S1210Hn/ S1213Hn/ T212DT/XSX13HG/ S1310WHn/ S1313WHn) The factory default of the web browser on your computer. 2 The remote network operation page is displayed.You can change it in the Setting > Security > Administrator Password menu. 4 Select LAN in the address bar of...
... "Enter Administrator Password" dialogue box is displayed. LAN Setting (for S1210Hn/ S1213Hn/ T212DT/XSX13HG/ S1310WHn/ S1313WHn) To control the projector remotely: 1 Enter the Projector IP address in this table. LAN Reset (for S1210Hn/ S1213Hn/ T212DT/XSX13HG/ S1310WHn/ S1313WHn) The factory default of the web browser on your computer. 2 The remote network operation page is displayed.You can change it in the Setting > Security > Administrator Password menu. 4 Select LAN in the address bar of...

User Manual
Page 39
... signal input detected after choosing "Yes" to turn off the projector immediately without fan cooling process by pressing Turn Off Mode the power button twice. • Instant Resume: Enables you to turn the lamp hour counter to 0 hours. Lamp Hour Elapse Displays the lamp's elapsed operating time (in hours). When this function to show up 30 hours before end of life. The message will show or hide warning message Lamp Reminding when the changing lamp message is turned on the High Altitude mode...
... signal input detected after choosing "Yes" to turn off the projector immediately without fan cooling process by pressing Turn Off Mode the power button twice. • Instant Resume: Enables you to turn the lamp hour counter to 0 hours. Lamp Hour Elapse Displays the lamp's elapsed operating time (in hours). When this function to show up 30 hours before end of life. The message will show or hide warning message Lamp Reminding when the changing lamp message is turned on the High Altitude mode...

User Manual
Page 42
... the resolution mode you have removed the lens cap and the projector is lower than or equal to the following troubleshooting guide. displayed image (For PC (Windows • For an incorrectly displayed image: 95/98/2000/XP/ • Open "My Computer > Control Panel," and Win7/Vista)) then double-click the "Display" icon. • Select the "Settings" tab. • Verify that the resolution setting of the connector pins are correctly connected...
... the resolution mode you have removed the lens cap and the projector is lower than or equal to the following troubleshooting guide. displayed image (For PC (Windows • For an incorrectly displayed image: 95/98/2000/XP/ • Open "My Computer > Control Panel," and Win7/Vista)) then double-click the "Display" icon. • Select the "Settings" tab. • Verify that the resolution setting of the connector pins are correctly connected...

User Manual
Page 43
... the projector. 4 The screen of the • If you are using an Apple® Mac® OS based notebook: In System Preferences, open Display and select Video Mirroring "On." 5 Image is unstable • Use "Tracking" to Get a Preferred Image Size by Adjusting Distance and Zoom" section for more information. 31 English 3 Partial, scrolling or incorrectly displayed image (For notebooks) • Press "RESYNC" on the control panel or remote control. •...
... the projector. 4 The screen of the • If you are using an Apple® Mac® OS based notebook: In System Preferences, open Display and select Video Mirroring "On." 5 Image is unstable • Use "Tracking" to Get a Preferred Image Size by Adjusting Distance and Zoom" section for more information. 31 English 3 Partial, scrolling or incorrectly displayed image (For notebooks) • Press "RESYNC" on the control panel or remote control. •...
User Manual
Page 44
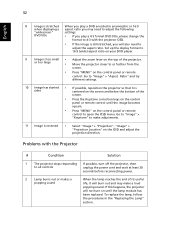
... adjustments. 11 Image is sides centered on the screen and below the bottom of its useful life, it is reversed • Select "Image" > "Projection", "Image" > "Projection Location" on the control panel or remote control to adjust the aspect ratio. Go to "Image" > "Aspect Ratio" and try different settings. 10 Image has slanted • If possible, reposition the projector so that it will also need to open the OSD menu. Problems with the projector...
... adjustments. 11 Image is sides centered on the screen and below the bottom of its useful life, it is reversed • Select "Image" > "Projection", "Image" > "Projection Location" on the control panel or remote control to adjust the aspect ratio. Go to "Image" > "Aspect Ratio" and try different settings. 10 Image has slanted • If possible, reposition the projector so that it will also need to open the OSD menu. Problems with the projector...

User Manual
Page 46
Error (Lamp breakdown) -- V LAMP LED Red -- ---- -- --- failure) V V V Quick flashing TEMP LED Red -- --- -- -- V -- Error (Color wheel -- Quick flashing V V Quick flashing -- -- -- 34 English LED & Alarm Definition Listing LED Messages Message Standby (Power cord plugged in) Power on Lamp retry Turning off (Cooling state) Turning off (Cooling completed) Error (Thermal failure) Error (Fan lock failure) Power LED Red Blue V -- --- V Quick flashing ---
Error (Lamp breakdown) -- V LAMP LED Red -- ---- -- --- failure) V V V Quick flashing TEMP LED Red -- --- -- -- V -- Error (Color wheel -- Quick flashing V V Quick flashing -- -- -- 34 English LED & Alarm Definition Listing LED Messages Message Standby (Power cord plugged in) Power on Lamp retry Turning off (Cooling state) Turning off (Cooling completed) Error (Thermal failure) Error (Fan lock failure) Power LED Red Blue V -- --- V Quick flashing ---


