Quick Start Guide
Page 1
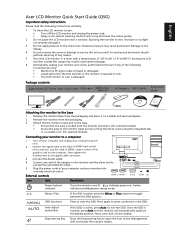
... LCD monitor AC Power cable Audio cable VGA cable HDMI cable (Optional) AC Adapter Users guide Quick start guide Attaching the monitor to the base 1 Remove the monitor base from the packaging. 3 Attach the the monitor stand arm to the base. • Ensure that the base is locked onto the monitor stand arm. (for selected models) • Secure the base to the monitor stand arm by turning the white screw using the integrated tab or a suitable coin. (for selected models) Connecting your monitor into a nearby electrical outlet. Blue indicates power on. Auto adjust button...
... LCD monitor AC Power cable Audio cable VGA cable HDMI cable (Optional) AC Adapter Users guide Quick start guide Attaching the monitor to the base 1 Remove the monitor base from the packaging. 3 Attach the the monitor stand arm to the base. • Ensure that the base is locked onto the monitor stand arm. (for selected models) • Secure the base to the monitor stand arm by turning the white screw using the integrated tab or a suitable coin. (for selected models) Connecting your monitor into a nearby electrical outlet. Blue indicates power on. Auto adjust button...

Quick Start Guide
Page 2
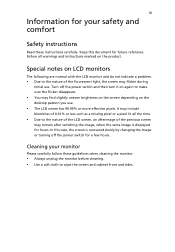
...using shielded cables to maintain compliance with your household waste disposal service or the shop where you can radiate radio frequency energy and, if not installed and used in compliance with the Class B limits may cause harmful interference to radio communications. Caution Changes...devices Only peripherals (input/output devices, terminals, printers, etc.) certified to comply with the essential requirements and other computing devices must not be attached to this product. Notice: Canadian users This Class B digital apparatus complies with the instructions, may be ...
...using shielded cables to maintain compliance with your household waste disposal service or the shop where you can radiate radio frequency energy and, if not installed and used in compliance with the Class B limits may cause harmful interference to radio communications. Caution Changes...devices Only peripherals (input/output devices, terminals, printers, etc.) certified to comply with the essential requirements and other computing devices must not be attached to this product. Notice: Canadian users This Class B digital apparatus complies with the instructions, may be ...
User Manual
Page 3
... the LCD monitor and do not indicate a problem. • Due to make sure the flicker disappears. • You may remain after switching the image, when the same image is recovered slowly by changing the image or turning off the power switch for a few hours. Turn off the power switch and then turn it on again to the nature of the previous screen may find slightly uneven brightness on the screen...
... the LCD monitor and do not indicate a problem. • Due to make sure the flicker disappears. • You may remain after switching the image, when the same image is recovered slowly by changing the image or turning off the power switch for a few hours. Turn off the power switch and then turn it on again to the nature of the previous screen may find slightly uneven brightness on the screen...
User Manual
Page 4
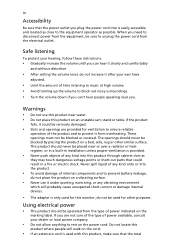
... other similar surface. Safe listening To protect your hearing, follow these instructions. • Gradually increase the volume until you can hear it clearly and comfortably and without distortion. • After setting the volume level, do not increase it under sporting, exercising, or any vibrating...unstable cart, stand or table. The openings should be blocked or covered. iv Accessibility Be sure that the power outlet you plug the power cord into is easily accessible and located as close to the equipment operator as they may touch dangerous voltage points or short-out parts that the...
... other similar surface. Safe listening To protect your hearing, follow these instructions. • Gradually increase the volume until you can hear it clearly and comfortably and without distortion. • After setting the volume level, do not increase it under sporting, exercising, or any vibrating...unstable cart, stand or table. The openings should be blocked or covered. iv Accessibility Be sure that the power outlet you plug the power cord into is easily accessible and located as close to the equipment operator as they may touch dangerous voltage points or short-out parts that the...

User Manual
Page 6
... www.acer-group.com for further information on the use of the global environment, please recycle. Keep them out of the reach of our other controls may contain small parts. chemical plants; Additional safety information Your device and its enhancements may result in damage and will often require extensive work by the operating instructions, since improper adjustment of...
... www.acer-group.com for further information on the use of the global environment, please recycle. Keep them out of the reach of our other controls may contain small parts. chemical plants; Additional safety information Your device and its enhancements may result in damage and will often require extensive work by the operating instructions, since improper adjustment of...
User Manual
Page 7
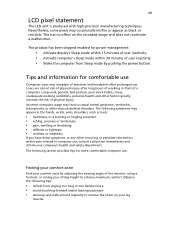
... power management: • Activate display's Sleep mode within 15 minutes of user inactivity. • Activate computer's Sleep mode within 30 minutes of working conditions, personal health and other recurring or persistent discomfort and/or pain related to remove the strain on the recorded image and does not constitute a malfunction. Users are also at risk of the monitor, using a footrest, or raising your sitting height...
... power management: • Activate display's Sleep mode within 15 minutes of user inactivity. • Activate computer's Sleep mode within 30 minutes of working conditions, personal health and other recurring or persistent discomfort and/or pain related to remove the strain on the recorded image and does not constitute a malfunction. Users are also at risk of the monitor, using a footrest, or raising your sitting height...

User Manual
Page 11
...the base (for selected models) 3 Screen position adjustment 4 Connecting the power cord 4 Power saving 4 Connecting the docking device (for selected models) 5 Display Data Channel (DDC) 5 Connector pin assignment 5 15-pin color display signal cable 5 19-pin color display signal cable* 6 6 Standard timing table 7 Installation 8 Users controls 9 Front panel controls 9 Acer eColor Management 10 Operation instructions 10 Features and benefits 10 Adjusting the OSD settings 11 Adjusting the picture quality 11 Adjusting the OSD position 12 Adjusting the setting...
...the base (for selected models) 3 Screen position adjustment 4 Connecting the power cord 4 Power saving 4 Connecting the docking device (for selected models) 5 Display Data Channel (DDC) 5 Connector pin assignment 5 15-pin color display signal cable 5 19-pin color display signal cable* 6 6 Standard timing table 7 Installation 8 Users controls 9 Front panel controls 9 Acer eColor Management 10 Operation instructions 10 Features and benefits 10 Adjusting the OSD settings 11 Adjusting the picture quality 11 Adjusting the OSD position 12 Adjusting the setting...
User Manual
Page 13
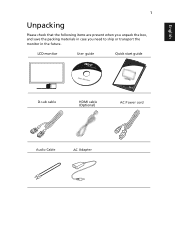
English 1 Unpacking Please check that the following items are present when you unpack the box, and save the packing materials in case you need to ship or transport the monitor in the future. LCD monitor User guide Quick start guide D-sub cable HDMI cable (Optional) AC Power cord Audio Cable AC Adapter
English 1 Unpacking Please check that the following items are present when you unpack the box, and save the packing materials in case you need to ship or transport the monitor in the future. LCD monitor User guide Quick start guide D-sub cable HDMI cable (Optional) AC Power cord Audio Cable AC Adapter

User Manual
Page 15
... "power saving" mode back to "on" is activated. Power saving The monitor will be kept until a control signal has been detected or the keyboard or mouse is around 3 seconds. Connecting the adapter and AC Power code • Check first to make sure that allows operation in which the equipment will be installed. English 3 Screen position adjustment To optimize the viewing position, you use is required. • Plug one end of the monitor. Mode On Power saving LED light Blue Orange The power saving mode...
... "power saving" mode back to "on" is activated. Power saving The monitor will be kept until a control signal has been detected or the keyboard or mouse is around 3 seconds. Connecting the adapter and AC Power code • Check first to make sure that allows operation in which the equipment will be installed. English 3 Screen position adjustment To optimize the viewing position, you use is required. • Plug one end of the monitor. Mode On Power saving LED light Blue Orange The power saving mode...

User Manual
Page 16
... monitor supports the DDC2B standard. Description 1 Red 2 Green 3 Blue 4 Monitor ground 5 DDC-return 6 R-ground 7 G-ground 8 B-ground PIN No. for example, supported resolutions and corresponding timing. Connector pin assignment 15-pin color display signal cable 1 5 6 10 11 15 PIN No. Description 9 +5 V 10 Logic ground 11 Monitor ground 12 DDC-serial data 13 H-sync 14 V-sync 15 DDC-serial clock 4 English Display Data Channel (DDC) To make installation easier, so long as your system supports...
... monitor supports the DDC2B standard. Description 1 Red 2 Green 3 Blue 4 Monitor ground 5 DDC-return 6 R-ground 7 G-ground 8 B-ground PIN No. for example, supported resolutions and corresponding timing. Connector pin assignment 15-pin color display signal cable 1 5 6 10 11 15 PIN No. Description 9 +5 V 10 Logic ground 11 Monitor ground 12 DDC-serial data 13 H-sync 14 V-sync 15 DDC-serial clock 4 English Display Data Channel (DDC) To make installation easier, so long as your system supports...
User Manual
Page 19
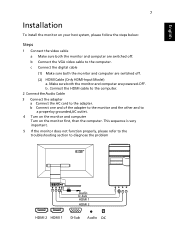
... digital cable (1) Make sure both the monitor and computer are switched off . b. Make sure both the monitor and computer are powered-OFF. Connect the HDMI cable to the computer. 2 Connect the Audio Cable 3 Connect the adapter a Connect the AC cord to a properloy grounded,AC outlet. 4 Turn on the monitor and computer Turn on your host system, please follow the steps below: Steps 1 Connect the video cable a Make sure both the monitor and computer are switched off . (2) HDMI Cable (Only HDMI-Input Model) a. b Connect...
... digital cable (1) Make sure both the monitor and computer are switched off . b. Make sure both the monitor and computer are powered-OFF. Connect the HDMI cable to the computer. 2 Connect the Audio Cable 3 Connect the adapter a Connect the AC cord to a properloy grounded,AC outlet. 4 Turn on the monitor and computer Turn on your host system, please follow the steps below: Steps 1 Connect the video cable a Make sure both the monitor and computer are switched off . (2) HDMI Cable (Only HDMI-Input Model) a. b Connect...
User Manual
Page 20
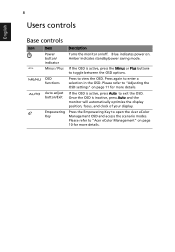
.... Please refer to "Adjusting the OSD settings" on page 10 for more details. Press again to open the Acer eColor Management OSD and access the scenario modes. Once the OSD is active, press Auto to exit the OSD. Empowering Key Press the Empowering Key to enter a selection in the OSD. 8 Users controls English Base controls Icon Item Description Power button/ indicator Turns the monitor on . Amber indicates standby/power saving mode. / Minus / Plus...
.... Please refer to "Adjusting the OSD settings" on page 10 for more details. Press again to open the Acer eColor Management OSD and access the scenario modes. Once the OSD is active, press Auto to exit the OSD. Empowering Key Press the Empowering Key to enter a selection in the OSD. 8 Users controls English Base controls Icon Item Description Power button/ indicator Turns the monitor on . Amber indicates standby/power saving mode. / Minus / Plus...

User Manual
Page 21
.... English 9 Acer eColor Management Operation instructions 1 Press the Empowering Key to open the Acer eColor Management OSD and access the scenario modes. 2 Press " " or " " to select the mode. 3 Press the Auto-adjust button to suit any situation. The most comfortable way to prevent eyestrain. Displays scenes in unsuitably-lit environments. Pictures and photographs appear in vibrant colors with sharp detail. Text mode Optimal balance of brightness and contrast...
.... English 9 Acer eColor Management Operation instructions 1 Press the Empowering Key to open the Acer eColor Management OSD and access the scenario modes. 2 Press " " or " " to select the mode. 3 Press the Auto-adjust button to suit any situation. The most comfortable way to prevent eyestrain. Displays scenes in unsuitably-lit environments. Pictures and photographs appear in vibrant colors with sharp detail. Text mode Optimal balance of brightness and contrast...
User Manual
Page 22
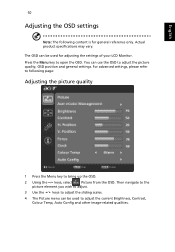
... to bring up the OSD. 2 Using the / keys, select Picture from the OSD. English 10 Adjusting the OSD settings Note: The following page: Adjusting the picture quality 1 Press the Menu key to open the OSD. For advanced settings, please refer to following content is for adjusting the settings of your LCD Monitor. You can use the OSD to adjust the current Brightness, Contrast, Colour Temp, Auto Config and other image-related qualities. Then navigate to...
... to bring up the OSD. 2 Using the / keys, select Picture from the OSD. English 10 Adjusting the OSD settings Note: The following page: Adjusting the picture quality 1 Press the Menu key to open the OSD. For advanced settings, please refer to following content is for adjusting the settings of your LCD Monitor. You can use the OSD to adjust the current Brightness, Contrast, Colour Temp, Auto Config and other image-related qualities. Then navigate to...
User Manual
Page 26
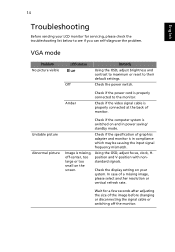
... and in compliance which may be causing the input signal frequency mismatch. 14 English Troubleshooting Before sending your system. VGA mode Problem No picture visible LED status Blue Off Remedy Using the OSD, adjust brightness and contrast to maximum or reset to the monitor. Check if the specification of a missing image, please select another resolution or vertical refresh rate. Check if the video signal cable is properly connected to their default settings. Unstable picture Abnormal picture Check if the computer system is missing, off the...
... and in compliance which may be causing the input signal frequency mismatch. 14 English Troubleshooting Before sending your system. VGA mode Problem No picture visible LED status Blue Off Remedy Using the OSD, adjust brightness and contrast to maximum or reset to the monitor. Check if the specification of a missing image, please select another resolution or vertical refresh rate. Check if the video signal cable is properly connected to their default settings. Unstable picture Abnormal picture Check if the computer system is missing, off the...
User Manual
Page 27
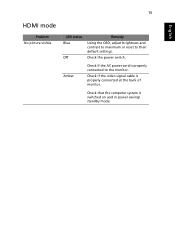
15 English HDMI mode Problem No picture visible LED status Blue Off Remedy Using the OSD, adjust brightness and contrast to maximum or reset to the monitor. Check that the computer system is properly connected at the back of monitor. Check if the video signal cable is switched on and in power saving/ standby mode. Check the power switch. Amber Check if the AC power cord is properly connected to their default settings.
15 English HDMI mode Problem No picture visible LED status Blue Off Remedy Using the OSD, adjust brightness and contrast to maximum or reset to the monitor. Check that the computer system is properly connected at the back of monitor. Check if the video signal cable is switched on and in power saving/ standby mode. Check the power switch. Amber Check if the AC power cord is properly connected to their default settings.
Service Manual
Page 1
Acer Acer -LCD-S243HL Service Manual LCD Monitor Acer S243HL
Acer Acer -LCD-S243HL Service Manual LCD Monitor Acer S243HL
Service Manual
Page 3
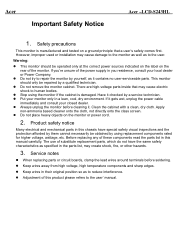
... visual inspections and the protection afforded by them cannot necessarily be repaired by a service technician. Service notes z When replacing parts or circuit boards, clamp the lead wires around terminals before cleaning it checked by a qualified technician. Safety precautions This monitor is damaged. Clean the cabinet with a clean, dry cloth. Acer Important Safety Notice Acer -LCD-S243HL 1. There are high-voltage parts inside that a user's safety comes first.
... visual inspections and the protection afforded by them cannot necessarily be repaired by a service technician. Service notes z When replacing parts or circuit boards, clamp the lead wires around terminals before cleaning it checked by a qualified technician. Safety precautions This monitor is damaged. Clean the cabinet with a clean, dry cloth. Acer Important Safety Notice Acer -LCD-S243HL 1. There are high-voltage parts inside that a user's safety comes first.

Service Manual
Page 4
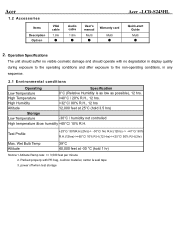
...-HDMI input, LED panel and over driver function. It's a green product and meets all ROHS standard. The image can be adjusted through OSD control. The monitor shall automatically to display lower resolution video modes into 1920x1080 full screen display. General: 01 Product Specification Acer -LCD-S243HL Acer S243HL is designed with DC 19V adapter power supplies and audio input. It support HDCP, Color management and ACM function. 1.1 Main Features Features Maximum resolution Back light system Pixel pitch Display area Contrast ratio Brightness Response time (Tr+Tf) Viewing...
...-HDMI input, LED panel and over driver function. It's a green product and meets all ROHS standard. The image can be adjusted through OSD control. The monitor shall automatically to display lower resolution video modes into 1920x1080 full screen display. General: 01 Product Specification Acer -LCD-S243HL Acer S243HL is designed with DC 19V adapter power supplies and audio input. It support HDCP, Color management and ACM function. 1.1 Main Features Features Maximum resolution Back light system Pixel pitch Display area Contrast ratio Brightness Response time (Tr+Tf) Viewing...
Service Manual
Page 5
... Description Option VGA cable 1.8m µ Audio cable 1.8m µ User's manual Multi µ Warranty card Multi µ Acer -LCD-S243HL Quick-start Guide Multi µ ...Notice:1.Altitude Ramp rate: Operation Specifications The unit should suffer no visible cosmetic damage and should operate with no degradation in display quality during ...Specification Low Temperature 0°C (Relative Humidity is as low as possible), 12 hrs. High Humidity +32°C/ 80% R.H., 12 hrs Altitude 12,000 feet at -30 °C (hold 3.5 hrs) Storage Low Temperature -30°C / humidity not controlled...
... Description Option VGA cable 1.8m µ Audio cable 1.8m µ User's manual Multi µ Warranty card Multi µ Acer -LCD-S243HL Quick-start Guide Multi µ ...Notice:1.Altitude Ramp rate: Operation Specifications The unit should suffer no visible cosmetic damage and should operate with no degradation in display quality during ...Specification Low Temperature 0°C (Relative Humidity is as low as possible), 12 hrs. High Humidity +32°C/ 80% R.H., 12 hrs Altitude 12,000 feet at -30 °C (hold 3.5 hrs) Storage Low Temperature -30°C / humidity not controlled...


