
Quick Start Guide
Page 1
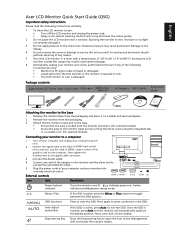
... the Audio Cable DC 22 1 4 Connect one and of any nature. 5 Store the LCD monitor in permanent damage. 6 Immediately unplug your display. HDMI 1 5 Plug the power cords of your computer and your monitor to Audio 22 1 D-Sub a properloy grounded,AC outlet. Amber indicates standby...between the OSD options. Storing the LCD monitor outside this unit yourself. OSD functions Press to enter a selection in the OSD. English Acer LCD Monitor Quick Start Guide (QSG) Important safety instructions Please read the following circumstances occur: • Monitor-to-PC signal cable ...
... the Audio Cable DC 22 1 4 Connect one and of any nature. 5 Store the LCD monitor in permanent damage. 6 Immediately unplug your display. HDMI 1 5 Plug the power cords of your computer and your monitor to Audio 22 1 D-Sub a properloy grounded,AC outlet. Amber indicates standby...between the OSD options. Storing the LCD monitor outside this unit yourself. OSD functions Press to enter a selection in the OSD. English Acer LCD Monitor Quick Start Guide (QSG) Important safety instructions Please read the following circumstances occur: • Monitor-to-PC signal cable ...
User Manual
Page 3
...• Due to wipe the screen and cabinet front and sides. In this document for hours. Turn off the power switch and then turn it on LCD monitors The following are normal with the LCD monitor and do not indicate a...after switching the image, when the same image is recovered slowly by changing the image or turning off the power switch for your monitor Please carefully follow these instructions carefully. Cleaning your safety and comfort Safety instructions Read these... marked on the desktop pattern you use . Keep this case, the screen is displayed for future reference.
...• Due to wipe the screen and cabinet front and sides. In this document for hours. Turn off the power switch and then turn it on LCD monitors The following are normal with the LCD monitor and do not indicate a...after switching the image, when the same image is recovered slowly by changing the image or turning off the power switch for your monitor Please carefully follow these instructions carefully. Cleaning your safety and comfort Safety instructions Read these... marked on the desktop pattern you use . Keep this case, the screen is displayed for future reference.
User Manual
Page 4
...unexpected short current or damage internal devices. • The adapter is easily accessible and located as possible. Safe listening To protect your dealer or local power company. • Do not allow anything to the equipment operator as close to rest on a bed, sofa, rug or other purposes. Never spill...This product should be operated from the type of time listening to music at high volume. • Avoid turning up the volume to unplug the power cord from the equipment, be seriously damaged. • Slots and openings are not sure of the type of any kind into the product. &#...
...unexpected short current or damage internal devices. • The adapter is easily accessible and located as possible. Safe listening To protect your dealer or local power company. • Do not allow anything to the equipment operator as close to rest on a bed, sofa, rug or other purposes. Never spill...This product should be operated from the type of time listening to music at high volume. • Avoid turning up the volume to unplug the power cord from the equipment, be seriously damaged. • Slots and openings are not sure of the type of any kind into the product. &#...

User Manual
Page 5
...the plug into the extension cord does not exceed the extension cord ampere rating. Unplug this product from unexpected noise produced by plugging in a grounded power outlet. The plug only fits in too many devices. Also, make sure that is damaged, cut or frayed • liquid was exposed to ... product. • Use the product only with the performance of this product yourself, as opening or removing covers may interfere with the supplied power supply cord set , make sure that may expose you need for details. v ampere rating of the equipment plugged into a non-grounded...
...the plug into the extension cord does not exceed the extension cord ampere rating. Unplug this product from unexpected noise produced by plugging in a grounded power outlet. The plug only fits in too many devices. Also, make sure that is damaged, cut or frayed • liquid was exposed to ... product. • Use the product only with the performance of this product yourself, as opening or removing covers may interfere with the supplied power supply cord set , make sure that may expose you need for details. v ampere rating of the equipment plugged into a non-grounded...
User Manual
Page 7
...and does not constitute a malfunction. The following symptoms may lead to achieve maximum comfort. This product has been shipped enabled for power management: • Activate display's Sleep mode within 15 minutes of user inactivity. • Activate computer's Sleep mode within 30 minutes of user inactivity. &#...Users are also at risk of physical injury after prolonged use . Finding your comfort zone Find your comfort zone by pushing the power button. Nevertheless, some pixels may complain of physical injury. vii LCD pixel statement The LCD unit is produced with high-precision ...
...and does not constitute a malfunction. The following symptoms may lead to achieve maximum comfort. This product has been shipped enabled for power management: • Activate display's Sleep mode within 15 minutes of user inactivity. • Activate computer's Sleep mode within 30 minutes of user inactivity. &#...Users are also at risk of physical injury after prolonged use . Finding your comfort zone Find your comfort zone by pushing the power button. Nevertheless, some pixels may complain of physical injury. vii LCD pixel statement The LCD unit is produced with high-precision ...

User Manual
Page 11
...your monitor iii Connecting/disconnecting the device iii Accessibility iv Safe listening iv Warnings iv Using electrical power iv Product servicing v Additional safety information vi IT Equipment Recycling Information vi Disposal instructions vi LCD...the power cord 4 Power saving 4 Connecting the docking device (for selected models) 5 Display Data Channel (DDC) 5 Connector pin assignment 5 15-pin color display signal cable 5 19-pin color display signal cable* 6 6 Standard timing table 7 Installation 8 Users controls 9 Front panel controls 9 Acer eColor...
...your monitor iii Connecting/disconnecting the device iii Accessibility iv Safe listening iv Warnings iv Using electrical power iv Product servicing v Additional safety information vi IT Equipment Recycling Information vi Disposal instructions vi LCD...the power cord 4 Power saving 4 Connecting the docking device (for selected models) 5 Display Data Channel (DDC) 5 Connector pin assignment 5 15-pin color display signal cable 5 19-pin color display signal cable* 6 6 Standard timing table 7 Installation 8 Users controls 9 Front panel controls 9 Acer eColor...
User Manual
Page 13
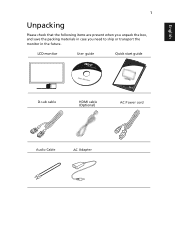
English 1 Unpacking Please check that the following items are present when you unpack the box, and save the packing materials in case you need to ship or transport the monitor in the future. LCD monitor User guide Quick start guide D-sub cable HDMI cable (Optional) AC Power cord Audio Cable AC Adapter
English 1 Unpacking Please check that the following items are present when you unpack the box, and save the packing materials in case you need to ship or transport the monitor in the future. LCD monitor User guide Quick start guide D-sub cable HDMI cable (Optional) AC Power cord Audio Cable AC Adapter

User Manual
Page 15
... The recovery time from the display controller, as indicated by the amber-colored power LED. The monitor can adjust the monitor tilt, using 220/240 V AC: Use a cord set should have the appropriate safety approvals for your hands to make sure that the power cord you can be installed...set, type SVT wire and plug rated 10 A/125 V. • For units using both of your area. • The monitor has a universal power supply that allows operation in which the equipment will be adjusted to "on" is activated. English 3 Screen position adjustment To optimize the viewing position,...
... The recovery time from the display controller, as indicated by the amber-colored power LED. The monitor can adjust the monitor tilt, using 220/240 V AC: Use a cord set should have the appropriate safety approvals for your hands to make sure that the power cord you can be installed...set, type SVT wire and plug rated 10 A/125 V. • For units using both of your area. • The monitor has a universal power supply that allows operation in which the equipment will be adjusted to "on" is activated. English 3 Screen position adjustment To optimize the viewing position,...
User Manual
Page 19
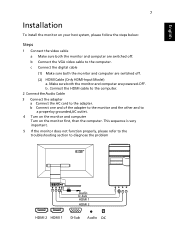
... important. 5 If the monitor does not function properly, please refer to the troubleshooting section to the computer. Make sure both the monitor and computer are powered-OFF. b. b Connect one and of the adapter to the monitor and the other and to the adapter. b Connect the VGA video cable to diagnose the...
... important. 5 If the monitor does not function properly, please refer to the troubleshooting section to the computer. Make sure both the monitor and computer are powered-OFF. b. b Connect one and of the adapter to the monitor and the other and to the adapter. b Connect the VGA video cable to diagnose the...
User Manual
Page 20
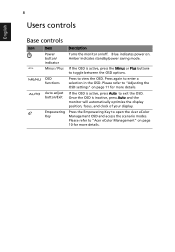
Blue indicates power on /off. Empowering Key Press the Empowering Key to view the OSD. Please refer to "Acer eColor Management" on page 11 for more details. OSD functions Press to open the Acer eColor Management OSD and access the scenario modes. Please refer to exit the OSD. Once .../Exit If the OSD is inactive, press Auto and the monitor will automatically optimize the display position, focus, and clock of your display. Press again to toggle between the OSD options. Amber indicates standby/power saving mode. / Minus / Plus If the OSD is active, press the Minus or...
Blue indicates power on /off. Empowering Key Press the Empowering Key to view the OSD. Please refer to "Acer eColor Management" on page 11 for more details. OSD functions Press to open the Acer eColor Management OSD and access the scenario modes. Please refer to exit the OSD. Once .../Exit If the OSD is inactive, press Auto and the monitor will automatically optimize the display position, focus, and clock of your display. Press again to toggle between the OSD options. Amber indicates standby/power saving mode. / Minus / Plus If the OSD is active, press the Minus or...
User Manual
Page 26
Check the power switch. Check if the specification of graphics adapter and monitor is properly connected at the back of monitor. Check the display setting on the screen. Image is missing, off the monitor. In case of the image before changing or disconnecting the..., please select another resolution or vertical refresh rate. 14 English Troubleshooting Before sending your system. Check if the video signal cable is in power saving/ standby mode. Using the OSD, adjust focus, clock, Hposition and V-position with nonstandard signals. VGA mode Problem No picture visible ...
Check the power switch. Check if the specification of graphics adapter and monitor is properly connected at the back of monitor. Check the display setting on the screen. Image is missing, off the monitor. In case of the image before changing or disconnecting the..., please select another resolution or vertical refresh rate. 14 English Troubleshooting Before sending your system. Check if the video signal cable is in power saving/ standby mode. Using the OSD, adjust focus, clock, Hposition and V-position with nonstandard signals. VGA mode Problem No picture visible ...
User Manual
Page 27
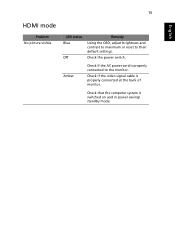
15 English HDMI mode Problem No picture visible LED status Blue Off Remedy Using the OSD, adjust brightness and contrast to maximum or reset to the monitor. Check that the computer system is properly connected to their default settings. Amber Check if the AC power cord is switched on and in power saving/ standby mode. Check if the video signal cable is properly connected at the back of monitor. Check the power switch.
15 English HDMI mode Problem No picture visible LED status Blue Off Remedy Using the OSD, adjust brightness and contrast to maximum or reset to the monitor. Check that the computer system is properly connected to their default settings. Amber Check if the AC power cord is switched on and in power saving/ standby mode. Check if the video signal cable is properly connected at the back of monitor. Check the power switch.
Service Manual
Page 3
... read the parts list in a lean, cool, dry environment. Acer Important Safety Notice Acer -LCD-S243HL 1. Warning: z This monitor should only be obtained by a qualified technician. z Do not remove the monitor cabinet. z Put your monitor only in this manual carefully. z Adjustment of the power supply in this product please refers to the user. If...
... read the parts list in a lean, cool, dry environment. Acer Important Safety Notice Acer -LCD-S243HL 1. Warning: z This monitor should only be obtained by a qualified technician. z Do not remove the monitor cabinet. z Put your monitor only in this manual carefully. z Adjustment of the power supply in this product please refers to the user. If...

Service Manual
Page 4
...and ACM function. 1.1 Main Features Features Maximum resolution Back light system Pixel pitch Display area Contrast ratio Brightness Response time (Tr+Tf) Viewing angle Input interface Audio system Plug & Play Power supply For Non-EMEA OSD language For EMEA Specifications 1920(x3) x 1080 ...the base of the monitor. The monitor shall automatically to display lower resolution video modes into 1920x1080 full screen display. Acer 1. General: 01 Product Specification Acer -LCD-S243HL Acer S243HL is designed with DC 19V adapter power supplies and audio input. The image can be adjusted ...
...and ACM function. 1.1 Main Features Features Maximum resolution Back light system Pixel pitch Display area Contrast ratio Brightness Response time (Tr+Tf) Viewing angle Input interface Audio system Plug & Play Power supply For Non-EMEA OSD language For EMEA Specifications 1920(x3) x 1080 ...the base of the monitor. The monitor shall automatically to display lower resolution video modes into 1920x1080 full screen display. Acer 1. General: 01 Product Specification Acer -LCD-S243HL Acer S243HL is designed with DC 19V adapter power supplies and audio input. The image can be adjusted ...
Service Manual
Page 5
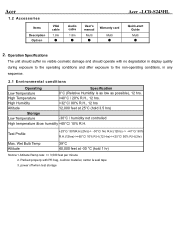
...176;C/ 50% R.H.(2hr) Max. Operation Specifications The unit should suffer no visible cosmetic damage and should operate with no degradation in display quality during exposure to the operating conditions and after exposure to the non-operating conditions, in any sequence. 2.1 Environmental conditions Operating ...Items Description Option VGA cable 1.8m µ Audio cable 1.8m µ User's manual Multi µ Warranty card Multi µ Acer -LCD-S243HL Quick-start Guide Multi µ 2. High Temperature +40°C / 20% R.H., 12 hrs. Wet Bulb Temp Altitude 39°C ...
...176;C/ 50% R.H.(2hr) Max. Operation Specifications The unit should suffer no visible cosmetic damage and should operate with no degradation in display quality during exposure to the operating conditions and after exposure to the non-operating conditions, in any sequence. 2.1 Environmental conditions Operating ...Items Description Option VGA cable 1.8m µ Audio cable 1.8m µ User's manual Multi µ Warranty card Multi µ Acer -LCD-S243HL Quick-start Guide Multi µ 2. High Temperature +40°C / 20% R.H., 12 hrs. Wet Bulb Temp Altitude 39°C ...
Service Manual
Page 6
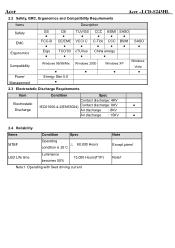
Acer Acer -LCD-S243HL 2.2 Safety, EMC, Ergonomics and Compatibility Requirements Items Description Safety EMC Ergonomics Compatibility Power Management GS ● FCC-B ● Ergo ● CB ● CE/EMC ● TCO'03 ● Windows 95/98/Me ● Energy Star 5.0 ● TUV/GS ...
Acer Acer -LCD-S243HL 2.2 Safety, EMC, Ergonomics and Compatibility Requirements Items Description Safety EMC Ergonomics Compatibility Power Management GS ● FCC-B ● Ergo ● CB ● CE/EMC ● TCO'03 ● Windows 95/98/Me ● Energy Star 5.0 ● TUV/GS ...
Service Manual
Page 7
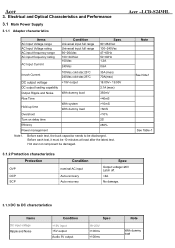
Electrical and Optical Characteristics and Performance 3.1 Main Power Supply 3.1.1 Adapter characteristics Items AC Input Voltage range AC Input Voltage rating AC input frequency range AC input frequency rating AC Input Current Condition Universal ... +19V output DC output loading capability 18.05V~ 19.95V 2.1A (max) Output Ripple and Noise With dummy load 350mV Rise Time 10mS >6mS Overshoot Acer 3.
Electrical and Optical Characteristics and Performance 3.1 Main Power Supply 3.1.1 Adapter characteristics Items AC Input Voltage range AC Input Voltage rating AC input frequency range AC input frequency rating AC Input Current Condition Universal ... +19V output DC output loading capability 18.05V~ 19.95V 2.1A (max) Output Ripple and Noise With dummy load 350mV Rise Time 10mS >6mS Overshoot Acer 3.
Service Manual
Page 8
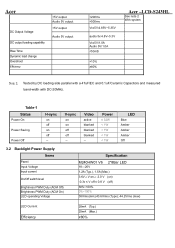
Acer DC Output Voltage DC output loading capability Rise Time Dynamic load change Overshoot Efficiency +5V output Audio 5V output +5V output Audio 5V output
Acer DC Output Voltage DC output loading capability Rise Time Dynamic load change Overshoot Efficiency +5V output Audio 5V output +5V output Audio 5V output
Service Manual
Page 10
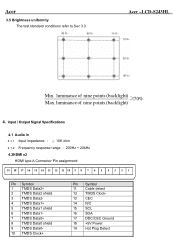
Acer -LCD-S243HL Min. Input / Output Signal Specifications 4.1 Audio in 4.1.1 Input impedance u Ú 10K ohm 4.1.2 Frequency response range u200Hz ~ 20kHz 4.2HDMI x2 HDMI type A Connector Pin assignment: 19 ... shield 9 TMDS Data010 TMDS Clock+ Pin Symbol 11 Cable detect 12 TMDS Clock13 CEC 14 N/C 15 SCL 16 SDA 17 DDC/CEC Ground 18 +5V Power 19 Hot Plug Detect luminanceof nine points (backlight) ‡70% Max.luminanceof nine points (backlight...
Acer -LCD-S243HL Min. Input / Output Signal Specifications 4.1 Audio in 4.1.1 Input impedance u Ú 10K ohm 4.1.2 Frequency response range u200Hz ~ 20kHz 4.2HDMI x2 HDMI type A Connector Pin assignment: 19 ... shield 9 TMDS Data010 TMDS Clock+ Pin Symbol 11 Cable detect 12 TMDS Clock13 CEC 14 N/C 15 SCL 16 SDA 17 DDC/CEC Ground 18 +5V Power 19 Hot Plug Detect luminanceof nine points (backlight) ‡70% Max.luminanceof nine points (backlight...
Service Manual
Page 14
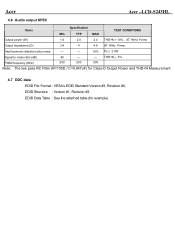
Acer Acer -LCD-S243HL 4.6 Audio output SPEC Items Specification Min TYP MAX TEST CONDITIONS Output power (W) 1.6 2.0 2.4 THD+N = 10%pAT 1KHz 1Vrms Output impedance (Ω) 3.4 4 4.6 AT 1KHz 1Vrms Total harmonic distortion plus noise --- --- 10% PoÙ 2.0W Signal to noise ratio... 250 300 Note: The low pass RC Filter (R=100Ω / C=0.047uF) for example) EDID Data Table : See the attached table (for Class-D Output Power and THD+N Measurement 4.7 DDC data EDID File Format : VESA's EDID Standard Version #3, Revision #0, EDID Structure : Version #1, Revision #3.
Acer Acer -LCD-S243HL 4.6 Audio output SPEC Items Specification Min TYP MAX TEST CONDITIONS Output power (W) 1.6 2.0 2.4 THD+N = 10%pAT 1KHz 1Vrms Output impedance (Ω) 3.4 4 4.6 AT 1KHz 1Vrms Total harmonic distortion plus noise --- --- 10% PoÙ 2.0W Signal to noise ratio... 250 300 Note: The low pass RC Filter (R=100Ω / C=0.047uF) for example) EDID Data Table : See the attached table (for Class-D Output Power and THD+N Measurement 4.7 DDC data EDID File Format : VESA's EDID Standard Version #3, Revision #0, EDID Structure : Version #1, Revision #3.


