Quick Start Guide
Page 1
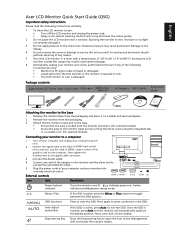
... not remove the cover or attempt to service this range may result in permanent damage. 6 Immediately unplug your display. HDMI 2 External controls HDMI 2 HDMI 1 D-Sub Audio DC Icon Item Description Power button/ indicator Turns the monitor on a stable and level workspace. 2 Remove the...° F). An authorized technician should perform servicing of -20° to open the Acer eColor Management OSD and access the scenario modes. Package contents LCD monitor AC Power cable Audio cable VGA cable HDMI cable (Optional) AC Adapter Users guide Quick start guide Attaching the...
... not remove the cover or attempt to service this range may result in permanent damage. 6 Immediately unplug your display. HDMI 2 External controls HDMI 2 HDMI 1 D-Sub Audio DC Icon Item Description Power button/ indicator Turns the monitor on a stable and level workspace. 2 Remove the...° F). An authorized technician should perform servicing of -20° to open the Acer eColor Management OSD and access the scenario modes. Package contents LCD monitor AC Power cable Audio cable VGA cable HDMI cable (Optional) AC Adapter Users guide Quick start guide Attaching the...
User Manual
Page 13
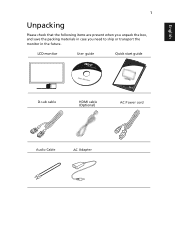
LCD monitor User guide Quick start guide D-sub cable HDMI cable (Optional) AC Power cord Audio Cable AC Adapter English 1 Unpacking Please check that the following items are present when you unpack the box, and save the packing materials in case you need to ship or transport the monitor in the future.
LCD monitor User guide Quick start guide D-sub cable HDMI cable (Optional) AC Power cord Audio Cable AC Adapter English 1 Unpacking Please check that the following items are present when you unpack the box, and save the packing materials in case you need to ship or transport the monitor in the future.
User Manual
Page 19
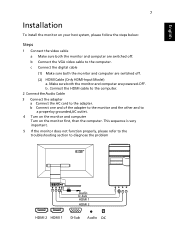
b Connect the VGA video cable to the adapter. Connect the HDMI cable to the computer. 2 Connect the Audio Cable 3 Connect the adapter a Connect the AC cord to the computer. This sequence is very important. 5 If the monitor does not function properly, please refer ... the monitor first, then the computer. b Connect one and of the adapter to the monitor and the other and to diagnose the problem DC 22 1 Audio 22 1 D-Sub HDMI 1 HDMI 2 HDMI 2 HDMI 1 D-Sub...
b Connect the VGA video cable to the adapter. Connect the HDMI cable to the computer. 2 Connect the Audio Cable 3 Connect the adapter a Connect the AC cord to the computer. This sequence is very important. 5 If the monitor does not function properly, please refer ... the monitor first, then the computer. b Connect one and of the adapter to the monitor and the other and to diagnose the problem DC 22 1 Audio 22 1 D-Sub HDMI 1 HDMI 2 HDMI 2 HDMI 1 D-Sub...

Service Manual
Page 4
... ROHS standard. The image can be adjusted through OSD control. The power button and display control buttons are on the base of the monitor. General: 01 Product Specification Acer -LCD-S243HL Acer S243HL is designed with DC 19V adapter power supplies and audio input. It support HDCP, Color management and ACM function. 1.1 Main Features Features Maximum...
... ROHS standard. The image can be adjusted through OSD control. The power button and display control buttons are on the base of the monitor. General: 01 Product Specification Acer -LCD-S243HL Acer S243HL is designed with DC 19V adapter power supplies and audio input. It support HDCP, Color management and ACM function. 1.1 Main Features Features Maximum...
Service Manual
Page 5
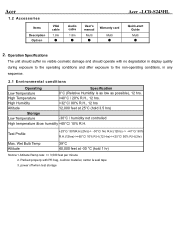
Operation Specifications The unit should suffer no visible cosmetic damage and should operate with no degradation in display quality during exposure to the operating conditions and after exposure to the non-operating conditions, in any sequence. 2.1 ...90% R.H.(12hrs)->+65°C/ 10% R.H.(12 Hrs)->+25°C/ 50% R.H.(2hr) Max. Acer 1.2 Accessories Items Description Option VGA cable 1.8m µ Audio cable 1.8m µ User's manual Multi µ Warranty card Multi µ Acer -LCD-S243HL Quick-start Guide Multi µ 2. High Humidity +32°C/ 80% R.H., 12 hrs ...
Operation Specifications The unit should suffer no visible cosmetic damage and should operate with no degradation in display quality during exposure to the operating conditions and after exposure to the non-operating conditions, in any sequence. 2.1 ...90% R.H.(12hrs)->+65°C/ 10% R.H.(12 Hrs)->+25°C/ 50% R.H.(2hr) Max. Acer 1.2 Accessories Items Description Option VGA cable 1.8m µ Audio cable 1.8m µ User's manual Multi µ Warranty card Multi µ Acer -LCD-S243HL Quick-start Guide Multi µ 2. High Humidity +32°C/ 80% R.H., 12 hrs ...
Service Manual
Page 7
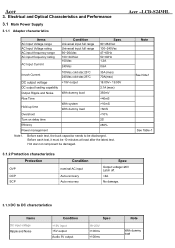
Acer 3. Electrical and Optical Characteristics and Performance 3.1 Main Power Supply 3.1.1 Adapter characteristics Items AC Input Voltage range AC Input Voltage rating AC input frequency range AC ...
Acer 3. Electrical and Optical Characteristics and Performance 3.1 Main Power Supply 3.1.1 Adapter characteristics Items AC Input Voltage range AC Input Voltage rating AC input frequency range AC ...
Service Manual
Page 8
Acer DC Output Voltage DC output loading capability Rise Time Dynamic load change Overshoot Efficiency +5V output Audio 5V output +5V output Audio 5V output
Acer DC Output Voltage DC output loading capability Rise Time Dynamic load change Overshoot Efficiency +5V output Audio 5V output +5V output Audio 5V output
Service Manual
Page 10
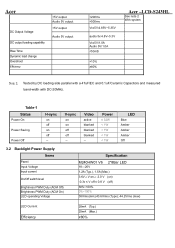
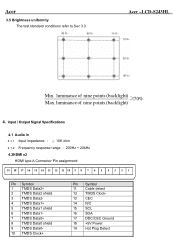
Acer 3.5 Brightness uniformity The test standard conditions refer to Sec 3.3. Input / Output Signal Specifications 4.1 Audio in 4.1.1 Input impedance u Ú 10K ohm 4.1.2 Frequency response range u200Hz ~ 20kHz 4.2HDMI x2 HDMI type A Connector Pin assignment: 19 18 17 16 15 14 13 ...+ Pin Symbol 11 Cable detect 12 TMDS Clock13 CEC 14 N/C 15 SCL 16 SDA 17 DDC/CEC Ground 18 +5V Power 19 Hot Plug Detect Acer -LCD-S243HL Min. luminanceof nine points (backlight) ‡70% Max.luminanceof nine points (backlight) 4.
Acer 3.5 Brightness uniformity The test standard conditions refer to Sec 3.3. Input / Output Signal Specifications 4.1 Audio in 4.1.1 Input impedance u Ú 10K ohm 4.1.2 Frequency response range u200Hz ~ 20kHz 4.2HDMI x2 HDMI type A Connector Pin assignment: 19 18 17 16 15 14 13 ...+ Pin Symbol 11 Cable detect 12 TMDS Clock13 CEC 14 N/C 15 SCL 16 SDA 17 DDC/CEC Ground 18 +5V Power 19 Hot Plug Detect Acer -LCD-S243HL Min. luminanceof nine points (backlight) ‡70% Max.luminanceof nine points (backlight) 4.
Service Manual
Page 14
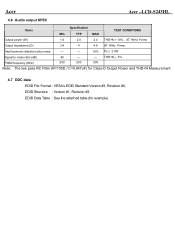
Acer Acer -LCD-S243HL 4.6 Audio output SPEC Items Specification Min TYP MAX TEST CONDITIONS Output power (W) 1.6 2.0 2.4 THD+N = 10%pAT 1KHz 1Vrms Output impedance (Ω) 3.4 4 4.6 AT 1KHz 1Vrms Total harmonic distortion ...
Acer Acer -LCD-S243HL 4.6 Audio output SPEC Items Specification Min TYP MAX TEST CONDITIONS Output power (W) 1.6 2.0 2.4 THD+N = 10%pAT 1KHz 1Vrms Output impedance (Ω) 3.4 4 4.6 AT 1KHz 1Vrms Total harmonic distortion ...
Service Manual
Page 17
...of an adjustment item, or change an adjustment value B. B. When "Main OSD" displays, press [e Color] to exit the OSD, and to the specification of INL MT230DW01 panel. Acer Acer -LCD-S243HL 5.2 Optical characteristic of LCD panel The test methods for the below items' definition, ...0.329 75% 250 Max. - B. When "Main OSD" un-displays, press [AUTO] to enter OSD interface. When "Main OSD" un-displays, press [MENU] to perform auto-adjustment B. A. When "Main OSD" displays, press [AUTO] to return to show "Audio" OSD and increase the volume, press [◄] to previous level menu...
...of an adjustment item, or change an adjustment value B. B. When "Main OSD" displays, press [e Color] to exit the OSD, and to the specification of INL MT230DW01 panel. Acer Acer -LCD-S243HL 5.2 Optical characteristic of LCD panel The test methods for the below items' definition, ...0.329 75% 250 Max. - B. When "Main OSD" un-displays, press [AUTO] to enter OSD interface. When "Main OSD" un-displays, press [MENU] to perform auto-adjustment B. A. When "Main OSD" displays, press [AUTO] to return to show "Audio" OSD and increase the volume, press [◄] to previous level menu...
Service Manual
Page 58
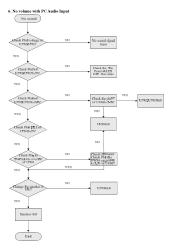
6. No volume with PC Audio Input
6. No volume with PC Audio Input


