

User Manual
Page 3
... unplug the power cord from the electrical outlet. Keep this product from the wall outlet before removing the power supply unit from overheating. If the product falls, it from the projector. • If the system has multiple sources of the product and to the equipment, be blocked or covered. The openings should never be blocked by unplugging all warnings and instructions marked on...
... unplug the power cord from the electrical outlet. Keep this product from the wall outlet before removing the power supply unit from overheating. If the product falls, it from the projector. • If the system has multiple sources of the product and to the equipment, be blocked or covered. The openings should never be blocked by unplugging all warnings and instructions marked on...

User Manual
Page 5
... servicing to qualified service personnel when: • the power cord or plug is damaged, cut or frayed • liquid was spilled into the projector's lens when the lamp is on the projector first and then signal sources • Do not place the product in following the operating instructions Note: Adjust only those controls that is necessary. • Locations where temperatures may become excessively high, such as opening or removing covers...
... servicing to qualified service personnel when: • the power cord or plug is damaged, cut or frayed • liquid was spilled into the projector's lens when the lamp is on the projector first and then signal sources • Do not place the product in following the operating instructions Note: Adjust only those controls that is necessary. • Locations where temperatures may become excessively high, such as opening or removing covers...

User Manual
Page 6
...; Reset the "Lamp Hour Reset" function from the Onscreen display "Management" menu after replacing the lamp module. • Do not attempt to suitable qualified professional service personnel. • Do not stand the projector on the remote control. • The lamp becomes extremely hot during operation. There are dangerous high voltages inside may hurt you. It could cause the object to removing the lamp assembly for ceiling mount installation. The only user serviceable part...
...; Reset the "Lamp Hour Reset" function from the Onscreen display "Management" menu after replacing the lamp module. • Do not attempt to suitable qualified professional service personnel. • Do not stand the projector on the remote control. • The lamp becomes extremely hot during operation. There are dangerous high voltages inside may hurt you. It could cause the object to removing the lamp assembly for ceiling mount installation. The only user serviceable part...

User Manual
Page 8
... the power plug from the Onscreen display "Management" menu after replacing the lamp module. • When switching the projector off, please ensure the projector completes its cooling cycle before disconnecting power. • Turn on the projector first and then the signal sources. • Do not use lens cap when projector is in this user's guide to maximize the life of your unit. Don't: • Block the slots and openings on...
... the power plug from the Onscreen display "Management" menu after replacing the lamp module. • When switching the projector off, please ensure the projector completes its cooling cycle before disconnecting power. • Turn on the projector first and then the signal sources. • Do not use lens cap when projector is in this user's guide to maximize the life of your unit. Don't: • Block the slots and openings on...
User Manual
Page 9
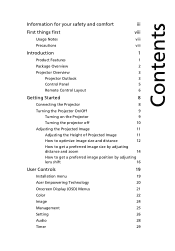
... Panel 5 Remote Control Layout 6 Getting Started 8 Connecting the Projector 8 Turning the Projector On/Off 9 Turning on the Projector 9 Turning the projector off 10 Adjusting the Projected Image 11 Adjusting the Height of Projected Image 11 How to optimize image size and distance 12 How to get a preferred image size by adjusting distance and zoom 14 How to get a preferred image position by adjusting lens shift 16 User Controls 19 Installation menu 19 Acer Empowering Technology 20 Onscreen Display (OSD) Menus 21 Color 22 Image 24 Management 25 Setting...
... Panel 5 Remote Control Layout 6 Getting Started 8 Connecting the Projector 8 Turning the Projector On/Off 9 Turning on the Projector 9 Turning the projector off 10 Adjusting the Projected Image 11 Adjusting the Height of Projected Image 11 How to optimize image size and distance 12 How to get a preferred image size by adjusting distance and zoom 14 How to get a preferred image position by adjusting lens shift 16 User Controls 19 Installation menu 19 Acer Empowering Technology 20 Onscreen Display (OSD) Menus 21 Color 22 Image 24 Management 25 Setting...
User Manual
Page 11
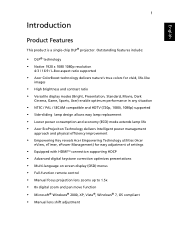
... power consumption and economy (ECO) mode extends lamp life • Acer EcoProjeciton Technology delivers Intelligent power management approach and physical efficiency improvement • Empowering Key reveals Acer Empowering Technology utilities (Acer eView, eTimer, ePower Management) for easy adjustment of settings • Equipped with HDMITM connection supporting HDCP • Advanced digital keystone correction optimizes presentations • Multi-language on screen display (OSD) menus • Full-function remote control • Manual focus projection lens zooms...
... power consumption and economy (ECO) mode extends lamp life • Acer EcoProjeciton Technology delivers Intelligent power management approach and physical efficiency improvement • Empowering Key reveals Acer Empowering Technology utilities (Acer eView, eTimer, ePower Management) for easy adjustment of settings • Equipped with HDMITM connection supporting HDCP • Advanced digital keystone correction optimizes presentations • Multi-language on screen display (OSD) menus • Full-function remote control • Manual focus projection lens zooms...
User Manual
Page 12
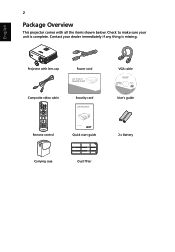
Contact your unit is missing. SOURCE MENU TEMP RESYNC LAMP ZOOM Projector with all the items shown below. Check to make sure your dealer immediately if any thing is complete. English 2 Package Overview This projector comes with lens cap Power cord Acer Projector Security Card Composite video cable Security card VGA cable P7500/F150/PF-801 Series P/N:MU.K2700.001 User's guide Remote control Quick start guide 2 x Battery Carrying case Dust filter
Contact your unit is missing. SOURCE MENU TEMP RESYNC LAMP ZOOM Projector with all the items shown below. Check to make sure your dealer immediately if any thing is complete. English 2 Package Overview This projector comes with lens cap Power cord Acer Projector Security Card Composite video cable Security card VGA cable P7500/F150/PF-801 Series P/N:MU.K2700.001 User's guide Remote control Quick start guide 2 x Battery Carrying case Dust filter

User Manual
Page 15
... "Turning the Projector On/ Off" section. Remote control receiver. English SOURCE 5 Control Panel 1 LAMP 2 6 TEMP 7 8 3 MENU 9 RESYNC 2 10 # 1 LAMP Function 2 KEYSTONE 3 RESYNC 4 MENU 5 POWER 6 Empowering key 7 TEMP 8 Four directional select keys 9 SOURCE 10 IR Recevier 45 Description Lamp Indicator LED Adjusts the image to the previous step for distortion caused by tilting the projector. Automatically synchronizes the projector to the input source. • Press "MENU" to launch the Onscreen display (OSD) menu, back to compensate for the OSD menu operation...
... "Turning the Projector On/ Off" section. Remote control receiver. English SOURCE 5 Control Panel 1 LAMP 2 6 TEMP 7 8 3 MENU 9 RESYNC 2 10 # 1 LAMP Function 2 KEYSTONE 3 RESYNC 4 MENU 5 POWER 6 Empowering key 7 TEMP 8 Four directional select keys 9 SOURCE 10 IR Recevier 45 Description Lamp Indicator LED Adjusts the image to the previous step for distortion caused by tilting the projector. Automatically synchronizes the projector to the input source. • Press "MENU" to launch the Onscreen display (OSD) menu, back to compensate for the OSD menu operation...

User Manual
Page 16
... the image, press again to display the image. 5 FREEZE To pause the screen image. 6 ASPECT RATIO To choose the desired aspect ratio (Auto/4:3/16:9/L.Box) 7 SOURCE Press "SOURCE" to choose from RGB, Component, S-Video, Composite, SCART, HDTV and HDMI™ sources. 8 RESYNC Automatically synchronizes the projector to the input source. 9 ZOOM Zooms the projector display in or out. 10 Back Press "BACK" to go back to the projector. English 6 Remote Control...
... the image, press again to display the image. 5 FREEZE To pause the screen image. 6 ASPECT RATIO To choose the desired aspect ratio (Auto/4:3/16:9/L.Box) 7 SOURCE Press "SOURCE" to choose from RGB, Component, S-Video, Composite, SCART, HDTV and HDMI™ sources. 8 RESYNC Automatically synchronizes the projector to the input source. 9 ZOOM Zooms the projector display in or out. 10 Back Press "BACK" to go back to the projector. English 6 Remote Control...

User Manual
Page 20
...Turning on the Projector 1 Remove the lens cap.(Illustration #1) 2 Ensure that the power cord and signal cable are securely connected. • If you connect to multiple sources at the same time, use the "Source" button on either control panel or the remote control or direct source key on the remote control to switch between inputs. 2 Power button SOURCE 1 Lens cap MENU TEMP RESYNC LAMP ZOOM The projector will turn blue.(Illustration #2) 4 Turn on your source automatically. • If the screen displays "Lock" and "Source" icons, it means the projector is locked onto a specific source...
...Turning on the Projector 1 Remove the lens cap.(Illustration #1) 2 Ensure that the power cord and signal cable are securely connected. • If you connect to multiple sources at the same time, use the "Source" button on either control panel or the remote control or direct source key on the remote control to switch between inputs. 2 Power button SOURCE 1 Lens cap MENU TEMP RESYNC LAMP ZOOM The projector will turn blue.(Illustration #2) 4 Turn on your source automatically. • If the screen displays "Lock" and "Source" icons, it means the projector is locked onto a specific source...

User Manual
Page 21
... message appears: "Please press the power button again to unplug the power cord. Note: Whenever the projector automatically shuts down , and the LED temp indicator will automatically turn solid red. Press the power button again. 2 The LED power indicator will turn RED and blink rapidly after the projector is now safe to complete the shutdown process." Warning indicators: • "Projector Overheated. Contact your local reseller or service center. Contact your local dealer or service center. The lamp with...
... message appears: "Please press the power button again to unplug the power cord. Note: Whenever the projector automatically shuts down , and the LED temp indicator will automatically turn solid red. Press the power button again. 2 The LED power indicator will turn RED and blink rapidly after the projector is now safe to complete the shutdown process." Warning indicators: • "Projector Overheated. Contact your local reseller or service center. Contact your local dealer or service center. The lamp with...
User Manual
Page 30
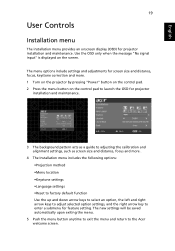
... the menu button on the screen. Use the OSD only when the message "No signal input" is displayed on the control pad to launch the OSD for projector installation and maintenance. 3 The background pattern acts as a guide to adjusting the calibration and alignment settings, such as screen size and distance, focus and more . 4 The Installation menu includes the following options: •Projection method •Menu location •Keystone settings •Language settings •Reset to factory default function Use the...
... the menu button on the screen. Use the OSD only when the message "No signal input" is displayed on the control pad to launch the OSD for projector installation and maintenance. 3 The background pattern acts as a guide to adjusting the calibration and alignment settings, such as screen size and distance, focus and more . 4 The Installation menu includes the following options: •Projection method •Menu location •Keystone settings •Language settings •Reset to factory default function Use the...

User Manual
Page 35
... select this function, the projector inverts the image for ceiling-mounted projection. Position • (Horizontal position) • V. to move the image down. You can project from behind a translucent screen. to choose your desired aspect ratio. • Auto: Keep the image with ceiling mounted projection. Rear-Ceiling • When you select this function to move the image up. Adjust image distortion caused by 1.333 times. 24 Image English Projection Front-Desktop • The factory default setting.
... select this function, the projector inverts the image for ceiling-mounted projection. Position • (Horizontal position) • V. to move the image down. You can project from behind a translucent screen. to choose your desired aspect ratio. • Auto: Keep the image with ceiling mounted projection. Rear-Ceiling • When you select this function to move the image up. Adjust image distortion caused by 1.333 times. 24 Image English Projection Front-Desktop • The factory default setting.

User Manual
Page 36
.... Default is no signal input after the allocated time. (in minutes) Displays the lamp's elapsed operating time (in the projected image, use this function to display a reminder to change the lamp 30 hours before its expected end-of the projector with the graphics card. Position", "Frequency" and "Tracking" functions are not supported under HDMI, DVI or Video mode. Choose "On" to return normal mode. The projector will lower power consumption, extend the lamp life and...
.... Default is no signal input after the allocated time. (in minutes) Displays the lamp's elapsed operating time (in the projected image, use this function to display a reminder to change the lamp 30 hours before its expected end-of the projector with the graphics card. Position", "Frequency" and "Tracking" functions are not supported under HDMI, DVI or Video mode. Choose "On" to return normal mode. The projector will lower power consumption, extend the lamp life and...

User Manual
Page 37
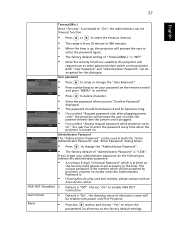
... search for other signals if the current input signal is enabled, your must enter the "Administrator Password" first before you press "Source" button on the display screen. Set your area). 26 Setting English Menu Location Source Lock Closed Caption Security Choose the menu location on the remote control for the administrator to manage usage of the projector. When source lock is turned "off the captioning feature. The user has to enter a password to operate the projector.
... search for other signals if the current input signal is enabled, your must enter the "Administrator Password" first before you press "Source" button on the display screen. Set your area). 26 Setting English Menu Location Source Lock Closed Caption Security Choose the menu location on the remote control for the administrator to manage usage of the projector. When source lock is turned "off the captioning feature. The user has to enter a password to operate the projector.
User Manual
Page 38
... projector is turned on /off of electronic screen will be used in the box). Choose "On" to enable VGA OUT connection. • Default is "On", the down/up , the projector will prompt the user to enter the password again. • The factory default setting of "Administrator Password" is "1234". Administrator Password The "Administrator Password" can be related with an Acer service center. • Default is "Off". 27 English VGA OUT (Standby) Auto Screen Reset...
... projector is turned on /off of electronic screen will be used in the box). Choose "On" to enable VGA OUT connection. • Default is "On", the down/up , the projector will prompt the user to enter the password again. • The factory default setting of "Administrator Password" is "1234". Administrator Password The "Administrator Password" can be related with an Acer service center. • Default is "Off". 27 English VGA OUT (Standby) Auto Screen Reset...
User Manual
Page 41
... the resolution mode you need under the "Monitor" tab. • Click "Show all devices". Please refer to the "Replacing the Lamp" section. • Make sure you have removed the lens cap and the projector is switched on. 2 Partial, scrolling or incorrectly displayed image(For PC • Press "RESYNC" on the remote control or control panel. • For an incorrectly displayed image: • Open "My Computer," open the "Control (Windows 2000...
... the resolution mode you need under the "Monitor" tab. • Click "Show all devices". Please refer to the "Replacing the Lamp" section. • Make sure you have removed the lens cap and the projector is switched on. 2 Partial, scrolling or incorrectly displayed image(For PC • Press "RESYNC" on the remote control or control panel. • For an incorrectly displayed image: • Open "My Computer," open the "Control (Windows 2000...

User Manual
Page 42
... you are using an Apple® Mac® OS based notebook: In System Preferences, open Display and select Video Mirroring "On". 5 Image is unstable • Adjust the "Tracking" to correct it compatible with the projector. 7 Image is out of focus • Make sure the lens cap is removed. • Adjusts the focus ring on the remote control or control or incorrectly panel. Refer to your computer's manual for more...
... you are using an Apple® Mac® OS based notebook: In System Preferences, open Display and select Video Mirroring "On". 5 Image is unstable • Adjust the "Tracking" to correct it compatible with the projector. 7 Image is out of focus • Make sure the lens cap is removed. • Adjusts the focus ring on the remote control or control or incorrectly panel. Refer to your computer's manual for more...
User Manual
Page 43
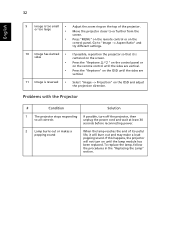
... a loud popping sound. Press the "Keystone / " on the control panel or on the screen. Problems with the Projector # Condition Solution 1 The projector stops responding If possible, turn on the top of its useful life, it is reversed • Adjust the zoom ring on until the lamp module has been replaced. If this happens, the projector will not turn off the projector, then to all controls unplug the power cord and wait...
... a loud popping sound. Press the "Keystone / " on the control panel or on the screen. Problems with the Projector # Condition Solution 1 The projector stops responding If possible, turn on the top of its useful life, it is reversed • Adjust the zoom ring on until the lamp module has been replaced. If this happens, the projector will not turn off the projector, then to all controls unplug the power cord and wait...

User Manual
Page 51
40 English Specifications The specifications listed below are subject to 95ºF Projection system Resolution Computer compatibility Video compatibility Aspect ratio Displayable colors Projection lens Projection screen size (diagonal) Projection distance Throw ratio Horizontal scan rate Vertical refresh scan rate Lamp type Keystone correction Audio Weight Dimensions (W x D x H) Remote control Digital Zoom Power supply Power consumption Operating temperature DLP® Native: 1080P (1920 x 1080), Maximum: UXGA (1600 x 1200),WSXGA+ (1680 x 1050), 1080p (1920 x 1080) IBM PC and ...
40 English Specifications The specifications listed below are subject to 95ºF Projection system Resolution Computer compatibility Video compatibility Aspect ratio Displayable colors Projection lens Projection screen size (diagonal) Projection distance Throw ratio Horizontal scan rate Vertical refresh scan rate Lamp type Keystone correction Audio Weight Dimensions (W x D x H) Remote control Digital Zoom Power supply Power consumption Operating temperature DLP® Native: 1080P (1920 x 1080), Maximum: UXGA (1600 x 1200),WSXGA+ (1680 x 1050), 1080p (1920 x 1080) IBM PC and ...


