
PD311 Service Guide
Page 16
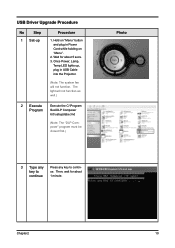
... contin- USB Driver Upgrade Procedure No Step 1 Set-up , plug in Power Cord while holding on "Menu" button and plug in USB Cable into the Projector. (Note: The system fan will not function as well.) 2 Execute Program Execute the C:\Program files\DLP Composer 6.0\usbupdata.cmd (Note: The "DLP ...Composer" program must be closed first.) Photo 3 Type any Press any key to ue. Once Power, Lamp, Temp LED lights up Procedure 1. Hold on "Menu". 2. Then, wait for about continue 1 minute. Wait for about 5 secs. 3.
... contin- USB Driver Upgrade Procedure No Step 1 Set-up , plug in Power Cord while holding on "Menu" button and plug in USB Cable into the Projector. (Note: The system fan will not function as well.) 2 Execute Program Execute the C:\Program files\DLP Composer 6.0\usbupdata.cmd (Note: The "DLP ...Composer" program must be closed first.) Photo 3 Type any Press any key to ue. Once Power, Lamp, Temp LED lights up Procedure 1. Hold on "Menu". 2. Then, wait for about continue 1 minute. Wait for about 5 secs. 3.
PD311 Service Guide
Page 18
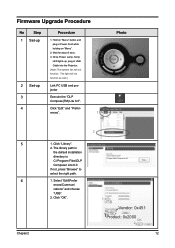
Once Power, Lamp, Temp LED lights up, plug in the default installation directory is C:\Program Files\DLP Composer Lite 6.0 If not, press "Browse" to select the right path. 1. Wait for about 5 secs. 3. The light will not function. The library path in USB Cable into the Projector. (Note: The system fan will not...Library". 2. Click "OK". 2 1 USB Vendor: 0x451 Product: 0x2000 OK 2 12 ences". 1 Photo 5 6 Chapter2 1. Firmware Upgrade Procedure No Step Procedure 1 Set-up Link PC USB and projector 3 Execute the "DLP Compose(TM) Lite 6.0". 4 Click "Edit" and "Prefer-
Once Power, Lamp, Temp LED lights up, plug in the default installation directory is C:\Program Files\DLP Composer Lite 6.0 If not, press "Browse" to select the right path. 1. Wait for about 5 secs. 3. The light will not function. The library path in USB Cable into the Projector. (Note: The system fan will not...Library". 2. Click "OK". 2 1 USB Vendor: 0x451 Product: 0x2000 OK 2 12 ences". 1 Photo 5 6 Chapter2 1. Firmware Upgrade Procedure No Step Procedure 1 Set-up Link PC USB and projector 3 Execute the "DLP Compose(TM) Lite 6.0". 4 Click "Edit" and "Prefer-
PD311 Service Guide
Page 47
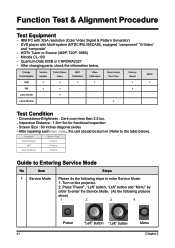
...1080i) - Minolta CL-100 - Inspection Distance : 1.5m~3m for functional inspection - Turn on the projector. 2. DVD player with XGA resolution (Color Video Signal & Pattern Generator) - Quantum Data 802B or CHROMA2327 - After repairing each PD311 / PD323, the unit should be burn-in Time Normal Repair 2 Hours NFF 4 Hours Auto Shutdown ... - After changing parts, check the information below ). Charge Parts/Update Version Update Color Wheel Index ADC Calibration Video Calibration Reset Lamp Use Time Factory Reset EDID M/B v v v v v v FW v v v Color Wheel...
...1080i) - Minolta CL-100 - Inspection Distance : 1.5m~3m for functional inspection - Turn on the projector. 2. DVD player with XGA resolution (Color Video Signal & Pattern Generator) - Quantum Data 802B or CHROMA2327 - After repairing each PD311 / PD323, the unit should be burn-in Time Normal Repair 2 Hours NFF 4 Hours Auto Shutdown ... - After changing parts, check the information below ). Charge Parts/Update Version Update Color Wheel Index ADC Calibration Video Calibration Reset Lamp Use Time Factory Reset EDID M/B v v v v v v FW v v v Color Wheel...
PD311 User's Guide EN
Page 3
...Remote Control with Laser Pointer 9 Installation 10 Connecting the Projector 10 Powering On/Off the Projector 11 Powering On the Projector 11 Powering Off the projector 12 Warning Indicator ...12 Adjusting the Projected Image 13 Adjusting the Projector Image Height 13 Adjusting the Projector Zoom / Focus 14 Adjusting Projected Image Size 14 ... (Computer/Video Mode 31 Timer (Computer/Video Mode 32 Language(Computer/Video Mode 33 Appendices 34 Troubleshooting 34 Replacing the lamp 37 Specifications ...39 Compatibility Modes 40 Regulation & safety notices 41 1 ... English
...Remote Control with Laser Pointer 9 Installation 10 Connecting the Projector 10 Powering On/Off the Projector 11 Powering On the Projector 11 Powering Off the projector 12 Warning Indicator ...12 Adjusting the Projected Image 13 Adjusting the Projector Image Height 13 Adjusting the Projector Zoom / Focus 14 Adjusting Projected Image Size 14 ... (Computer/Video Mode 31 Timer (Computer/Video Mode 32 Language(Computer/Video Mode 33 Appendices 34 Troubleshooting 34 Replacing the lamp 37 Specifications ...39 Compatibility Modes 40 Regulation & safety notices 41 1 ... English
PD311 User's Guide EN
Page 4
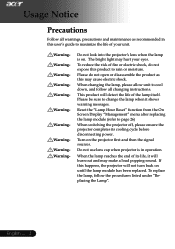
...or disassemble the product as recommended in operation. Do not look into the projector's lens when the lamp is in this user's guide to page 26) When switching the projector off, please ensure the projector completes its life, it shows warning messages. Do not use lens cap ...when projector is on the projector first and then the signal sources. When the lamp reaches the end of the lamp itself. English ... 2 Warning- ...
...or disassemble the product as recommended in operation. Do not look into the projector's lens when the lamp is in this user's guide to page 26) When switching the projector off, please ensure the projector completes its life, it shows warning messages. Do not use lens cap ...when projector is on the projector first and then the signal sources. When the lamp reaches the end of the lamp itself. English ... 2 Warning- ...

PD311 User's Guide EN
Page 13
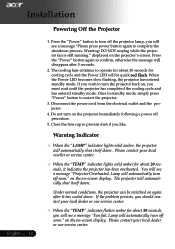
Turn on the lamp by pressing "Power" button on your source automatically. If the screen displays "Lock" & "Source" icons, it means the projector locks on the projector first and then the signal sources. 1 Lens Cap 2 Power 11 ... The projector will detect your source (computer, notebook, video ... control panel. And the Power LED will flash red. 3. Installation Powering On/Off the Projector Powering On the Projector 1. The Power LED will turn on the projector. Turn on this source type and there is no such type of input signal found. ...
Turn on the lamp by pressing "Power" button on your source automatically. If the screen displays "Lock" & "Source" icons, it means the projector locks on the projector first and then the signal sources. 1 Lens Cap 2 Power 11 ... The projector will detect your source (computer, notebook, video ... control panel. And the Power LED will flash red. 3. Installation Powering On/Off the Projector Powering On the Projector 1. The Power LED will turn on the projector. Turn on this source type and there is no such type of input signal found. ...
PD311 User's Guide EN
Page 14
...cooling fans continue to prevent dust if you will see a message "Please press power button again to turn off the projector lamp, you must wait until the projector has completed the cooling cycle and has entered standby mode. Once in standby mode, simply press "Power" button to confirm... your local dealer or our service center. If you wish to turn the projector back on again after 5 seconds. 2. Lamp will see a message "Fan fail. Disconnect the power cord from the electrical outlet and the projector. 4. Press the "Power" button to complete the shutdown process. Press the...
...cooling fans continue to prevent dust if you will see a message "Please press power button again to turn off the projector lamp, you must wait until the projector has completed the cooling cycle and has entered standby mode. Once in standby mode, simply press "Power" button to confirm... your local dealer or our service center. If you wish to turn the projector back on again after 5 seconds. 2. Lamp will see a message "Fan fail. Disconnect the power cord from the electrical outlet and the projector. 4. Press the "Power" button to complete the shutdown process. Press the...
PD311 User's Guide EN
Page 26
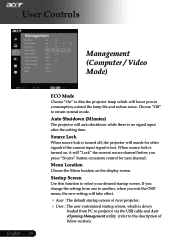
... remote control for other signals if the current input signal is down loaded from PC to projector via the USB cable and Acer eOpening Management utility (refer to dim the projector lamp which will lower power consumption, extend the lamp life and reduce noise. Choose "Off" to select your desired startup screen. When source lock...
... remote control for other signals if the current input signal is down loaded from PC to projector via the USB cable and Acer eOpening Management utility (refer to dim the projector lamp which will lower power consumption, extend the lamp life and reduce noise. Choose "Off" to select your desired startup screen. When source lock...
PD311 User's Guide EN
Page 27
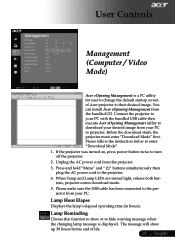
... to change the default startup screen of life. 25 ... You can install Acer eOpening Management from the projector. 3. When Temp and Lamp LEDs are turned light, release both buttons, projector enters download mode. 5. Lamp Hour Elapse Displays the lamp's elapsed operating time (in hours). Connect the projector to your PC with the bundled USB cable then execute...
... to change the default startup screen of life. 25 ... You can install Acer eOpening Management from the projector. 3. When Temp and Lamp LEDs are turned light, release both buttons, projector enters download mode. 5. Lamp Hour Elapse Displays the lamp's elapsed operating time (in hours). Connect the projector to your PC with the bundled USB cable then execute...
PD311 User's Guide EN
Page 28
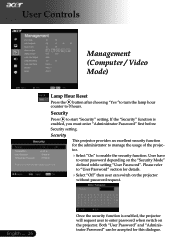
... Press the button after choosing "Yes "to turn the lamp hour counter to start "Security" setting. Security Press to 0 hours. Please refer to "User Password" section for the administrator to manage the usage of the projector. Select "On" to enable the security function....61492;Select "Off" then user can be accepted for this dialogue. If the "Security" function is enabled, the projector will request user to enter password depending on the projector without password request. Both "User Password" and "Administrator Password" can switch on the "Security Mode" defined while...
... Press the button after choosing "Yes "to turn the lamp hour counter to start "Security" setting. Security Press to 0 hours. Please refer to "User Password" section for the administrator to manage the usage of the projector. Select "On" to enable the security function....61492;Select "Off" then user can be accepted for this dialogue. If the "Security" function is enabled, the projector will request user to enter password depending on the projector without password request. Both "User Password" and "Administrator Password" can switch on the "Security Mode" defined while...
PD311 User's Guide EN
Page 36
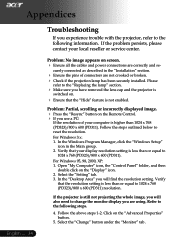
... resolution. Appendices English ... 34 Troubleshooting If you will also need to change the monitor display you have removed the lens cap and the projector is switched on screen. Ensure all the cables and power connections are correctly and se- For Windows 3.x: 1. Click on the...that the resolution setting is higher than 1024 x 768 (PD323)/800 x 600 (PD311). Please refer to the following steps. 4. In the "Desktop Area" you experience trouble with the projector, refer to the "Replacing the lamp" section. Make sure you are not crooked or broken. Check...
... resolution. Appendices English ... 34 Troubleshooting If you will also need to change the monitor display you have removed the lens cap and the projector is switched on screen. Ensure all the cables and power connections are correctly and se- For Windows 3.x: 1. Click on the...that the resolution setting is higher than 1024 x 768 (PD323)/800 x 600 (PD311). Please refer to the following steps. 4. In the "Desktop Area" you experience trouble with the projector, refer to the "Replacing the lamp" section. Make sure you are not crooked or broken. Check...
PD311 User's Guide EN
Page 38
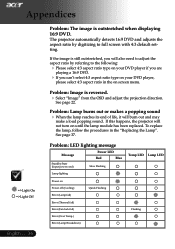
from the OSD and adjust the projection direction. To replace the lamp, follow the procedures in the on screen menu. The projector automatically detects 16:9 DVD and adjusts the aspect ratio by referring to full screen with 4:3 default setting. Problem: LED lighting ...:9 DVD. If you can't select 4:3 aspect ratio type on your DVD player, please select 4:3 aspect ratio in the "Replacing the Lamp". If this happens, the projector will burn out and may make a loud popping sound. Appendices =>Light On =>Light Off English ... 36 Problem: The image is reversed. ...
from the OSD and adjust the projection direction. To replace the lamp, follow the procedures in the on screen menu. The projector automatically detects 16:9 DVD and adjusts the aspect ratio by referring to full screen with 4:3 default setting. Problem: LED lighting ...:9 DVD. If you can't select 4:3 aspect ratio type on your DVD player, please select 4:3 aspect ratio in the "Replacing the Lamp". If this happens, the projector will burn out and may make a loud popping sound. Appendices =>Light On =>Light Off English ... 36 Problem: The image is reversed. ...
PD311 User's Guide EN
Page 39
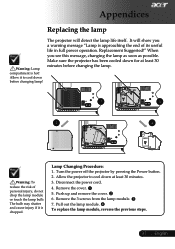
... personal injury, do not drop the lamp module or touch the lamp bulb. Lamp Changing Procedure: 1. Remove the cover. 5. Remove the 3 screws from the lamp module. 7. The projector will show you see this message, changing the lamp as soon as possible. Allow the projector to cool down before changing the lamp. 1 3 2 4 Warning: To reduce the risk...
... personal injury, do not drop the lamp module or touch the lamp bulb. Lamp Changing Procedure: 1. Remove the cover. 5. Remove the 3 screws from the lamp module. 7. The projector will show you see this message, changing the lamp as soon as possible. Allow the projector to cool down before changing the lamp. 1 3 2 4 Warning: To reduce the risk...

PD311 User's Guide EN
Page 40
Lamp will automatically turn off soon." will automatically turn off soon." Appendices Problem: Message Reminders "Lamp is approaching the end of order. tion. will be shown about 10 seconds when lamp life is going to deplete. "Projector Overheated. will be shown when the fan is over heat. "Fan fail. Replacement Suggested!" Lamp will be shown when the system temperature is out of its useful life in full power opera- English ... 38
Lamp will automatically turn off soon." will automatically turn off soon." Appendices Problem: Message Reminders "Lamp is approaching the end of order. tion. will be shown about 10 seconds when lamp life is going to deplete. "Projector Overheated. will be shown when the fan is over heat. "Fan fail. Replacement Suggested!" Lamp will be shown when the system temperature is out of its useful life in full power opera- English ... 38


