
PD120 User's Manual - EN
Page 1
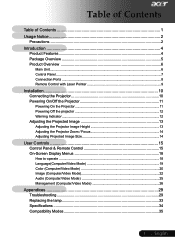
... Connection Ports ...8 Remote Control with Laser Pointer 9 Installation 10 Connecting the Projector 10 Powering On/Off the Projector 11 Powering On the Projector 11 Powering Off the projector 12 Warning Indicator ...12 Adjusting the Projected Image 13 Adjusting the Projector Image Height 13 Adjusting the Projector Zoom / Focus 14 Adjusting Projected Image Size 14 User Controls 15 Control Panel & Remote Control 15 On-Screen Display Menus 18 How to operate ...18 Language(Computer/Video Mode 19 Color (Computer/Video Mode 20 Image (Computer/Video Mode 22 Audio (Computer/Video Mode...
... Connection Ports ...8 Remote Control with Laser Pointer 9 Installation 10 Connecting the Projector 10 Powering On/Off the Projector 11 Powering On the Projector 11 Powering Off the projector 12 Warning Indicator ...12 Adjusting the Projected Image 13 Adjusting the Projector Image Height 13 Adjusting the Projector Zoom / Focus 14 Adjusting Projected Image Size 14 User Controls 15 Control Panel & Remote Control 15 On-Screen Display Menus 18 How to operate ...18 Language(Computer/Video Mode 19 Color (Computer/Video Mode 20 Image (Computer/Video Mode 22 Audio (Computer/Video Mode...
PD120 User's Manual - EN
Page 2
... disconnecting power. English ... 2 WarningWarningWarningWarningWarning- To replace the lamp, follow all warnings, precautions and maintenance as this user's guide to page 26) When switching the projector off, please ensure the projector completes its life, it shows warning messages. Usage Notice Precautions Follow all changing instructions. Reset the "Lamp Hour Reset" function from the On Screen Display "Management" menu after replacing the lamp module (refer to maximize the life of the lamp itself. Do not use lens cap when projector...
... disconnecting power. English ... 2 WarningWarningWarningWarningWarning- To replace the lamp, follow all warnings, precautions and maintenance as this user's guide to page 26) When switching the projector off, please ensure the projector completes its life, it shows warning messages. Usage Notice Precautions Follow all changing instructions. Reset the "Lamp Hour Reset" function from the On Screen Display "Management" menu after replacing the lamp module (refer to maximize the life of the lamp itself. Do not use lens cap when projector...
PD120 User's Manual - EN
Page 4
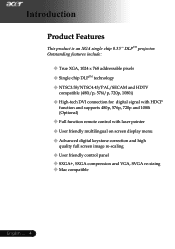
... HDTV compatible (480i/p, 576i/p, 720p, 1080i) High-tech DVI connection for digital signal with HDCP function and supports 480p, 576p, 720p and 1080i (Optional) Full function remote control with laser pointer User friendly multilingual on screen display menu Advanced digital keystone correction and high quality full screen image re-scaling User friendly control panel SXGA+, SXGA compression and VGA, SVGA re-sizing Mac compatible English ... 4
... HDTV compatible (480i/p, 576i/p, 720p, 1080i) High-tech DVI connection for digital signal with HDCP function and supports 480p, 576p, 720p and 1080i (Optional) Full function remote control with laser pointer User friendly multilingual on screen display menu Advanced digital keystone correction and high quality full screen image re-scaling User friendly control panel SXGA+, SXGA compression and VGA, SVGA re-sizing Mac compatible English ... 4
PD120 User's Manual - EN
Page 9
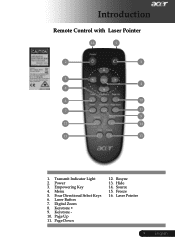
Keystone 10. Resync 13. Freeze 16. Power 3. Digital Zoom 8. Page Up 11. Hide 14. Four Directional Select Keys 6. Menu 5. Laser Button 7. Page Down 12. Laser Pointer 9 ... English Empowering Key 4. Source 15. Transmit Indicator Light 2. Keystone + 9. Introduction Remote Control with Laser Pointer 16 1 2 3 5 4 8 6 10 7 11 9 12 14 13 15 1.
Keystone 10. Resync 13. Freeze 16. Power 3. Digital Zoom 8. Page Up 11. Hide 14. Four Directional Select Keys 6. Menu 5. Laser Button 7. Page Down 12. Laser Pointer 9 ... English Empowering Key 4. Source 15. Transmit Indicator Light 2. Keystone + 9. Introduction Remote Control with Laser Pointer 16 1 2 3 5 4 8 6 10 7 11 9 12 14 13 15 1.
PD120 User's Manual - EN
Page 11
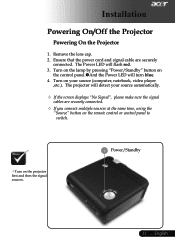
... the power cord and signal cable are securely connected. If you connect multiple sources at the same time, using the "Source" button on the remote control or control panel to switch. Turn on your source automatically. If the screen displays "No Signal", please make sure the signal cables are securely connected. The projector will turn blue. 4. The Power LED will flash red. 3. Installation Powering On/Off the Projector Powering On the Projector 1. Remove the lens cap. 2. Turn on the projector first and then the signal sources. 1 Power/Standby...
... the power cord and signal cable are securely connected. If you connect multiple sources at the same time, using the "Source" button on the remote control or control panel to switch. Turn on your source automatically. If the screen displays "No Signal", please make sure the signal cables are securely connected. The projector will turn blue. 4. The Power LED will flash red. 3. Installation Powering On/Off the Projector Powering On the Projector 1. Remove the lens cap. 2. Turn on the projector first and then the signal sources. 1 Power/Standby...
PD120 User's Manual - EN
Page 12
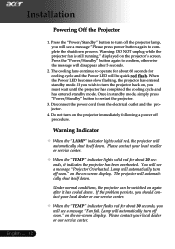
... standby mode. Once in standby mode, simply press "Power/Standby" button to turn off soon." Warning Indicator When the "LAMP" indicator lights solid red, the projector will automatically shut itself down . Under normal conditions, the projector can be quick red flash. Please contact your local reseller or service center. When the "TEMP" indicator lights solid red for about 20 seconds, it has cooled down. on the on -screen display. You will see a message "Projector Overheated. displayed...
... standby mode. Once in standby mode, simply press "Power/Standby" button to turn off soon." Warning Indicator When the "LAMP" indicator lights solid red, the projector will automatically shut itself down . Under normal conditions, the projector can be quick red flash. Please contact your local reseller or service center. When the "TEMP" indicator lights solid red for about 20 seconds, it has cooled down. on the on -screen display. You will see a message "Projector Overheated. displayed...
PD120 User's Manual - EN
Page 16
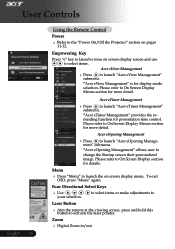
.... User Controls English ... 16 Using the Remote Control Power Refer to launch the press "Menu" again. Please refer to launch "Acer eTimer Management" "Acer eTimer Management" provides the reminding function for details. Please refer to On Screen Display Menus section for more detail. "Acer eOpening Management" allows user to launch "Acer eView Management" "Acer eView Management" is for display mode selection. press and hold this Zoom Digital Zoom...
.... User Controls English ... 16 Using the Remote Control Power Refer to launch the press "Menu" again. Please refer to launch "Acer eTimer Management" "Acer eTimer Management" provides the reminding function for details. Please refer to On Screen Display Menus section for more detail. "Acer eOpening Management" allows user to launch "Acer eView Management" "Acer eView Management" is for display mode selection. press and hold this Zoom Digital Zoom...
PD120 User's Manual - EN
Page 20
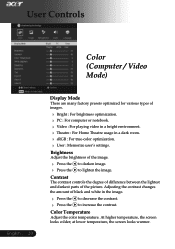
... contrast changes the amount of black and white in a dark room. sRGB : For true-color optimization. User : Memorize user's settings. At higher temperature, the screen looks colder; to increase the contrast. Brightness Adjust the brightness of the picture. Color Temperature Adjust the color temperature. at lower temperature, the screen looks warmer. Contrast The contrast controls the degree of difference between the lightest and darkest parts of the image...
... contrast changes the amount of black and white in a dark room. sRGB : For true-color optimization. User : Memorize user's settings. At higher temperature, the screen looks colder; to increase the contrast. Brightness Adjust the brightness of the picture. Color Temperature Adjust the color temperature. at lower temperature, the screen looks warmer. Contrast The contrast controls the degree of difference between the lightest and darkest parts of the image...
PD120 User's Manual - EN
Page 21
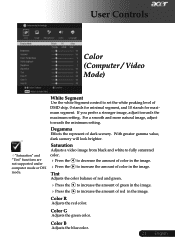
... amount of green in the image. Press the to decrease the amount of color in the image. If you prefer a stronger image, adjust towards the minimum setting. Color R Adjusts the red color. For a smooth and more natural image, adjust towards the maximum setting. to set the white peaking level of DMD chip. 0 stands for minimal segment, and 10 stands for maximum segment. User Controls Color (Computer / Video Mode) White Segment Use the white Segment control to...
... amount of green in the image. Press the to decrease the amount of color in the image. If you prefer a stronger image, adjust towards the minimum setting. Color R Adjusts the red color. For a smooth and more natural image, adjust towards the maximum setting. to set the white peaking level of DMD chip. 0 stands for minimal segment, and 10 stands for maximum segment. User Controls Color (Computer / Video Mode) White Segment Use the white Segment control to...
PD120 User's Manual - EN
Page 22
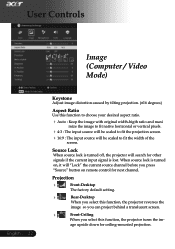
... the projection screen. 16:9 : The input source will be scaled to fit the width of the screen. age upside down for next channel. Source Lock When source lock is lost. User Controls English ... 22 Image (Computer / Video Mode) Keystone Adjust image distortion caused by tilting projection. (±16 degrees) Aspect Ratio Use this function, the projector reverses the image so you can project behind a translucent screen. Front-Ceiling When you press "Source" button on remote control for ceiling-mounted projection.
... the projection screen. 16:9 : The input source will be scaled to fit the width of the screen. age upside down for next channel. Source Lock When source lock is lost. User Controls English ... 22 Image (Computer / Video Mode) Keystone Adjust image distortion caused by tilting projection. (±16 degrees) Aspect Ratio Use this function, the projector reverses the image so you can project behind a translucent screen. Front-Ceiling When you press "Source" button on remote control for ceiling-mounted projection.
PD120 User's Manual - EN
Page 23
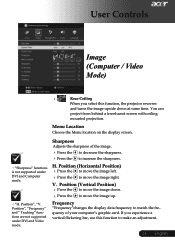
... a vertical flickering bar, use this function, the projector reverses and turns the image upside down . Press the to move the image down at same time. V. Position (Vertical Position) Press the to move the image right. Menu Location Choose the Menu location on the display screen. "Sharpness" functions is not supported under DVI and Video mode. If you select this function to make an adjustment. 23 ... Position...
... a vertical flickering bar, use this function, the projector reverses and turns the image upside down . Press the to move the image down at same time. V. Position (Vertical Position) Press the to move the image right. Menu Location Choose the Menu location on the display screen. "Sharpness" functions is not supported under DVI and Video mode. If you select this function to make an adjustment. 23 ... Position...
PD120 User's Manual - EN
Page 26
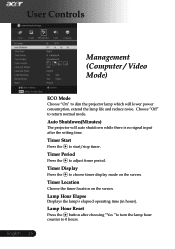
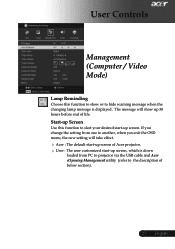
... projector will lower power consumption, extend the lamp life and reduce noise. Timer Location Choose the timer location on the screen. Timer Period Press the to choose timer display mode on the screen. Timer Display Press the to adjust timer period. User Controls Management (Computer / Video Mode) English ... 26 ECO Mode Choose "On" to 0 hours. Lamp Hour Reset Press the button after choosing "Yes "to turn the lamp hour counter to dim the projector lamp which will auto shutdown while there is no signal input after the setting time...
... projector will lower power consumption, extend the lamp life and reduce noise. Timer Location Choose the timer location on the screen. Timer Period Press the to choose timer display mode on the screen. Timer Display Press the to adjust timer period. User Controls Management (Computer / Video Mode) English ... 26 ECO Mode Choose "On" to 0 hours. Lamp Hour Reset Press the button after choosing "Yes "to turn the lamp hour counter to dim the projector lamp which will auto shutdown while there is no signal input after the setting time...
PD120 User's Manual - EN
Page 27
... 30 hours before end of below section). 27 ... User Controls Management (Computer / Video Mode) Lamp Reminding Choose this function to slect your desired start -up screen, which is displayed. If you change the setting from one to another, when you exit the OSD menu, the new setting will show or to hide warning message when the changing lamp message is down loaded from PC to projector via the USB cable and Acer eOpening...
... 30 hours before end of below section). 27 ... User Controls Management (Computer / Video Mode) Lamp Reminding Choose this function to slect your desired start -up screen, which is displayed. If you change the setting from one to another, when you exit the OSD menu, the new setting will show or to hide warning message when the changing lamp message is down loaded from PC to projector via the USB cable and Acer eOpening...
PD120 User's Manual - EN
Page 28
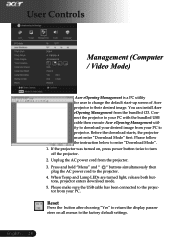
... cord to the factory default settings. English ... 28 Please follow the instruction below to their desired image. User Controls Management (Computer / Video Mode) Acer eOpening Management is a PC utility for user to change the default start-up screen of Acer projector to enter "Download Mode". 1. When Temp and Lamp LEDs are turned light, release both buttons, projector enters download mode. 5. Please make sure the USB cable has been connected to turn off the projector. 2. Before the download starts, the projector must enter "Download Mode" first. If the projector was turned...
... cord to the factory default settings. English ... 28 Please follow the instruction below to their desired image. User Controls Management (Computer / Video Mode) Acer eOpening Management is a PC utility for user to change the default start-up screen of Acer projector to enter "Download Mode". 1. When Temp and Lamp LEDs are turned light, release both buttons, projector enters download mode. 5. Please make sure the USB cable has been connected to turn off the projector. 2. Before the download starts, the projector must enter "Download Mode" first. If the projector was turned...
PD120 User's Manual - EN
Page 29
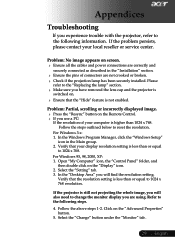
... are using. Problem: Partial, scrolling or incorrectly displayed image. Press the "Resync" button on the Remote Control. If If you will also need to reset the resolution. Open "My Computer" icon, the "Control Panel" folder, and then double click on the "Advanced Properties" button. 5. Select the "Change" button under the "Monitor" tab . 29 ... English Please Make sure you experience trouble with the projector, refer...
... are using. Problem: Partial, scrolling or incorrectly displayed image. Press the "Resync" button on the Remote Control. If If you will also need to reset the resolution. Open "My Computer" icon, the "Control Panel" folder, and then double click on the "Advanced Properties" button. 5. Select the "Change" button under the "Monitor" tab . 29 ... English Please Make sure you experience trouble with the projector, refer...
PD120 User's Manual - EN
Page 30
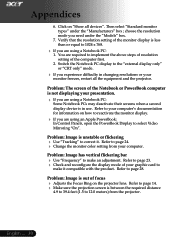
... the projection screen is unstable or flickering Use "Tracking" to make it . English ... 30 Refer to your monitor freezes, restart all devices". Refer to Problem: Image is in changing resolutions or your computer's documentation for information on "Show all the equipment and the projector. Appendices 6. choose the resolution mode you are using an Apple PowerBook: In Control Panels, open the PowerBook Display to...
... the projection screen is unstable or flickering Use "Tracking" to make it . English ... 30 Refer to your monitor freezes, restart all devices". Refer to Problem: Image is in changing resolutions or your computer's documentation for information on "Show all the equipment and the projector. Appendices 6. choose the resolution mode you are using an Apple PowerBook: In Control Panels, open the PowerBook Display to...
PD120 User's Manual - EN
Page 31
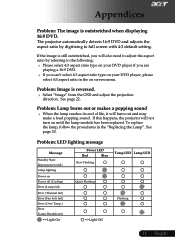
... lighting message Message Standby State (Input power cord) Lamp lighting Power on Power off (Cooling) Error (Lamp fail) Error (Thermal fail) Error (Fan lock fail) Error (Over Temp.) Error (Lamp Breakdown) =>Light On Power LED Red Blue Slow Flashing Quick Flashing =>Light Off Temp LED Lamp LED Flashing 31 ... Problem: Image is outstretched when displaying 16:9 DVD. Appendices Problem: The image is reversed. Select "Image" from the direction. The projector automatically detects 16:9 DVD and adjusts the aspect ratio by referring to full screen with 4:3 default setting...
... lighting message Message Standby State (Input power cord) Lamp lighting Power on Power off (Cooling) Error (Lamp fail) Error (Thermal fail) Error (Fan lock fail) Error (Over Temp.) Error (Lamp Breakdown) =>Light On Power LED Red Blue Slow Flashing Quick Flashing =>Light Off Temp LED Lamp LED Flashing 31 ... Problem: Image is outstretched when displaying 16:9 DVD. Appendices Problem: The image is reversed. Select "Image" from the direction. The projector automatically detects 16:9 DVD and adjusts the aspect ratio by referring to full screen with 4:3 default setting...

PD120 User's Manual - EN
Page 32
will be shown about 10 seconds when lamp life is approaching the end of order. Lamp will automatically turn off soon." Lamp will automatically turn off soon." Appendices Problem: Message Reminders "Lamp is going to deplete. "Projector Overheated. Replacement Suggested!" English ... 32 will be shown when the fan is over heat. "Fan fail. tion. will be shown when the system temperature is out of its useful life in full power opera-
will be shown about 10 seconds when lamp life is approaching the end of order. Lamp will automatically turn off soon." Lamp will automatically turn off soon." Appendices Problem: Message Reminders "Lamp is going to deplete. "Projector Overheated. Replacement Suggested!" English ... 32 will be shown when the fan is over heat. "Fan fail. tion. will be shown when the system temperature is out of its useful life in full power opera-
PD120 User's Manual - EN
Page 33
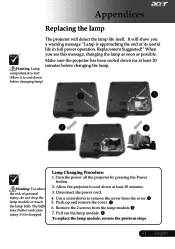
... its useful life in full power operation. Use a screwdriver to cool down before changing the lamp. Push up and remove the cover. 6. Remove the 2 screws from the cover. 5. When you a warning message "Lamp is approaching the end of personal injury, do not drop the lamp module or touch the lamp bulb. Lamp Changing Procedure: 1. Disconnect the power cord. 4. Turn the power off the projector by pressing the Power button. 2. Allow the projector to remove the screw from the lamp...
... its useful life in full power operation. Use a screwdriver to cool down before changing the lamp. Push up and remove the cover. 6. Remove the 2 screws from the cover. 5. When you a warning message "Lamp is approaching the end of personal injury, do not drop the lamp module or touch the lamp bulb. Lamp Changing Procedure: 1. Disconnect the power cord. 4. Turn the power off the projector by pressing the Power button. 2. Allow the projector to remove the screw from the lamp...
PD120 User's Manual - EN
Page 34
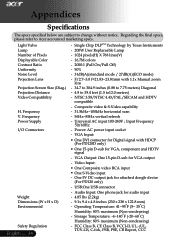
... - 31dB(A)(standard mode / 27dB(A)(ECO mode) Projection Lens - One 5V DC output jack for audio input Weight - 4.85 lbs (2.2kg) Dimensions (W x H x D) Environmental Safety Regulation English ... 34 - 9.1x 9.4 x 4.8 inches (230 x 238 x 122.8 mm) o o - VGA Input: One DVI connector for Digital signal with 1.1x Manual zoom lens Projection Screen Size (Diag.) - 34.7 to 304.9 inches (0.88 to 7.75 meters) Diagonal Projection Distance - 4.9 to 39.4 feet (1.5 to12.0 meters) Video Compatibility - Audio Input: One...
... - 31dB(A)(standard mode / 27dB(A)(ECO mode) Projection Lens - One 5V DC output jack for audio input Weight - 4.85 lbs (2.2kg) Dimensions (W x H x D) Environmental Safety Regulation English ... 34 - 9.1x 9.4 x 4.8 inches (230 x 238 x 122.8 mm) o o - VGA Input: One DVI connector for Digital signal with 1.1x Manual zoom lens Projection Screen Size (Diag.) - 34.7 to 304.9 inches (0.88 to 7.75 meters) Diagonal Projection Distance - 4.9 to 39.4 feet (1.5 to12.0 meters) Video Compatibility - Audio Input: One...


