
PD115 Service Guide
Page 6
Table of Contents Chapter 4 Trouble shooting 30 Video Signal troubleshooting 31 Operation FunctionTroubleshooting 34 Power SourceTroubleshooting 35 Function Test and Alignment 36 Equipment Needed 36 Test Condition...36 Test Display Modes and Patterns 37 Compatible Modes 37 Function Test Display Pattern 38 Chapter 5 Connector Information 40 Introduction...40 Main Board...40 Power Board ...46 Ballast Board ...48 Chapter 6 FRU(FieldReplaceable Unit) List 49 FRU List...50
Table of Contents Chapter 4 Trouble shooting 30 Video Signal troubleshooting 31 Operation FunctionTroubleshooting 34 Power SourceTroubleshooting 35 Function Test and Alignment 36 Equipment Needed 36 Test Condition...36 Test Display Modes and Patterns 37 Compatible Modes 37 Function Test Display Pattern 38 Chapter 5 Connector Information 40 Introduction...40 Main Board...40 Power Board ...46 Ballast Board ...48 Chapter 6 FRU(FieldReplaceable Unit) List 49 FRU List...50
PD115 Service Guide
Page 10
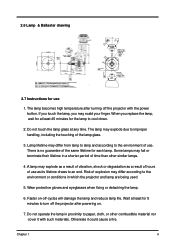
The lamp becomes high temperature after powering on -off the projector with such materials. Lamp lifetime may differ according to an end. Wait at least for 5 minutes to cool down. 2. Do not operate the lamp in a shorter period of explosion may differ from lamp to lamp and according to the environment of use as a result of hours of use 1. Some lamps may explode as a result...
The lamp becomes high temperature after powering on -off the projector with such materials. Lamp lifetime may differ according to an end. Wait at least for 5 minutes to cool down. 2. Do not operate the lamp in a shorter period of explosion may differ from lamp to lamp and according to the environment of use as a result of hours of use 1. Some lamps may explode as a result...
PD115 Service Guide
Page 14
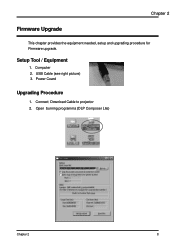
Open burning programma (DLP Composer Lite) Chapter 2 8 USB Cable (see right picture) 3. Power Coard Upgrading Procedure 1. Computer 2. Setup Tool / Equipment 1. Connect Download Cable to projector 2. Chapter 2 Firmware Upgrade This chapter provides the equipment needed, setup and upgrading procedure for Firmware upgrade.
Open burning programma (DLP Composer Lite) Chapter 2 8 USB Cable (see right picture) 3. Power Coard Upgrading Procedure 1. Computer 2. Setup Tool / Equipment 1. Connect Download Cable to projector 2. Chapter 2 Firmware Upgrade This chapter provides the equipment needed, setup and upgrading procedure for Firmware upgrade.
PD115 Service Guide
Page 40
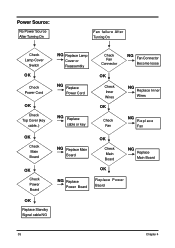
Power Source: No Power Source After Turning On Fan failure After Turning On Check Lamp Cover Switch OK Check Power Cord OK Check Top Cover (key cable..) NG Replace Lamp Cover or Reassembly NG Replace Power Cord NG Replace cable or key Check Fan Connector OK Check Inner Wires OK Check Fan NG Fan Connector Become loose NG Replace Inner Wires NG Replace Fan OK Check Main Board OK Check Power Board NG Replace Main Board OK Check Main Board OK NG Replace Main Board NG Replace Power Board Replace Power Baord OK Replace Standby Signal cable NG 35 Chapter 4
Power Source: No Power Source After Turning On Fan failure After Turning On Check Lamp Cover Switch OK Check Power Cord OK Check Top Cover (key cable..) NG Replace Lamp Cover or Reassembly NG Replace Power Cord NG Replace cable or key Check Fan Connector OK Check Inner Wires OK Check Fan NG Fan Connector Become loose NG Replace Inner Wires NG Replace Fan OK Check Main Board OK Check Power Board NG Replace Main Board OK Check Main Board OK NG Replace Main Board NG Replace Power Board Replace Power Baord OK Replace Standby Signal cable NG 35 Chapter 4
PD115 User's Guide EN
Page 1
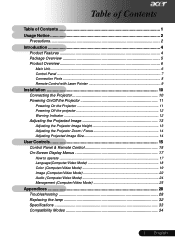
... Connection Ports ...8 Remote Control with Laser Pointer 9 Installation 10 Connecting the Projector 10 Powering On/Off the Projector 11 Powering On the Projector 11 Powering Off the projector 12 Warning Indicator ...12 Adjusting the Projected Image 13 Adjusting the Projector Image Height 13 Adjusting the Projector Zoom / Focus 14 Adjusting Projected Image Size 14 User Controls 15 Control Panel & Remote Control 15 On-Screen Display Menus 17 How to operate ...17 Language(Computer/Video Mode 18 Color (Computer/Video Mode 19 Image (Computer/Video Mode 22 Audio (Computer/Video Mode...
... Connection Ports ...8 Remote Control with Laser Pointer 9 Installation 10 Connecting the Projector 10 Powering On/Off the Projector 11 Powering On the Projector 11 Powering Off the projector 12 Warning Indicator ...12 Adjusting the Projected Image 13 Adjusting the Projector Image Height 13 Adjusting the Projector Zoom / Focus 14 Adjusting Projected Image Size 14 User Controls 15 Control Panel & Remote Control 15 On-Screen Display Menus 17 How to operate ...17 Language(Computer/Video Mode 18 Color (Computer/Video Mode 19 Image (Computer/Video Mode 22 Audio (Computer/Video Mode...
PD115 User's Guide EN
Page 2
... out and may hurt your unit. Please be sure to page 26). Usage Notice Precautions Follow all changing instructions. Reset the "Lamp Hour Reset" function from the On Screen Display "Management" menu after replacing the lamp module (refer to change the lamp when it will detect the life of its cooling cycle before disconnecting power. When switching the projector off, please ensure the projector completes its life, it shows warning messages.
... out and may hurt your unit. Please be sure to page 26). Usage Notice Precautions Follow all changing instructions. Reset the "Lamp Hour Reset" function from the On Screen Display "Management" menu after replacing the lamp module (refer to change the lamp when it will detect the life of its cooling cycle before disconnecting power. When switching the projector off, please ensure the projector completes its life, it shows warning messages.
PD115 User's Guide EN
Page 9
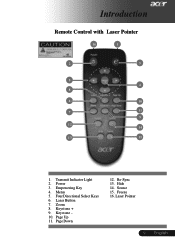
Empowering Key 4. Keystone 10. Hide 14. Laser Pointer 9 ... English Laser Button 7. Zoom 8. Keystone + 9. Page Up 11. Power 3. Re-Sync 13. Source 15. Four Directional Select Keys 6. Menu 5. Page Down 12. Introduction Remote Control with Laser Pointer 16 1 2 3 5 4 8 6 10 7 11 9 12 14 13 15 1. Freeze 16. Transmit Indicator Light 2.
Empowering Key 4. Keystone 10. Hide 14. Laser Pointer 9 ... English Laser Button 7. Zoom 8. Keystone + 9. Page Up 11. Power 3. Re-Sync 13. Source 15. Four Directional Select Keys 6. Menu 5. Page Down 12. Introduction Remote Control with Laser Pointer 16 1 2 3 5 4 8 6 10 7 11 9 12 14 13 15 1. Freeze 16. Transmit Indicator Light 2.
PD115 User's Guide EN
Page 11
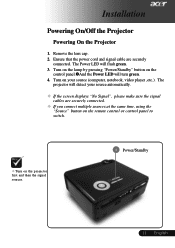
... remote control or control panel to switch. ™ Turn on the projector first and then the signal sources. 1 Power/Standby 11 ... Turn on the control panel.nAnd the Power LED will turn green. 4. The Power LED will detect your source (computer, notebook, video player ,etc.). Turn on the lamp by pressing "Power/Standby" button on your source automatically. ™ If the screen displays "No Signal", please make sure the signal cables are securely connected. The projector will flash green. 3. Installation Powering On/Off the Projector Powering On the Projector 1. Remove the lens...
... remote control or control panel to switch. ™ Turn on the projector first and then the signal sources. 1 Power/Standby 11 ... Turn on the control panel.nAnd the Power LED will turn green. 4. The Power LED will detect your source (computer, notebook, video player ,etc.). Turn on the lamp by pressing "Power/Standby" button on your source automatically. ™ If the screen displays "No Signal", please make sure the signal cables are securely connected. The projector will flash green. 3. Installation Powering On/Off the Projector Powering On the Projector 1. Remove the lens...
PD115 User's Guide EN
Page 12
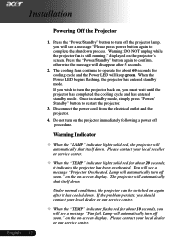
... must wait until the projector has completed the cooling cycle and has entered standby mode. When the Power LED begins flashing, the projector has entered standby mode. Warning Indicator ™ When the "LAMP" indicator lights solid red, the projector will keep green. If you wish to restart the projector. 3. Installation English ... 12 Powering Off the Projector 1. on the on , you will automatically shut itself down . Lamp will automatically turn the projector back on -screen display. The projector will see a message "Projector Overheated.
... must wait until the projector has completed the cooling cycle and has entered standby mode. When the Power LED begins flashing, the projector has entered standby mode. Warning Indicator ™ When the "LAMP" indicator lights solid red, the projector will keep green. If you wish to restart the projector. 3. Installation English ... 12 Powering Off the Projector 1. on the on , you will automatically shut itself down . Lamp will automatically turn the projector back on -screen display. The projector will see a message "Projector Overheated.

PD115 User's Guide EN
Page 16
... an USB cable. User Controls English ... 16 Using the Remote Control Power 4 Refer to the "Power On/Off the Projector" section on screen display menu. to select items or make adjustments to Laser Button 4 Aim the remote at the viewing screen, press and hold this button to choose RGB, Component-p, Component-i, S-Video, Composite Video , DVI-D (Optional)and HDTV sources. Freeze 4 Press "Freeze" to the input source. Re-Sync 4 Automatically synchronizes the projector to pause the screen image. This...
... an USB cable. User Controls English ... 16 Using the Remote Control Power 4 Refer to the "Power On/Off the Projector" section on screen display menu. to select items or make adjustments to Laser Button 4 Aim the remote at the viewing screen, press and hold this button to choose RGB, Component-p, Component-i, S-Video, Composite Video , DVI-D (Optional)and HDTV sources. Freeze 4 Press "Freeze" to the input source. Re-Sync 4 Automatically synchronizes the projector to pause the screen image. This...
PD115 User's Guide EN
Page 19
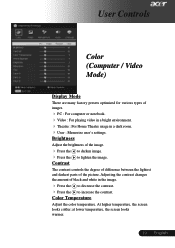
... Adjust the brightness of the picture. Color Temperature Adjust the color temperature. to lighten the image. at lower temperature, the screen looks warmer. 19 ... Adjusting the contrast changes the amount of black and white in a dark room. 4 User : Memorize user's settings. English The contrast controls the degree of difference between the lightest and darkest parts of the image. 4 Press the 4 Press the Contrast to darken image. User Controls Color (Computer / Video Mode) Display Mode There are many factory...
... Adjust the brightness of the picture. Color Temperature Adjust the color temperature. to lighten the image. at lower temperature, the screen looks warmer. 19 ... Adjusting the contrast changes the amount of black and white in a dark room. 4 User : Memorize user's settings. English The contrast controls the degree of difference between the lightest and darkest parts of the image. 4 Press the 4 Press the Contrast to darken image. User Controls Color (Computer / Video Mode) Display Mode There are many factory...
PD115 User's Guide EN
Page 20
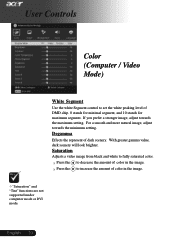
... decrease the amount of color in the image. English ... 20 Degamma Effects the represent of DMD chip. 0 stands for minimal segment, and 10 stands for maximum segment. With greater gamma value, dark scenery will look brighter. For a smooth and more natural image, adjust towards the maximum setting. User Controls Color (Computer / Video Mode) White Segment Use the white Segment control to set the white peaking level of dark...
... decrease the amount of color in the image. English ... 20 Degamma Effects the represent of DMD chip. 0 stands for minimal segment, and 10 stands for maximum segment. With greater gamma value, dark scenery will look brighter. For a smooth and more natural image, adjust towards the maximum setting. User Controls Color (Computer / Video Mode) White Segment Use the white Segment control to set the white peaking level of dark...
PD115 User's Guide EN
Page 25
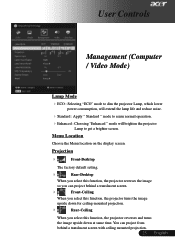
English You can project behind a translucent screen with ceiling mounted projection. 25 ... User Controls Management (Computer / Video Mode) Lamp Mode 4ECO : Selecting "ECO" mode to dim the projector Lamp, which lower power consumption, will extend the lamp life and reduce noise. 4Standard : Apply " Standard " mode to reurn normal operation. 4Enhanced : Choosing "Enhanced " mode will brighten the projector Lamp to get a brighter screen. Menu Location Choose the Menu location on the display screen. Projection 4 Front-Desktop The factory default setting. 4 Rear-Desktop When ...
English You can project behind a translucent screen with ceiling mounted projection. 25 ... User Controls Management (Computer / Video Mode) Lamp Mode 4ECO : Selecting "ECO" mode to dim the projector Lamp, which lower power consumption, will extend the lamp life and reduce noise. 4Standard : Apply " Standard " mode to reurn normal operation. 4Enhanced : Choosing "Enhanced " mode will brighten the projector Lamp to get a brighter screen. Menu Location Choose the Menu location on the display screen. Projection 4 Front-Desktop The factory default setting. 4 Rear-Desktop When ...

PD115 User's Guide EN
Page 26
User Controls Management (Computer / Video Mode) English ... 26 Source Lock When source lock is turned off, the projector will take effect. 4 Acer : The default start-up screen of below section). Lamp Hour Reset Press the button after choosing "Yes "to turn the lamp hour counter to slect your desired start -up 30 hours before end of life. Start-up Screen utility (refer to the description of Acer projector. 4 User : The user customized start -up screen. If you change the setting from PC to projector via the USB cable and...
User Controls Management (Computer / Video Mode) English ... 26 Source Lock When source lock is turned off, the projector will take effect. 4 Acer : The default start-up screen of below section). Lamp Hour Reset Press the button after choosing "Yes "to turn the lamp hour counter to slect your desired start -up 30 hours before end of life. Start-up Screen utility (refer to the description of Acer projector. 4 User : The user customized start -up screen. If you change the setting from PC to projector via the USB cable and...

PD115 User's Guide EN
Page 27
.... When "Temp" and "Lamp" LEDs turn off the projector. 3. If the AC power cord of projector was unplugged, plug the AC power. 2. English Connect the projector to your PC with the bundled USB cable then execute My Start-up Screen utility to turn on all the fan of the projector was shut down and the "Power" LED is a PC utility for user to change the default start-up screen of Acer projector to enter "Download Mode". 1. Reset Press the button after choosing...
.... When "Temp" and "Lamp" LEDs turn off the projector. 3. If the AC power cord of projector was unplugged, plug the AC power. 2. English Connect the projector to your PC with the bundled USB cable then execute My Start-up Screen utility to turn on all the fan of the projector was shut down and the "Power" LED is a PC utility for user to change the default start-up screen of Acer projector to enter "Download Mode". 1. Reset Press the button after choosing...
PD115 User's Guide EN
Page 28
...-Sync" button on the Remote Control. 4 If you use a PC: If the resolution of connectors are using. For Windows 95, 98, 2000, XP: 1. In the "Desktop Area" you will also need to 1024 x 768. Follow the above steps 1-2. Click on the "Display" icon. 2. Please refer to the "Replacing the lamp" section. 4 Make sure you have removed the lens cap and the projector is switched on screen...
...-Sync" button on the Remote Control. 4 If you use a PC: If the resolution of connectors are using. For Windows 95, 98, 2000, XP: 1. In the "Desktop Area" you will also need to 1024 x 768. Follow the above steps 1-2. Click on the "Display" icon. 2. Please refer to the "Replacing the lamp" section. 4 Make sure you have removed the lens cap and the projector is switched on screen...
PD115 User's Guide EN
Page 29
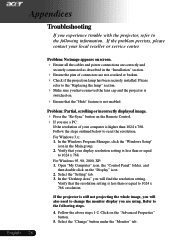
... are using a Notebook PC: 1. Problem: Image is out of the Notebook or PowerBook computer is not displaying your computer's documentation for information on how to page 23. 4 Change the monitor color setting from the projector. 29 ... Click on the projector lens. Refer to your presentation. 4 If you are using an Apple PowerBook: In Control Panels, open the PowerBook Display to page 22. 4 Check and reconfigure the display mode...
... are using a Notebook PC: 1. Problem: Image is out of the Notebook or PowerBook computer is not displaying your computer's documentation for information on how to page 23. 4 Change the monitor color setting from the projector. 29 ... Click on the projector lens. Refer to your presentation. 4 If you are using an Apple PowerBook: In Control Panels, open the PowerBook Display to page 22. 4 Check and reconfigure the display mode...
PD115 User's Guide EN
Page 30
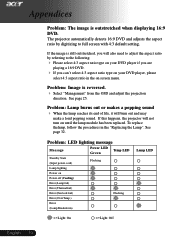
.... Problem: LED lighting message Message Power LED Temp LED Green Standby State (Input power cord) Flashing Lamp lighting Power on screen menu. Problem: Lamp burns out or makes a popping sound 4 When the lamp reaches its end of life, it will not turn on until the lamp module has been replaced. See page 25. If this happens, the projector will burn out and may make a loud popping sound. If the image is reversed. 4 Select "Management" from the OSD and adjust the projection direction. To replace...
.... Problem: LED lighting message Message Power LED Temp LED Green Standby State (Input power cord) Flashing Lamp lighting Power on screen menu. Problem: Lamp burns out or makes a popping sound 4 When the lamp reaches its end of life, it will not turn on until the lamp module has been replaced. See page 25. If this happens, the projector will burn out and may make a loud popping sound. If the image is reversed. 4 Select "Management" from the OSD and adjust the projection direction. To replace...

PD115 User's Guide EN
Page 31
English will be shown when the system temperature is over heat. 4 "Fan fail. Replacement Suggested!" will automatically turn off soon." will automatically turn off soon." Lamp will be shown about 10 seconds when lamp life is going to deplete. 4 "Projector Overheated. Appendices Problem: Message Reminders 4 "Lamp is approaching the end of order. 31 ... Lamp will be shown when the fan is out of its useful life in full power operation.
English will be shown when the system temperature is over heat. 4 "Fan fail. Replacement Suggested!" will automatically turn off soon." will automatically turn off soon." Lamp will be shown about 10 seconds when lamp life is going to deplete. 4 "Projector Overheated. Appendices Problem: Message Reminders 4 "Lamp is approaching the end of order. 31 ... Lamp will be shown when the fan is out of its useful life in full power operation.
PD115 User's Guide EN
Page 33
... change without notice. Light Valve Lamp Number of Pixels Displayable Color Contrast Ratio Uniformity Noise Level Projection Lens Projection Screen Size (Diag.) Projection Distance Video Compatibility H. Operating Temperature: 41~95oF (5~ 35oC) Humidity: 80% maximum (Non-condensing) - FCC Class B, CE Class B, VCCI-II, UL, cUL, TÜV-GS, C-tick, PSB, PSE, CB Report, CCC 33 ... VGA Output: One 15-pin D-sub for remote project control - English Audio Input: One phone jack for remote computer control - Frequency V. USB...
... change without notice. Light Valve Lamp Number of Pixels Displayable Color Contrast Ratio Uniformity Noise Level Projection Lens Projection Screen Size (Diag.) Projection Distance Video Compatibility H. Operating Temperature: 41~95oF (5~ 35oC) Humidity: 80% maximum (Non-condensing) - FCC Class B, CE Class B, VCCI-II, UL, cUL, TÜV-GS, C-tick, PSB, PSE, CB Report, CCC 33 ... VGA Output: One 15-pin D-sub for remote project control - English Audio Input: One phone jack for remote computer control - Frequency V. USB...


