

User Manual
Page 4
... pin is not properly grounded may interfere with the performance of this product where people will probably cause unexpected short current or damage rotor devices, lamp. If you are used with a three-wire grounded plug. The overall system load must not exceed 80% of power indicated on the marking label. Do...
... pin is not properly grounded may interfere with the performance of this product where people will probably cause unexpected short current or damage rotor devices, lamp. If you are used with a three-wire grounded plug. The overall system load must not exceed 80% of power indicated on the marking label. Do...
User Manual
Page 5
... eyes. • Turn on . Additional safety information • Do not look into the product • the product was spilled into the projector's lens when the lamp is necessary. • Locations where temperatures may become excessively high, such as opening or removing covers may expose you to dangerous voltage points or other...
... eyes. • Turn on . Additional safety information • Do not look into the product • the product was spilled into the projector's lens when the lamp is necessary. • Locations where temperatures may become excessively high, such as opening or removing covers may expose you to dangerous voltage points or other...
User Manual
Page 6
...lamp temporarily, press HIDE on the remote control. • The lamp ...in the OSD after replacing the lamp module. • Do not...look into the ventilation slots while the lamp is over causing injury and damaging the ...it regularly to the lamp failing. • Never replace the lamp assembly or any electronic ...Replace the lamp as soon as the heat from the lamp may lead ...lamp, allow the unit to cool down, and follow the instructions included with the replacement lamp. • Reset the lamp timer from Management > Lamp... the lamp assembly for replacement. • Do not operate the lamp for ...
...lamp temporarily, press HIDE on the remote control. • The lamp ...in the OSD after replacing the lamp module. • Do not...look into the ventilation slots while the lamp is over causing injury and damaging the ...it regularly to the lamp failing. • Never replace the lamp assembly or any electronic ...Replace the lamp as soon as the heat from the lamp may lead ...lamp, allow the unit to cool down, and follow the instructions included with the replacement lamp. • Reset the lamp timer from Management > Lamp... the lamp assembly for replacement. • Do not operate the lamp for ...
User Manual
Page 7
...Waste from Electrical and Electronics Equipment (WEEE) regulations, visit http://www.acer-group.com/public/Sustainability/sustainability01.htm Mercury advisory For projectors or electronic products containing an LCD/CRT monitor or display: "Lamp(s) contain Mercury, Dispose Properly." To minimize pollution and ensure utmost ...protection of according to local, state or federal laws. For lamp-specific disposal information, check www.lamprecycle.org vii Caution when listening to audio To protect your hearing, follow these...
...Waste from Electrical and Electronics Equipment (WEEE) regulations, visit http://www.acer-group.com/public/Sustainability/sustainability01.htm Mercury advisory For projectors or electronic products containing an LCD/CRT monitor or display: "Lamp(s) contain Mercury, Dispose Properly." To minimize pollution and ensure utmost ...protection of according to local, state or federal laws. For lamp-specific disposal information, check www.lamprecycle.org vii Caution when listening to audio To protect your hearing, follow these...
User Manual
Page 8
... moistened with mild detergent to clean the display housing. • Disconnect the power plug from the Onscreen display "Management" menu after replacing the lamp module. • When switching the projector off the product before disconnecting power. • Turn on the projector first and then the signal sources...first Usage Notes Do: • Turn off , please ensure the projector completes its life, it shows warning messages. • Reset the "Lamp Hour Reset" function from AC outlet if the product is not being used for ventilation. • Use abrasive cleaners, waxes or solvents to...
... moistened with mild detergent to clean the display housing. • Disconnect the power plug from the Onscreen display "Management" menu after replacing the lamp module. • When switching the projector off the product before disconnecting power. • Turn on the projector first and then the signal sources...first Usage Notes Do: • Turn off , please ensure the projector completes its life, it shows warning messages. • Reset the "Lamp Hour Reset" function from AC outlet if the product is not being used for ventilation. • Use abrasive cleaners, waxes or solvents to...

User Manual
Page 10
Troubleshooting 28 LED & Alarm Definition Listing 32 Cleaning and replacing the dust filters 33 Replacing the Lamp 34 Ceiling Mount Installation 36 Specifications 39 Compatibility modes 41 Regulations and safety notices 45
Troubleshooting 28 LED & Alarm Definition Listing 32 Cleaning and replacing the dust filters 33 Replacing the Lamp 34 Ceiling Mount Installation 36 Specifications 39 Compatibility modes 41 Regulations and safety notices 45
User Manual
Page 11
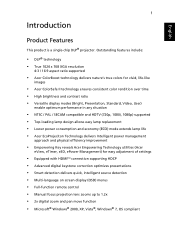
...) enable optimum performance in any situation • NTSC / PAL / SECAM compatible and HDTV (720p, 1080i, 1080p) supported • Top-loading lamp design allows easy lamp replacement • Lower power consumption and economy (ECO) mode extends lamp life • Acer EcoProjeciton Technology delivers Intelligent power management approach and physical efficiency improvement • Empowering Key reveals...
...) enable optimum performance in any situation • NTSC / PAL / SECAM compatible and HDTV (720p, 1080i, 1080p) supported • Top-loading lamp design allows easy lamp replacement • Lower power consumption and economy (ECO) mode extends lamp life • Acer EcoProjeciton Technology delivers Intelligent power management approach and physical efficiency improvement • Empowering Key reveals...
User Manual
Page 12
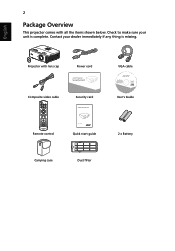
English 2 Package Overview This projector comes with lens cap Power cord Acer Projector Security Card Composite video cable Security card VGA cable P7215/F217/PF-X16/ P7213/F213/PF-X14 Series P/N:MC.JEJ11.002 User's Guide Remote control Quick start guide 2 x Battery Carrying case Dust filter SOURCE TEMP RESYNC LAMP MENU Projector with all the items shown below. Check to make sure your dealer immediately if any thing is complete. Contact your unit is missing.
English 2 Package Overview This projector comes with lens cap Power cord Acer Projector Security Card Composite video cable Security card VGA cable P7215/F217/PF-X16/ P7213/F213/PF-X14 Series P/N:MC.JEJ11.002 User's Guide Remote control Quick start guide 2 x Battery Carrying case Dust filter SOURCE TEMP RESYNC LAMP MENU Projector with all the items shown below. Check to make sure your dealer immediately if any thing is complete. Contact your unit is missing.
User Manual
Page 13
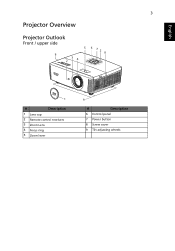
English 3 Projector Overview Projector Outlook Front / upper side 8 234 TEMP 5 6 72 8 SOURCE RESYNC LAMP MENU 1 # Description 1 Lens cap 2 Remote control receivers 3 Zoom Lens 4 Focus ring 5 Zoom lever 9 # Description 6 Control panel 7 Power button 8 Screw cover 9 Tilt adjusting wheels
English 3 Projector Overview Projector Outlook Front / upper side 8 234 TEMP 5 6 72 8 SOURCE RESYNC LAMP MENU 1 # Description 1 Lens cap 2 Remote control receivers 3 Zoom Lens 4 Focus ring 5 Zoom lever 9 # Description 6 Control panel 7 Power button 8 Screw cover 9 Tilt adjusting wheels
User Manual
Page 15
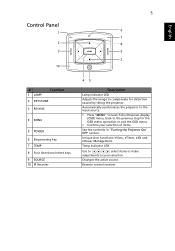
... 2 KEYSTONE 3 RESYNC 4 MENU 5 POWER 6 Empowering key 7 TEMP 8 Four directional select keys 9 SOURCE 10 IR Recevier 45 Description Lamp Indicator LED Adjusts the image to the previous step for distortion caused by tilting the projector. Remote control receiver. Automatically synchronizes the projector to the ... Indicator LED Use to select items or make adjustments to your selection of items. See the contents in "Turning the Projector On/ Off" section. Unique Acer functions: eView, eTimer, e3D and ePower Management.
... 2 KEYSTONE 3 RESYNC 4 MENU 5 POWER 6 Empowering key 7 TEMP 8 Four directional select keys 9 SOURCE 10 IR Recevier 45 Description Lamp Indicator LED Adjusts the image to the previous step for distortion caused by tilting the projector. Remote control receiver. Automatically synchronizes the projector to the ... Indicator LED Use to select items or make adjustments to your selection of items. See the contents in "Turning the Projector On/ Off" section. Unique Acer functions: eView, eTimer, e3D and ePower Management.
User Manual
Page 19
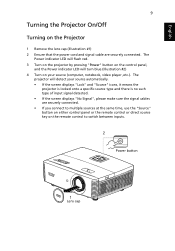
... that the power cord and signal cable are securely connected. • If you connect to switch between inputs. 2 Power button SOURCE 1 Lens cap TEMP RESYNC LAMP MENU
... that the power cord and signal cable are securely connected. • If you connect to switch between inputs. 2 Power button SOURCE 1 Lens cap TEMP RESYNC LAMP MENU

User Manual
Page 20
...center. Note: Whenever the projector automatically shuts down , and the LED temp indicator will automatically turn solid red. Lamp will turn off soon." The lamp with automatically turn off, the projector will automatically turn the projector off, press the power button. This message ... button again to unplug the power cord. Contact your local dealer or service center. • "Fan failed. Lamp will automatically shut down and the LED lamp indicator turns solid red, contact your local reseller or service center. Warning indicators: • "Projector Overheated. This...
...center. Note: Whenever the projector automatically shuts down , and the LED temp indicator will automatically turn solid red. Lamp will turn off soon." The lamp with automatically turn off, the projector will automatically turn the projector off, press the power button. This message ... button again to unplug the power cord. Contact your local dealer or service center. • "Fan failed. Lamp will automatically shut down and the LED lamp indicator turns solid red, contact your local reseller or service center. Warning indicators: • "Projector Overheated. This...
User Manual
Page 35
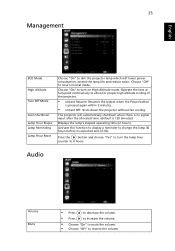
...hours before its expected end-of the projector. • Instant Resume: Resumes the system when the Power button is 120 minutes) Displays the lamp's elapsed operating time (in hours). Activate this function to display a reminder to turn on High Altitude mode. Audio Volume Mute • ...to increase the volume. • Choose "On" to mute the volume. • Choose "Off" to return normal mode. Choose "On" to turn the lamp hour counter to allow for proper high altitude cooling of -life. Operate the fans at full speed continuously to 0 hours. Choose "Off" to restore the...
...hours before its expected end-of the projector. • Instant Resume: Resumes the system when the Power button is 120 minutes) Displays the lamp's elapsed operating time (in hours). Activate this function to display a reminder to turn on High Altitude mode. Audio Volume Mute • ...to increase the volume. • Choose "On" to mute the volume. • Choose "Off" to return normal mode. Choose "On" to turn the lamp hour counter to allow for proper high altitude cooling of -life. Operate the fans at full speed continuously to 0 hours. Choose "Off" to restore the...
User Manual
Page 38
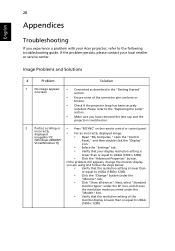
... appears, change the monitor display you are bent or broken. • Check if the projector lamp has been securely installed. 28 Appendices English Troubleshooting If you experience a problem with your Acer projector, refer to the "Replacing the Lamp" section. • Make sure you have removed the lens cap and the projector is switched...
... appears, change the monitor display you are bent or broken. • Check if the projector lamp has been securely installed. 28 Appendices English Troubleshooting If you experience a problem with your Acer projector, refer to the "Replacing the Lamp" section. • Make sure you have removed the lens cap and the projector is switched...
User Manual
Page 40
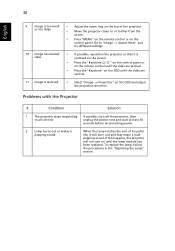
...remote control until the sides are vertical. • Select "Image --> Projection" on the control panel. To replace the lamp, follow the procedures in the "Replacing the Lamp" section. Problems with the Projector # Condition Solution 1 The projector stops responding If possible, turn off the projector, then... to all controls unplug the power cord and wait at least 30 seconds before reconnecting power. 2 Lamp burns out or makes a popping sound When the lamp reaches the end of the projector. • Move the projector closer to "Image --> Aspect Ratio" and try ...
...remote control until the sides are vertical. • Select "Image --> Projection" on the control panel. To replace the lamp, follow the procedures in the "Replacing the Lamp" section. Problems with the Projector # Condition Solution 1 The projector stops responding If possible, turn off the projector, then... to all controls unplug the power cord and wait at least 30 seconds before reconnecting power. 2 Lamp burns out or makes a popping sound When the lamp reaches the end of the projector. • Move the projector closer to "Image --> Aspect Ratio" and try ...
User Manual
Page 41
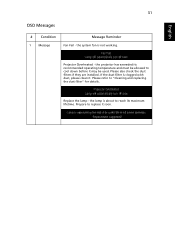
English 31 OSD Messages # Condition 1 Message Message Reminder Fan Fail - Please also check the dust filters if they are installed. Prepare to replace it . Projector Overheated - If the dust filter is clogged with dust, please clean it soon. the projector has exceeded its maximum lifetime. Replace the lamp - the lamp is not working. the system fan is about to reach its recommended operating temperature and must be allowed to "Cleaning and replacing the dust filter" for details. Please refer to cool down before it may be used.
English 31 OSD Messages # Condition 1 Message Message Reminder Fan Fail - Please also check the dust filters if they are installed. Prepare to replace it . Projector Overheated - If the dust filter is clogged with dust, please clean it soon. the projector has exceeded its maximum lifetime. Replace the lamp - the lamp is not working. the system fan is about to reach its recommended operating temperature and must be allowed to "Cleaning and replacing the dust filter" for details. Please refer to cool down before it may be used.
User Manual
Page 42
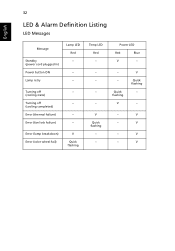
Turning off -- (cooling state) Turning off -- (cooling completed) Error (thermal failure) -- Quick flashing V V Quick flashing -- -- -- Error (fan lock failure) -- Power LED Red Blue V -- --- V -- V Quick flashing --- Error (lamp breakdown) Error (color wheel fail) V Quick flashing Temp LED Red -- --- -- -- V -- V 32 English LED & Alarm Definition Listing LED Messages Message Standby (power cord plugged in) Power button ON Lamp retry Lamp LED Red -- --- V --
Turning off -- (cooling state) Turning off -- (cooling completed) Error (thermal failure) -- Quick flashing V V Quick flashing -- -- -- Error (fan lock failure) -- Power LED Red Blue V -- --- V -- V Quick flashing --- Error (lamp breakdown) Error (color wheel fail) V Quick flashing Temp LED Red -- --- -- -- V -- V 32 English LED & Alarm Definition Listing LED Messages Message Standby (power cord plugged in) Power button ON Lamp retry Lamp LED Red -- --- V --
User Manual
Page 44
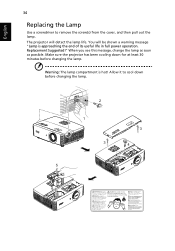
.... Make sure the projector has been cooling down before changing the lamp. You will detect the lamp life. SOURCE 5 TEMP LAMP MENU RESYNC 2 1 3 6 3 4 Warning: The lamp compartment is approaching the end of its useful life in full power operation. English 34 Replacing the Lamp Use a screwdriver to cool down for at least 30 minutes before...
.... Make sure the projector has been cooling down before changing the lamp. You will detect the lamp life. SOURCE 5 TEMP LAMP MENU RESYNC 2 1 3 6 3 4 Warning: The lamp compartment is approaching the end of its useful life in full power operation. English 34 Replacing the Lamp Use a screwdriver to cool down for at least 30 minutes before...
User Manual
Page 45
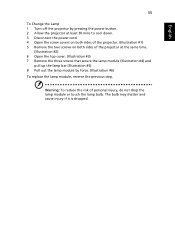
... the same time. (Illustration #2) 6 Open the top cover. (Illustration #3) 7 Remove the three screws that secure the lamp module (Illustration #4) and pull up the lamp bar.(Illustration #5) 8 Pull out the lamp module by force. (Illustration #6) To replace the lamp module, reverse the previous step. Warning: To reduce the risk of the projector at least 30...
... the same time. (Illustration #2) 6 Open the top cover. (Illustration #3) 7 Remove the three screws that secure the lamp module (Illustration #4) and pull up the lamp bar.(Illustration #5) 8 Pull out the lamp module by force. (Illustration #6) To replace the lamp module, reverse the previous step. Warning: To reduce the risk of the projector at least 30...
User Manual
Page 49
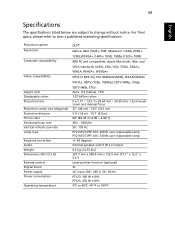
...colors Projection lens Projection screen size (diagonal) Projection distance Throw ratio Horizontal scan rate Vertical refresh scan rate Lamp type Keystone correction Audio Weight Dimensions (W x D x H) Remote control Digital Zoom Power supply Power ...(6.0 m) 60" @2.44 m (2.00 ~ 2.40:1) 30 k - 100 kHz 50 - 120 Hz P7213/F213/PF-X14: 300 W user-replaceable lamp P7215/F217/PF-X16: 330 W user-replaceable lamp +/- 40 degrees Internal speaker with 5 W x 2 output 6.5 kg (14.33 Ibs.) 397.7 mm x 309.4 mm x 125.9 mm (15...For final specs, please refer to Acer's published marketing specifications.
...colors Projection lens Projection screen size (diagonal) Projection distance Throw ratio Horizontal scan rate Vertical refresh scan rate Lamp type Keystone correction Audio Weight Dimensions (W x D x H) Remote control Digital Zoom Power supply Power ...(6.0 m) 60" @2.44 m (2.00 ~ 2.40:1) 30 k - 100 kHz 50 - 120 Hz P7213/F213/PF-X14: 300 W user-replaceable lamp P7215/F217/PF-X16: 330 W user-replaceable lamp +/- 40 degrees Internal speaker with 5 W x 2 output 6.5 kg (14.33 Ibs.) 397.7 mm x 309.4 mm x 125.9 mm (15...For final specs, please refer to Acer's published marketing specifications.


