User Manual
Page 3
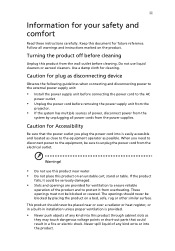
... dangerous voltage points or short-out parts that the power outlet you need to disconnect power to the equipment, be blocked or covered. Use a damp cloth for your safety and comfort Read these instructions carefully. Warnings! • Do not use liquid cleaners or aerosol cleaners. Keep this product on the product. Follow all power cords from the system by placing the...
... dangerous voltage points or short-out parts that the power outlet you need to disconnect power to the equipment, be blocked or covered. Use a damp cloth for your safety and comfort Read these instructions carefully. Warnings! • Do not use liquid cleaners or aerosol cleaners. Keep this product on the product. Follow all power cords from the system by placing the...
User Manual
Page 5
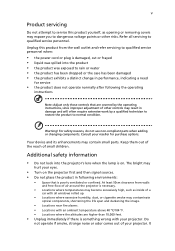
... your projector. Keep them out of the reach of your reseller for service • the product does not operate normally after following the operating instructions Note: Adjust only those controls that are higher than 10,000 feet. • Unplug immediately if there is necessary. • Locations where temperatures may become excessively high, such as opening or removing covers may contain small parts. Do not operate if...
... your projector. Keep them out of the reach of your reseller for service • the product does not operate normally after following the operating instructions Note: Adjust only those controls that are higher than 10,000 feet. • Unplug immediately if there is necessary. • Locations where temperatures may become excessively high, such as opening or removing covers may contain small parts. Do not operate if...
User Manual
Page 6
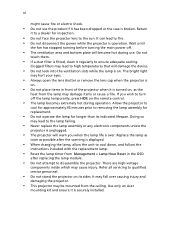
... a dust filter is broken. Wait until the fan has stopped running before turning the main power off the lamp temporarily, press HIDE on . • Do not place items in the OSD after the warning is displayed. • When changing the lamp, allow the unit to high temperatures that will become hot during operation. Use only an Acer mounting kit and ensure it is on the remote control...
... a dust filter is broken. Wait until the fan has stopped running before turning the main power off the lamp temporarily, press HIDE on . • Do not place items in the OSD after the warning is displayed. • When changing the lamp, allow the unit to high temperatures that will become hot during operation. Use only an Acer mounting kit and ensure it is on the remote control...
User Manual
Page 8
... Notes Do: • Turn off , please ensure the projector completes its life, it shows warning messages. • Reset the "Lamp Hour Reset" function from the Onscreen display "Management" menu after replacing the lamp module. • When switching the projector off the product before disconnecting power. • Turn on the projector first and then the signal sources. • Do not use lens cap when projector is in this user's guide to maximize the life of your eyes...
... Notes Do: • Turn off , please ensure the projector completes its life, it shows warning messages. • Reset the "Lamp Hour Reset" function from the Onscreen display "Management" menu after replacing the lamp module. • When switching the projector off the product before disconnecting power. • Turn on the projector first and then the signal sources. • Do not use lens cap when projector is in this user's guide to maximize the life of your eyes...
User Manual
Page 9
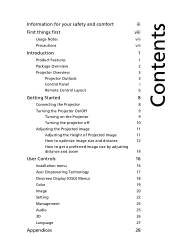
... 2 Projector Overview 3 Projector Outlook 3 Control Panel 5 Remote Control Layout 6 Getting Started 8 Connecting the Projector 8 Turning the Projector On/Off 9 Turning on the Projector 9 Turning the projector off 10 Adjusting the Projected Image 11 Adjusting the Height of Projected Image 11 How to optimize image size and distance 12 How to get a preferred image size by adjusting distance and zoom 14 User Controls 16 Installation menu 16 Acer Empowering Technology 17 Onscreen Display (OSD) Menus 18 Color 19 Image 20 Setting 22 Management 25 Audio 25...
... 2 Projector Overview 3 Projector Outlook 3 Control Panel 5 Remote Control Layout 6 Getting Started 8 Connecting the Projector 8 Turning the Projector On/Off 9 Turning on the Projector 9 Turning the projector off 10 Adjusting the Projected Image 11 Adjusting the Height of Projected Image 11 How to optimize image size and distance 12 How to get a preferred image size by adjusting distance and zoom 14 User Controls 16 Installation menu 16 Acer Empowering Technology 17 Onscreen Display (OSD) Menus 18 Color 19 Image 20 Setting 22 Management 25 Audio 25...
User Manual
Page 11
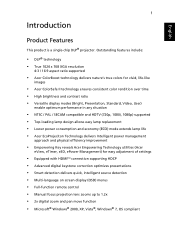
... This product is a single-chip DLP® projector. Outstanding features include: • DLP® technology • True 1024 x 768 XGA resolution 4:3 / 16:9 aspect ratio supported • Acer ColorBoost technology delivers nature's true colors for vivid, life-like images • Acer ColorSafe II technology ensures consistent color rendition over time • High brightness and contrast ratio • Versatile display modes (Bright, Presentation, Standard, Video, User) enable optimum performance in any...
... This product is a single-chip DLP® projector. Outstanding features include: • DLP® technology • True 1024 x 768 XGA resolution 4:3 / 16:9 aspect ratio supported • Acer ColorBoost technology delivers nature's true colors for vivid, life-like images • Acer ColorSafe II technology ensures consistent color rendition over time • High brightness and contrast ratio • Versatile display modes (Bright, Presentation, Standard, Video, User) enable optimum performance in any...
User Manual
Page 15
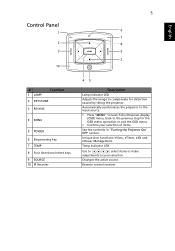
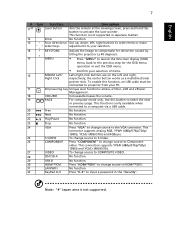
Changes the active source. English SOURCE 5 Control Panel 1 LAMP 2 6 TEMP 7 8 3 MENU 9 RESYNC 2 10 # 1 LAMP Function 2 KEYSTONE 3 RESYNC 4 MENU 5 POWER 6 Empowering key 7 TEMP 8 Four directional select keys 9 SOURCE 10 IR Recevier 45 Description Lamp Indicator LED Adjusts the image to compensate for the OSD menu operation or exit the OSD menu. • Confirm your selection. Unique Acer functions: eView, eTimer, e3D and ePower Management. Remote control receiver. Temp Indicator LED Use to select items or make adjustments to the previous step for...
Changes the active source. English SOURCE 5 Control Panel 1 LAMP 2 6 TEMP 7 8 3 MENU 9 RESYNC 2 10 # 1 LAMP Function 2 KEYSTONE 3 RESYNC 4 MENU 5 POWER 6 Empowering key 7 TEMP 8 Four directional select keys 9 SOURCE 10 IR Recevier 45 Description Lamp Indicator LED Adjusts the image to compensate for the OSD menu operation or exit the OSD menu. • Confirm your selection. Unique Acer functions: eView, eTimer, e3D and ePower Management. Remote control receiver. Temp Indicator LED Use to select items or make adjustments to the previous step for...
User Manual
Page 16
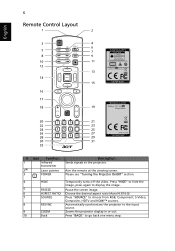
... to display the image. 5 FREEZE Pause the screen image. 6 ASPECT RATIO Choose the desired aspect ratio (Auto/4:3/16:9) 7 SOURCE Press "SOURCE" to choose from RGB, Component, S-Video, Composite, HDTV and HDMI™ sources. 8 RESYNC Automatically synchronizes the projector to the input source. 9 ZOOM Zooms the projector display in or out. 10 Back Press "BACK" to the projector. Please see "Turning the Projector On/Off" section. 4 HIDE Temporarily turns off the video. English 6 Remote Control...
... to display the image. 5 FREEZE Pause the screen image. 6 ASPECT RATIO Choose the desired aspect ratio (Auto/4:3/16:9) 7 SOURCE Press "SOURCE" to choose from RGB, Component, S-Video, Composite, HDTV and HDMI™ sources. 8 RESYNC Automatically synchronizes the projector to the input source. 9 ZOOM Zooms the projector display in or out. 10 Back Press "BACK" to the projector. Please see "Turning the Projector On/Off" section. 4 HIDE Temporarily turns off the video. English 6 Remote Control...
User Manual
Page 17
...-click buttons are on the left , right buttons to select items or make select keys adjustments to COMPOSITE VIDEO. PAGE For computer mode only. Next No function. To change source to your PC. Press "HDMI™/DVI" to change source to a computer via a USB cable. This function is not supported. This connection supports YPbPr (480p/576p/720p/ 1080i) and YCbCr (480i/576i). USB B HDMI™/DVI LAN/WiFi...
...-click buttons are on the left , right buttons to select items or make select keys adjustments to COMPOSITE VIDEO. PAGE For computer mode only. Next No function. To change source to your PC. Press "HDMI™/DVI" to change source to a computer via a USB cable. This function is not supported. This connection supports YPbPr (480p/576p/720p/ 1080i) and YCbCr (480i/576i). USB B HDMI™/DVI LAN/WiFi...
User Manual
Page 19
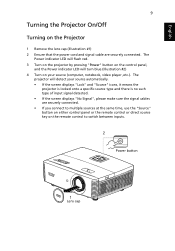
... the screen displays "No Signal", please make sure the signal cables are securely connected. • If you connect to switch between inputs. 2 Power button SOURCE 1 Lens cap TEMP RESYNC LAMP MENU English 9 Turning the Projector On/Off Turning on the remote control to multiple sources at the same time, use the "Source" button on either control panel or the remote control or direct source key on the Projector 1 Remove the lens cap.(Illustration #1) 2 Ensure that the power cord and signal cable are securely connected. The Power indicator LED will flash red. 3 Turn on the projector by...
... the screen displays "No Signal", please make sure the signal cables are securely connected. • If you connect to switch between inputs. 2 Power button SOURCE 1 Lens cap TEMP RESYNC LAMP MENU English 9 Turning the Projector On/Off Turning on the remote control to multiple sources at the same time, use the "Source" button on either control panel or the remote control or direct source key on the Projector 1 Remove the lens cap.(Illustration #1) 2 Ensure that the power cord and signal cable are securely connected. The Power indicator LED will flash red. 3 Turn on the projector by...

User Manual
Page 20
Warning indicators: • "Projector Overheated. This onscreen message indicates that the projector has overheated. The lamp will automatically turn solid red. This message appears: "Please press the power button again to unplug the power cord. This onscreen message indicates that the fan has failed. The lamp with automatically turn off, the projector will automatically shut down, and the LED temp indicator will turn off, the projector will automatically shut down and the LED lamp indicator turns solid red, contact your local dealer or service center. •...
Warning indicators: • "Projector Overheated. This onscreen message indicates that the projector has overheated. The lamp will automatically turn solid red. This message appears: "Please press the power button again to unplug the power cord. This onscreen message indicates that the fan has failed. The lamp with automatically turn off, the projector will automatically shut down, and the LED temp indicator will turn off, the projector will automatically shut down and the LED lamp indicator turns solid red, contact your local dealer or service center. •...
User Manual
Page 26
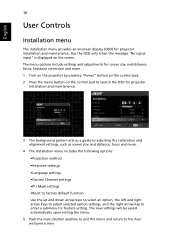
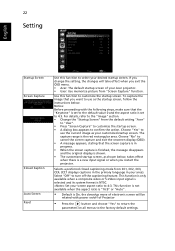
... the Acer welcome screen. The menu options include settings and adjustments for screen size and distance, focus, keystone correction and more . 1 Turn on the projector by pressing "Power" button on the control pad. 2 Press the menu button on the screen. The new settings will be saved automatically upon exiting the menu. 5 Push the menu button anytime to exit the menu and return to enter a submenu for projector installation and maintenance. English 16 User Controls Installation menu The installation menu provides an onscreen display...
... the Acer welcome screen. The menu options include settings and adjustments for screen size and distance, focus, keystone correction and more . 1 Turn on the projector by pressing "Power" button on the control pad. 2 Press the menu button on the screen. The new settings will be saved automatically upon exiting the menu. 5 Push the menu button anytime to exit the menu and return to enter a submenu for projector installation and maintenance. English 16 User Controls Installation menu The installation menu provides an onscreen display...
User Manual
Page 30
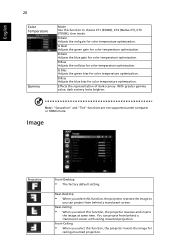
... this function to choose CT1 (6500K), CT2 (Native CT), CT3 (7500K), User mode. Image Projection Front-Desktop • The factory default setting. G Gain Adjusts the green gain for color temperature optimization. You can project from behind a translucent screen. B Bias Adjusts the blue bias for color temperature optimization. Rear-Ceiling • When you can project from behind a translucent screen with ceiling mounted projection. English 20 Color Temperature Gamma Mode Use this function, the projector reverses and inverts the image at same time.
... this function to choose CT1 (6500K), CT2 (Native CT), CT3 (7500K), User mode. Image Projection Front-Desktop • The factory default setting. G Gain Adjusts the green gain for color temperature optimization. You can project from behind a translucent screen. B Bias Adjusts the blue bias for color temperature optimization. Rear-Ceiling • When you can project from behind a translucent screen with ceiling mounted projection. English 20 Color Temperature Gamma Mode Use this function, the projector reverses and inverts the image at same time.
User Manual
Page 32
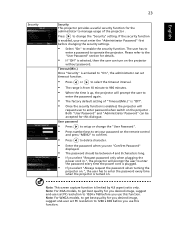
... startup screen. Set your desired startup screen. Choose "Yes" to use as the startup screen, follow the instructions below , takes effect when there is a new input signal or when you restart the projector. Selects a preferred closed captioning mode from "Screen Capture" function. 22 Setting English Startup Screen Screen Capture Closed Caption Auto Screen Reset Use this function to turn off of your Acer projector. • User: Use memorize picture from CC1, CC2, CC3, CC4, (CC1 displays...
... startup screen. Set your desired startup screen. Choose "Yes" to use as the startup screen, follow the instructions below , takes effect when there is a new input signal or when you restart the projector. Selects a preferred closed captioning mode from "Screen Capture" function. 22 Setting English Startup Screen Screen Capture Closed Caption Auto Screen Reset Use this function to turn off of your Acer projector. • User: Use memorize picture from CC1, CC2, CC3, CC4, (CC1 displays...
User Manual
Page 33
... the remote control and press "MENU" to confirm. • Press to delete character. • Enter the password when you see "Confirm Password" displayed. • The password should be accepted for you desired image, suggest end-user set PC resolution to 1280 x 800 before you use this function. Timeout(Min.) Once "Security" is plugged. • If you select "Always request the password when turning the projector...
... the remote control and press "MENU" to confirm. • Press to delete character. • Enter the password when you see "Confirm Password" displayed. • The password should be accepted for you desired image, suggest end-user set PC resolution to 1280 x 800 before you use this function. Timeout(Min.) Once "Security" is plugged. • If you select "Always request the password when turning the projector...
User Manual
Page 35
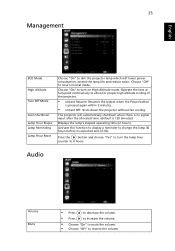
... to display a reminder to change the lamp 30 hours before its expected end-of the projector. • Instant Resume: Resumes the system when the Power button is 120 minutes) Displays the lamp's elapsed operating time (in hours). English 25 Management ECO Mode High Altitude Turn Off Mode Auto Shutdown Lamp Hour Elapse Lamp Reminding Lamp Hour Reset Choose "On" to dim the projector lamp which will automatically shutdown when there is no signal input after the allocated time. (default...
... to display a reminder to change the lamp 30 hours before its expected end-of the projector. • Instant Resume: Resumes the system when the Power button is 120 minutes) Displays the lamp's elapsed operating time (in hours). English 25 Management ECO Mode High Altitude Turn Off Mode Auto Shutdown Lamp Hour Elapse Lamp Reminding Lamp Hour Reset Choose "On" to dim the projector lamp which will automatically shutdown when there is no signal input after the allocated time. (default...
User Manual
Page 38
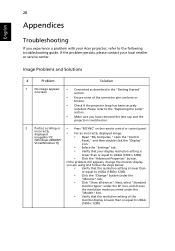
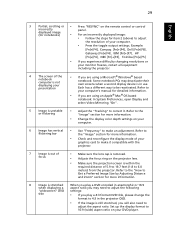
... box, and choose the resolution mode you are bent or broken. • Check if the projector lamp has been securely installed. Please refer to the "Replacing the Lamp" section. • Make sure you experience a problem with your Acer projector, refer to UXGA (1600 x 1200). incorrectly displayed image(For PC • For an incorrectly displayed image: • Open "My Computer," open the "Control (Windows 2000/XP/ Vista/Windows 7)) Panel," and then double...
... box, and choose the resolution mode you are bent or broken. • Check if the projector lamp has been securely installed. Please refer to the "Replacing the Lamp" section. • Make sure you experience a problem with your Acer projector, refer to UXGA (1600 x 1200). incorrectly displayed image(For PC • For an incorrectly displayed image: • Open "My Computer," open the "Control (Windows 2000/XP/ Vista/Windows 7)) Panel," and then double...
User Manual
Page 39
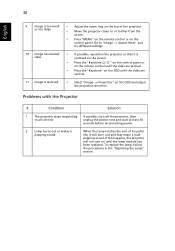
... 5.9 to 19.7 feet (1.8 to Get a Preferred Image Size by Adjusting Distance and Zoom" section for more information. 8 Image is stretched When you play a DVD encoded in use. Refer to the "How to 6.0 meters) from the projector. Refer to the or flickering "Image" section for more information. • Change the display color depth settings on the remote control or control incorrectly panel. Each has a different way to 4:3 in the...
... 5.9 to 19.7 feet (1.8 to Get a Preferred Image Size by Adjusting Distance and Zoom" section for more information. 8 Image is stretched When you play a DVD encoded in use. Refer to the "How to 6.0 meters) from the projector. Refer to the or flickering "Image" section for more information. • Change the display color depth settings on the remote control or control incorrectly panel. Each has a different way to 4:3 in the...
User Manual
Page 40
... of the projector. • Move the projector closer to "Image --> Aspect Ratio" and try different settings. • If possible, reposition the projector so that it will not turn on the OSD and adjust the projection direction. To replace the lamp, follow the procedures in the "Replacing the Lamp" section. Go to or further from the screen. • Press "MENU" on the remote control or on the control panel.
... of the projector. • Move the projector closer to "Image --> Aspect Ratio" and try different settings. • If possible, reposition the projector so that it will not turn on the OSD and adjust the projection direction. To replace the lamp, follow the procedures in the "Replacing the Lamp" section. Go to or further from the screen. • Press "MENU" on the remote control or on the control panel.
User Manual
Page 49
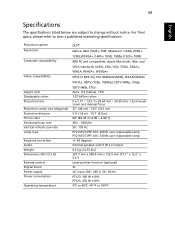
Projection system Resolution Computer compatibility Video compatibility Aspect ratio Displayable colors Projection lens Projection screen size (diagonal) Projection distance Throw ratio Horizontal scan rate Vertical refresh scan rate Lamp type Keystone correction Audio Weight Dimensions (W x D x H) Remote control Digital Zoom Power supply Power consumption Operating temperature DLP® Native: XGA (1024 x 768), Maximum: UXGA (1600 x 1200),WSXGA+ (1680 x 1050), 1080p (1920 x 1080) IBM PC and compatibles, Apple Macintosh, iMac and VESA standards: SXGA, XGA, VGA, SVGA, SXGA+, WXGA, WXGA+, ...
Projection system Resolution Computer compatibility Video compatibility Aspect ratio Displayable colors Projection lens Projection screen size (diagonal) Projection distance Throw ratio Horizontal scan rate Vertical refresh scan rate Lamp type Keystone correction Audio Weight Dimensions (W x D x H) Remote control Digital Zoom Power supply Power consumption Operating temperature DLP® Native: XGA (1024 x 768), Maximum: UXGA (1600 x 1200),WSXGA+ (1680 x 1050), 1080p (1920 x 1080) IBM PC and compatibles, Apple Macintosh, iMac and VESA standards: SXGA, XGA, VGA, SVGA, SXGA+, WXGA, WXGA+, ...


