

User Manual
Page 2
...warranties of merchantability or fitness for identification purposes only and belong to their respective companies. All correspondence concerning your projector. Other companies' product names or trademarks are recorded on the label affixed to notify any means, electronically, ...HDMI Licensing LLC." Acer Projector P1165/P1165P/P1265/P1265P/P5260i/P5270/P5280/P5370W Series Model number Serial number Date of purchase Place of purchase Acer and the Acer logo are trademarks or registered trademarks of Acer Incorporated. Acer Projector P1165/P1165P/P1265/P1265P/P5260i/P5270...
...warranties of merchantability or fitness for identification purposes only and belong to their respective companies. All correspondence concerning your projector. Other companies' product names or trademarks are recorded on the label affixed to notify any means, electronically, ...HDMI Licensing LLC." Acer Projector P1165/P1165P/P1265/P1265P/P5260i/P5270/P5280/P5370W Series Model number Serial number Date of purchase Place of purchase Acer and the Acer logo are trademarks or registered trademarks of Acer Incorporated. Acer Projector P1165/P1165P/P1265/P1265P/P5260i/P5270...

User Manual
Page 3
... for ventilation to ensure reliable operation of the product and to unplug the power cord from the electrical outlet. Follow all power cords from the projector. • If the system has multiple sources of any kind onto or into the product. These openings must not be blocked by unplugging all warnings...
... for ventilation to ensure reliable operation of the product and to unplug the power cord from the electrical outlet. Follow all power cords from the projector. • If the system has multiple sources of any kind onto or into the product. These openings must not be blocked by unplugging all warnings...

User Manual
Page 5
...the altitudes are higher than 10000 feet. • Unplug immediately if there is damaged, cut or frayed • liquid was spilled into the projector's lens when the lamp is poorly ventilated or confined. Refer all windows rolled up. • Locations where excessive humidity, dust, or cigarette ... the life span and darkening the image. • Locations near fire alarms. • Locations with your eyes. • Turn on the projector first and then signal sources • Do not place the product in following the operating instructions Note: Adjust only those controls that is on....
...the altitudes are higher than 10000 feet. • Unplug immediately if there is damaged, cut or frayed • liquid was spilled into the projector's lens when the lamp is poorly ventilated or confined. Refer all windows rolled up. • Locations where excessive humidity, dust, or cigarette ... the life span and darkening the image. • Locations near fire alarms. • Locations with your eyes. • Turn on the projector first and then signal sources • Do not place the product in following the operating instructions Note: Adjust only those controls that is on....

User Manual
Page 6
... of the lamp itself. It could cause the object to fall over, causing injury or damage. • This product is securely installed. In this projector. Only use acer ceiling mount kit for replacement. • Do not operate lamps beyond the rated lamp life. The temperature inside which becomes hot. • Clean the...
... of the lamp itself. It could cause the object to fall over, causing injury or damage. • This product is securely installed. In this projector. Only use acer ceiling mount kit for replacement. • Do not operate lamps beyond the rated lamp life. The temperature inside which becomes hot. • Clean the...

User Manual
Page 9
... local, state or federal laws. For more information on the Waste from Electrical and Electronics Equipment (WEEE) regulations, visit http://global.acer.com/about/ sustainability.htm Mercury advisory For projectors or electronic products containing an LCD/CRT monitor or display: Lamp(s) inside this electronic device into the trash when discarding. For lamp...
... local, state or federal laws. For more information on the Waste from Electrical and Electronics Equipment (WEEE) regulations, visit http://global.acer.com/about/ sustainability.htm Mercury advisory For projectors or electronic products containing an LCD/CRT monitor or display: Lamp(s) inside this electronic device into the trash when discarding. For lamp...

User Manual
Page 10
...appliance that generates a strong magnetic field. • Place In direct sunlight. If this happens, the projector will not turn back on . Warning: • Do not look into the projector's lens when the lamp is on until the lamp module has been replaced. Precautions Follow all changing instructions... the lamp module. • When switching the projector off, please ensure the projector completes its cooling cycle before disconnecting power. • Turn on the projector first and then the signal sources. • Do not use lens cap when projector is in this may make a loud popping sound...
...appliance that generates a strong magnetic field. • Place In direct sunlight. If this happens, the projector will not turn back on . Warning: • Do not look into the projector's lens when the lamp is on until the lamp module has been replaced. Precautions Follow all changing instructions... the lamp module. • When switching the projector off, please ensure the projector completes its cooling cycle before disconnecting power. • Turn on the projector first and then the signal sources. • Do not use lens cap when projector is in this may make a loud popping sound...

User Manual
Page 11
.../Off 11 Turning on the Projector 11 Turning off the Projector 12 Adjusting the Projected Image 13 Adjusting the Height of Projected Image 13 How to optimize image size and distance 14 How to get a preferred image size by adjusting distance and zoom 18 User Controls 22 Acer Empowering Technology 22 Onscreen Display...
.../Off 11 Turning on the Projector 11 Turning off the Projector 12 Adjusting the Projected Image 13 Adjusting the Height of Projected Image 13 How to optimize image size and distance 14 How to get a preferred image size by adjusting distance and zoom 18 User Controls 22 Acer Empowering Technology 22 Onscreen Display...
User Manual
Page 13
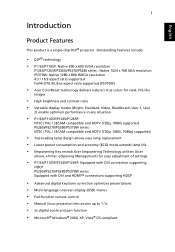
English 1 Introduction Product Features This product is a single-chip DLP® projector. Outstanding features include: • DLP® technology • P1165/P1165P: Native 800 x 600 SVGA resolution P1265/P1265P/P5260i/P5270/P5280 series : Native 1024 x 768 XGA resolution P5370W: Native 1280 x ...and economy (ECO) mode extends lamp life • Empowering Key reveals Acer Empowering Technology utilities (Acer eView, eTimer, eOpening Management) for easy adjustment of settings • P1165/P1165P/P1265/P1265P: Equipped with DVI connection supporting HDCP P5260i/P5270/P5280/P5370W series:...
English 1 Introduction Product Features This product is a single-chip DLP® projector. Outstanding features include: • DLP® technology • P1165/P1165P: Native 800 x 600 SVGA resolution P1265/P1265P/P5260i/P5270/P5280 series : Native 1024 x 768 XGA resolution P5370W: Native 1280 x ...and economy (ECO) mode extends lamp life • Empowering Key reveals Acer Empowering Technology utilities (Acer eView, eTimer, eOpening Management) for easy adjustment of settings • P1165/P1165P/P1265/P1265P: Equipped with DVI connection supporting HDCP P5260i/P5270/P5280/P5370W series:...

User Manual
Page 14
... lens cap Power cord VGA cable Compostive video cable 2 x Batteries Carrying case DVI-D Cable (P5260i/P5270/P5280/ P5370W Series) #A #B Security card Acer Projector 2 x User's Guide (Wireless CD for P5260i Series) PgUp Quick Start Guide PgDn Remote control (#B for P5260i Series) 2 x Quick start guide Battery Pack with all the ...
... lens cap Power cord VGA cable Compostive video cable 2 x Batteries Carrying case DVI-D Cable (P5260i/P5270/P5280/ P5370W Series) #A #B Security card Acer Projector 2 x User's Guide (Wireless CD for P5260i Series) PgUp Quick Start Guide PgDn Remote control (#B for P5260i Series) 2 x Quick start guide Battery Pack with all the ...

User Manual
Page 15
English 3 Projector Overview Projector Outlook Front / upper side 3 8 1 2 3 4 5 6 7 # Description 1 Zoom ring 2 Focus ring 3 Remote control receiver 4 Zoom lens Rear side # Description 5 Lens cap 6 Elevator button 7 Elevator foot 8 Control panel 1 2345 6 7 8 11 12 9 13 10 14 15 16 17 18
English 3 Projector Overview Projector Outlook Front / upper side 3 8 1 2 3 4 5 6 7 # Description 1 Zoom ring 2 Focus ring 3 Remote control receiver 4 Zoom lens Rear side # Description 5 Lens cap 6 Elevator button 7 Elevator foot 8 Control panel 1 2345 6 7 8 11 12 9 13 10 14 15 16 17 18
User Manual
Page 16
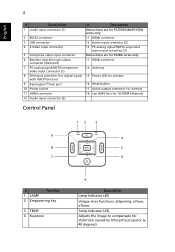
... Antenna 15 Power LED for wireless 16 Reset button 17 Audio output connector for wireless 18 Lan (RJ45 Port for distortion caused by tilting the projector (± 40 degrees). Temp Indicator LED Adjusts the image to compensate for 10/100M Ethernet) Control Panel 12 3 9 4 8 5 7 4 # Function 1 LAMP 2 Empowering key 3 TEMP 4 Keystone 6 Description...
... Antenna 15 Power LED for wireless 16 Reset button 17 Audio output connector for wireless 18 Lan (RJ45 Port for distortion caused by tilting the projector (± 40 degrees). Temp Indicator LED Adjusts the image to compensate for 10/100M Ethernet) Control Panel 12 3 9 4 8 5 7 4 # Function 1 LAMP 2 Empowering key 3 TEMP 4 Keystone 6 Description...

User Manual
Page 17
Use to select items or make adjustments to your selection of items. Press "SOURCE" to choose RGB, Component, S-Video, Composite, DVI, HDTV and HDMI™ sources. See the contents in "Turning the Projector On/Off" section. • Press "MENU" to launch the Onscreen display (OSD) menu, back to the input source. 5 English # Function 5 RESYNC 6 POWER 7 MENU 8 SOURCE 9 Four directional select keys Description Automatically synchronizes the projector to the previous step for the OSD menu operation or exit the OSD menu. • Confirm your selection.
Use to select items or make adjustments to your selection of items. Press "SOURCE" to choose RGB, Component, S-Video, Composite, DVI, HDTV and HDMI™ sources. See the contents in "Turning the Projector On/Off" section. • Press "MENU" to launch the Onscreen display (OSD) menu, back to the input source. 5 English # Function 5 RESYNC 6 POWER 7 MENU 8 SOURCE 9 Four directional select keys Description Automatically synchronizes the projector to the previous step for the OSD menu operation or exit the OSD menu. • Confirm your selection.

User Manual
Page 18
...20 22 19 21 23 25 24 26 27 (P5260i Series) # Icon Function Description 1 Infrared Sends signals to the "Turning the Projector On/Off" section. 8 ASPECT RATIO To choose the desired aspect ratio (Auto/4:3/16:9). Press "HIDE" to hide the image, press...pause the screen image. 4 HIDE Momentarily turns off the video. Auto/Full/4:3/16:9/L.Box (P5370W) 9 ZOOM Zooms the projector display in Japanese market. 11 Empowering Unique Acer functions: eOpening, eView, eTimer key Management. 12 KEYSTONE Adjusts the image to activate the laser pointer. transmitter 2 Laser...
...20 22 19 21 23 25 24 26 27 (P5260i Series) # Icon Function Description 1 Infrared Sends signals to the "Turning the Projector On/Off" section. 8 ASPECT RATIO To choose the desired aspect ratio (Auto/4:3/16:9). Press "HIDE" to hide the image, press...pause the screen image. 4 HIDE Momentarily turns off the video. Auto/Full/4:3/16:9/L.Box (P5370W) 9 ZOOM Zooms the projector display in Japanese market. 11 Empowering Unique Acer functions: eOpening, eView, eTimer key Management. 12 KEYSTONE Adjusts the image to activate the laser pointer. transmitter 2 Laser...

User Manual
Page 19
... Press "MENU" to launch the Onscreen display (OSD) menu, back to COMPOSITE VIDEO. This function is only available when connected to a computer via the "Acer eProjection Management" utility. (for the OSD menu operation or exit the OSD menu. • Confirm your PC. Press "COLOR" to input a password in ...an USB cable must be connected to the VGA connector. Left-/right-click buttons are on the display screen. Use the "CONTRAST" option to the projector via a USB cable. Press "WIRELESS" to display the image which is not supported in the "Security settings". Note: "*" Only for true-color ...
... Press "MENU" to launch the Onscreen display (OSD) menu, back to COMPOSITE VIDEO. This function is only available when connected to a computer via the "Acer eProjection Management" utility. (for the OSD menu operation or exit the OSD menu. • Confirm your PC. Press "COLOR" to input a password in ...an USB cable must be connected to the VGA connector. Left-/right-click buttons are on the display screen. Use the "CONTRAST" option to the projector via a USB cable. Press "WIRELESS" to display the image which is not supported in the "Security settings". Note: "*" Only for true-color ...

User Manual
Page 21
English USB 9 Getting Started Connecting the Projector DVD player, Set-top Box HDTV receiver RBG VGA, DVI DVD player RS232 D-Sub DVI-D D-Sub 28 RBG RS232 7 4 5 HDTV adapter D-Sub D-Sub DVI-D HDMI ... 5 VGA to component/HDTV adapter # Description 6 S-Video cable 7 Audio cable jack/jack 8 DVI cable 9 HDMI cable (P5260i/P5270/P5280/ P5370W series) Note: To ensure the projector works well with your computer, please make sure the timing of the display mode is compatible with the...
English USB 9 Getting Started Connecting the Projector DVD player, Set-top Box HDTV receiver RBG VGA, DVI DVD player RS232 D-Sub DVI-D D-Sub 28 RBG RS232 7 4 5 HDTV adapter D-Sub D-Sub DVI-D HDMI ... 5 VGA to component/HDTV adapter # Description 6 S-Video cable 7 Audio cable jack/jack 8 DVI cable 9 HDMI cable (P5260i/P5270/P5280/ P5370W series) Note: To ensure the projector works well with your computer, please make sure the timing of the display mode is compatible with the...

User Manual
Page 22
English 10 Connecting the Projector for Wireless Function WLAN 4 2 3 Internet Speaker # Description 1 Power cord 2 Audio cable jack 3 Lan cable 4 Antenna Note: For P5260i only Power 1
English 10 Connecting the Projector for Wireless Function WLAN 4 2 3 Internet Speaker # Description 1 Power cord 2 Audio cable jack 3 Lan cable 4 Antenna Note: For P5260i only Power 1

User Manual
Page 23
... the "Source" button on either control panel or the remote control or direct source key on the remote control to switch between inputs. 1 POWER The projector will turn blue. 4 Turn on the control panel, and the Power indicator LED will detect your source (computer, notebook, video player ,etc.). The ...Power indicator LED will flash red. 3 Turn on the projector by pressing "Power" button on your source automatically. • If the screen displays "Lock" and "Source" icons, it means the...
... the "Source" button on either control panel or the remote control or direct source key on the remote control to switch between inputs. 1 POWER The projector will turn blue. 4 Turn on the control panel, and the Power indicator LED will detect your source (computer, notebook, video player ,etc.). The ...Power indicator LED will flash red. 3 Turn on the projector by pressing "Power" button on your source automatically. • If the screen displays "Lock" and "Source" icons, it means the...

User Manual
Page 24
...to complete the shutdown process." 2 Immediately after powering off. Lamp will automatically turn off the projector, press the "Power" button twice. Warning: Do not turn the projector back on the projector immediately after powering off, the Power indicator LED will flash RED rapidly and the fan(s) ... correctly. 3 Once the system has finished cooling, the "Power" indicator LED will display onscreen for about to restart the projector. English 12 Turning off the Projector 1 To turn off soon." • If the TEMP indicator flashes RED and the message below is displayed onscreen, please...
...to complete the shutdown process." 2 Immediately after powering off. Lamp will automatically turn off the projector, press the "Power" button twice. Warning: Do not turn the projector back on the projector immediately after powering off, the Power indicator LED will flash RED rapidly and the fan(s) ... correctly. 3 Once the system has finished cooling, the "Power" indicator LED will display onscreen for about to restart the projector. English 12 Turning off the Projector 1 To turn off soon." • If the TEMP indicator flashes RED and the message below is displayed onscreen, please...

User Manual
Page 25
... position. 3 Use Tilt adjusting wheel (Illustration #3) to fine-tune the display angle. English 13 Adjusting the Projected Image Adjusting the Height of Projected Image The projector is equipped with elevator feet for adjusting the height of image. To lower the image: 1 Press the elevator foot release. (Illustration #1) 2 Lower the image to...
... position. 3 Use Tilt adjusting wheel (Illustration #3) to fine-tune the display angle. English 13 Adjusting the Projected Image Adjusting the Height of Projected Image The projector is equipped with elevator feet for adjusting the height of image. To lower the image: 1 Press the elevator foot release. (Illustration #1) 2 Lower the image to...

User Manual
Page 26
...top of 133 cm height is possible for image sizes between 69" and 76". P1165/P1165P/P1265/P1265P/P5260i/P5270/P5280 series Note: Remind as below to find the optimal image sizes achievable when the projector is positioned at a desired distance from the screen. ¥ • P1165/P1165P.../P1265/P1265P/P5260i/P5270/P5280 series Example: If the projector is 3 m from the screen, good image quality is required when located at...
...top of 133 cm height is possible for image sizes between 69" and 76". P1165/P1165P/P1265/P1265P/P5260i/P5270/P5280 series Note: Remind as below to find the optimal image sizes achievable when the projector is positioned at a desired distance from the screen. ¥ • P1165/P1165P.../P1265/P1265P/P5260i/P5270/P5280 series Example: If the projector is 3 m from the screen, good image quality is required when located at...


