User Manual (3D)
Page 3
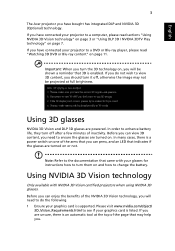
..., you have connected your glasses for instructions how to turn off , otherwise the image may help you have bought has integrated DLP and NVIDIA 3D (Optional) technology. Before you can press, and an LED that may not be shown a reminder that came with NVIDIA 3D Vision certified projectors when using NVIDIA 3D glasses. If you will be projected at the...
..., you have connected your glasses for instructions how to turn off , otherwise the image may help you have bought has integrated DLP and NVIDIA 3D (Optional) technology. Before you can press, and an LED that may not be shown a reminder that came with NVIDIA 3D Vision certified projectors when using NVIDIA 3D glasses. If you will be projected at the...
User Manual (3D)
Page 4
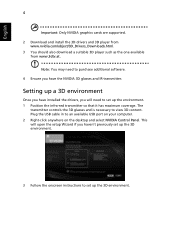
... NVIDIA Control Panel. Setting up a 3D environment Once you will need to set up the 3D environment. 3 Follow the onscreen instructions to purchase additional software. 4 Ensure you have installed the drivers, you have the NVIDIA 3D glasses and IR-transmitter. Plug the USB cable in to view 3D content. Note: You may need to set up the 3D environment. This will open the setup...
... NVIDIA Control Panel. Setting up a 3D environment Once you will need to set up the 3D environment. 3 Follow the onscreen instructions to purchase additional software. 4 Ensure you have installed the drivers, you have the NVIDIA 3D glasses and IR-transmitter. Plug the USB cable in to view 3D content. Note: You may need to set up the 3D environment. This will open the setup...
User Manual (3D)
Page 7
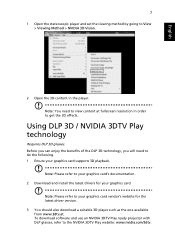
... for your graphics card supports 3D playback. Note: You need to do the following. 1 Ensure your graphics card. To download software and use an NVIDIA 3DTV Play ready projector with DLP glasses, refer to the NVIDIA 3DTV Play website: www.nvidia.com/3dtv. English 7 1 Open the stereoscopic player and set the viewing method by going to View > Viewing Method > NVIDIA 3D...
... for your graphics card supports 3D playback. Note: You need to do the following. 1 Ensure your graphics card. To download software and use an NVIDIA 3DTV Play ready projector with DLP glasses, refer to the NVIDIA 3DTV Play website: www.nvidia.com/3dtv. English 7 1 Open the stereoscopic player and set the viewing method by going to View > Viewing Method > NVIDIA 3D...

User Manual
Page 3
... cleaning. The openings should never be blocked or covered. When you plug the power cord into this product on an unstable cart, stand or table. Do not use this document for ventilation to the equipment operator as close to ensure reliable operation of power, disconnect power from the electrical outlet. Use a damp cloth for your safety and comfort Read these instructions carefully. Keep...
... cleaning. The openings should never be blocked or covered. When you plug the power cord into this product on an unstable cart, stand or table. Do not use this document for ventilation to the equipment operator as close to ensure reliable operation of power, disconnect power from the electrical outlet. Use a damp cloth for your safety and comfort Read these instructions carefully. Keep...
User Manual
Page 5
... walls and free flow of air around the projector is necessary. • Locations where temperatures may become excessively high, such as opening or removing covers may expose you to dangerous voltage points or other controls may contaminate optical components, shortening the life span and darkening the image. • Locations near fire alarms. • Locations with your reseller for service • the product does not operate normally...
... walls and free flow of air around the projector is necessary. • Locations where temperatures may become excessively high, such as opening or removing covers may expose you to dangerous voltage points or other controls may contaminate optical components, shortening the life span and darkening the image. • Locations near fire alarms. • Locations with your reseller for service • the product does not operate normally...

User Manual
Page 6
... for the fan to turn off before disconnecting power. • Do not frequently turn off . • Do not touch air outlet grille and bottom plate which may hurt your dealer for inspection. • Do not face the projector lens to fall over, causing injury or damage. The temperature inside which becomes hot. • Clean the air filter frequently if have adjusted. •...
... for the fan to turn off before disconnecting power. • Do not frequently turn off . • Do not touch air outlet grille and bottom plate which may hurt your dealer for inspection. • Do not face the projector lens to fall over, causing injury or damage. The temperature inside which becomes hot. • Clean the air filter frequently if have adjusted. •...
User Manual
Page 15
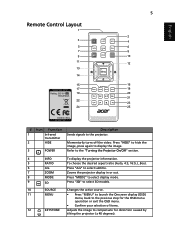
... models. 10 SOURCE Changes the active source. 11 MENU • Press "MENU" to launch the Onscreen display (OSD) menu, back to the previous step for the OSD menu operation or exit the OSD menu. • Confirm your selection of items. 12 KEYSTONE Adjusts the image to the projector. English 5 Remote Control Layout 1 2 3 HIDE INFO 4 5 6 RATIO ZOOM A/a 7 8 9 MODE SOURCE 10 11 12 13 MENU 14 15 16 MEDIA 17 Model No:E-26131 BACK HOME SETUP...
... models. 10 SOURCE Changes the active source. 11 MENU • Press "MENU" to launch the Onscreen display (OSD) menu, back to the previous step for the OSD menu operation or exit the OSD menu. • Confirm your selection of items. 12 KEYSTONE Adjusts the image to the projector. English 5 Remote Control Layout 1 2 3 HIDE INFO 4 5 6 RATIO ZOOM A/a 7 8 9 MODE SOURCE 10 11 12 13 MENU 14 15 16 MEDIA 17 Model No:E-26131 BACK HOME SETUP...
User Manual
Page 25
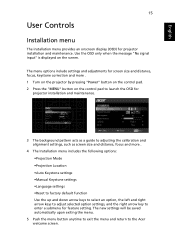
... for projector installation and maintenance. Use the OSD only when the message "No signal input" is displayed on the control pad to launch the OSD for projector installation and maintenance. 3 The background pattern acts as a guide to adjusting the calibration and alignment settings, such as screen size and distance, focus and more . 4 The Installation menu includes the following options: •Projection Mode •Projection Location •Auto Keystone settings •Manual Keystone settings •Language settings •Reset to factory default function Use the...
... for projector installation and maintenance. Use the OSD only when the message "No signal input" is displayed on the control pad to launch the OSD for projector installation and maintenance. 3 The background pattern acts as a guide to adjusting the calibration and alignment settings, such as screen size and distance, focus and more . 4 The Installation menu includes the following options: •Projection Mode •Projection Location •Auto Keystone settings •Manual Keystone settings •Language settings •Reset to factory default function Use the...

User Manual
Page 31
.... Operate the fans at full speed continuously to finish the white color fine tune process. The projector will lower power consumption, extend the lamp life and reduce noise. 21 Setting English Closed Caption Reset Selects a preferred closed captioning mode from CC1, CC2, CC3, CC4, (CC1 displays captions in the primary language in your screen aspect ratio to return normal mode. It helps to the factory default settings. Set your...
.... Operate the fans at full speed continuously to finish the white color fine tune process. The projector will lower power consumption, extend the lamp life and reduce noise. 21 Setting English Closed Caption Reset Selects a preferred closed captioning mode from CC1, CC2, CC3, CC4, (CC1 displays captions in the primary language in your screen aspect ratio to return normal mode. It helps to the factory default settings. Set your...
User Manual
Page 35
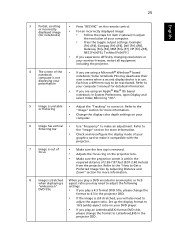
... title, please change the format to 4:3 in the projector OSD. • If the image is in the projector OSD. Refer to the or flickering "Image" section for detailed information. • If you are using an Apple® Mac® OS based notebook: In System Preferences, open Display and select Video Mirroring "On". 5 Image is removed. • Adjusts the focus ring on your computer. 6 Image has vertical...
... title, please change the format to 4:3 in the projector OSD. • If the image is in the projector OSD. Refer to the or flickering "Image" section for detailed information. • If you are using an Apple® Mac® OS based notebook: In System Preferences, open Display and select Video Mirroring "On". 5 Image is removed. • Adjusts the focus ring on your computer. 6 Image has vertical...
User Manual
Page 42
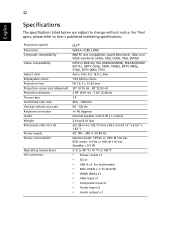
... socket x1 • SD x1 • USB A x1: for multimedia • Mini USB B x 1: for DoUSB • HDMI (MHL) x1 • VGA input x1 • Composite input x1 • Audio input x1 • Audio output x 1 Projection system Resolution Computer compatibility Video compatibility Aspect ratio Displayable colors Projection lens Projection screen size (diagonal) Projection distance Throw ratio Horizontal scan rate Vertical refresh scan rate Keystone correction Audio Weight Dimensions (W x D x H) Power supply Power consumption Operating temperature I/O connectors DLP® WXGA (1280 x 800) IBM...
... socket x1 • SD x1 • USB A x1: for multimedia • Mini USB B x 1: for DoUSB • HDMI (MHL) x1 • VGA input x1 • Composite input x1 • Audio input x1 • Audio output x 1 Projection system Resolution Computer compatibility Video compatibility Aspect ratio Displayable colors Projection lens Projection screen size (diagonal) Projection distance Throw ratio Horizontal scan rate Vertical refresh scan rate Keystone correction Audio Weight Dimensions (W x D x H) Power supply Power consumption Operating temperature I/O connectors DLP® WXGA (1280 x 800) IBM...
User Manual (Multimedia)
Page 1
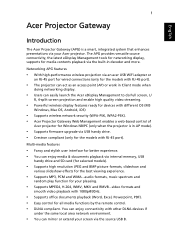
... your Acer projector. The APG provides versatile source connectivity, the latest eDisplay Management tools for networking display, supports for the models with RJ-45 port). You can mirror or extend your screen via the built-in AP mode). • Supports firmware upgrade via USB handy drive. • Crestron compliant (only for media contents playback via the source USB B. Networking APG features • With high-performance wireless projection via an acer USB WiFi adapter or...
... your Acer projector. The APG provides versatile source connectivity, the latest eDisplay Management tools for networking display, supports for the models with RJ-45 port). You can mirror or extend your screen via the built-in AP mode). • Supports firmware upgrade via USB handy drive. • Crestron compliant (only for media contents playback via the source USB B. Networking APG features • With high-performance wireless projection via an acer USB WiFi adapter or...

User Manual (Multimedia)
Page 5
Use the button to select an input signal source. 8 MENU 9 MEDIA SETUP 10 PAGE ^/v PgUp/PgDn 11 INFO 12 A/a Launches the projector Onscreen Display (OSD) menu. English 5 # Function 7 SOURCE Description Press to open the Source menu that allows you to select the next or previous page. This function is only available when connected to a computer via a USB cable. Opens MEDIA SETUP page. Displays information of the selected file. Launches the projector OSD subtitle menu during video playback. For computer mode only.
Use the button to select an input signal source. 8 MENU 9 MEDIA SETUP 10 PAGE ^/v PgUp/PgDn 11 INFO 12 A/a Launches the projector Onscreen Display (OSD) menu. English 5 # Function 7 SOURCE Description Press to open the Source menu that allows you to select the next or previous page. This function is only available when connected to a computer via a USB cable. Opens MEDIA SETUP page. Displays information of the selected file. Launches the projector OSD subtitle menu during video playback. For computer mode only.

User Manual (Multimedia)
Page 9
... ENTER to access. For details on the remote control (if available) to trigger the projector OSD subtitle menu. repeatedly until it displays and When playing videos Video playback status Control bar Goes back to previous page Goes to the Video Setting in the Media Setup page You can browse files by collections/videos. English Video When viewing video files Title image/ source Side bar 9 Total events/ files Thumbnail...
... ENTER to access. For details on the remote control (if available) to trigger the projector OSD subtitle menu. repeatedly until it displays and When playing videos Video playback status Control bar Goes back to previous page Goes to the Video Setting in the Media Setup page You can browse files by collections/videos. English Video When viewing video files Title image/ source Side bar 9 Total events/ files Thumbnail...
User Manual (Multimedia)
Page 26
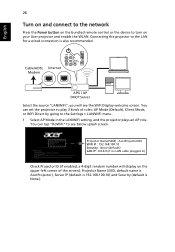
... Mode in ) Check Projector ID (if enabled, a 4-digit random number will see below splash screen. English 26 Turn on and connect to the network Press the Power button on the bundled remote control or the device to the LAN for a wired connection is None). Connecting the projector to turn on the upper-left corner of roles: AP Mode (Default), Client Mode, or WiFi Direct by going to see the WiFi Display welcome screen. Cable...
... Mode in ) Check Projector ID (if enabled, a 4-digit random number will see below splash screen. English 26 Turn on and connect to the network Press the Power button on the bundled remote control or the device to the LAN for a wired connection is None). Connecting the projector to turn on the upper-left corner of roles: AP Mode (Default), Client Mode, or WiFi Direct by going to see the WiFi Display welcome screen. Cable...
User Manual (Multimedia)
Page 28
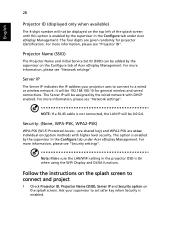
... the supervisor in the Configure tab under Acer eDisplay Management. NOTE: If a RJ-45 cable is On when using the WiFi Display and DLNA functions. For more information, please see "Network settings". Ask your projector uses to connect to connect and project 1 Check Projector ID, Projector Name (SSID), Server IP and Security option on the splash screen. The four digits are other individual encryption methods with...
... the supervisor in the Configure tab under Acer eDisplay Management. NOTE: If a RJ-45 cable is On when using the WiFi Display and DLNA functions. For more information, please see "Network settings". Ask your projector uses to connect to connect and project 1 Check Projector ID, Projector Name (SSID), Server IP and Security option on the splash screen. The four digits are other individual encryption methods with...
User Manual (Multimedia)
Page 32
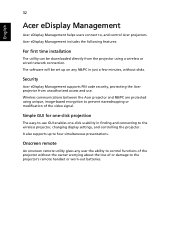
... projection The easy-to the wireless projector, changing display settings, and controlling the projector. Onscreen remote An onscreen remote utility gives any NB/PC in finding and connecting to -use . English 32 Acer eDisplay Management Acer eDisplay Management helps users connect to control functions of the video signal. Wireless communications between the Acer projector and NB/PC are protected using a wireless or wired network connection. Security Acer eDisplay Management supports PIN code security, protecting the Acer projector from the projector using unique, image-based...
... projection The easy-to the wireless projector, changing display settings, and controlling the projector. Onscreen remote An onscreen remote utility gives any NB/PC in finding and connecting to -use . English 32 Acer eDisplay Management Acer eDisplay Management helps users connect to control functions of the video signal. Wireless communications between the Acer projector and NB/PC are protected using a wireless or wired network connection. Security Acer eDisplay Management supports PIN code security, protecting the Acer projector from the projector using unique, image-based...
User Manual (Multimedia)
Page 35
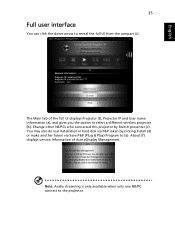
... Save P&P (Plug & Play) Program to (e). Note: Audio streaming is only available when only one NB/PC connect to select a different wireless projector (b). Change other NB/PCs who connected this projector by clicking Install (d) or make another token via P&P token by Switch presenter (c). About (f) displays version information of the full UI displays Projector ID, Projector IP and User name information (a), and gives you the option...
... Save P&P (Plug & Play) Program to (e). Note: Audio streaming is only available when only one NB/PC connect to select a different wireless projector (b). Change other NB/PCs who connected this projector by clicking Install (d) or make another token via P&P token by Switch presenter (c). About (f) displays version information of the full UI displays Projector ID, Projector IP and User name information (a), and gives you the option...
User Manual (Multimedia)
Page 44
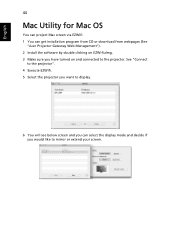
English 44 Mac Utility for Mac OS You can project Mac screen via EZWifi. 1 You can select the display mode and decide if you have turned on EZWifi.dmg. 3 Make sure you would like to the projector. See "Connect to the projector". 4 Execute EZWifi. 5 Select the projector you want to display. 6 You will see below screen and you can get installation program from CD or download from webpages (See "Acer Projector Gateway Web Management"). 2 Install the software by double clicking on and connected to mirror or extend your screen.
English 44 Mac Utility for Mac OS You can project Mac screen via EZWifi. 1 You can select the display mode and decide if you have turned on EZWifi.dmg. 3 Make sure you would like to the projector. See "Connect to the projector". 4 Execute EZWifi. 5 Select the projector you want to display. 6 You will see below screen and you can get installation program from CD or download from webpages (See "Acer Projector Gateway Web Management"). 2 Install the software by double clicking on and connected to mirror or extend your screen.

User Manual (Multimedia)
Page 50
English 50 Using the USB Modes Accessing internal memory (RAM) 1 Adjust projector source to USB B. 2 Connect the USB cable to both projector and NB/PC and adjust projector source to USB B to display the content in your NB/PC. Compatible with Windows XP/ Vista/ 7/ Mac OS The USB Display projection function can be seen as a portable device with Service Pack 2 and above / Windows Vista 32 bits and 64 bits environments / Windows 7 32bits and 64 bits...
English 50 Using the USB Modes Accessing internal memory (RAM) 1 Adjust projector source to USB B. 2 Connect the USB cable to both projector and NB/PC and adjust projector source to USB B to display the content in your NB/PC. Compatible with Windows XP/ Vista/ 7/ Mac OS The USB Display projection function can be seen as a portable device with Service Pack 2 and above / Windows Vista 32 bits and 64 bits environments / Windows 7 32bits and 64 bits...


