
User Manual (3D)
Page 3
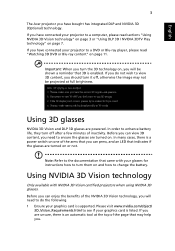
... turn off , otherwise the image may help you can press, and an LED that came with NVIDIA 3D Vision certified projectors when using NVIDIA 3D glasses. In order to the documentation that indicates if the glasses are unsure, there is an automatic tool at full brightness. English 3 The Acer projector you have connected your graphics card is supported. Before you can view...
... turn off , otherwise the image may help you can press, and an LED that came with NVIDIA 3D Vision certified projectors when using NVIDIA 3D glasses. In order to the documentation that indicates if the glasses are unsure, there is an automatic tool at full brightness. English 3 The Acer projector you have connected your graphics card is supported. Before you can view...
User Manual (3D)
Page 4
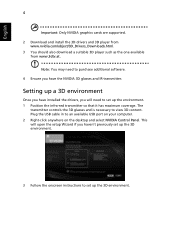
... additional software. 4 Ensure you have installed the drivers, you will open the setup Wizard if you have the NVIDIA 3D glasses and IR-transmitter. The transmitter controls the 3D glasses and is necessary to an available USB port on your computer. 2 Right-click anywhere on the desktop and select NVIDIA Control Panel. English 4 Important: Only NVIDIA graphics cards are supported. 2 Download and install...
... additional software. 4 Ensure you have installed the drivers, you will open the setup Wizard if you have the NVIDIA 3D glasses and IR-transmitter. The transmitter controls the 3D glasses and is necessary to an available USB port on your computer. 2 Right-click anywhere on the desktop and select NVIDIA Control Panel. English 4 Important: Only NVIDIA graphics cards are supported. 2 Download and install...
User Manual (3D)
Page 7
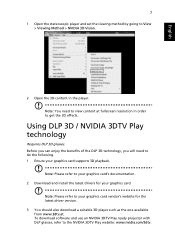
... card's documentation. 2 Download and install the latest drivers for the latest driver version. 3 You should also download a suitable 3D player such as the one available from www.3dtv.at fullscreen resolution in the player. Note: Please refer to do the following. 1 Ensure your graphics card. To download software and use an NVIDIA 3DTV Play ready projector with DLP glasses, refer to...
... card's documentation. 2 Download and install the latest drivers for the latest driver version. 3 You should also download a suitable 3D player such as the one available from www.3dtv.at fullscreen resolution in the player. Note: Please refer to do the following. 1 Ensure your graphics card. To download software and use an NVIDIA 3DTV Play ready projector with DLP glasses, refer to...
User Manual (3D)
Page 8
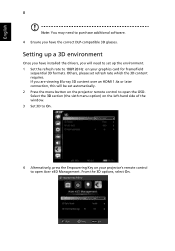
..., press the Empowering Key on your projector's remote control to set up a 3D environment Once you have installed the drivers, you have the correct DLP-compatible 3D glasses. Setting up the environment. 1 Set the refresh rate to open Acer e3D Management. From the 3D options, select On. Others, please set automatically. 2 Press the menu button on the projector remote control to 100/120 Hz on your graphics...
..., press the Empowering Key on your projector's remote control to set up a 3D environment Once you have installed the drivers, you have the correct DLP-compatible 3D glasses. Setting up the environment. 1 Set the refresh rate to open Acer e3D Management. From the 3D options, select On. Others, please set automatically. 2 Press the menu button on the projector remote control to 100/120 Hz on your graphics...
User Manual (3D)
Page 11
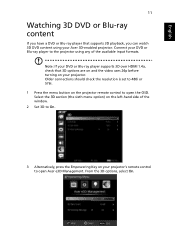
... projector using your Acer 3D-enabled projector. Older connections should check the resolution is set to 480i or 576i. 1 Press the menu button on your projector's remote control to open the OSD. From the 3D options, select On. Select the 3D section (the sixth menu option) on the left-hand side of the available input formats. Note: If your DVD or Blu-ray player supports 3D over HDMI...
... projector using your Acer 3D-enabled projector. Older connections should check the resolution is set to 480i or 576i. 1 Press the menu button on your projector's remote control to open the OSD. From the 3D options, select On. Select the 3D section (the sixth menu option) on the left-hand side of the available input formats. Note: If your DVD or Blu-ray player supports 3D over HDMI...
User Manual
Page 3
... product and to unplug the power cord from the projector. • If the system has multiple sources of any kind into this document for plug as possible. Use a damp cloth for your safety and comfort Read these instructions carefully. This product should never be blocked or covered. iii Information for cleaning. Follow all power cords from overheating. Caution for future reference...
... product and to unplug the power cord from the projector. • If the system has multiple sources of any kind into this document for plug as possible. Use a damp cloth for your safety and comfort Read these instructions carefully. This product should never be blocked or covered. iii Information for cleaning. Follow all power cords from overheating. Caution for future reference...

User Manual
Page 5
... the operating instructions Note: Adjust only those controls that is poorly ventilated or confined. For safety reasons, do not use non-compliant parts when adding or changing components. The bright may hurt your projector. v Product servicing Do not attempt to service this product from walls and free flow of air around the projector is necessary. • Locations where temperatures may become excessively high, such as opening or removing covers...
... the operating instructions Note: Adjust only those controls that is poorly ventilated or confined. For safety reasons, do not use non-compliant parts when adding or changing components. The bright may hurt your projector. v Product servicing Do not attempt to service this product from walls and free flow of air around the projector is necessary. • Locations where temperatures may become excessively high, such as opening or removing covers...
User Manual
Page 6
...fan to turn off before disconnecting power. • Do not frequently turn off . • Do not touch air outlet grille and bottom plate which may hurt your dealer. • Do not keep using this case, unplug immediately and contact your eyes. • Always open the lens shutter or remove the lens cap when the projector... damage when the filter/ventilation slots clogged with any object when the projector is operating. The temperature inside which becomes hot. • Clean the air filter frequently if have adjusted. • Do not listen to music at high volumes for extended ...
...fan to turn off before disconnecting power. • Do not frequently turn off . • Do not touch air outlet grille and bottom plate which may hurt your dealer. • Do not keep using this case, unplug immediately and contact your eyes. • Always open the lens shutter or remove the lens cap when the projector... damage when the filter/ventilation slots clogged with any object when the projector is operating. The temperature inside which becomes hot. • Clean the air filter frequently if have adjusted. • Do not listen to music at high volumes for extended ...
User Manual
Page 8
...; When switching the projector off the product before disconnecting power. • Turn on the projector first and then the signal sources. • Do not use lens cap when projector is in this user's guide to maximize the life of your eyes. • To reduce the risk of time. Don't: • Block the slots and openings on . Warning: • Do not look into the projector's lens when the light is...
...; When switching the projector off the product before disconnecting power. • Turn on the projector first and then the signal sources. • Do not use lens cap when projector is in this user's guide to maximize the life of your eyes. • To reduce the risk of time. Don't: • Block the slots and openings on . Warning: • Do not look into the projector's lens when the light is...

User Manual
Page 9
... Features 1 Package Overview 2 Projector Overview 4 Projector Outlook 4 Control Panel 5 Remote Control Layout 6 MHL (Mobile High-Definition Link) Control 8 Getting Started 10 Connecting the Projector 10 Turning the Projector On/Off 11 Turning on the Projector 11 Turning the projector off 12 Adjusting the Projected Image 13 Adjusting the Height of Projected Image 13 How to optimize image size and distance 14 User Controls 16 Installation menu 16 Onscreen Display (OSD) Menus 17 Color 18 Image 20 Setting 22 Management 22 Audio 23 3D 23 Language...
... Features 1 Package Overview 2 Projector Overview 4 Projector Outlook 4 Control Panel 5 Remote Control Layout 6 MHL (Mobile High-Definition Link) Control 8 Getting Started 10 Connecting the Projector 10 Turning the Projector On/Off 11 Turning on the Projector 11 Turning the projector off 12 Adjusting the Projected Image 13 Adjusting the Height of Projected Image 13 How to optimize image size and distance 14 User Controls 16 Installation menu 16 Onscreen Display (OSD) Menus 17 Color 18 Image 20 Setting 22 Management 22 Audio 23 3D 23 Language...

User Manual
Page 11
... size projector facilitates business purposes and home entertainment. • Acer EcoProjeciton Technology delivers Intelligent power management approach and physical efficiency improvement. • Equipped with HDMI™ connection supporting HDCP. • Advanced digital keystone correction delivers optimum presentations. • Multi-language on screen display (OSD) menus. • 1.7x digital zoom and pan move function. • Environmental light source and longer life by LED solution. • Enjoy media playback via USB...
... size projector facilitates business purposes and home entertainment. • Acer EcoProjeciton Technology delivers Intelligent power management approach and physical efficiency improvement. • Equipped with HDMI™ connection supporting HDCP. • Advanced digital keystone correction delivers optimum presentations. • Multi-language on screen display (OSD) menus. • 1.7x digital zoom and pan move function. • Environmental light source and longer life by LED solution. • Enjoy media playback via USB...

User Manual
Page 16
..." to enter media OSD setting. Previous Press to the previous step for the OSD menu operation or exit the OSD menu. Menu Press "MENU" to launch the Onscreen display (OSD) menu, back to previous the media file. Refer to the projector. English 6 Remote Control Layout 2 3 5 8 10 POWER ZOOM HIDE RATIO MODE SOURCE MEDIA HOME MEDIA SETUP MENU 1 17 4 6 7 9 18 11 POWER FREEZE HIDE RATIO MODE SOURCE BACK ENTER MENU 7 19 12 BACK...
..." to enter media OSD setting. Previous Press to the previous step for the OSD menu operation or exit the OSD menu. Menu Press "MENU" to launch the Onscreen display (OSD) menu, back to previous the media file. Refer to the projector. English 6 Remote Control Layout 2 3 5 8 10 POWER ZOOM HIDE RATIO MODE SOURCE MEDIA HOME MEDIA SETUP MENU 1 17 4 6 7 9 18 11 POWER FREEZE HIDE RATIO MODE SOURCE BACK ENTER MENU 7 19 12 BACK...

User Manual
Page 21
... power cord and signal cable are securely connected. • If you connect to switch between inputs. 1 Power button The Power indicator LED will flash red. 2 Turn on the projector by pressing "Power" button on the control panel, and the Power indicator LED will detect your source (computer, notebook, video player ,etc.). The projector will turn blue.(Illustration #1) 3 Turn on the remote control to multiple sources at the same time, use the "Source" button on either control panel or the remote control or direct source key on your source automatically. • If the screen displays...
... power cord and signal cable are securely connected. • If you connect to switch between inputs. 1 Power button The Power indicator LED will flash red. 2 Turn on the projector by pressing "Power" button on the control panel, and the Power indicator LED will detect your source (computer, notebook, video player ,etc.). The projector will turn blue.(Illustration #1) 3 Turn on the remote control to multiple sources at the same time, use the "Source" button on either control panel or the remote control or direct source key on your source automatically. • If the screen displays...
User Manual
Page 24
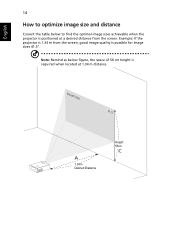
screen size 41.5" A 1.34m Desired Distance Height: 56cm C Note: Remind as below to find the optimal image sizes achievable when the projector is positioned at 1.34 m distance. Example: If the projector is 1.34 m from the screen. English 14 How to optimize image size and distance Consult the table below figure, the space of 56 cm height is required when located at a desired distance from the screen, good image quality is possible for image sizes 41.5".
screen size 41.5" A 1.34m Desired Distance Height: 56cm C Note: Remind as below to find the optimal image sizes achievable when the projector is positioned at 1.34 m distance. Example: If the projector is 1.34 m from the screen. English 14 How to optimize image size and distance Consult the table below figure, the space of 56 cm height is required when located at a desired distance from the screen, good image quality is possible for image sizes 41.5".
User Manual
Page 26
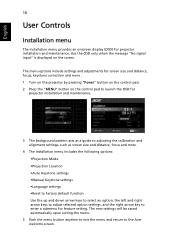
... only when the message "No signal input" is displayed on the control pad to launch the OSD for projector installation and maintenance. 3 The background pattern acts as a guide to adjusting the calibration and alignment settings, such as screen size and distance, focus and more . 4 The Installation menu includes the following options: •Projection Mode •Projection Location •Auto Keystone settings •Manual Keystone settings •Language settings •Reset to factory default function Use the up and down arrow keys...
... only when the message "No signal input" is displayed on the control pad to launch the OSD for projector installation and maintenance. 3 The background pattern acts as a guide to adjusting the calibration and alignment settings, such as screen size and distance, focus and more . 4 The Installation menu includes the following options: •Projection Mode •Projection Location •Auto Keystone settings •Manual Keystone settings •Language settings •Reset to factory default function Use the up and down arrow keys...
User Manual
Page 30
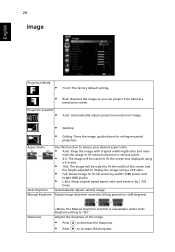
... • L.Box: Keep original signal aspect ratio and zoom in by tilting projection. (±40 degrees) Sharpness The Manual Keystone function is unavailable under Auto Keystone setting to increase the sharpness. Auto: Automatically adjusts projection location of image. • Desktop • Ceiling: Turns the image upside down for ceiling-mounted projection. Adjust image distortion caused by 1.333 times. 20 Image English Projection Mode • Front: The factory default setting. • Projection Location • Rear: Reverses the image so you can project from behind...
... • L.Box: Keep original signal aspect ratio and zoom in by tilting projection. (±40 degrees) Sharpness The Manual Keystone function is unavailable under Auto Keystone setting to increase the sharpness. Auto: Automatically adjusts projection location of image. • Desktop • Ceiling: Turns the image upside down for ceiling-mounted projection. Adjust image distortion caused by 1.333 times. 20 Image English Projection Mode • Front: The factory default setting. • Projection Location • Rear: Reverses the image so you can project from behind...
User Manual
Page 32
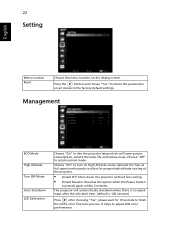
... when the Power button is pressed again within 2 minutes. Choose "Off" to adjust LED color performance. The projector will lower power consumption, extend the lamp life and reduce noise. Operate the fans at full speed continuously to allow for 10 seconds to finish the white color fine tune process. 22 Setting English Menu Location Reset Choose the menu location on all menus to the factory default settings. Choose "On" to turn on High Altitude mode.
... when the Power button is pressed again within 2 minutes. Choose "Off" to adjust LED color performance. The projector will lower power consumption, extend the lamp life and reduce noise. Operate the fans at full speed continuously to allow for 10 seconds to finish the white color fine tune process. 22 Setting English Menu Location Reset Choose the menu location on all menus to the factory default settings. Choose "On" to turn on High Altitude mode.
User Manual
Page 36
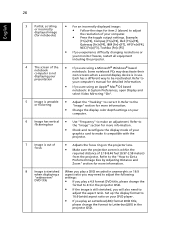
...; Change the display color depth settings on your computer. 6 Image has vertical • Use "Frequency" to make it . Each has a different way to make an adjustment. 26 English 3 Partial, scrolling • For an incorrectly displayed image: or incorrectly displayed image (for notebooks) • Follow the steps for item 2 (above) to adjust the resolution of focus • Adjusts the focus ring on the projector lens. • Make sure the projection screen...
...; Change the display color depth settings on your computer. 6 Image has vertical • Use "Frequency" to make it . Each has a different way to make an adjustment. 26 English 3 Partial, scrolling • For an incorrectly displayed image: or incorrectly displayed image (for notebooks) • Follow the steps for item 2 (above) to adjust the resolution of focus • Adjusts the focus ring on the projector lens. • Make sure the projection screen...
User Manual
Page 39
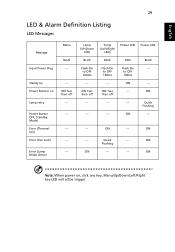
...) Error (Fan Lock) Error (Lamp Break down) Menu BLUE --- --ON 1sec then off --- --- ON --- Lamp (UP/Down LED) BLUE Flash On to OFF 100ms --- then off --- --- --- Quick --- ON Flashing ON --- --- ON --- ON Note: When power on Lamp retry Power button OFF; ON ON 1sec --- Temp (Left/Right LED) Power LED BLUE RED Flash On to OFF 100ms Flash On to OFF 100ms --ON 1sec then off ----- ------- ON Power LED BLUE --- --ON Quick Flashing --- --- English 29 LED & Alarm Definition Listing LED Messages Message Input Power...
...) Error (Fan Lock) Error (Lamp Break down) Menu BLUE --- --ON 1sec then off --- --- ON --- Lamp (UP/Down LED) BLUE Flash On to OFF 100ms --- then off --- --- --- Quick --- ON Flashing ON --- --- ON --- ON Note: When power on Lamp retry Power button OFF; ON ON 1sec --- Temp (Left/Right LED) Power LED BLUE RED Flash On to OFF 100ms Flash On to OFF 100ms --ON 1sec then off ----- ------- ON Power LED BLUE --- --ON Quick Flashing --- --- English 29 LED & Alarm Definition Listing LED Messages Message Input Power...

User Manual
Page 40
Projection system Resolution Computer compatibility Aspect ratio Displayable colors Projection lens Projection screen size (diagonal) Projection distance Throw ratio Horizontal scan rate Vertical refresh scan rate Keystone correction Weight Dimensions (W x D x H) Power supply Power consumption Operating temperature I/O connectors DLP® WXGA (1280 x 800) IBM PC and compatibles, Apple Macintosh, iMac and VESA standards: SXGA, XGA, SVGA, VGA, WXGA Full, 4:3, 16:9, L.Box 16.7 million colors YM101, fixed lens, F/2.0 30" (0.76 m) - 80" (2.03 m) 3.18' (0.97 m) - 8.46' (2.58...
Projection system Resolution Computer compatibility Aspect ratio Displayable colors Projection lens Projection screen size (diagonal) Projection distance Throw ratio Horizontal scan rate Vertical refresh scan rate Keystone correction Weight Dimensions (W x D x H) Power supply Power consumption Operating temperature I/O connectors DLP® WXGA (1280 x 800) IBM PC and compatibles, Apple Macintosh, iMac and VESA standards: SXGA, XGA, SVGA, VGA, WXGA Full, 4:3, 16:9, L.Box 16.7 million colors YM101, fixed lens, F/2.0 30" (0.76 m) - 80" (2.03 m) 3.18' (0.97 m) - 8.46' (2.58...


