
Acer Projector H6510BD, P1340W, X1140, X1240 Service Guide
Page 19
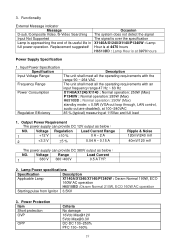
Replacement suggested! Occasion The system does not detect the signal The signal is over the specification X1140A/X1240/X1140/P1340W : Lamp Hour is at 4470 hours H6510BD : Lamp Hour is approaching the end of its useful life in full power ...0.04 A ~ 0.15 A The power supply can provide DC 12V output as below : NO. Lamp Power specifications Specification Description Applicable Lamp X1140A/X1240/X1140/P1340W : Osram Normal 190W, ECO 160W AC operation H6510BD :Osram Normal 210W, ECO 160W AC operation Starting pulse from Ignitor 3.5KV 3. 3. Power Protection Item Short ...
Replacement suggested! Occasion The system does not detect the signal The signal is over the specification X1140A/X1240/X1140/P1340W : Lamp Hour is at 4470 hours H6510BD : Lamp Hour is approaching the end of its useful life in full power ...0.04 A ~ 0.15 A The power supply can provide DC 12V output as below : NO. Lamp Power specifications Specification Description Applicable Lamp X1140A/X1240/X1140/P1340W : Osram Normal 190W, ECO 160W AC operation H6510BD :Osram Normal 210W, ECO 160W AC operation Starting pulse from Ignitor 3.5KV 3. 3. Power Protection Item Short ...
Acer Projector H6510BD, P1340W, X1140, X1240 Service Guide
Page 93
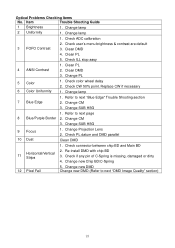
...Check ADC calibration 3 FOFO Contrast 2. Clean PL 5. Check CW 50% point. Replace CW if necessary 1. Change CM 3. Change SUB HSG 9 Focus 10 Dust 1. Check PL datum and DMD parallel Clean DMD 1. Change lamp 2 Uniformity 1. Change PL 5 Color 6 Color Uniformity 1. Change SUB HSG 1....dirty 4. Change new Chip BD/C-Spring 12 Pixel Fail 5. Item Trouble Shooting Guide 1 Brightness 1. Clean PL 2. Clean DMD 3. Change lamp 7 Blue Edge 1. Check user's menu brightness & contrast are default 3. Refer to next "Blue Edge" Trouble Shooting section 2. Re-...
...Check ADC calibration 3 FOFO Contrast 2. Clean PL 5. Check CW 50% point. Replace CW if necessary 1. Change CM 3. Change SUB HSG 9 Focus 10 Dust 1. Check PL datum and DMD parallel Clean DMD 1. Change lamp 2 Uniformity 1. Change PL 5 Color 6 Color Uniformity 1. Change SUB HSG 1....dirty 4. Change new Chip BD/C-Spring 12 Pixel Fail 5. Item Trouble Shooting Guide 1 Brightness 1. Clean PL 2. Clean DMD 3. Change lamp 7 Blue Edge 1. Check user's menu brightness & contrast are default 3. Refer to next "Blue Edge" Trouble Shooting section 2. Re-...
User Manual
Page 4
If you need to replace the power cord set . The overall system load must not exceed 80% of all products plugged into the wall outlet does not exceed the fuse ... product only with a three-wire grounded plug. Do not locate this product where people will probably cause unexpected short current or damage rotor devices or lamp. Make sure the power outlet is a safety feature. The plug only fits in too many devices. Contact your dealer or local power company. • Do...
If you need to replace the power cord set . The overall system load must not exceed 80% of all products plugged into the wall outlet does not exceed the fuse ... product only with a three-wire grounded plug. Do not locate this product where people will probably cause unexpected short current or damage rotor devices or lamp. Make sure the power outlet is a safety feature. The plug only fits in too many devices. Contact your dealer or local power company. • Do...
User Manual
Page 6
...projector is unplugged. • The product will detect the life of displaying inverted images for replacement. • Do not operate lamps beyond the rated lamp life. vi might cause fire or electric shock. To temporarily turn off the lamp, press HIDE on . • Do not block the projector lens with dirt or ...operation as this case, unplug immediately and contact your dealer for inspection. • Do not face the projector lens to the sun. Only use acer ceiling mount kit for the fan to become hot. • Clean the air filter frequently. The best way is to fall over, causing ...
...projector is unplugged. • The product will detect the life of displaying inverted images for replacement. • Do not operate lamps beyond the rated lamp life. vi might cause fire or electric shock. To temporarily turn off the lamp, press HIDE on . • Do not block the projector lens with dirt or ...operation as this case, unplug immediately and contact your dealer for inspection. • Do not face the projector lens to the sun. Only use acer ceiling mount kit for the fan to become hot. • Clean the air filter frequently. The best way is to fall over, causing ...
User Manual
Page 8
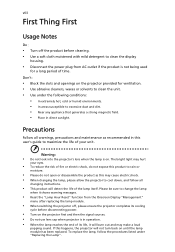
...'s guide to excessive dust and dirt. • Near any appliance that generates a strong magnetic field. • Place in direct sunlight. To replace the lamp, follow all changing instructions. • This product will detect the life of its life, it shows warning messages. • Reset the...completes its cooling cycle before cleaning. • Use a soft cloth moistened with mild detergent to change the lamp when it will not turn back on until the lamp module has been replaced. Please be sure to clean the display housing. • Disconnect the power plug from the Onscreen Display "...
...'s guide to excessive dust and dirt. • Near any appliance that generates a strong magnetic field. • Place in direct sunlight. To replace the lamp, follow all changing instructions. • This product will detect the life of its life, it shows warning messages. • Reset the...completes its cooling cycle before cleaning. • Use a soft cloth moistened with mild detergent to change the lamp when it will not turn back on until the lamp module has been replaced. Please be sure to clean the display housing. • Disconnect the power plug from the Onscreen Display "...

User Manual
Page 10
Appendices 39 Troubleshooting 39 LED & Alarm Definition Listing 43 Replacing the Lamp 44 Ceiling Mount Installation 45 Specifications 48 Compatibility Modes 51 Regulations and safety notices 55
Appendices 39 Troubleshooting 39 LED & Alarm Definition Listing 43 Replacing the Lamp 44 Ceiling Mount Installation 45 Specifications 48 Compatibility Modes 51 Regulations and safety notices 55
User Manual
Page 49
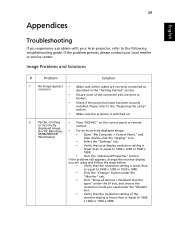
If the problem persists, please contact your Acer projector, refer to the "Replacing the Lamp" section. • Make sure the projector is switched on. 2 Partial, scrolling • Press "RESYNC" on the control panel or remote or incorrectly displayed image .... • Click the "Change" button under the "Monitor" tab. • Click "Show all the cables are bent or broken. • Check if the projection lamp has been securely installed. 39 Appendices English Troubleshooting If you need under the "Models" box. • Verify that your display resolution setting is lower than...
If the problem persists, please contact your Acer projector, refer to the "Replacing the Lamp" section. • Make sure the projector is switched on. 2 Partial, scrolling • Press "RESYNC" on the control panel or remote or incorrectly displayed image .... • Click the "Change" button under the "Monitor" tab. • Click "Show all the cables are bent or broken. • Check if the projection lamp has been securely installed. 39 Appendices English Troubleshooting If you need under the "Models" box. • Verify that your display resolution setting is lower than...
User Manual
Page 51
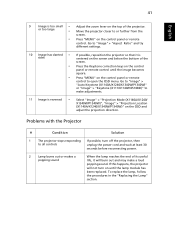
... panel or remote control to make a loud popping sound. To replace the lamp, follow the procedures in the "Replacing the Lamp" section. Go to "Image" > "Auto Keystone (X1140A/X1240/X1340W/P1340W)" or "Image" > "Keystone (X111/X1140/H6510BD)" to open the OSD menu. If this happens, the projector will...the Keystone correction keys on the control panel or remote control until the image becomes square. • Press "MENU" on until the lamp module has been replaced. Go to or further from the screen. • Press "MENU" on the control panel or remote control. or too large ...
... panel or remote control to make a loud popping sound. To replace the lamp, follow the procedures in the "Replacing the Lamp" section. Go to "Image" > "Auto Keystone (X1140A/X1240/X1340W/P1340W)" or "Image" > "Keystone (X111/X1140/H6510BD)" to open the OSD menu. If this happens, the projector will...the Keystone correction keys on the control panel or remote control until the image becomes square. • Press "MENU" on until the lamp module has been replaced. Go to or further from the screen. • Press "MENU" on the control panel or remote control. or too large ...
User Manual
Page 52
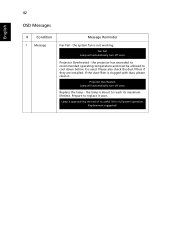
... OSD Messages # Condition 1 Message Message Reminder Fan Fail - the projector has exceeded its recommended operating temperature and must be allowed to replace it . Lamp will automatically turn off soon. the lamp is clogged with dust, please clean it soon. If the dust filter is about to reach its useful life in full power...
... OSD Messages # Condition 1 Message Message Reminder Fan Fail - the projector has exceeded its recommended operating temperature and must be allowed to replace it . Lamp will automatically turn off soon. the lamp is clogged with dust, please clean it soon. If the dust filter is about to reach its useful life in full power...
User Manual
Page 54
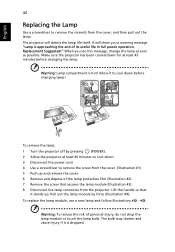
... to remove the screw(s) from the cover, and then pull out the lamp. Lift the handle so that secures the lamp module (Illustration #3). 8 Disconnect the lamp connector from the projector. To replace the lamp module, use a new lamp and follow Illustrations # 5 - # 8 . English 44 Replacing the Lamp Use a screwdriver to remove the screw from the cover. (Illustration #1) 5 Push up...
... to remove the screw(s) from the cover, and then pull out the lamp. Lift the handle so that secures the lamp module (Illustration #3). 8 Disconnect the lamp connector from the projector. To replace the lamp module, use a new lamp and follow Illustrations # 5 - # 8 . English 44 Replacing the Lamp Use a screwdriver to remove the screw from the cover. (Illustration #1) 5 Push up...


