
Acer Projector H6510BD, P1340W, X1140, X1240 Service Guide
Page 2
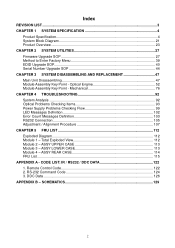
... 113 Module 3 - ASSY LOWER CASE 113 Module 4 - DDC Data ...126 APPENDIX B - CODE LIST: IR / RS232 / DDC DATA 122 1. SCHEMATICS 129 2 Total Exploded View 112 Module 2 - Remote Control Code 122 2. Optical Engine 52 Module Assembly Key Point - Index REVISION LIST ...3 CHAPTER 1 SYSTEM SPECIFICATION 4 Product Specification...4 System Block Diagram 21 Product Overview ...23...
... 113 Module 3 - ASSY LOWER CASE 113 Module 4 - DDC Data ...126 APPENDIX B - CODE LIST: IR / RS232 / DDC DATA 122 1. SCHEMATICS 129 2 Total Exploded View 112 Module 2 - Remote Control Code 122 2. Optical Engine 52 Module Assembly Key Point - Index REVISION LIST ...3 CHAPTER 1 SYSTEM SPECIFICATION 4 Product Specification...4 System Block Diagram 21 Product Overview ...23...
Acer Projector H6510BD, P1340W, X1140, X1240 Service Guide
Page 122
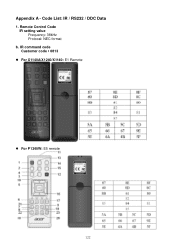
Appendix A - Code List: IR / RS232 / DDC Data 1. IR command code Customer code:0813 For X1140A/X1240/X1140: E1 Remote For P1340W: E5 remote 122 Remote Control Code IR setting value Frequency: 38kHz Protocal: NEC format b.
Appendix A - Code List: IR / RS232 / DDC Data 1. IR command code Customer code:0813 For X1140A/X1240/X1140: E1 Remote For P1340W: E5 remote 122 Remote Control Code IR setting value Frequency: 38kHz Protocal: NEC format b.
User Manual
Page 6
...cause a fire. It could cause the object to become hot. • Clean the air filter frequently. Refer servicing only to break on the remote control. • The lamp becomes extremely hot during operation. vi might cause fire or electric shock. There are clogged with any electronic components ...module. • Do not attempt to fall over, causing injury or damage. • This product is capable of the lamp itself. Only use acer ceiling mount kit for inspection. • Do not face the projector lens to fire. • When switching the projector off the lamp, press ...
...cause a fire. It could cause the object to become hot. • Clean the air filter frequently. Refer servicing only to break on the remote control. • The lamp becomes extremely hot during operation. vi might cause fire or electric shock. There are clogged with any electronic components ...module. • Do not attempt to fall over, causing injury or damage. • This product is capable of the lamp itself. Only use acer ceiling mount kit for inspection. • Do not face the projector lens to fire. • When switching the projector off the lamp, press ...
User Manual
Page 9
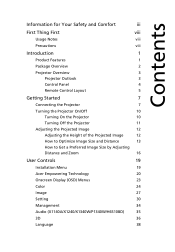
... Thing First viii Usage Notes viii Precautions viii Introduction 1 Product Features 1 Package Overview 2 Projector Overview 3 Projector Outlook 3 Control Panel 4 Remote Control Layout 5 Getting Started 7 Connecting the Projector 7 Turning the Projector On/Off 10 Turning On the Projector 10 Turning Off the Projector... Get a Preferred Image Size by Adjusting Distance and Zoom 16 User Controls 19 Installation Menu 19 Acer Empowering Technology 20 Onscreen Display (OSD) Menus 23 Color 24 Image 27 Setting 30 Management 34 Audio (X1140A/X1240/X1340W/...
... Thing First viii Usage Notes viii Precautions viii Introduction 1 Product Features 1 Package Overview 2 Projector Overview 3 Projector Outlook 3 Control Panel 4 Remote Control Layout 5 Getting Started 7 Connecting the Projector 7 Turning the Projector On/Off 10 Turning On the Projector 10 Turning Off the Projector... Get a Preferred Image Size by Adjusting Distance and Zoom 16 User Controls 19 Installation Menu 19 Acer Empowering Technology 20 Onscreen Display (OSD) Menus 23 Color 24 Image 27 Setting 30 Management 34 Audio (X1140A/X1240/X1340W/...
User Manual
Page 11
... on , the projector dynamically adjusts the power consumption of the lamp according to the brightness of the lamp by up to the 3D functions (H6510BD only) • Acer ColorBoost technology delivers vivid, life-like images • High brightness and contrast ratio • Versatile display modes enable optimum performance in any situation •... consumption will be reduced and the contrast of the image will decrease the power consumption of the image being projected. Dynamic Black: If turned on remote control allows quick and easy access to 70% when no input signal can be enhanced. -
... on , the projector dynamically adjusts the power consumption of the lamp according to the brightness of the lamp by up to the 3D functions (H6510BD only) • Acer ColorBoost technology delivers vivid, life-like images • High brightness and contrast ratio • Versatile display modes enable optimum performance in any situation •... consumption will be reduced and the contrast of the image will decrease the power consumption of the image being projected. Dynamic Black: If turned on remote control allows quick and easy access to 70% when no input signal can be enhanced. -
User Manual
Page 12
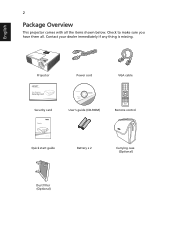
Contact your dealer immediately if any thing is missing. English Projector Power cord VGA cable Security card User's guide (CD-ROM) Remote control Quick start guide Battery x 2 Carrying case (Optional) Dust filter (Optional) Check to make sure you have them all the items shown below. 2 Package Overview This projector comes with all .
Contact your dealer immediately if any thing is missing. English Projector Power cord VGA cable Security card User's guide (CD-ROM) Remote control Quick start guide Battery x 2 Carrying case (Optional) Dust filter (Optional) Check to make sure you have them all the items shown below. 2 Package Overview This projector comes with all .
User Manual
Page 13
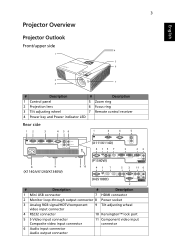
... Outlook Front/upper side 1 3 4 5 6 2 7 3 # Description # Description 1 Control panel 5 Zoom ring 2 Projection lens 6 Focus ring 3 Tilt adjusting wheel 7 Remote control receiver 4 Power key and Power indicator LED Rear side (X111/X1140) (P1340W) (X1140A/X1240/X1340W) (H6510BD) # Description # Description 1 Mini USB connector 7 HDMI connector 2 Monitor loop-through output connector 8 Power socket 3 Analog RGB signal...
... Outlook Front/upper side 1 3 4 5 6 2 7 3 # Description # Description 1 Control panel 5 Zoom ring 2 Projection lens 6 Focus ring 3 Tilt adjusting wheel 7 Remote control receiver 4 Power key and Power indicator LED Rear side (X111/X1140) (P1340W) (X1140A/X1240/X1340W) (H6510BD) # Description # Description 1 Mini USB connector 7 HDMI connector 2 Monitor loop-through output connector 8 Power socket 3 Analog RGB signal...
User Manual
Page 15
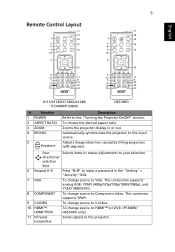
... (480p/576p/720p/1080i/1080p), and YCbCr (480i/576i). 8 COMPONENT To change source to HDMI™ (or DVI). (P1340W/ H6510BD only) 11 Infrared transmitter Sends signals to S-Video. 10 HDMI™; Four directional selection keys Selects items or makes adjustments to your selection...connector supports YPbPr. 9 S-VIDEO To change source to Component video. To choose the desired aspect ratio. 5 Remote Control Layout English X111/X1140/X1140A/X1240/ X1340W/P1340W H6510BD # Function 1 POWER 2 ASPECT RATIO 3 ZOOM 4 RESYNC 5 Keystone Description Refer to the input source. ...
... (480p/576p/720p/1080i/1080p), and YCbCr (480i/576i). 8 COMPONENT To change source to HDMI™ (or DVI). (P1340W/ H6510BD only) 11 Infrared transmitter Sends signals to S-Video. 10 HDMI™; Four directional selection keys Selects items or makes adjustments to your selection...connector supports YPbPr. 9 S-VIDEO To change source to Component video. To choose the desired aspect ratio. 5 Remote Control Layout English X111/X1140/X1140A/X1240/ X1340W/P1340W H6510BD # Function 1 POWER 2 ASPECT RATIO 3 ZOOM 4 RESYNC 5 Keystone Description Refer to the input source. ...
User Manual
Page 20
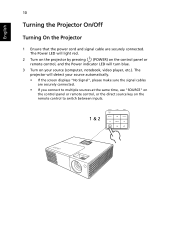
..., and the Power indicator LED will detect your source (computer, notebook, video player, etc.). The projector will turn blue. 3 Turn on the remote control to switch between inputs. 1 & 2 English 10 Turning the Projector On/Off Turning On the Projector 1 Ensure that the power cord and signal cable... are securely connected. • If you connect to multiple sources at the same time, use "SOURCE" on the control panel or remote control, or the direct source key on your source automatically. • If the screen displays "No Signal", please make sure the signal cables are ...
..., and the Power indicator LED will detect your source (computer, notebook, video player, etc.). The projector will turn blue. 3 Turn on the remote control to switch between inputs. 1 & 2 English 10 Turning the Projector On/Off Turning On the Projector 1 Ensure that the power cord and signal cable... are securely connected. • If you connect to multiple sources at the same time, use "SOURCE" on the control panel or remote control, or the direct source key on your source automatically. • If the screen displays "No Signal", please make sure the signal cables are ...
User Manual
Page 29
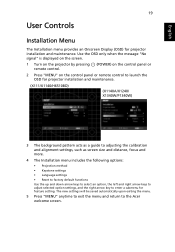
..." is displayed on the screen. 1 Turn on the projector by pressing remote control. (POWER) on the control panel or 2 Press "MENU" on the control panel or remote control to launch the OSD for projector installation and maintenance. (X111/X1140/H6510BD) (X1140A/X1240/ X1340W/P1340W) 3 The background pattern acts as a ...down arrow keys to select an option, the left and right arrow keys to adjust selected option settings, and the right arrow key to the Acer welcome screen. The new settings will be saved automatically upon exiting the menu. 5 Press "MENU" anytime to exit the menu and return to...
..." is displayed on the screen. 1 Turn on the projector by pressing remote control. (POWER) on the control panel or 2 Press "MENU" on the control panel or remote control to launch the OSD for projector installation and maintenance. (X111/X1140/H6510BD) (X1140A/X1240/ X1340W/P1340W) 3 The background pattern acts as a ...down arrow keys to select an option, the left and right arrow keys to adjust selected option settings, and the right arrow key to the Acer welcome screen. The new settings will be saved automatically upon exiting the menu. 5 Press "MENU" anytime to exit the menu and return to...
User Manual
Page 33
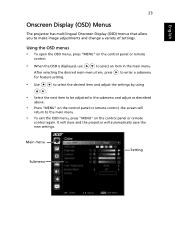
...It will close and the projector will return to the main menu. • To exit the OSD menu, press "MENU" on the control panel or remote control. • When the OSD is displayed, use to make image adjustments and change a variety of settings. Using the OSD menus • To ...open the OSD menu, press "MENU" on the control panel or remote control again. Main menu Submenu Setting English 23 Onscreen Display (OSD) Menus The projector has multilingual Onscreen Display (OSD) menus that allow you to select...
...It will close and the projector will return to the main menu. • To exit the OSD menu, press "MENU" on the control panel or remote control. • When the OSD is displayed, use to make image adjustments and change a variety of settings. Using the OSD menus • To ...open the OSD menu, press "MENU" on the control panel or remote control again. Main menu Submenu Setting English 23 Onscreen Display (OSD) Menus The projector has multilingual Onscreen Display (OSD) menus that allow you to select...
User Manual
Page 42
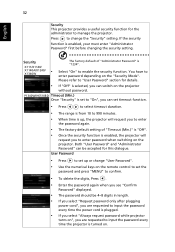
Select "On" to manage the projector. You have to 990 minutes. • When time is up or change the "Security" setting. P1340W/H6510BD Timeout (Min.) Once "Security" is set to "On", you can set timeout function. • Press to select timeout duration. • The range ... provides a useful security function for the administrator to enable the security function. Press to change "User Password". • Use the numerical keys on the remote control to set up , the projector will request you to confirm. • To delete the digits, Press . • Enter the password again when...
Select "On" to manage the projector. You have to 990 minutes. • When time is up or change the "Security" setting. P1340W/H6510BD Timeout (Min.) Once "Security" is set to "On", you can set timeout function. • Press to select timeout duration. • The range ... provides a useful security function for the administrator to enable the security function. Press to change "User Password". • Use the numerical keys on the remote control to set up , the projector will request you to confirm. • To delete the digits, Press . • Enter the password again when...
User Manual
Page 49
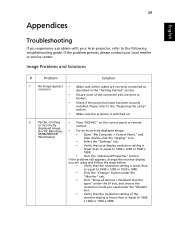
... in the "Getting Started" section. • Ensure none of the monitor display is switched on. 2 Partial, scrolling • Press "RESYNC" on the control panel or remote or incorrectly displayed image (For PC (Windows • control. If the problem persists, please contact your...
... in the "Getting Started" section. • Ensure none of the monitor display is switched on. 2 Partial, scrolling • Press "RESYNC" on the control panel or remote or incorrectly displayed image (For PC (Windows • control. If the problem persists, please contact your...
User Manual
Page 50
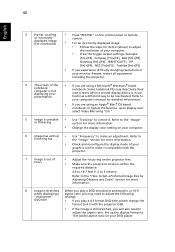
... the "Image" section for more information. • Check and reconfigure the display mode of focus • Adjust the focus ring on the control panel or remote control. • For an incorrectly displayed image: • Follow the steps for item 2 (above) to be reactivated. Set up the display format to 16:9 (wide...
... the "Image" section for more information. • Check and reconfigure the display mode of focus • Adjust the focus ring on the control panel or remote control. • For an incorrectly displayed image: • Follow the steps for item 2 (above) to be reactivated. Set up the display format to 16:9 (wide...
User Manual
Page 51
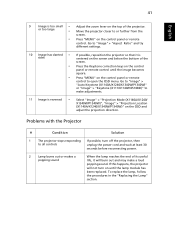
... • Press the Keystone correction keys on the control panel or remote control until the lamp module has been replaced. Go to "Image" > "Auto Keystone (X1140A/X1240/X1340W/P1340W)" or "Image" > "Keystone (X111/X1140/H6510BD)" to or further from the screen. • Press "MENU" ...on until the image becomes square. • Press "MENU" on the control panel or remote control to open the OSD menu. Problems with the Projector # Condition Solution ...
... • Press the Keystone correction keys on the control panel or remote control until the lamp module has been replaced. Go to "Image" > "Auto Keystone (X1140A/X1240/X1340W/P1340W)" or "Image" > "Keystone (X111/X1140/H6510BD)" to or further from the screen. • Press "MENU" ...on until the image becomes square. • Press "MENU" on the control panel or remote control to open the OSD menu. Problems with the Projector # Condition Solution ...
User Manual
Page 60
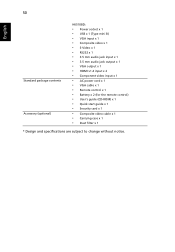
...H6510BD: • Power socket x 1 • USB x 1 (Type mini B) • VGA input x 1 • Composite video x 1 • S-Video x 1 • RS232 x 1 • 3.5 mm audio jack input x 1 • 3.5 mm audio jack output x 1 • VGA output x 1 • HDMI v1.4 input x 2 • Component video input x 1 • AC power cord x 1 • VGA cable x 1 • Remote... control x 1 • Battery x 2 (for the remote control) • User's guide (CD-ROM) x 1 • Quick start guide x 1 • Security...
...H6510BD: • Power socket x 1 • USB x 1 (Type mini B) • VGA input x 1 • Composite video x 1 • S-Video x 1 • RS232 x 1 • 3.5 mm audio jack input x 1 • 3.5 mm audio jack output x 1 • VGA output x 1 • HDMI v1.4 input x 2 • Component video input x 1 • AC power cord x 1 • VGA cable x 1 • Remote... control x 1 • Battery x 2 (for the remote control) • User's guide (CD-ROM) x 1 • Quick start guide x 1 • Security...
User Manual (3D)
Page 5
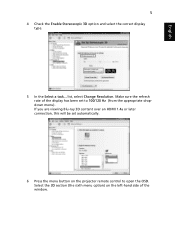
English 5 4 Check the Enable Stereoscopic 3D option and select the correct display type. 5 In the Select a task... list, select Change Resolution. If you are viewing Blu-ray 3D content over an HDMI 1.4a or later connection, this will be set to open the OSD. Select the 3D section (the sixth menu option) on the projector remote control to 100/120 Hz (from the appropriate dropdown menu). Make sure the refresh rate of the display has been set automatically. 6 Press the menu button on the left-hand side of the window.
English 5 4 Check the Enable Stereoscopic 3D option and select the correct display type. 5 In the Select a task... list, select Change Resolution. If you are viewing Blu-ray 3D content over an HDMI 1.4a or later connection, this will be set to open the OSD. Select the 3D section (the sixth menu option) on the projector remote control to 100/120 Hz (from the appropriate dropdown menu). Make sure the refresh rate of the display has been set automatically. 6 Press the menu button on the left-hand side of the window.
User Manual (3D)
Page 6
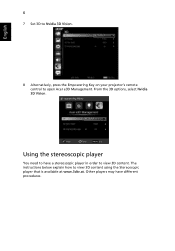
The instructions below explain how to open Acer e3D Management. From the 3D options, select Nvidia 3D Vision. English 6 7 Set 3D to Nvidia 3D Vision. 8 Alternatively, press the Empowering Key on your projector's remote control to view 3D content using the Stereoscopic player that is available at www.3dtv.at. Other players may have a stereoscopic player in order to have different procedures. Using the stereoscopic player You need to view 3D content.
The instructions below explain how to open Acer e3D Management. From the 3D options, select Nvidia 3D Vision. English 6 7 Set 3D to Nvidia 3D Vision. 8 Alternatively, press the Empowering Key on your projector's remote control to view 3D content using the Stereoscopic player that is available at www.3dtv.at. Other players may have a stereoscopic player in order to have different procedures. Using the stereoscopic player You need to view 3D content.
User Manual (3D)
Page 8
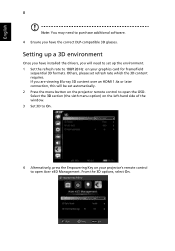
...menu option) on the left-hand side of the window. 3 Set 3D to On. 4 Alternatively, press the Empowering Key on the projector remote control to open Acer e3D Management. If you have the correct DLP-compatible 3D glasses. Setting up the environment. 1 Set the refresh rate to 100/120 Hz on... your projector's remote control to open the OSD. English 8 Note: You may need to set up a 3D environment Once you have installed the drivers...
...menu option) on the left-hand side of the window. 3 Set 3D to On. 4 Alternatively, press the Empowering Key on the projector remote control to open Acer e3D Management. If you have the correct DLP-compatible 3D glasses. Setting up the environment. 1 Set the refresh rate to 100/120 Hz on... your projector's remote control to open the OSD. English 8 Note: You may need to set up a 3D environment Once you have installed the drivers...
User Manual (3D)
Page 11
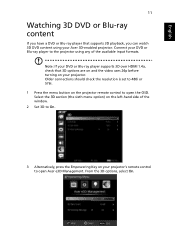
Connect your DVD or Blu-ray player to the projector using your Acer 3D-enabled projector. Select the 3D section (the sixth menu option) on the left-hand side of the available input formats. From the 3D options, ... the Empowering Key on your projector. Older connections should check the resolution is set to 480i or 576i. 1 Press the menu button on the projector remote control to open the OSD. Note: If your DVD or Blu-ray player supports 3D over HDMI 1.4a, check that supports 3D playback, you have...
Connect your DVD or Blu-ray player to the projector using your Acer 3D-enabled projector. Select the 3D section (the sixth menu option) on the left-hand side of the available input formats. From the 3D options, ... the Empowering Key on your projector. Older connections should check the resolution is set to 480i or 576i. 1 Press the menu button on the projector remote control to open the OSD. Note: If your DVD or Blu-ray player supports 3D over HDMI 1.4a, check that supports 3D playback, you have...


