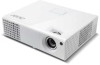
Acer Projector H6510BD, P1340W, X1140, X1240 Service Guide
Page 9
...Keystone-) 3 LEDs: Power On/Off Status; When CC enable and aspect ratio 16:9, keystone range ±38∘ X1140A/X1240/X1140/P1340W : Projector will auto-detect 9 HDMI-Video/audio and HDMI-Graphic Signal 4. Menu ; Down-mix 5.1channel to stereo channels IR Receiver x 1 (Front)... 13.1 IR Receiver 13.2 Serial Connector 13.3 USB Connector 14.0 User Interface 14.1 Operator Keypad 14.2 Indicators 14.3 Electric Keystone 14.4 Auto Ceiling mount EDID 1.3 X1140/H6510BD : 15 pin D-Sub (Female) x 1 X1140A/X1240/P1340W : 15 pin D-Sub (Female) x 2 G(Y): Video amplitude 0.7/1.0 Vp-p : Impedance...
...Keystone-) 3 LEDs: Power On/Off Status; When CC enable and aspect ratio 16:9, keystone range ±38∘ X1140A/X1240/X1140/P1340W : Projector will auto-detect 9 HDMI-Video/audio and HDMI-Graphic Signal 4. Menu ; Down-mix 5.1channel to stereo channels IR Receiver x 1 (Front)... 13.1 IR Receiver 13.2 Serial Connector 13.3 USB Connector 14.0 User Interface 14.1 Operator Keypad 14.2 Indicators 14.3 Electric Keystone 14.4 Auto Ceiling mount EDID 1.3 X1140/H6510BD : 15 pin D-Sub (Female) x 1 X1140A/X1240/P1340W : 15 pin D-Sub (Female) x 2 G(Y): Video amplitude 0.7/1.0 Vp-p : Impedance...
User Manual
Page 6
... dirt or dust. • Do not look into the air outlet grille when projector is securely installed. There are dangerous high voltages inside may hurt you. Only use acer ceiling mount kit for mounting the projector and ensure it . In this case contact your dealer. • Do not ...keep using this could cause it to wait for ceiling mount installation. The temperature inside which has its cooling cycle...
... dirt or dust. • Do not look into the air outlet grille when projector is securely installed. There are dangerous high voltages inside may hurt you. Only use acer ceiling mount kit for mounting the projector and ensure it . In this case contact your dealer. • Do not ...keep using this could cause it to wait for ceiling mount installation. The temperature inside which has its cooling cycle...

User Manual
Page 37
...• Projection (X111/X1140/ • H6510BD) • Projection • Mode (X1140A/ X1240/X1340W/ • P1340W) Front-Desktop: The factory default setting. Rear-Ceiling: When you select this function, the projector inverts the image for ceiling-mounted projection. You can project from behind a ...translucent screen. Rear-Desktop: When you select this function, the projector reverses and inverts the image at same time. Rear...
...• Projection (X111/X1140/ • H6510BD) • Projection • Mode (X1140A/ X1240/X1340W/ • P1340W) Front-Desktop: The factory default setting. Rear-Ceiling: When you select this function, the projector inverts the image for ceiling-mounted projection. You can project from behind a ...translucent screen. Rear-Desktop: When you select this function, the projector reverses and inverts the image at same time. Rear...
User Manual
Page 55
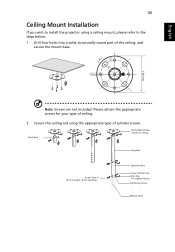
... 2 0 130 mm Note: Screws are not included. For tighten/loosen Tightening Screw Medium Rod English 45 Ceiling Mount Installation If you wish to install the projector using the appropriate type of the ceiling, and secure the mount base. Please obtain the appropriate screws for your type of ceiling. 2 Secure the ceiling rod using...
... 2 0 130 mm Note: Screws are not included. For tighten/loosen Tightening Screw Medium Rod English 45 Ceiling Mount Installation If you wish to install the projector using the appropriate type of the ceiling, and secure the mount base. Please obtain the appropriate screws for your type of ceiling. 2 Secure the ceiling rod using...
User Manual
Page 56
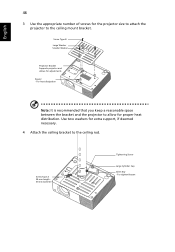
Use two washers for the projector size to attach the projector to the ceiling mount bracket. Screw Type A 50 mm length /8 mm diameter Tightening Screw Large Cylinder Cap Allen Key - English 46 3 Use the appropriate number of screws for extra .... 4 Attach the ceiling bracket to the ceiling rod. For heat dissipation Note: It is recommended that you keep a reasonable space between the bracket and the projector to allow for adjustments Spacer - Screw Type B Large Washer Smaller Washer Projector Bracket Supports projector and allows for proper heat distribution. For tighten/loosen
Use two washers for the projector size to attach the projector to the ceiling mount bracket. Screw Type A 50 mm length /8 mm diameter Tightening Screw Large Cylinder Cap Allen Key - English 46 3 Use the appropriate number of screws for extra .... 4 Attach the ceiling bracket to the ceiling rod. For heat dissipation Note: It is recommended that you keep a reasonable space between the bracket and the projector to allow for adjustments Spacer - Screw Type B Large Washer Smaller Washer Projector Bracket Supports projector and allows for proper heat distribution. For tighten/loosen


