
User Manual
Page 2
...new editions of this manual or supplementary documents and publications. The serial number and model number are used herein for a particular purpose. Acer Incorporated. Acer Projector H6500/E-140/HE-802 Series User's Guide Original Issue: 09/2011 Changes may be incorporated in the ... by photocopy, recording or otherwise, without obligation to their respective companies. Acer Projector H6500/E-140/HE-802 Series Model number Serial number Date of purchase Place of purchase Acer and the Acer logo are trademarks or registered trademarks of such revisions or changes. "HDMITM,...
...new editions of this manual or supplementary documents and publications. The serial number and model number are used herein for a particular purpose. Acer Incorporated. Acer Projector H6500/E-140/HE-802 Series User's Guide Original Issue: 09/2011 Changes may be incorporated in the ... by photocopy, recording or otherwise, without obligation to their respective companies. Acer Projector H6500/E-140/HE-802 Series Model number Serial number Date of purchase Place of purchase Acer and the Acer logo are trademarks or registered trademarks of such revisions or changes. "HDMITM,...

User Manual
Page 3
... into the product. Never spill liquid of any kind onto or into this product on an unstable cart, stand or table. Warnings! • Do not use liquid cleaners or aerosol cleaners. Do not use this product near or over a radiator or heat register, or in a built-in a fire or electric shock.... Use a damp cloth for your safety and comfort Read these instructions carefully. This product should never be blocked or covered. Follow all power cords from overheating. ...
... into the product. Never spill liquid of any kind onto or into this product on an unstable cart, stand or table. Warnings! • Do not use liquid cleaners or aerosol cleaners. Do not use this product near or over a radiator or heat register, or in a built-in a fire or electric shock.... Use a damp cloth for your safety and comfort Read these instructions carefully. This product should never be blocked or covered. Follow all power cords from overheating. ...
User Manual
Page 4
... is equipped with a three-wire grounded plug. Do not insert the plug into the extension cord does not exceed the extension cord ampere rating. Using a power outlet that the new power cord meets the following requirements: detachable type, UL listed/CSA certified, VDE approved or its equivalent, 4.5 ...Contact your dealer or local power company. • Do not allow anything to rest on the marking label. If you are used with this product. • Use the product only with the performance of this product, make sure that is properly grounded before inserting the AC adapter plug. The...
... is equipped with a three-wire grounded plug. Do not insert the plug into the extension cord does not exceed the extension cord ampere rating. Using a power outlet that the new power cord meets the following requirements: detachable type, UL listed/CSA certified, VDE approved or its equivalent, 4.5 ...Contact your dealer or local power company. • Do not allow anything to rest on the marking label. If you are used with this product. • Use the product only with the performance of this product, make sure that is properly grounded before inserting the AC adapter plug. The...
User Manual
Page 5
For safety reasons, do not use non-compliant parts when adding or changing components. Warning! Your device and its enhancements may contain small parts. The bright may hurt your eyes. • ...
For safety reasons, do not use non-compliant parts when adding or changing components. Warning! Your device and its enhancements may contain small parts. The bright may hurt your eyes. • ...
User Manual
Page 6
... removing the lamp assembly for inspection. • Do not face the projector lens to break or drop it is capable of the lamp itself. Only use acer ceiling mount kit for the fan to fall over, causing injury or damage. • This product is securely installed. The best way is operating. ... is the lamp which becomes hot. • Clean the air filter frequently if have. In this case contact your dealer. • Do not keep using this projector. It may cause the projector to turn off . • Do not touch air outlet grille and bottom plate which has its cooling cycle...
... removing the lamp assembly for inspection. • Do not face the projector lens to break or drop it is capable of the lamp itself. Only use acer ceiling mount kit for the fan to fall over, causing injury or damage. • This product is securely installed. The best way is operating. ... is the lamp which becomes hot. • Clean the air filter frequently if have. In this case contact your dealer. • Do not keep using this projector. It may cause the projector to turn off . • Do not touch air outlet grille and bottom plate which has its cooling cycle...
User Manual
Page 8
...strong magnetic field. • Place In direct sunlight. viii First things first Usage Notes Do: • Turn off the product before cleaning. • Use a soft cloth moistened with mild detergent to clean the display housing. • Disconnect the power plug from the Onscreen display "Management" menu after replacing... projector completes its cooling cycle before disconnecting power. • Turn on the projector first and then the signal sources. • Do not use lens cap when projector is in this user's guide to change the lamp when it will burn out and may make a loud popping sound...
...strong magnetic field. • Place In direct sunlight. viii First things first Usage Notes Do: • Turn off the product before cleaning. • Use a soft cloth moistened with mild detergent to clean the display housing. • Disconnect the power plug from the Onscreen display "Management" menu after replacing... projector completes its cooling cycle before disconnecting power. • Turn on the projector first and then the signal sources. • Do not use lens cap when projector is in this user's guide to change the lamp when it will burn out and may make a loud popping sound...
User Manual
Page 14
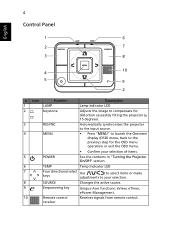
.... 5 POWER See the contents in "Turning the Projector On/Off" section. 6 TEMP Temp Indicator LED 7 Four directional select Use to select items or make keys adjustments to your selection. 8 SOURCE Changes the active source. 9 Empowering key Unique Acer functions: eView, eTimer, ePower Management. 10 Remote control Receives signals from remote control. receiver
.... 5 POWER See the contents in "Turning the Projector On/Off" section. 6 TEMP Temp Indicator LED 7 Four directional select Use to select items or make keys adjustments to your selection. 8 SOURCE Changes the active source. 9 Empowering key Unique Acer functions: eView, eTimer, ePower Management. 10 Remote control Receives signals from remote control. receiver
User Manual
Page 15
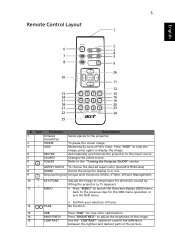
...RATIO To choose the desired aspect ratio (Auto/4:3/16:9/L.Box) 8 ZOOM Zooms the projector display in or out. 9 Empowering key Unique Acer functions: eView, eTimer, ePower Management. 10 KEYSTONE Adjusts the image to compensate for distortion caused by tilting the projector (± 15 degrees... RGB Press "RGB" for true-color optimization. 14 BRIGHTNESS Press "BRIGHTNESS" to adjust the brightness of the image. 15 CONTRAST Use the "CONTRAST" option to the input source. Automatically synchronizes the projector to control the difference between the lightest and darkest parts of...
...RATIO To choose the desired aspect ratio (Auto/4:3/16:9/L.Box) 8 ZOOM Zooms the projector display in or out. 9 Empowering key Unique Acer functions: eView, eTimer, ePower Management. 10 KEYSTONE Adjusts the image to compensate for distortion caused by tilting the projector (± 15 degrees... RGB Press "RGB" for true-color optimization. 14 BRIGHTNESS Press "BRIGHTNESS" to adjust the brightness of the image. 15 CONTRAST Use the "CONTRAST" option to the input source. Automatically synchronizes the projector to control the difference between the lightest and darkest parts of...

User Manual
Page 16
... source to HDMI™. 23 MUTE No function. 24 WIRELESS No function. 25 KeyPad 0~9 Press "0~9" to input a password in the "Security settings". 26 Four directional Use up, down, left, right buttons to select items or make select keys adjustments to your selection. This connection supports YPbPr (480p/576p/720p/1080p) and...
... source to HDMI™. 23 MUTE No function. 24 WIRELESS No function. 25 KeyPad 0~9 Press "0~9" to input a password in the "Security settings". 26 Four directional Use up, down, left, right buttons to select items or make select keys adjustments to your selection. This connection supports YPbPr (480p/576p/720p/1080p) and...
User Manual
Page 18
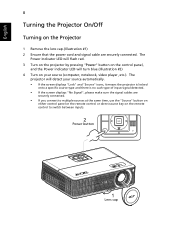
... lens cap.(Illustration #1) 2 Ensure that the power cord and signal cable are securely connected. • If you connect to multiple sources at the same time, use the "Source" button on either control panel or the remote control or direct source key on the remote control to switch between inputs. 2 Power button...
... lens cap.(Illustration #1) 2 Ensure that the power cord and signal cable are securely connected. • If you connect to multiple sources at the same time, use the "Source" button on either control panel or the remote control or direct source key on the remote control to switch between inputs. 2 Power button...
User Manual
Page 20
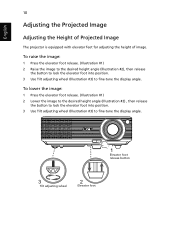
...Illustration #1) 2 Raise the image to the desired height angle (Illustration #2), then release the button to lock the elevator foot into position. 3 Use Tilt adjusting wheel (Illustration #3) to fine-tune the display angle. To lower the image: 1 Press the elevator foot release. (Illustration #1) ...2 Lower the image to the desired height angle (Illustration #2) , then release the button to lock the elevator foot into position. 3 Use Tilt adjusting wheel (Illustration #3) to fine-tune the display angle. 1 Elevator foot release button 3 Tilt adjusting wheel 2 Elevator foot English 10...
...Illustration #1) 2 Raise the image to the desired height angle (Illustration #2), then release the button to lock the elevator foot into position. 3 Use Tilt adjusting wheel (Illustration #3) to fine-tune the display angle. To lower the image: 1 Press the elevator foot release. (Illustration #1) ...2 Lower the image to the desired height angle (Illustration #2) , then release the button to lock the elevator foot into position. 3 Use Tilt adjusting wheel (Illustration #3) to fine-tune the display angle. 1 Elevator foot release button 3 Tilt adjusting wheel 2 Elevator foot English 10...
User Manual
Page 25
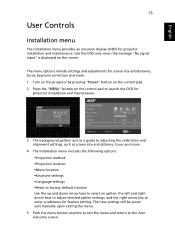
...options: •Projection method •Projection location •Menu location •Keystone settings •Language settings •Reset to factory default function Use the up and down arrow keys to select an option, the left and right arrow keys to adjust selected option settings, and the right ...arrow key to the Acer welcome screen. English 15 User Controls Installation menu The installation menu provides an onscreen display (OSD) for feature setting. The menu options ...
...options: •Projection method •Projection location •Menu location •Keystone settings •Language settings •Reset to factory default function Use the up and down arrow keys to select an option, the left and right arrow keys to adjust selected option settings, and the right ...arrow key to the Acer welcome screen. English 15 User Controls Installation menu The installation menu provides an onscreen display (OSD) for feature setting. The menu options ...
User Manual
Page 27
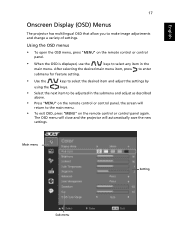
... menus • To open the OSD menu, press "MENU" on the remote control or control panel. • When the OSD is displayed, use the keys to select any item in the submenu and adjust as described above. • Press "MENU" on the remote control or control panel, the ... save the new settings. After selecting the desired main menu item, press to enter submenu for feature setting. • Use the keys to select the desired item and adjust the settings by using the keys. • Select the next item to make image adjustments and change a variety of settings. The OSD menu...
... menus • To open the OSD menu, press "MENU" on the remote control or control panel. • When the OSD is displayed, use the keys to select any item in the submenu and adjust as described above. • Press "MENU" on the remote control or control panel, the ... save the new settings. After selecting the desired main menu item, press to enter submenu for feature setting. • Use the keys to select the desired item and adjust the settings by using the keys. • Select the next item to make image adjustments and change a variety of settings. The OSD menu...
User Manual
Page 28
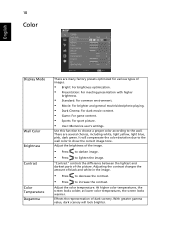
Use this function to choose a proper color according to lighten the image. "Contrast" controls the difference between the lightest and darkest parts of dark scenery. Adjust ...
Use this function to choose a proper color according to lighten the image. "Contrast" controls the difference between the lightest and darkest parts of dark scenery. Adjust ...
User Manual
Page 30
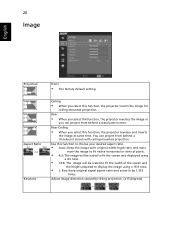
... the image for ceiling-mounted projection. Box: Keep original signal aspect ratio and zoom in by tilting projection. (±15 degrees) Use this function, the projector reverses and inverts the image at same time. Aspect Ratio Keystone Ceiling • When you select this function..., the projector reverses the image so you select this function to display the image using a 16:9 ratio. • L. Adjust image distortion caused by 1.333 times. 20 Image English Projection Front • The factory default ...
... the image for ceiling-mounted projection. Box: Keep original signal aspect ratio and zoom in by tilting projection. (±15 degrees) Use this function, the projector reverses and inverts the image at same time. Aspect Ratio Keystone Ceiling • When you select this function..., the projector reverses the image so you select this function to display the image using a 16:9 ratio. • L. Adjust image distortion caused by 1.333 times. 20 Image English Projection Front • The factory default ...
User Manual
Page 31
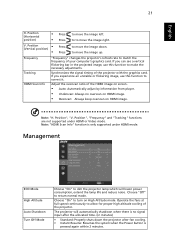
to move the image right. If you experience an unstable or flickering image, use this function to turn on HDMI image. Position", "Frequency" and "Tracking" functions are not supported under HDMI mode. Choose "On" to correct it. Position (Horizontal ...) • Press to move the image left. • Press to to move the image down the projector after the allocated time. (in the projected image, use this function to match the frequency of the projector. V. If you can see a vertical flickering bar in minutes) • Standard: Properly shuts down . Adjust the...
to move the image right. If you experience an unstable or flickering image, use this function to turn on HDMI image. Position", "Frequency" and "Tracking" functions are not supported under HDMI mode. Choose "On" to correct it. Position (Horizontal ...) • Press to move the image left. • Press to to move the image down the projector after the allocated time. (in the projected image, use this function to match the frequency of the projector. V. If you can see a vertical flickering bar in minutes) • Standard: Properly shuts down . Adjust the...
User Manual
Page 33
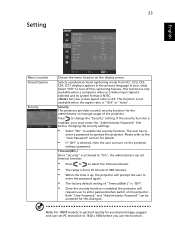
... usage of "Timeout(Min.)" is "Off". • Once the security function is enabled, your must enter the "Administrator Password" first before you use this dialogue. Security This projector provides a useful security function for details. • If "Off" is NTSC. Please refer to the "User Password" section for the administrator to enable the...
... usage of "Timeout(Min.)" is "Off". • Once the security function is enabled, your must enter the "Administrator Password" first before you use this dialogue. Security This projector provides a useful security function for details. • If "Off" is NTSC. Please refer to the "User Password" section for the administrator to enable the...
User Manual
Page 34
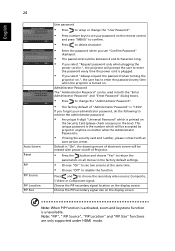
...by projector anytime no matter what the Administrator Password is. • If losing this security card and number, please contact with an Acer service center. Choose the PIP secondary signal location on the display screen. Choose the PIP secondary signal size on the display screen. ... or change the "Administrator Password". • The factory default of "Administrator Password" is "1234". Administrator Password The "Administrator Password" can be used in .", the projector will be related with power on/off of Projector. • Press the button and choose "Yes" to return the parameters on...
...by projector anytime no matter what the Administrator Password is. • If losing this security card and number, please contact with an Acer service center. Choose the PIP secondary signal location on the display screen. Choose the PIP secondary signal size on the display screen. ... or change the "Administrator Password". • The factory default of "Administrator Password" is "1234". Administrator Password The "Administrator Password" can be used in .", the projector will be related with power on/off of Projector. • Press the button and choose "Yes" to return the parameters on...
User Manual
Page 35
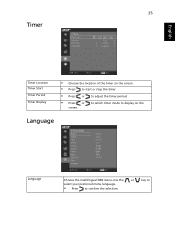
Use the or key to select your preferred menu language. • Press to adjust the timer period. • Press or screen. to which timer mode to display on the screen. • Press to start or stop the timer. • Press or to confirm the selection. English 25 Timer Timer Location Timer Start Timer Period Timer Display • Choose the location of the timer on the Language Language Choose the multilingual OSD menu.
Use the or key to select your preferred menu language. • Press to adjust the timer period. • Press or screen. to which timer mode to display on the screen. • Press to start or stop the timer. • Press or to confirm the selection. English 25 Timer Timer Location Timer Start Timer Period Timer Display • Choose the location of the timer on the Language Language Choose the multilingual OSD menu.
User Manual
Page 36
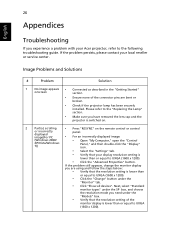
...still appears, change the monitor display you need under the "Models" box. • Verify that the resolution setting of the connector pins are using and follow the steps below: • Verify that the resolution setting is lower than or equal to UXGA (1600 x 1200). Please refer ...to the "Replacing the Lamp" section. • Make sure you experience a problem with your Acer projector, refer to the following troubleshooting guide. 26 Appendices English Troubleshooting If you have removed the lens cap and the projector is switched on. 2...
...still appears, change the monitor display you need under the "Models" box. • Verify that the resolution setting of the connector pins are using and follow the steps below: • Verify that the resolution setting is lower than or equal to UXGA (1600 x 1200). Please refer ...to the "Replacing the Lamp" section. • Make sure you experience a problem with your Acer projector, refer to the following troubleshooting guide. 26 Appendices English Troubleshooting If you have removed the lens cap and the projector is switched on. 2...


