User Manual
Page 6
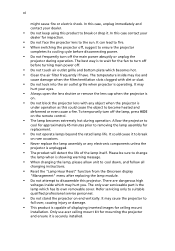
... with any electronic components unless the projector is capable of the lamp itself. In this product to break on the remote control. • The lamp becomes extremely hot during operation. Only use acer ceiling mount kit for replacement. • Do not operate lamps beyond the rated lamp life. In this case, unplug...
... with any electronic components unless the projector is capable of the lamp itself. In this product to break on the remote control. • The lamp becomes extremely hot during operation. Only use acer ceiling mount kit for replacement. • Do not operate lamps beyond the rated lamp life. In this case, unplug...

User Manual
Page 9
... your safety and comfort iii First things first viii Usage Notes viii Precautions viii Introduction 1 Product Features 1 Package Overview 2 Projector Overview 3 Projector Outlook 3 Control Panel 4 Remote Control Layout 5 MHL (Mobile High-Definition Link) Control 7 Getting Started 8 Connecting the Projector 8 Turning the Projector On/Off 10 Turning on the Projector 10 Turning...User Controls 21 Installation menu 21 Onscreen Display (OSD) Menus 22 Color 23 Image 25 Setting 27 Management 30 Audio 31 3D 32 Language 32 Acer LAN webpage management 33
... your safety and comfort iii First things first viii Usage Notes viii Precautions viii Introduction 1 Product Features 1 Package Overview 2 Projector Overview 3 Projector Outlook 3 Control Panel 4 Remote Control Layout 5 MHL (Mobile High-Definition Link) Control 7 Getting Started 8 Connecting the Projector 8 Turning the Projector On/Off 10 Turning on the Projector 10 Turning...User Controls 21 Installation menu 21 Onscreen Display (OSD) Menus 22 Color 23 Image 25 Setting 27 Management 30 Audio 31 3D 32 Language 32 Acer LAN webpage management 33
User Manual
Page 12
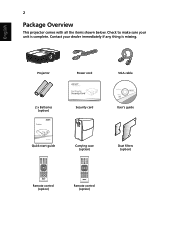
Contact your unit is missing. Check to make sure your dealer immediately if any thing is complete. Projector Power cord VGA cable 2 x Batteries (option) Security card User's guide Quick start guide MEDIA SETUP MODE SOURCE HIDE ZOOM RATIO FREEZE Carrying case (option) MEDIA SETUP MODE SOURCE HIDE ZOOM FREEZE Remote control (option) Remote control (option) Dust filters (option) English 2 Package Overview This projector comes with all the items shown below.
Contact your unit is missing. Check to make sure your dealer immediately if any thing is complete. Projector Power cord VGA cable 2 x Batteries (option) Security card User's guide Quick start guide MEDIA SETUP MODE SOURCE HIDE ZOOM RATIO FREEZE Carrying case (option) MEDIA SETUP MODE SOURCE HIDE ZOOM FREEZE Remote control (option) Remote control (option) Dust filters (option) English 2 Package Overview This projector comes with all the items shown below.
User Manual
Page 13
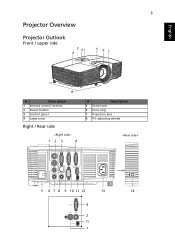
English 3 Projector Overview Projector Outlook Front / upper side 4 3 21 5 67 8 # Description 1 Remote control receiver 2 Power button 3 Control panel 4 Lamp cover Right / Rear side 12 3 4 # Description 5 Zoom lever 6 Focus ring 7 Projection lens 8 Tilt adjusting wheels VGA OUT VGA IN 2 VGA IN 1 S-VIDEO VIDEO AUDIO IN / MHL AUDIO OUT AUDIO IN RS232 USB CTRL 5 6 7 8 9 10 11 12 13 14 VGA IN VIDEO S-VIDEO USB CTRL 4 2 11 1
English 3 Projector Overview Projector Outlook Front / upper side 4 3 21 5 67 8 # Description 1 Remote control receiver 2 Power button 3 Control panel 4 Lamp cover Right / Rear side 12 3 4 # Description 5 Zoom lever 6 Focus ring 7 Projection lens 8 Tilt adjusting wheels VGA OUT VGA IN 2 VGA IN 1 S-VIDEO VIDEO AUDIO IN / MHL AUDIO OUT AUDIO IN RS232 USB CTRL 5 6 7 8 9 10 11 12 13 14 VGA IN VIDEO S-VIDEO USB CTRL 4 2 11 1

User Manual
Page 15
...). No. 2018, Zhonghuayuan west road, Yushan town,Kunshan city, China MC.JG811.008 # Icon Function 1 Infrared transmitter 2 POWER Description Sends signals to the projector. English 5 Remote Control Layout 1 25 3 2 SOURCE 4 5 MEDIA 6 SETUP MODE HIDE 7 8 MEDIA SETUP MODE SOURCE HIDE 26 9 ZOOM RATIO FREEZE 10 ZOOM FREEZE 11 12 13 15 17...
...). No. 2018, Zhonghuayuan west road, Yushan town,Kunshan city, China MC.JG811.008 # Icon Function 1 Infrared transmitter 2 POWER Description Sends signals to the projector. English 5 Remote Control Layout 1 25 3 2 SOURCE 4 5 MEDIA 6 SETUP MODE HIDE 7 8 MEDIA SETUP MODE SOURCE HIDE 26 9 ZOOM RATIO FREEZE 10 ZOOM FREEZE 11 12 13 15 17...

User Manual
Page 16
... "VGA" to change source to HDMI/MHL. (no DVI function) 24 LAN/WiFi No function. 25 Laser pointer Aim the remote at the viewing screen. 26 Laser button Aim the remote at the viewing screen, press and hold this button to select the next or previous page. This connector supports analog RGB...
... "VGA" to change source to HDMI/MHL. (no DVI function) 24 LAN/WiFi No function. 25 Laser pointer Aim the remote at the viewing screen. 26 Laser button Aim the remote at the viewing screen, press and hold this button to select the next or previous page. This connector supports analog RGB...

User Manual
Page 20
... power cord and signal cable are securely connected. • If you connect to multiple sources at the same time, use the "Source" button on the remote control or direct source key on the remote control to switch between inputs. Power button The projector will turn blue. 3 Turn on the control panel or... remote control, and the Power indicator LED will detect your source (computer, notebook, video player ,etc.). The Power indicator LED will flash red. 2 Turn on the ...
... power cord and signal cable are securely connected. • If you connect to multiple sources at the same time, use the "Source" button on the remote control or direct source key on the remote control to switch between inputs. Power button The projector will turn blue. 3 Turn on the control panel or... remote control, and the Power indicator LED will detect your source (computer, notebook, video player ,etc.). The Power indicator LED will flash red. 2 Turn on the ...
User Manual
Page 32
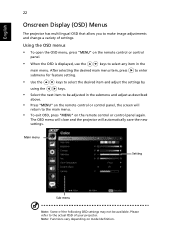
The OSD menu will close and the projector will return to the main menu. • To exit OSD, press "MENU" on the remote control or control panel. • When the OSD is displayed, use the keys to be available. English 22 Onscreen Display (OSD) Menus The projector has ... adjusted in the main menu. Using the OSD menus • To open the OSD menu, press "MENU" on the remote control or control panel again. Note: Functions vary depending on the remote control or control panel, the screen will automatically save the new settings. to enter • Use the keys to select...
The OSD menu will close and the projector will return to the main menu. • To exit OSD, press "MENU" on the remote control or control panel. • When the OSD is displayed, use the keys to be available. English 22 Onscreen Display (OSD) Menus The projector has ... adjusted in the main menu. Using the OSD menus • To open the OSD menu, press "MENU" on the remote control or control panel again. Note: Functions vary depending on the remote control or control panel, the screen will automatically save the new settings. to enter • Use the keys to select...
User Manual
Page 37
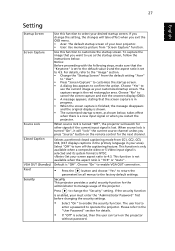
..." to cancel the screen capture and exit the onscreen display (OSD). • A message appears, stating that you exit the OSD menu. • Acer: The default startup screen of the projector . Selects a preferred closed captioning mode from CC1, CC2, CC3, CC4, (CC1 displays captions in the primary... you press "Source" button on the projector without password. If you change the "Security" setting. Select "Off" to turn on the remote control for the administrator to manage usage of your must enter the "Administrator Password" first before changing the security settings. • Select "On...
..." to cancel the screen capture and exit the onscreen display (OSD). • A message appears, stating that you exit the OSD menu. • Acer: The default startup screen of the projector . Selects a preferred closed captioning mode from CC1, CC2, CC3, CC4, (CC1 displays captions in the primary... you press "Source" button on the projector without password. If you change the "Security" setting. Select "Off" to turn on the remote control for the administrator to manage usage of your must enter the "Administrator Password" first before changing the security settings. • Select "On...
User Manual
Page 38
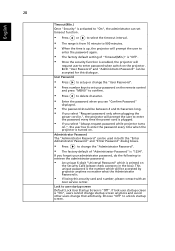
Both "User Password" and "Administrator Password" can be accepted for this security card and number, please contact with an Acer service center. This unique password is the number which is printed on the Security Card (please check accessory in both the "Enter Administrator ... Password" dialog boxes. • Press to enter password when switch on the projector . Lock to unlock startup screen. If you forgot your password on the remote control and press "MENU" to confirm. • Press to delete character. • Enter the password when you see "Confirm Password" displayed. •...
Both "User Password" and "Administrator Password" can be accepted for this security card and number, please contact with an Acer service center. This unique password is the number which is printed on the Security Card (please check accessory in both the "Enter Administrator ... Password" dialog boxes. • Press to enter password when switch on the projector . Lock to unlock startup screen. If you forgot your password on the remote control and press "MENU" to confirm. • Press to delete character. • Enter the password when you see "Confirm Password" displayed. •...
User Manual
Page 47
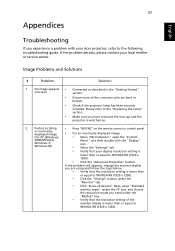
... connector pins are using and follow the steps below: • Verify that the resolution setting is switched on. 2 Partial, scrolling • Press "RESYNC" on the remote control or control panel. If the problem persists, please contact your local reseller or service center. 37 Appendices English Troubleshooting If you experience a problem with...
... connector pins are using and follow the steps below: • Verify that the resolution setting is switched on. 2 Partial, scrolling • Press "RESYNC" on the remote control or control panel. If the problem persists, please contact your local reseller or service center. 37 Appendices English Troubleshooting If you experience a problem with...

User Manual
Page 48
....0 meters) (1080p series) from the projector. Refer to the or flickering "Image" section for more information. • Change the display color depth settings on the remote control or control or incorrectly panel. presentation Each has a different way to Get a Preferred Image Size by Adjusting Distance and Zoom" section for more information...
....0 meters) (1080p series) from the projector. Refer to the or flickering "Image" section for more information. • Change the display color depth settings on the remote control or control or incorrectly panel. presentation Each has a different way to Get a Preferred Image Size by Adjusting Distance and Zoom" section for more information...
User Manual
Page 49
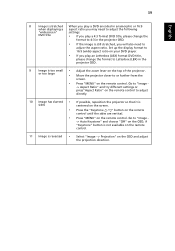
... a aspect ratio you may need to Letterbox (LBX) in the projector OSD. 9 Image is too small • Adjust the zoom lever on the remote control. Go to or further from the screen. • Press "MENU" on the top of the projector. or too large • Move the projector..."MENU" on the OSD and adjust the projection direction. Go to "Image - -> Aspect Ratio" and try different settings or press"Aspect Ratio" on the remote control to adjust directly. 10 Image has slanted • If possible, reposition the projector so that it is reversed • Select "Image --> Projection" on...
... a aspect ratio you may need to Letterbox (LBX) in the projector OSD. 9 Image is too small • Adjust the zoom lever on the remote control. Go to or further from the screen. • Press "MENU" on the top of the projector. or too large • Move the projector..."MENU" on the OSD and adjust the projection direction. Go to "Image - -> Aspect Ratio" and try different settings or press"Aspect Ratio" on the remote control to adjust directly. 10 Image has slanted • If possible, reposition the projector so that it is reversed • Select "Image --> Projection" on...
User Manual
Page 59
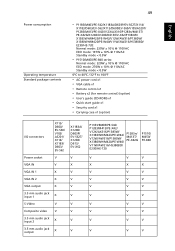
.../V12X/AX316/P1283n/M413T/ PE-X42G/X1283/X1280/D613/EV-X62/P1383W/ X1383WH/M423/PE-W42/V12W/AW316/P1380W/ X1380WH/M420/PE-W40/V11W/AW216/H5380BD/ E230/HE-720: Normal mode: 235W ± 10% @ 110VAC ECO mode: 197W ± 10% @ 110VAC Standby mode < 0.5W • P1510/M450/PE-840 series: Normal... Standby mode < 0.5W 0ºC to 40ºC / 32ºF to 104ºF • AC power cord x1 • VGA cable x1 • Remote control x1 • Battery x2 (for remote control) (option) • User's guide (CD-ROM) x1 • Quick start guide x1 • Security card x1 • Carrying case x1 (option...
.../V12X/AX316/P1283n/M413T/ PE-X42G/X1283/X1280/D613/EV-X62/P1383W/ X1383WH/M423/PE-W42/V12W/AW316/P1380W/ X1380WH/M420/PE-W40/V11W/AW216/H5380BD/ E230/HE-720: Normal mode: 235W ± 10% @ 110VAC ECO mode: 197W ± 10% @ 110VAC Standby mode < 0.5W • P1510/M450/PE-840 series: Normal... Standby mode < 0.5W 0ºC to 40ºC / 32ºF to 104ºF • AC power cord x1 • VGA cable x1 • Remote control x1 • Battery x2 (for remote control) (option) • User's guide (CD-ROM) x1 • Quick start guide x1 • Security card x1 • Carrying case x1 (option...


