

Quick Start Guide
Page 1
.... 5. Connect the VGA video cable to user's guide in CD-ROM packaged with the AC power available in particular, if there are powered-OFF. b. Operation Detail Please refer to the computer. 1-2 Digital Cable (Only Dual-Input Model) a. Connect one end of the 24-pin DVI cable to the back of dust. • Never use the computer's power cable to diagnose the problem. 1-1 1-2 1-3 3 2 32 1-3 1-2 1-1 Troubleshooting Tips No Power - You can use your monitor does...
.... 5. Connect the VGA video cable to user's guide in CD-ROM packaged with the AC power available in particular, if there are powered-OFF. b. Operation Detail Please refer to the computer. 1-2 Digital Cable (Only Dual-Input Model) a. Connect one end of the 24-pin DVI cable to the back of dust. • Never use the computer's power cable to diagnose the problem. 1-1 1-2 1-3 3 2 32 1-3 1-2 1-1 Troubleshooting Tips No Power - You can use your monitor does...

Quick Start Guide
Page 2
... frequency energy and, if not installed and used in accordance with the instructions, may be made using shielded cables to provide reasonable protection against harmful interference in the European Union This symbol on the product or on , the user is encouraged to try to conserve natural resources and ensure that interference will help . Notice: Peripheral devices Only peripherals (input...
... frequency energy and, if not installed and used in accordance with the instructions, may be made using shielded cables to provide reasonable protection against harmful interference in the European Union This symbol on the product or on , the user is encouraged to try to conserve natural resources and ensure that interference will help . Notice: Peripheral devices Only peripherals (input...

User Manual
Page 1
TABLE OF CONTENTS Special notes on LCD monitors 1 Information for your safety and comfort 2 Unpacking 5 Attaching/Removing the base 6 Screen position adjustment 6 Connecting the power cord 7 Safety precaution 7 Cleaning your monitor 7 Power saving 8 DDC 8 Connector Pin Assignment 9 Standard Timing Table 11 Installation 12 User controls 13 Troubleshooting 19
TABLE OF CONTENTS Special notes on LCD monitors 1 Information for your safety and comfort 2 Unpacking 5 Attaching/Removing the base 6 Screen position adjustment 6 Connecting the power cord 7 Safety precaution 7 Cleaning your monitor 7 Power saving 8 DDC 8 Connector Pin Assignment 9 Standard Timing Table 11 Installation 12 User controls 13 Troubleshooting 19

User Manual
Page 2
... flicker during initial use . • The LCD screen has effective pixels of the previous screen may remain after switching the image, when the same image is recovered slowly by changing the image or turning off the Power Switch for hours. In this case, the screen is displayed for hours. EN-1 NOTES • Due to the nature of the fluorescent light, the screen may find slightly uneven brightness on the screen...
... flicker during initial use . • The LCD screen has effective pixels of the previous screen may remain after switching the image, when the same image is recovered slowly by changing the image or turning off the Power Switch for hours. In this case, the screen is displayed for hours. EN-1 NOTES • Due to the nature of the fluorescent light, the screen may find slightly uneven brightness on the screen...

User Manual
Page 3
... comfortably and without distortion. • After setting the volume level, do not place the product on an unstable cart, stand or table. Keep this product near you need to disconnect power to the equipment, be seriously damaged. • Slots and openings are provided for accessibility Be sure that the power outlet you plug the power cord into the product. • To...
... comfortably and without distortion. • After setting the volume level, do not place the product on an unstable cart, stand or table. Keep this product near you need to disconnect power to the equipment, be seriously damaged. • Slots and openings are provided for accessibility Be sure that the power outlet you plug the power cord into the product. • To...

User Manual
Page 4
..., as black or red dots. Long work periods, bad posture, poor work by adjusting the viewing angle of other recurring or persistent discomfort and/or pain related to qualified service person- This has no effect on your sitting height to remove the strain on the recorded image and does not constitute a malfunction. Nevertheless, some pixels may appear in one fixed posture •...
..., as black or red dots. Long work periods, bad posture, poor work by adjusting the viewing angle of other recurring or persistent discomfort and/or pain related to qualified service person- This has no effect on your sitting height to remove the strain on the recorded image and does not constitute a malfunction. Nevertheless, some pixels may appear in one fixed posture •...

User Manual
Page 5
..., excessive room lighting, poorly focused screens, very small typefaces and low-contrast displays could stress your documents, place the display at bright light sources, such as possible. • Exercise regularly and maintain a healthy body. Eyes • Rest your eyes frequently. • Give your eyes regular breaks by using drapes, shades or blinds • using a task light • changing the display's viewing angle • using a glare...
..., excessive room lighting, poorly focused screens, very small typefaces and low-contrast displays could stress your documents, place the display at bright light sources, such as possible. • Exercise regularly and maintain a healthy body. Eyes • Rest your eyes frequently. • Give your eyes regular breaks by using drapes, shades or blinds • using a task light • changing the display's viewing angle • using a glare...

User Manual
Page 6
UNPACKING Please check the following items are present when you unpack the box, and save the packing materials in case you will need to ship or transport the monitor in future. • LCD Monitor • AC Power Cord • D-Sub Cable • DVI Cable (Only Dual-Input Model) • Audio Cable (Only Audio-Input Model) • (Optional) User Manual • Quick Start Guide EN-5
UNPACKING Please check the following items are present when you unpack the box, and save the packing materials in case you will need to ship or transport the monitor in future. • LCD Monitor • AC Power Cord • D-Sub Cable • DVI Cable (Only Dual-Input Model) • Audio Cable (Only Audio-Input Model) • (Optional) User Manual • Quick Start Guide EN-5
User Manual
Page 7
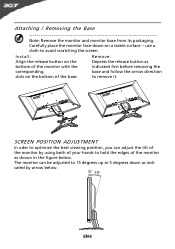
to avoid scratching the screen. use a cloth to remove it. SCREEN POSITION ADJUSTMENT In oder to optimize the best viewing position, you can be adjusted to hold the edges of the base. EN-6 Attaching / Removing the Base Note: Remove the monitor and monitor base from its packaging. Carefully place the monitor face-down as bottom of the monitor with the indicated first before removing the corresponding base and follow the arrow direction slots...
to avoid scratching the screen. use a cloth to remove it. SCREEN POSITION ADJUSTMENT In oder to optimize the best viewing position, you can be adjusted to hold the edges of the base. EN-6 Attaching / Removing the Base Note: Remove the monitor and monitor base from its packaging. Carefully place the monitor face-down as bottom of the monitor with the indicated first before removing the corresponding base and follow the arrow direction slots...

User Manual
Page 8
... cover the ventilation slots or openings of the monitor. SAFETY PRECAUTION • Avoid placing the monitor, or any other light sources may reflect on the power cord to avoid damage to the cable. • Do not expose the monitor to make sure that allows operation in which the equipment will be installed. EN-7 No user-adjustment is adequate ventilation. • Avoid placing the monitor against a bright...
... cover the ventilation slots or openings of the monitor. SAFETY PRECAUTION • Avoid placing the monitor, or any other light sources may reflect on the power cord to avoid damage to the cable. • Do not expose the monitor to make sure that allows operation in which the equipment will be installed. EN-7 No user-adjustment is adequate ventilation. • Avoid placing the monitor against a bright...

User Manual
Page 9
... Plug and Play with your system if your system also supports DDC protocol. The DDC (Display Data Channel) is activated. The recovery time from the display controller, as indicated by the amber-color power LED. DDC To make your installation easier, the monitor is able to ON state is around 3 seconds. EN-8 State ON Power Saving Mode LED Light Blue Orange The power saving states will be kept until a control signal...
... Plug and Play with your system if your system also supports DDC protocol. The DDC (Display Data Channel) is activated. The recovery time from the display controller, as indicated by the amber-color power LED. DDC To make your installation easier, the monitor is able to ON state is around 3 seconds. EN-8 State ON Power Saving Mode LED Light Blue Orange The power saving states will be kept until a control signal...

User Manual
Page 10
DESCRIPTION +5V Logic Ground Monitor Ground DDC-Serial Data H-Sync V-Sync DDC-Serial Clock EN-9 DESCRIPTION Red Green Blue Monitor Ground Self Test R-Ground G-Ground B-Ground PIN NO. 9. 10. 11. 12. 13. 14. 15. CONNECTOR PIN ASSIGNMENT 5 1 10 6 15 11 15-Pin Color Display Signal Cable PIN NO. 1. 2. 3. 4. 5. 6. 7. 8.
DESCRIPTION +5V Logic Ground Monitor Ground DDC-Serial Data H-Sync V-Sync DDC-Serial Clock EN-9 DESCRIPTION Red Green Blue Monitor Ground Self Test R-Ground G-Ground B-Ground PIN NO. 9. 10. 11. 12. 13. 14. 15. CONNECTOR PIN ASSIGNMENT 5 1 10 6 15 11 15-Pin Color Display Signal Cable PIN NO. 1. 2. 3. 4. 5. 6. 7. 8.

User Manual
Page 11
...+ TMDS Data 0/5 Shield NC NC TMDS Clock Shield TMDS Clock+ DDC TMDS Clock- 19-Pin color display signal cable* PIN Meaning PIN 1. on device) SCL SDA DDC/CEC Ground +5V Power Hot Plug Detect TMDS Data2- 13. 2. TMDS Data2+ 14. 3. TMDS Data1+ 22. 11. CEC.... TMDS Data0 Shield 17. 9. NC 20. 9. TMDS Data0- 18. 19. * only for certain models EN-10 Meaning TMDS Clock+ TMDS Clock Shield TMDS Clock- TMDS Data 2/4 Shield 15. 4. NC 17. 6. 24-Pin Color Display Signal Cable* PIN Meaning PIN 1. TMDS Data2+ 10. 2. TMDS Data1 Shield 14. 6.
...+ TMDS Data 0/5 Shield NC NC TMDS Clock Shield TMDS Clock+ DDC TMDS Clock- 19-Pin color display signal cable* PIN Meaning PIN 1. on device) SCL SDA DDC/CEC Ground +5V Power Hot Plug Detect TMDS Data2- 13. 2. TMDS Data2+ 14. 3. TMDS Data1+ 22. 11. CEC.... TMDS Data0 Shield 17. 9. NC 20. 9. TMDS Data0- 18. 19. * only for certain models EN-10 Meaning TMDS Clock+ TMDS Clock Shield TMDS Clock- TMDS Data 2/4 Shield 15. 4. NC 17. 6. 24-Pin Color Display Signal Cable* PIN Meaning PIN 1. TMDS Data2+ 10. 2. TMDS Data1 Shield 14. 6.
User Manual
Page 13
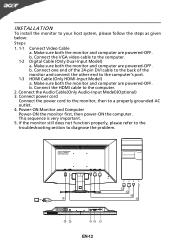
.... 1-2 Digital Cable (Only Dual-Input Model) a. Connect power cord Connect the power cord to the monitor, then to your host system, please follow the steps as given below: Steps 1. 1-1 Connect Video Cable a. INSTALLATION To install the monitor to a properly grounded AC outlet. 4. Connect the HDMI cable to diagnose the problem. 1-1 1-2 1-3 3 2 32 1-3 1-2 1-1 EN-12 b. If the monitor still does not function properly, please refer to the troubleshooting section to the computer. 2. b. b. Connect the Audio Cable(Only Audio-Input Model)(Optional...
.... 1-2 Digital Cable (Only Dual-Input Model) a. Connect power cord Connect the power cord to the monitor, then to your host system, please follow the steps as given below: Steps 1. 1-1 Connect Video Cable a. INSTALLATION To install the monitor to a properly grounded AC outlet. 4. Connect the HDMI cable to diagnose the problem. 1-1 1-2 1-3 3 2 32 1-3 1-2 1-1 EN-12 b. If the monitor still does not function properly, please refer to the troubleshooting section to the computer. 2. b. b. Connect the Audio Cable(Only Audio-Input Model)(Optional...

User Manual
Page 14
... connected to open the shortcut menu. Empowering: Press the Empowering Key to your monitor. (a) VGA input (b) DVI input (c) HDMI input As you cycle through the sources you quickly select the most commonly accessed settings. The Auto Adjustment function is selected ,but the VGA and DVI cables are not connected, a floating dialog box indicates: "No Cable Connect" or "No Signal" EN-13 Lights up to activate the OSD menu. Volume Up / Down Press to adjust volume (Only Audio-Input Model)(Optional) INPUT Input Key Use Input...
... connected to open the shortcut menu. Empowering: Press the Empowering Key to your monitor. (a) VGA input (b) DVI input (c) HDMI input As you cycle through the sources you quickly select the most commonly accessed settings. The Auto Adjustment function is selected ,but the VGA and DVI cables are not connected, a floating dialog box indicates: "No Cable Connect" or "No Signal" EN-13 Lights up to activate the OSD menu. Volume Up / Down Press to adjust volume (Only Audio-Input Model)(Optional) INPUT Input Key Use Input...

User Manual
Page 15
... to suit any situation Optimal balance of brightness and contrast N/A Text mode prevent eyestrain. Features and Benefits Main Menu icon Sub Menu icon Sub Menu item Description N/A User mode User defined. Acer eColor Management Operation instructions Step 1: Press " " Key to open the Acer eColor Management OSD and access the scenario modes Step 2: Press " " or " " to select the mode Step 3: Press " Adjust/Exit " Key to confirm the mode and run Auto Adjust.
... to suit any situation Optimal balance of brightness and contrast N/A Text mode prevent eyestrain. Features and Benefits Main Menu icon Sub Menu icon Sub Menu item Description N/A User mode User defined. Acer eColor Management Operation instructions Step 1: Press " " Key to open the Acer eColor Management OSD and access the scenario modes Step 2: Press " " or " " to select the mode Step 3: Press " Adjust/Exit " Key to confirm the mode and run Auto Adjust.

User Manual
Page 16
.... 3 Use the / keys to adjust the sliding scales. 4 The Picture menu can be used for general reference only. EN-15 Press the MENU key to open the OSD. Adjusting the OSD settings Note: The following page: Adjusting the picture quality 1 Press the MENU key to bring up the OSD. 2 Using the / keys, select Picture from the OSD. The OSD can be used to adjust the current Brightness, Contrast, Colour Temp, Auto Config and other image...
.... 3 Use the / keys to adjust the sliding scales. 4 The Picture menu can be used for general reference only. EN-15 Press the MENU key to open the OSD. Adjusting the OSD settings Note: The following page: Adjusting the picture quality 1 Press the MENU key to bring up the OSD. 2 Using the / keys, select Picture from the OSD. The OSD can be used to adjust the current Brightness, Contrast, Colour Temp, Auto Config and other image...

User Manual
Page 20
... Picture · Check if the specification of computer system is properly connected to their default settings. TROUBLESHOOTING Before sending your LCD monitor for a few seconds after adjusting the size of the image before changing or disconnecting the signal cable or powering OFF the monitor. No Picture · Check if AC power cord is ON. LED displays amber color · Check if video signal cable is properly connected at the back of monitor. · Check if the power of graphics adapter and monitor is · Using OSD, adjust RESOLUTION...
... Picture · Check if the specification of computer system is properly connected to their default settings. TROUBLESHOOTING Before sending your LCD monitor for a few seconds after adjusting the size of the image before changing or disconnecting the signal cable or powering OFF the monitor. No Picture · Check if AC power cord is ON. LED displays amber color · Check if video signal cable is properly connected at the back of monitor. · Check if the power of graphics adapter and monitor is · Using OSD, adjust RESOLUTION...

User Manual
Page 21
LED displays amber color · Check if video signal cable is properly connected at the back of monitor. · Check if the power of the host PC is in minimum position and try to raise the volume level. No Picture · Check if AC power cord is ON. LED OFF · Check the power switch. EN-20 (DVI Mode) Problems Current Status Remedy LED ON · Using OSD, adjust brightness and contrast to maximum or reset to the monitor. Abnormal Sound (Only AudioInput model) (Optional...
LED displays amber color · Check if video signal cable is properly connected at the back of monitor. · Check if the power of the host PC is in minimum position and try to raise the volume level. No Picture · Check if AC power cord is ON. LED OFF · Check the power switch. EN-20 (DVI Mode) Problems Current Status Remedy LED ON · Using OSD, adjust brightness and contrast to maximum or reset to the monitor. Abnormal Sound (Only AudioInput model) (Optional...

User Manual
Page 22
...RoHS Directive 2002/95/EC on the Restriction of the Use of certain Hazardous Substances in force to begin affixing CE marking 2009. EN55022, AS/NZS CISPR22 Class B. -. Easy Lai /Manager Regulation, Acer Inc. EN55024 -. Year to assure that all the...Rd., Hsichih, Taipei Hsien 221, Taiwan Contact Person: Mr. Easy Lai, E-mail: easy_lai@acer.com.tw An d, Acer Europe SA Via Cantonale, Centro Galleria 2 6928 Manno Switzerland Hereby declare that: Product: Trade Name: Model Number: SKU Number: LCD Monitor Acer G235H G235H xxxxxx ("x" = 0~9, a ~ z, A ~ Z or Blank) Is compliant with the essential...
...RoHS Directive 2002/95/EC on the Restriction of the Use of certain Hazardous Substances in force to begin affixing CE marking 2009. EN55022, AS/NZS CISPR22 Class B. -. Easy Lai /Manager Regulation, Acer Inc. EN55024 -. Year to assure that all the...Rd., Hsichih, Taipei Hsien 221, Taiwan Contact Person: Mr. Easy Lai, E-mail: easy_lai@acer.com.tw An d, Acer Europe SA Via Cantonale, Centro Galleria 2 6928 Manno Switzerland Hereby declare that: Product: Trade Name: Model Number: SKU Number: LCD Monitor Acer G235H G235H xxxxxx ("x" = 0~9, a ~ z, A ~ Z or Blank) Is compliant with the essential...


